
Nightweaver (CC2) Build
By Orgy.
Fundamentals
Let’s first understand how the damage in CC2 works.
As highlighted, the core fundamental damage in CC2 comes from spamming the core skill by casting as many tactical skills as possible because every cast triggers the core skill regardless of the energy necessary to activate the core skill.
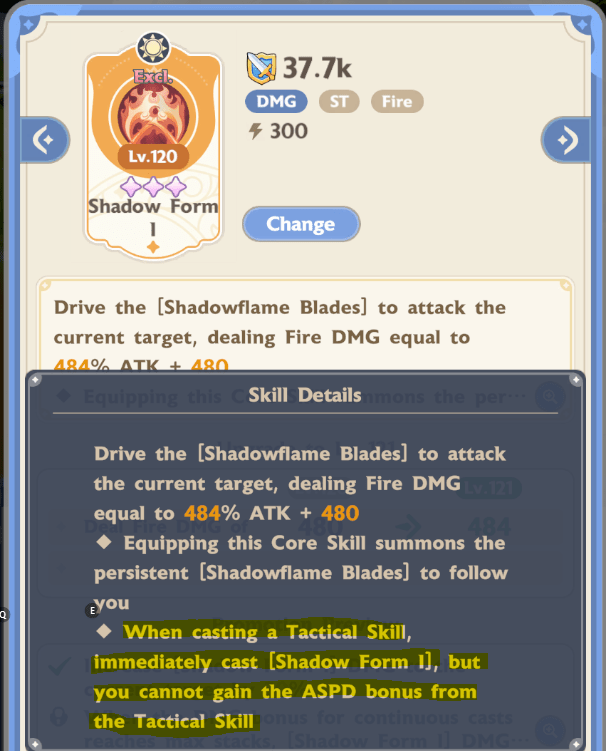
It is important to note that the ASPD bonus cannot be gained through tactical skills, which throws out the idea of using the “Shadow Acceleration” skill.
To pair with the core skill, “Shadow Form I”, we need a tactical skill with the most minimal cooldown.

The new tactical skill, “Shadow Zero”, does that perfectly. This skill has an initial cooldown of 5 seconds and applies a debuff on all the enemies, “Blazing Shadow”, that increases the fire damage taken by 7% PER STACK. Blazing Shadow can be stacked infinite times as long as it is refreshed, or reapplied, within the 2-second duration.
Therefore, we now have TWO criteria to improve the damage dealt using these two fundamental skills for CC2:
- Cast as many tactical skills as possible to continuously spam the core skill.
- Cast as many “Shadow Zero” as possible to stack the debuff on the enemy.
Since “Shadow Zero” is a tactical skill, we can simplify the criteria based on “shadow zero”:
- Cast as many “Shadow Zero” as possible to stack debuff and cast core skill.
- Reapply debuff within the 2-second duration to prolong the debuff duration.
Note: If you are a noob, before reading such complex guide, you should familiarize yourself with Go Go Muffin Beginners Guide on this website. There you will learn the basic knowledge of the game and get useful tips. If you are an experienced player, then this guide you will be definitely interesting!
Tactical Skill Setup
- TLDR: Shadow Zero, Overload State, Five Steps to Mastery
Based on the fundamental skills, the goal is to use more tactical skills.
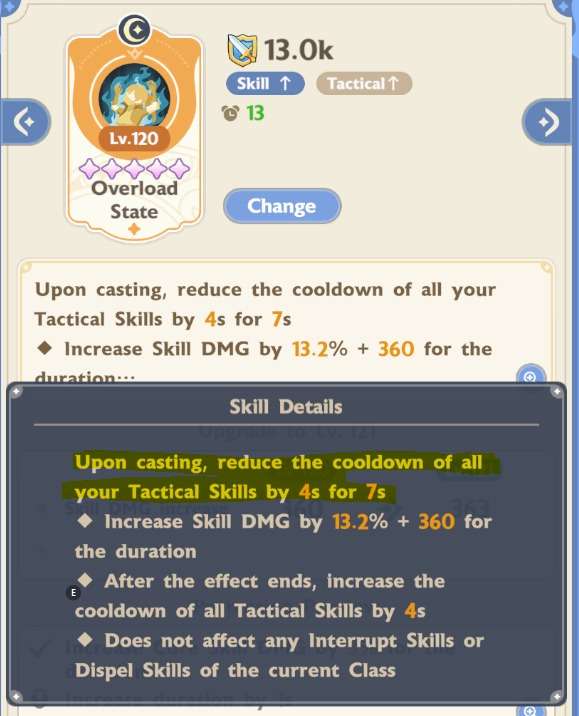
Skill, “Overload State”, fulfills the requirement by reducing the other tactical skill cooldowns by 4 s for 7 s at lv120 (legendary). This means that “Shadow Zero” now has 1 second cooldown.
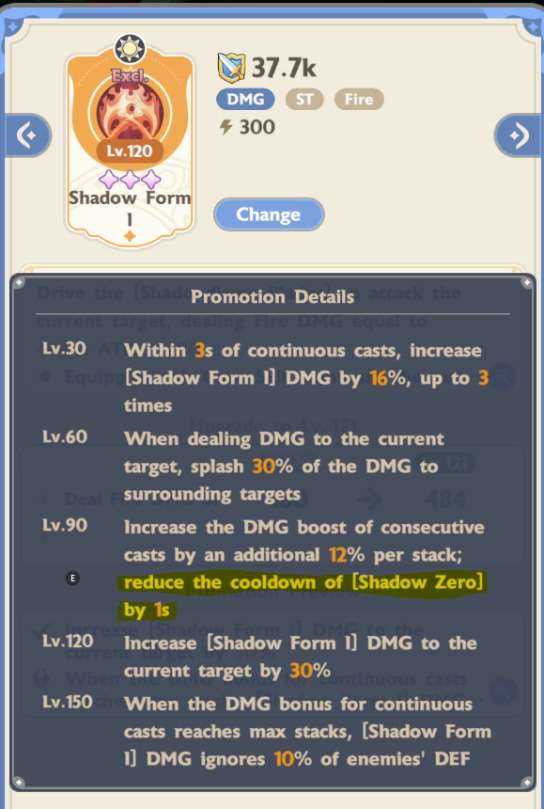
Furthermore, the lv90 effect of the core skill, “Shadow Form I”, further reduces the cooldown by 1 s. This makes the “Shadow Zero” cooldown 0 s and continuously cast during “Overload State”.
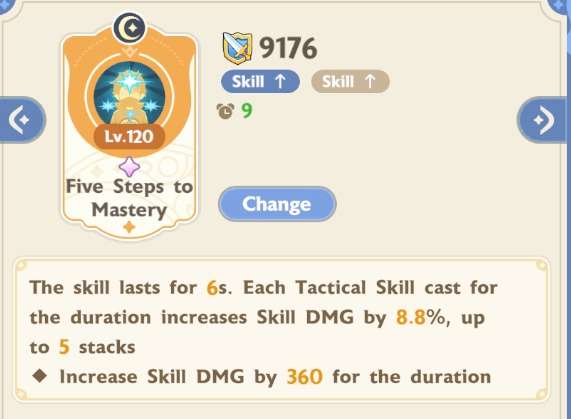
So, that leaves us with the last tactical skill to decide. Simply we choose “Five Steps to Mastery” for the damage-increasing effect of all the constant casting we do.
Depending on the situation, we would be replacing this skill with:
- Sudden Kick – Interrupt
- Physically Dispel – Dispel
- Smoke Screen – Party Crit Rate Buff
You may wonder, “How come other skills were not considered?”
- Shadow Acceleration/Shadow Image
- We do not deal shadow damage in cc2 (flame)
- ASPD bonus does not apply due to “Shadow Form I” innate effect
- Transcendence
- The reduction in core damage counteracts with our main damage coming from core skill
- Return to Simplicity
- Continuous casting of tactical skill prematurely ends the effect of Return to Simplicity
- Hunting Mark
- Weaker alternative to “Five Steps to Mastery”
- Etc.
- Did you read their effects? What made you think those are better?
Passive Skill Setup
- TLDR: Shadow Form II, Shadow Form Final, Temporary Reload, Cross-Class Mastery, Feint-in-Advance
The two cc2 exclusive passive skills “Shadow Form II” and “Shadow Form Final” are tied to the effects in the talent for cc2 and the effects of the core skill.
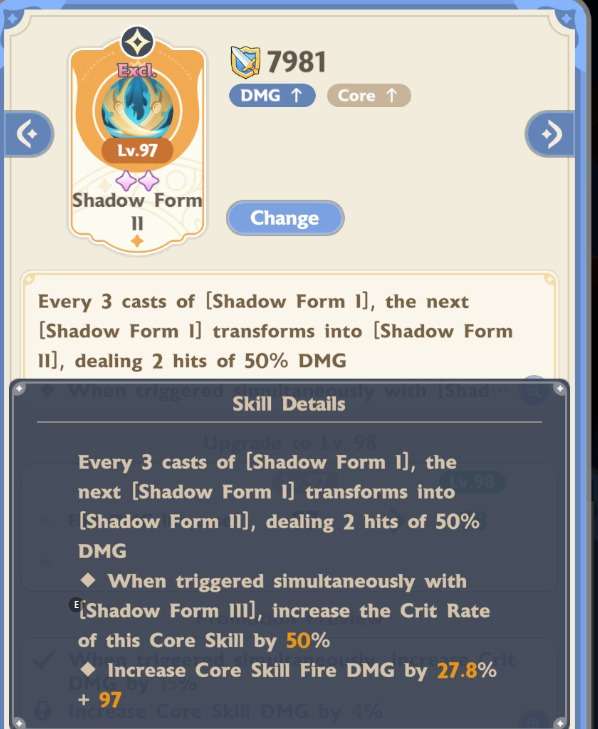
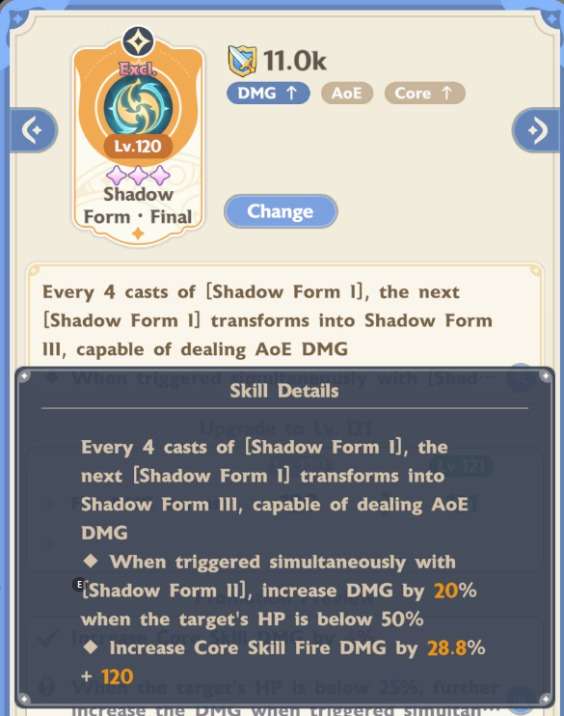
From these descriptions, we can see that in every 12 casts, both passives are triggered simultaneously [least common multiple (LCM) of 3 and 4]. This will become important when we discuss the talent tree.
Now, for the other 3 slots, there are many options to choose from:
- Temporary Reload
- Preemptive Strike
- Feint in Advance
- Cross-Class Mastery
- Scavenger’s Feast
- Slow Swordsmanship
Considering most of our damage is from core skill, temporary reload is currently fixed to our setup since it increases core skill damage on tactical skill cast, which our skill does simultaneously.
As for Preemptive Strike, it is useful for starting bursts for fights that can last under 10 seconds, such as the main stages or a super whale that can 1-hit-KO anything.
Aside from the two special cases, let’s take a look at the other four passive choices and choose TWO:
- Cross-Class Mastery
- Feint in Advance
- Scavenger’s Feast
- Slow Swordsmanship
Based on preliminary testing in the link.
The “Slow Swordsmanship” passive skill performed the lowest in comparison while “Scavenger’s Feast” needs some time before being fully stacked against a single, or few, mobs. However, at full stack, “Scavenger’s Feast” outperforms “Cross-Class Mastery”, which makes it a good choice for content like Waves of Horror.
Talent Tree Setup
- TLDR: Art of Incineration, Forging Foundation, Hastened Cooldown.
In simplified structure, there are two options for the talent, “Art of Incineration.”
Option 1: Full Right

Option 2: Both, Right, Both, Left

The main difference between the two is whether or not the damage is focused on the start or later in battle.
Basic differences between two options:
- Option 1 – Best for Perilous/Dragon/Event with 143%+ ASPD
- 95/95 points
- Battle lasting MORE than 1.5 min (see calc below)
- Initial Overload skill duration extended by 5 seconds
- Allows for a total of 19 (7+5+7) seconds of uninterrupted [Blazing Shadow] stacks
- Detonating [Destruction] mark permanently increases flame damage by 7.5% per stack up to 10 stacks (75%)
- Every 12 casts of “Shadow Form I” applies [Destruction]
- After 10 flame damage detonates [Destruction]
- Option 2 – Best for Main and Rift [RRDD possible as well (90/95)]
- 78/95 points
- Can put rest of points on other two side talents
- Beneficial to get an extra large node on one of the trees at early levels
- Can put rest of points on other two side talents
- Battle lasting LESS than 1.5 min (see calc below)
- Initial Overload skill duration extended by 5 seconds
- Allows for a total of 19 (7+5+7) seconds of uninterrupted [Blazing Shadow] stacks
- Initial 10 seconds have additional [Blazing Shadow] stack per cast
- Does not detonated [Destruction]
- 15% increased Fire damage taken by the marked
- [Extinction] stack on enemy every 12 casts of “Shadow Form I”
- 3% increased core skill damage taken by the marked
- Can stack up to 4 times (12%)
- “Shadow Zero” deals 200% damage to marked with [Extinction]
- 78/95 points
Ignoring the detonation of [destruction], we can estimate the time its take for option 1 to out-DPS option 2. For simplicity, we will assume that we have ASPD of 1.5 (1.5 attack per 1 second) and damage dealt will be (attack based on current stack then add next stack).
For the option 1, we can denote the first 19 seconds as 1.5N * ( 1 + 2 + 3 +… + 19), where N is 7% (dmg amplification per stack) and 1.5 stack per second. We need to incorporate the 7.5% per stack from [destruction] detonation. For simplicity, we will assume a stack per 12 casts, or 8 seconds (12/1.5). Lastly, all commonality between the two options will be neglected.

For the option 2, we follow the similar concept as option 1 but separate the initial 10 second to later 9 sections due to double stack per cast only lasting the initial 10 seconds. In addition, we will incorporate 3% in place the 7.5%.

Considering that the stacks reset after and both goes to same number of stacks, the only difference will be based on the 7.5% (75% max) and 3% (12% max) additional damage increase.

Where X is the time in seconds. This can be simplified to:

This results in about X = 61 seconds.
So based on this result, it can be theorized that after 80 seconds (61+19), option 1 begins to outperform option 2. This value can change based on the attack speed but can safely assume option 1 is better for any battle longer than 1.5 minutes assuming you have about 1.5 ASPD.
As for the other talent:
- Forging Foundation
- Great source of ASPD and ASPD is a necessity
- Hastened Cooldown
- Lower cooldown on Overload tactical skill
- Combination Node
- +2% per stack up to 5 stacks (+10%) for 5 seconds on casting tactical skill
- Can replace talent for turning point/critical rate/dmg/determination if needed for possible loss of stabilized stacks (loss of dps due to possibly hitting less max stack)
- Cooldown isn’t detrimental unless you have 30%+ cooldown reduction (CDR) but it does help lower the aspd requirement
- May require manually start each cycle (see TL;DR in rotation)
Melomon Recommendation
- TLDR: Main: Demon Hound, Special Skills: Demon Hound, Ice Valley Colt, Thunder
Fixed:

For Option 1 (General Purpose): Thunder (safer and higher floor/avg but lower ceiling) OR Smartie (lower floor but higher ceiling).

For Option 2 (for short fights i.e. ~1min): Ex. Main and Rift.

Alternatives:

Stat Priority
- TLDR: ASPD(Haste), Critical Rate and Damage, Determination, Accuracy, Mastery
This is pure assumption based on my personal opinion. This is subject to change and here to just provide some guidance. Note: If you are a whale, or can swipe your credit card for stats, ignore this and just maximize everything you can. See bottom for ASPD calculation.
- Always try to keep Accuracy at 100~106%
- Defensive
- HP, Endurance
- Early
- 140%+ ASPD (ASPD is haste% + bonus(such as forging talent))
- 40~50% crit rate
- 30~40% determination
- 220%+ crit dmg
- 10~20% mastery
- Mid to Whale
- 155%+ (172%+ with haste accessory) ASPD
- 50%+ crit rate
- 40%+ determination
- 270%+ crit dmg
- 20%+ mastery
- End (Copium) – unachievable
- 1.7+ASPD
- 80% crit rate
- 80% determination
- ~300% crit dmg
- ~50% mastery
Mid and End goals are just an opinion and subject to change based on available resources and likeliness to achieve. After some thoughts, I began to wonder how much ASPD do I need? In most cases for F2P and Casual Spender, “Is it worth it to replace a Crit Damage pet move for Haste?”
To start off, how much ASPD do I need for that one extra stack/hit of [Blazing Shadow]? Taking a basic equation of (total stack / duration) = ASPD Required, the following table for legendary overload skill at lv120 can be achieved for the typical 7 s overload duration.
| Max Stack | ASPD (%) to Hit the Stack within 7 sec | DMG Increase vs Previous Stack |
| 8 | 114.3% | – |
| 9 | 128.6% | 25% |
| 10 | 142.9% | 22.20% |
| 11 | 157.1% | 20% |
| 12 | 171.4% | 18.90% |
This table provides the minimum ASPD to achieve that much stack/hits per overload duration except for the first 2 cycles (19 s). So having any ASPD in between should not increase or decrease the damage since we cannot do a portion of an attack (either you attack or you don’t).
So, do you NEED 150% ASPD? No. It only helps for the first 19 s but afterwards, it is the same as having 143% ASPD.
Now, some of you may wonder, “I have 130% ASPD and if I replace my crit damage pet move for haste move, I can get 143% ASPD for 22% more damage. But I lost 40% crit damage… Is it worth it?”
Let’s make an estimate for which is better.
At level 21 legendary crit damage pet move, it gives approximately 20%. So, let’s say you alway crit on all your hits for extreme case difference and replace TWO moves for haste. This results in you having a crit damage stat of 220% from 260% and ASPD of 143% from 130%. Therefore, you do 10 casts instead of 9 during the cycles.
Taking the equation for damage calculation, we take the summation of all the hits during the cycle and multiply by the crit damage modifier while ignoring all else in assumption that they stay the same.

Where y is the max stack and C is the crit damage modifier.
So, taking the values from table above, the lower your ASPD is, it is better to lose some crit damage for ASPD to go to the next tier, or max stack, on average. However, this is not recommended for any runs lasting shorter than ~30 seconds!
| Stack | 260% Crit Damage | 220% Crit Damage AND Stack + 1 | DMG Difference |
| 9 | 819% | 847% | 34.20% |
| 10 | 1001% | 1016.40% | 15.40% |
| 11 | 1201.20% | 1201.20% | 0% |
Taking the same condition as above but for the first 19 s, the 260% crit damage outperforms by 7.5%.
Based on these tables, you can figure out if you should get more ASPD or not.
From this information, we can consider the well-known table from CN guide, which takes in account of “Shadow Zero” prior to overload period, which can give additional stack and lowering the bar depending on your current cooldown reduction in a practical run.
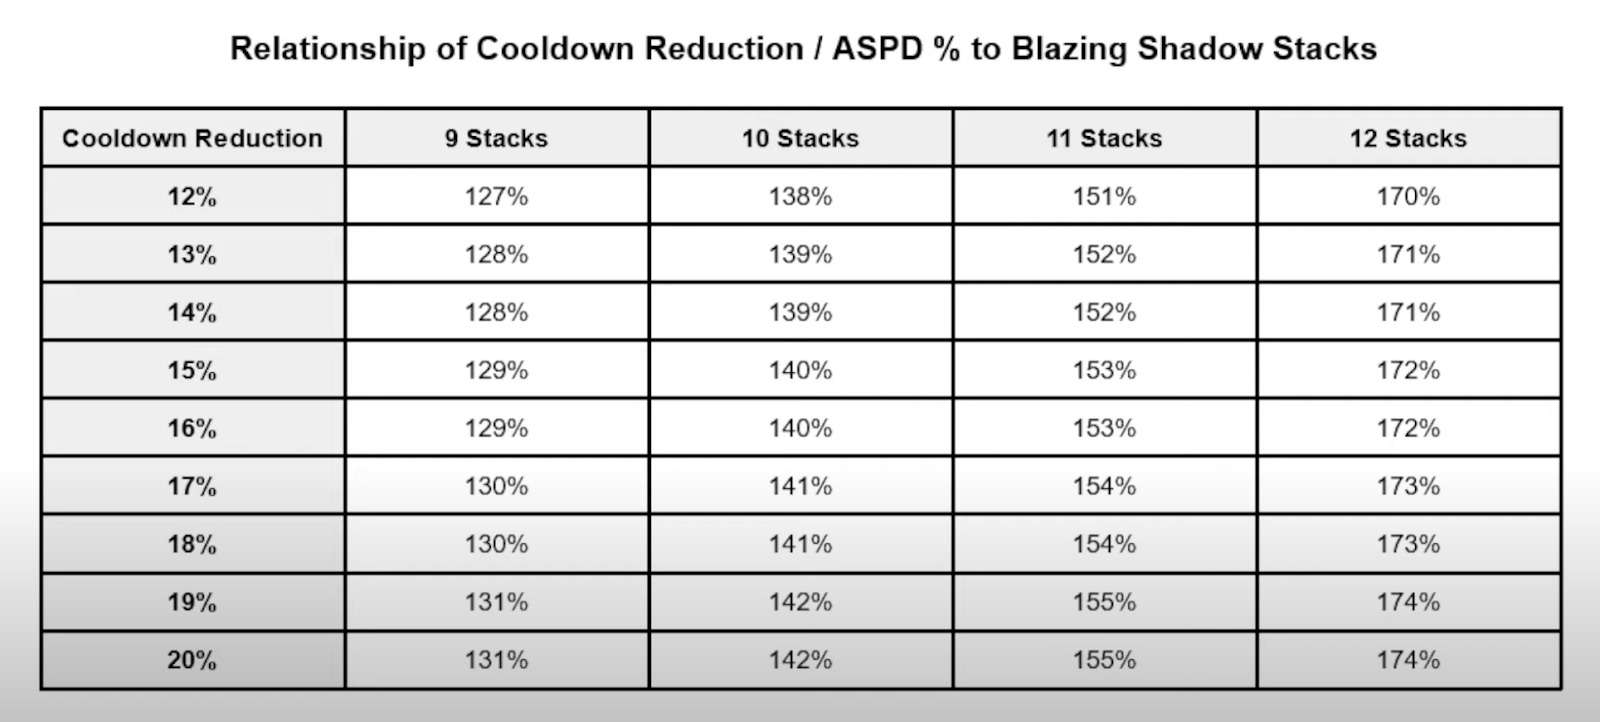
The increasing ASPD requirement for higher cooldown reduction is due to requiring faster cast to cast the follow-up before the initial expires.However, there can be some issue due to latency/ping (?) and NOT guaranteed for everyone at these values. You may need to run each start of the cycle manually.
Rotation
- TLDR: Shadow Zero -> Auto (within a sec from casting Shadow Zero).
So based on the findings where it is recommended to fully utilize the initial 19 seconds of Overload duration, you can simply auto from start, but manually hitting Shadow Zero prior to hitting auto is more recommended (make sure it is within ~1s of Shadow Zero cast).
However, you may be worried that by doing so, the cooldown between the tactical skills will misalign and lose out on dps. Fortunately, based on the chart below, it is estimated that you will lose out on some dps on 3rd rotation BUT the cooldowns will realign by 4th rotation. It is better to benefit from 1st and 2nd rotation with minor loss on 3rd rotation than losing out by having aligned cooldown from start.
| Rotation | Time (s) | Overload (s) | Five Step (s) |
| 1 | 0 | 13 | 9 (13-4) |
| 9 | 4 | 9 (0) | |
| 2 | 13 | 13 | 5 |
| 18 | 8 | 9 (13-4) reset | |
| 19 | 7 | 12 (13-1) | |
| 3 | 26 | 13 | 1 |
| 27 | 12 | 9 (13-4) reset | |
| 33 | 6 | 7 | |
| 4 | 39 | 13 | 9 (13-4) reset |


Be the first to comment