
Farm around ~250K runes per hour by completing this quick 18 kill loop. Quick and easy for those around level 40-80 looking to grind into the stratosphere.
Annihilate the hideous Vulgar Militia just north of the Farum Greatbridge grace site in a 5 minute loop.
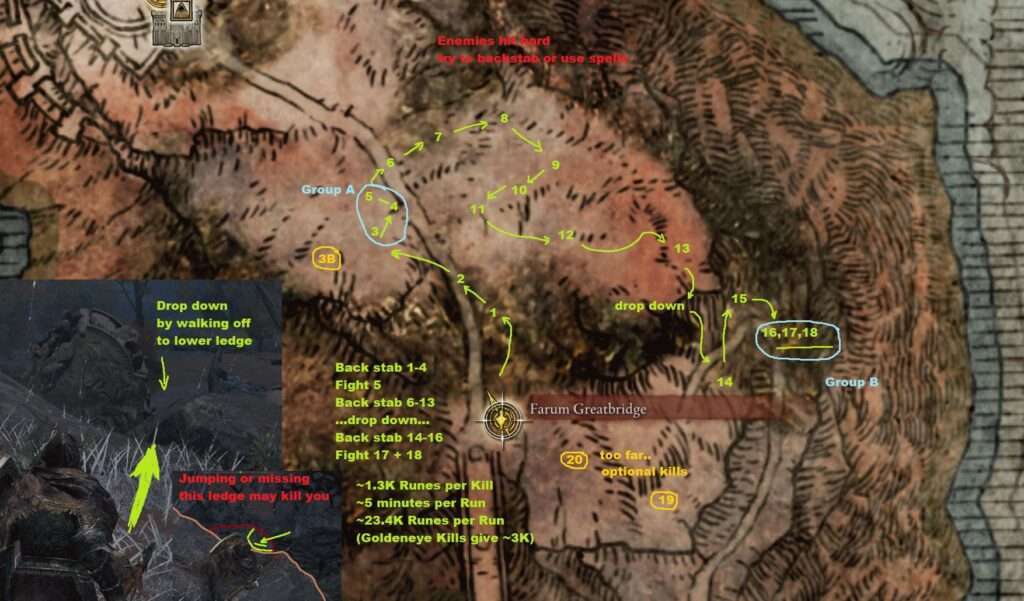
The Farum-ing Route
The farming route starts from the Farum Greatbridge grace site. If you haven’t unlocked the Farum Greatbridge grace site you can fast travel to the Bestial Sanctum and ride south along the road. You’ll find the grace site just before the bridge with the scary dragon on it.
There are roughly 18 Vulgar Militia spawns and takes about 5 minutes to complete at level ~60 using a ~40 strength build with Partisan at +12 and Great Shield at +6. This route is best for melees but will likely work well for casters too.
Most Vulgar Militia mobs can be back stabbed and quickly finished if they are not one-shot. There should be plenty of room to sneak around and back stab most targets. It’s worth using AoW or fast casting spells to quickly take down engaging targets because these militia are no joke! That said, its best keep your health topped off between fights to give yourself the best chance of not losing any runes or time.
Run Difficulty and Stats
Difficulty: Mid-level, intermediate skill; tough to very tough enemies for lower level characters
- ~18 Vulgar Militia
- ~5-6 minutes per run
- ~1.3K runes per kill (goldeneye targets give ~3-5K runes*)
- ~23.4K runes per run
- ~280.8K runes per hour
Humanoid enemies that drop Vulgar Militia armor sets, saw, shotel and kukri. The Vulgar Militia Saw is a halberd with built-in bleed.
Is it coincidence that the starting grace site sounds a lot like “Farm Greatbridge?”
Drop Down
You’ll drop to a lower ledge after target #13. In most cases, you’ll be able to run or walk off the cliff without taking fall damage or causing a fatal fall (instant death). These easiest way to do this is by walking off onto a lower ledge. Make sure you land on the right half of the ledge pictured in the map above. If walk off on the left you will slide and continue falling which may be fatal.
Difficult Targets
By level 40-80 many of you will be pretty comfortable taking on groups of enemies. Regardless, below are some strategies and notes for taking on the tough groups. Almost all of the targets path or wander in a small area so, use your discretion when engaging these enemies. The trio in Group B do not wander and keep the same formation unless disturbed by sounds or nearby combat.
Targets #3, #4, and #5 may engage together but often wander in different directions exposing their behinds. Targets #3 and #4 are often close together and
Target #15 can be difficult to sneak up on because he is often hides behind a large tree root. He can path near the trio of #16, #17, and #18, so you should jump over the tree root and engage before fighting that trio.
The final group is a three pack and can be very dangerous if not approached with caution. Target #14 may path too close to #16, #17, and #18 causing the entire group to engage. Slapping a nearby tree may get the attention of #14 but also may cause the group to turn and search for you. If #14 is too close to the trio, take out #15 first and #14 may path away from the group on his own.
When engaging targets #16, #17, and #18 in group B, if you can one-shot with a back stab, then take out the middle target first. You will have iframes (invincibility frames) when back stabbing and the initial assault from the other targets should be avoided. Quickly retreat by sprinting away from these remaining targets and prepare to fight head on. Rolling away will leave you too close and their follow-up attacks may connect so be sure to create distant by sprinting.
Optional Enemies
Targets #3B, #19, #20 are often too far. These out of the way targets can be skipped.


Be the first to comment