
Here you will find many useful tips that can help you get a good start in the game.
Gameplay Guide to Basics
General Gameplay Tips
- All patterns can be survived without invulnerability – analyze and react calmly
- Use your defensive option to avoid hits if you mess up positioning
- Focus on surviving first when learning, then optimize damage
- Always be casting something on the global cooldown for maximum DPS
- Practice, study boss mechanics, and try new strategies after each wipe
Wizard
- Style: Build And Spend/Proc
- Rotation: 4 > 2 > 3 > 2 > [1…]; 3 > 2 on cooldown
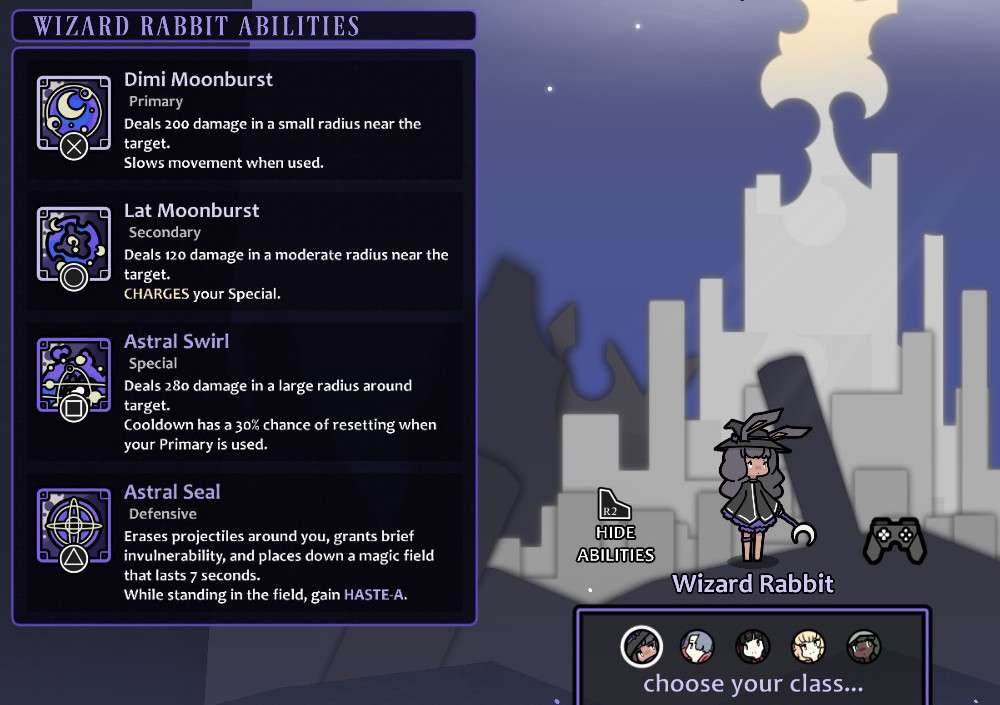
- Camp in one spot and spam abilities to deal big damage
- Use your mobile secondary ability if you need to relocate
- Build for cooldown reduction, haste, special damage to maximize Astral Swirl
- Don’t worry too much about movement speed
Assassin
- Style: Proc/Positional
- Rotation: 4 > 3 > [1 > 1 > 1 > 1 > 1 > 2 > 4 > 3…] (Length may change based on GCD modifiers.); 4 > 3 on 4’s cooldown, 3 if you have 2 Charges.
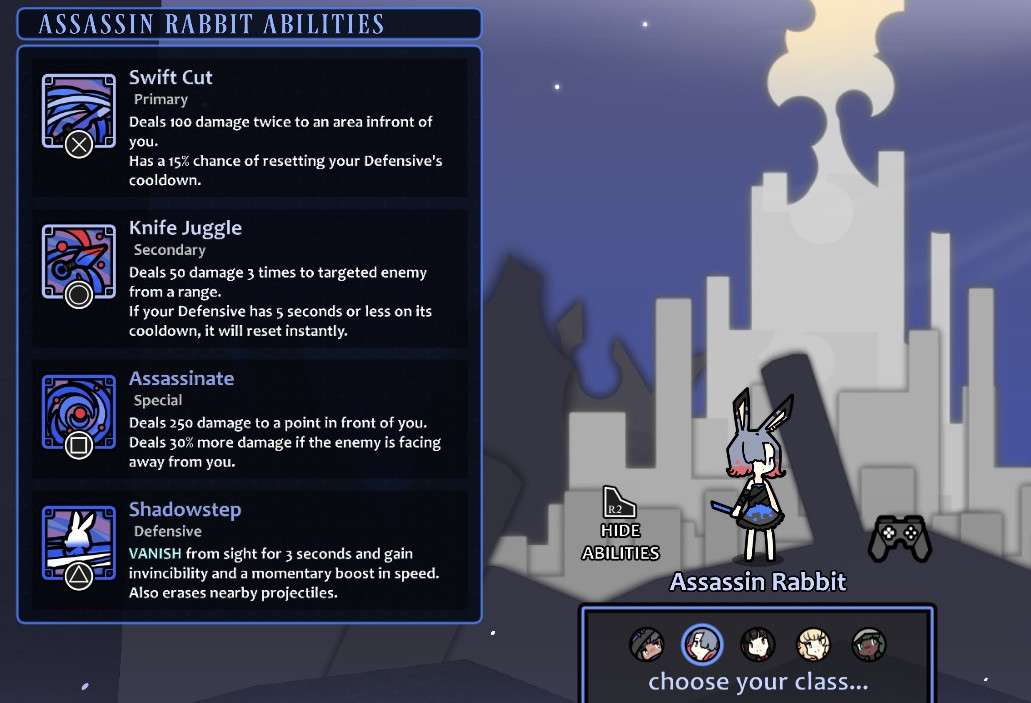
- High risk, high reward – stick close and use Assassinate behind bosses
- Use Shadowstep to reposition safely behind the boss
- Stack damage buffs like Smite, Curse, Burn to boost Assassinate
- Prioritize defensive cooldown reduction and haste for more Vanished Assassinates
Heavyblade
- Style: Build and Spend
- Rotation: 2 > 3 > 1 > 2 > 3 > [1…]; 2 > 3 > 1 on 3’s cooldown
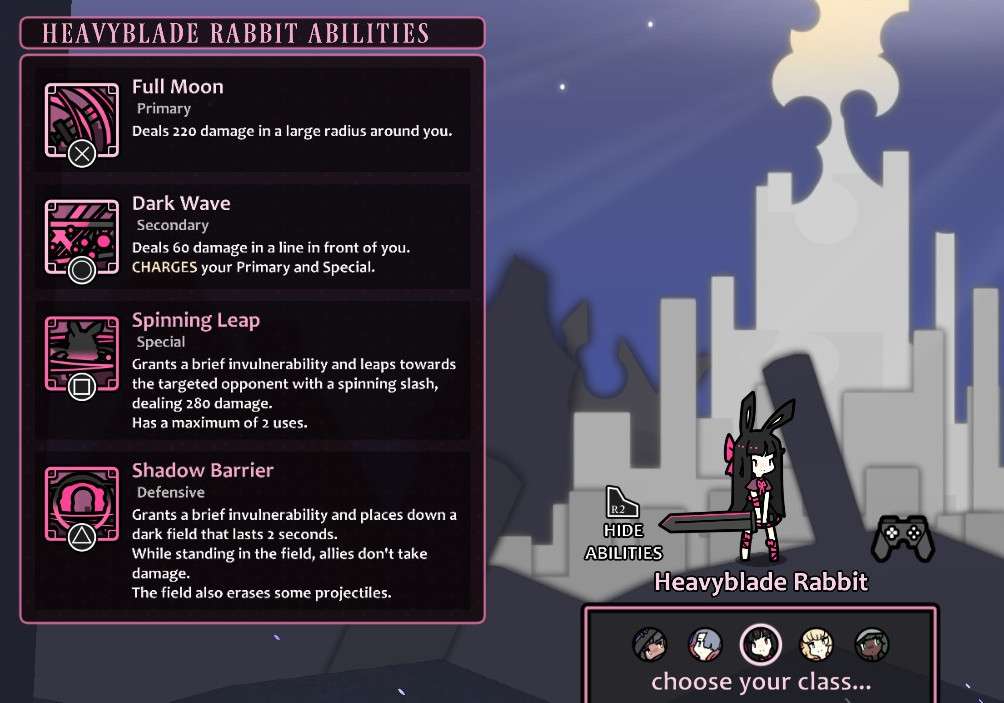
- Simple rotation – mostly use your high damage primary attack
- Very tough with damage immunity and your defensive barrier
- Focus on increasing primary and special damage stats
- Don’t need to prioritize movement speed as much
Dancer
- Style: Proc/Support
- Rotation: 4 > 3 > [2 > 1 > 1…]; 3 on cooldown
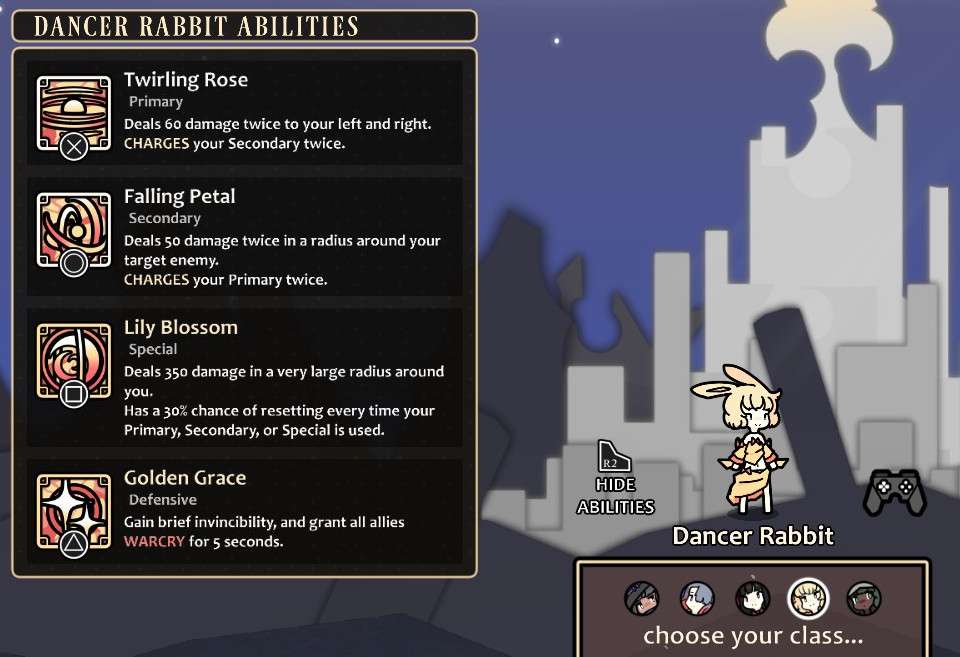
- Keep up your damage buff with Twirling Rose and Falling Petal
- Time Golden Grace burst with your team’s big cooldowns
- Want cooldown reduction for more Lily Blossoms
- Can use any stat boosts due to proc-based gameplay
Druid
- Style: Maintenance
- Rotation: 3 > 2 > [1…]; 3 on cooldown, 2 on duration timer
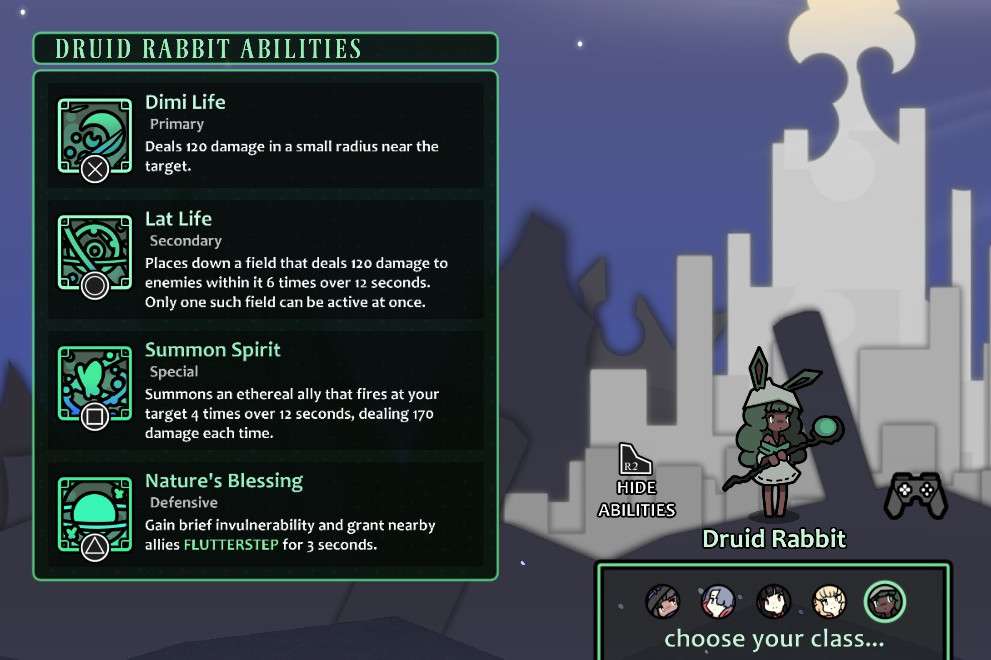
- Challenging rotation managing ground-target abilities
- Use Nature’s Blessing defensive for team mobility
- Stack secondary, special damage and cooldown stats for Lat Life/Summon Spirit
- Avoid stats like haste that don’t benefit ground-target abilities
Steam Deck Tip
If you’re playing on Steam Deck, I’d recommend turning on “Handheld Mode”, in Options > More Options. It makes the mouse work like a touchscreen, and makes it so that the mouse isn’t a different “player” than the controller controls.
Important note
To complete the story, on any difficulty, your route selection map will indicate where there are story events (with a ? icon).
Every faction has 10 story events, spread over the areas, that you need to do in order + after that beat the area’s boss to get their cutscene.
From there, beating Shira until you’ve seen all of her dialogue, with a new one unlocking per area boss freed of the spell, will get the final cutscene and unlock the credits+epilogue.
I hope you found this useful. Wishing you luck!



WTF is “defend yourself”
i dont know what to do when it happens
That probably means, “Use the defensive cooldown that each class has, or else abandon whatever you’re doing and concentrate on surviving.” I hope that’s useful.
In addition, the boss places static colored circles in a “soak” (from XIV) variant that damages everyone if one of them is empty at the end of the cast.
Excellent mentor and in line with my expertise.
I would like to assert that “Match Color” harms you if you overlap a color that isn’t yours, but testing would be necessary for this. Therefore, you must separate every pair of colors; otherwise, you could just cluster in one area and overlook the mechanic.
By performing a 1>1>1>2>2>3>3>repeat, you can increase your dps on defense. You can also build up your charges on 2 for when you need to get away. For me, the only way I’ve been able to spam 1 was with a sapphire 1 or brightstorm spear.
The rotation of a defender is… difficult to summarize. Strangely enough, considering how easy it is on paper. The key problem is figuring out exactly what “optimal” means when the end result can be obtained by any combination of five 1’s and five charged 2’s. Not to mention the fact that it technically influences your DPS indirectly, you may want to weave a 4 in there someplace.
In the end, a lot of Rabbit & Steel’s rotations require you to make split second decisions in order to maximize your effectiveness. Therefore, while understanding the flow is sometimes crucial, it’s also important to know when to break from it and hold cooldowns or change your course to improve your position, especially if you can avoid sacrificing too much damage. Most likely something I want to take care of in a later update to this manual…
Building for Special damage on the Sniper class can result in extremely high damage output. The combination of Emerald Special and Emerald secondary abilities is particularly effective. If you can acquire FLASH-INT or FLOW-INT, it further enhances the build’s potency.
In certain two-target fights where the enemies remain close to each other, you can hold the target swap button to hit both targets simultaneously. Using this combo, you have been able to deal massive damage, around 6500 DPS, allowing you to defeat the enemies in one or two shots.
Ancient Rotation:
2 > 2 > 4 > 2 > 1 > 1 > 2 > 1 > 3 > 1 > 1 > 2 > 4 > 2
Use ability 1 as a filler until other abilities are off cooldown. If ability 3 is on cooldown, use ability 2.
Targeting:
Holding Shift (keyboard) or LB (controller) will target the middle point between 2-4 enemies. This is crucial for hitting all enemies simultaneously while managing your cooldowns and pet’s position.
Dealing with mobile enemies (wolves):
Wait until the wolves stop moving, then immediately send your pet to their location. If you command your pet while the wolves are still moving, the pet will go to their previous position, not their current one. Once your pet is in position, use ability 3 and continue your rotation. Avoid spamming ability 2 when the wolves are moving, as it will result in a DPS loss.
Here’s a rewrite of the Defender class rotation and tips, simplified and with less slang:
Defender (The Best Class)
Rotation: Spam your first ability (1) until your third ability (3) is available. Use your third ability twice, then go back to using your first ability. If you need to reposition, use your second ability (2) instead. Once your third ability is ready again, use it and repeat the process.
The fourth ability (4) is not included in the rotation because it’s best used as a “get out of jail free” card for yourself or your teammates when they’re in trouble. Keep in mind that the invulnerability effect has a 0.5-second delay before it activates.
Similarly, the bullet dispel effect of your third ability (3) is not instant and requires precise timing.
Your special ability is your primary damage source, so prioritize items that enhance it. Look for items that deal damage while you’re invulnerable or grant invulnerability when you use your special. These will be incredibly valuable for maximizing your effectiveness as a Defender.
Bruiser Rotation: (I’m not a bruiser, but I kind of am) For the dmg>1>1>4>1>4>1>then fuck around until 3 or 4 come off cd>1. 3 at close range
I don’t actually utilize 2 very often unless something like rotating lasers forces me to relocate. Although it is a stubby attack, the possibility that it could charge your primary isn’t terrible. GO FOR IT if you can obtain the main upgrade that gives you a backstab. I watched several games where a guy (with the appropriate build) was nearly always hitting for 1k~ to 2k after getting buffed.
I’ll enter the rotations I’ve been using for the new characters because I don’t know how long it will take for Op to unlock the other characters. I apologize for any awkward formatting; if there’s a better way, please correct me.
Spellsword Rotation: 2>4>3>3>2>1 till 3 returns from CD>2 to obtain additional darkspell stacks>4 upon CD return, etc.
Always check your darkspell stacks, and feel free to deviate from my rotation if necessary—for example, if you’re about to run out of spells. Apply your own discretion.
Rotation of Sniper: (I usually do) After the snare timer expires, 1>4>1>2>3>3>3>1>2>3>1>2>repeat
Sniper movement is terrible until you equip yourself with equipment that improve it. You want to locate a place to relax and shoot people, as OP mentioned for the wizard.
Sniper movement is terrible until you equip yourself with equipment that improve it. You want to locate a place to relax and shoot people, as OP mentioned for the wizard. Your special is a great filler ability, especially when you need to move, and your primary is your huge damage move. Since you’ll probably get another use of your special if you have to move, attempt to retain your secondary’s snare effect on the enemy.
It’s important to note that the Druid excels in multiplayer! Lat Life and Summon Spirit both interact with buffs in the similar way as FFXIV DoTs, where they snapshot your buffs when you place them down, which makes them very effective when coupled with a dancer. With my GF buffing us, I was able to consistently hit 1,000+ DPS in area 3 (I believe it was the Darkhouse).
For insane output, you can stack invulnerability buffs onto your defensive and special casts. My favorite heavyblade gear is the one that grants super on special cast, which lowers gcd, increases damage, and grants invulnerability for six seconds.