
An in-depth guide about Gambit and its individual roles.
Guide Contents
Guide to High Tier Gambit
Note: Credit goes to Miyako-
Breaking Roles Down
Gambit at its core is a game of invasions and drains. Your team must bank 25 or more motes first to invade, and then use the invasion to try to deny the bank from the other team to allow the blockers to drain, also denying the first invasion from the enemy team. Speed is the name of the game at first, not only trying to drain the enemies if they’ve already banked, but outright deny motes and mess up the flow of the enemy team. Jobs can be boiled down to a handful of specific roles, and some key words.
As a Reaper, you’re the bread and butter of any team. Your job is to clear waves, bank what motes you pickup, and help protect the Killector from wave redbars as they take down the wave bosses. You’re at the front of every fight and taking down wave after wave. Simple and to the point, you just keep killing and then kill some more.
As a Killector, you collect motes the most, bank motes the most, and shred any wave bosses and the High Value Targets (HVT). You’re probably doing the most Primeval damage, and the most important at the end of the round. You’ll probably grab some wall heavy to guarantee yourself some heavy for prime dps, or all of it if your Invader is good with their weapons. Speaking of which…
As an Invader, your job is multiple things, most of which is killing enemy guardians. In your first few seconds, you should try to grab any special from the first wave or two, and any heavy if it happens to spawn. As soon as that portal opens, you’re off to the races. You’ll (hopefully) kill all four opponents, denying them anywhere from 20 to 60 motes (15×4). In your few seconds (if your team is fast you’ll be not invading for no more than 20-30 seconds) of your offtime, you’re helping the Sentry to clear the bank, protecting the Killector and Reaper if an opposing Invader arrives, or picking up some spare motes and ammo from previous waves. Take heavy if you’d like, but it’s probably better for the Killector or Sentry.
As a Sentry, your main priority is to clear out Blockers, protect the other team-mates from the Invader, (that’s called Anti-Invader play, or just Anti, and is probably the most important thing to learn if you want to play Gambit in higher tier play.) by shutting down the opposing Invader before they can even ready their gun or hit an ally.
Now that I’ve set some roles (Reap, Killector, Sentry, and the Invader) and what they do (wave clear, collect and finish waves, clear bank and anti, and invade to deny mote banks/bank clearing) I’d like to show you a “perfect” Gambit game. For simplicity, I’ll explain this with a game of Fallen on Emerald Coast.
The Prime Event
The first wave spawns on the Ruins area (Front), and the second on the Beach area (right) when you kill the first wave. At the transmat, all of your fireteam+1 makes a mad dash for the first wave. You all know wave 1 doesn’t have enough to bank a full 25, so your Reaper grabs a few and your Killector grabs most at the end. Your Sentry is with the Reaper, grabbing the next wave’s motes and your Invader is grabbing ammo for their invasion. As soon as you all finish grabbing, you bank. Twenty Five motes plus some extras in the span of a minute or two, and three blockers to drain. Your Invader goes, and shuts down all four enemies while they try to clear their bank. The score is now ~40-0, and your team is absolutely killing it. After a minute or two of trickling in blockers from the Reaper, Killector, and Sentry, they all pull out their heavies (hopefully swords, or Lament if you can, but weapon metas are for another day. May vary with seasonal mods.) and absolutely melt the Primeval and its first wave of envoys. You win, and that was a Gambit game in under 5 minutes. Congrats.
Side note; Gambit Prime was similar, but had a well dropped in specific areas for Prime DPS, after Prime Envoys were killed. It extended the DPS phase and made swords wayyy harder to use, to help opposing teams catch up. The Ascendant Primeval Servitor in current gameplay is the current adaptation of a broken up damage phase and a way to make swords ineffective or difficult to use, but doesn’t do the best of jobs at either of those in my opinion.
That hype, and that rush of adrenaline for the Invader hitting shots and avoiding death, the Reaper and Killector running through wave to wave and destroying entire small armies of enemies single handedly, and the Sentry who’s running around, clearing the bank in seconds and shutting down the enemy Invader over and over, that feeling of pride in a team and yourself, are what drag people into this game, myself included.
Play to Their Weakness, Boost Your Strengths
This next bit is gonna cover some “Advanced” Gambit tips and tricks, explained with some images, videos, and the theatre of the mind. The main advantage of most of these tricks are taking advantage of some game mechanics, invader spawns and placements, and generalized tactics made to force your team into the winning side or a better spot. This will cover strategies, playstyles, and loadouts for all classes and Roles.
Reapers Are slightly limited, but not as much as others. With the priority to survive and kill the prime or wave bosses, High burst dps heavies, single target heavies and specials with multitarget AoE abilities are supreme. Top Arc Hunter with Liar’s Handshake, Bottom Arc Titan Synthosceps/Dunemarchers, Stasis (something to boost grenade and melee charges, maybe Verity’s Brow or Ahamkara Grasps?), Top Solar (use Sunbracers) or Top Void Warlock (use Nezerac’s Sin) are all great basises for a build. Running Warmind cells is great to build around, which leads into using the Seventh Seraph CQC and Witherhoard. This is a fairly simple and common choice for some reapers, and while it may have alternatives and other better counterparts, this combo is a great entrance to reaping. Stacking Cell mods (Wrath, Rage, Medic, Reach, and Protection are what is used standardly, for a gambit warmind build) helps a hundred-fold. As for Heavy, Something like a sword would help rip through the prime (see Falling Guillotine god rolls, or possibly Crown Splitter if you play Titan, or Lament’s high burst damage, if you aren’t using Witherhoard.) or whatever the season’s overpowered mod is (ex. Breach and clear and Anarchy/Witherhoard, particle deconstruction with Telesto/1K/Sleeper, etc. etc.)
Killectors typically use stuff similar to Reapers, so there’s not much to say here. Hunter Top Arc Liar’s, Warlock Top Solar Sunbracers/Nezerac’s Sin Void/Verity’s Stasis, Titan Dunes/Synthos with arc, Hunter Liar’s on top arc, CQC or a Xenoclast (specific role outclasses CQC damage wise, but removes the use of cells. Instead, you would use a CWL ammo generation build using Radiant Light/Powerful Friends/Orbs of Light/Heavy Handed/Striking Light, to pump out more burst damage, and increase sword DPS. It’s a give and take, and I’ll go over it more in the next writeup) and a sword or whatever boss baker of the season (In current it’s 1k/Sleeper Simulant, but Lament is very dependable with a bubble titan. Ask your local Sentry to try one today!) As for Kinetics, I’m not too sure. Something with longer ranges and burst damage like a scout or sniper works I guess. A good sniper is Succession, with Moving Target or Reconstruction and Snapshot. As for scouts, I’d say DMT if you’ve got vorpal, but I don’t recommend running a primary ammo weapon in Gambit, especially an exotic one. I’d go for a sniper, possibly Izinagi’s Burden, or even Witherhoard as well. Be mindful, and if you don’t trust yourself to defend against an Invader with either of your weapons, possibly reconsider and revise your loadout.
Invaders should use their secrecy to their advantage. Abuse the free wallhacks and shield given on spawn. The typical invader uses a sniper, a secondary of choice which could be an auto rifle, or even shotgun or fusion rifle. A rocket launcher or machine gun is typical, but running a sword or the melter of the season would be nice for prime DPS if you trust your aim enough. Other than that, most of your loadout is up to you. Multiple builds are able to be used, but my personal favourite is a HEF build, which is common in crucible. The base of this is of course High Energy Fire, Powerful Friends, and Radiant Light, all of which are great in most modes. The other two I would personally use are Stacks On Stacks, and Supercharge. Stacks On Stacks generates an extra charge of Light, and Supercharge allows you to hold up to 5 charges. Use this to your advantage, and hit those shots. Hunters can use bottom tree Golden Gun, to secure cross map kills. Something like bottom tree Voidwalker also works fantastically to deny bank usage and to secure longer range kills, or deny super use. Warlocks could use either Nova Bomb, Chaos Reach, or either Dawnblade. Most if not all supers on warlock hit hard and move fast. Anything from Dawn Chorus, Geomags, or anything to increase your ability to move and groove. Titans have the hardest hitting supers, like Thundercrash, Bottom Solar, and Top Void. I suggest Bubble titan (top void), for not only prime damage, but also for denying bank use with Helm of Saint-14. things like Cuirass, Skullfort, Dunemarchers, or Heart of Innermost Light would also work well, combined with arc for damage and such, or ability usage. I would also suggest something to increase super charge, or deal more damage. Dynamo/Ashes to Assets/Hands-On, ammo scavengers, etc. etc. You’ll want to preferably stay away from Targeters and Scavengers, as they take up space and are costly. Use that energy to slot other mods instead.
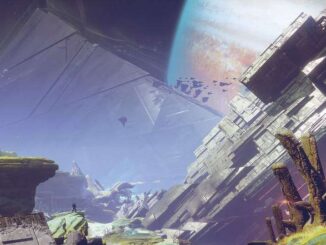
Sentries probably have the most restricted builds, centered around not only bank clearing with burst damage, on top of invasion denial, through something called “Spawnkilling” which you’ve probably experience once or twice in Crucible. Similar to the prior mentioned Crucible, Gambit has forced spawns and spawn locations for Invaders, with two or three factors to take into consideration. Wave placement taking priority, Team placement, and Outliers. Wave placement is simple. The invader cannot spawn in the section where the current wave is, under any condition. Team placement is where the majority of the team is, which will then make the spawn prefer the farther location. (ex. if your wave is trees on Em Coast, and your team is there too, they’ll probably spawn Beach) Outliers are things like preferring not to spawn somewhere a player is currently to avoid up close surprises or spawnkills, or preferring to place an invader in one area for a spawn location, rather than a separate open location, for one reason or another. Each of these outliers differ from map to map, but are easy to pick up on. An example is that Gambit likes to put invaders on Beach for Emerald Coast. The Invader will not spawn if the current wave is on Beach, or if the majority of the team is there. If neither of these are true (your team and wave are on Trees, like the last example) The invader will likely spawn on Beach. The Beach spawn is somewhere here, where my character is looking. Several angles can be used from other areas, to kill the Invader near instantly.
While I don’t recommend relying on it, I highly suggest Bad Omens with a Tracking Module. Since it’s a legendary, you can save your exotic slot. It’s also a world drop, so happy hunting. For a main use gun, I’d highly recommend Izinagi’s Burden, since it can one shot to the body, with Honed Edge x4, as soon as an invader spawns.This in my opinion is completely broken. Use it to your advantage. Something like Cartesian Coordinate is great in the current season (Season of the Lost) for Particle Deconstruction. Outside of that, I would use something with high damage and low cost. Shotguns work wonders, and some of the wave frame grenade launchers are great. I would recommend a shotgun if you don’t have either of the previously mentioned (I use a Deicide with Grave Robber/12P, but it really doesn’t matter) The previously mentioned HEF build can also apply to Sentry, and the increased interaction with other team members would probably play better than the short time Invaders are near the team.
Counter Invading and Trickle Blocking
A Counter Invade is a great example of something you can do as a Sentry or Invader. After killing the opposing Invader, hop through your portal that should be open, and send it. One of the two enemies equipped to deal with you is dead, and the other may be recouping or trying to help their other teammates. Now’s the time to strike, especially if their bank is blocked. Pick the Sentry while they’re distracted, and now you only have to deal with a scared Killector and Reaper. This isn’t a guaranteed win, but is a pretty common situation. The average Invader shouldn’t have motes, so you should deny all of their motes. This also gives your team around 8-10 seconds of bank drain, and the other team scrambling to unblock and bank to invade.
Trickle Blocking is pretty much what it says on the cover. Trickling lower level enemies on top of one or two large blockers. Small Blockers have the ability to immunize other blockers, and can and will be a huge nuisance when your Invader goes, or in prime phase. Stacking one Large, and a few Smalls will keep them busy for a bit. This can be done as a reaper every wave if you pick up 9, or as a sentry doing other things to keep busy. These are both great ways to occupy yourself as a Sentry if the bank is clear and the opposing portal is on cooldown.
Portal Opening and Cooldown Mechanics
The portal functions off two or three requirements to open.
- Having 25, 50, or 75 motes banked. The portal will open automatically if this is met, along with the cooldown.
- A short 10-15 second cooldown starts when your Invader deactivated the portal by returning to your side. After this, the portal is able to reopen.
- The other team got their Prime first. If so, your portal will open every 33-40% of the health they do. The cooldown also still applies, so don’t be surprised if you only get one or two if they boss bake. Be weary that the opposing portal opens if your team starts to lead in damage. An activated portal will always be notified in the kill feed, like a raid mechanic. The chat also displays if anyone on either team loses motes, and if an invader invades.
As a Sentry or Invader you should keep tabs on this. As a Sentry or Reaper you should keep an even closer eye and notice when an Invasion is soon, to protect yourself or bank to avoid losing motes. This is probably the most underrated mechanic, which is disappointing since it helps the majority of struggles you may have as a Reaper or Killector.
Double Special’s Benefits and Weaknesses
As you may have picked up on the fact that I recommended the use of two special ammo weapons. This is because the majority of higher tier players tend to use two specials for a multitude of reasons. Mainly, Having two specials increases the general chance to acquire a natural heavy brick, and generally increases your damage with either weapon. More heavy means more rockets for anti, more sword for prime melting, and faster waves. Reaper and Killector players also tend to rely on their melee and abilities for wave clearing (Synthos/Dunemarchers, Sunbracers, and Liar’s being top picks) for most red bar enemies, and only really use special for majors and wave bosses. This cuts down on the need for a primary, and allows faster overall wave clear time.
The negative of this, is just bad RNG. If you happen to run out of ammo, you’re kinda screwed. A typical work around is Heavy Handed, an Arc Charged with Light mod that produces special ammo for Shotguns and Fusion Rifles when you get a kill with it while surrounded. Another is Extra Reserves, which has a chance to spawn a special ammo brick when you get a void energy kill while Charged with Light (If you run this, Telesto and Nezerac’s Sin with top void Warlock and Particle Deconstruction is kinda nuts). An extra guarantee is Special Ammo Finisher and a Scavenger of your matching weapon (ex. Shotgun Scav), Special Ammo Finisher grants a special ammo brick when you do a finisher, for 1/10th of your super. Some supers don’t really do too much reaping wise, and may be better off for just granting ammo. It’s up to you for the most part.
Managing and moderating special usage is the key to double special, and is a great and simple way to boost your Gambit gameplay. If you take nothing else away from this, please try to use double special ammo.
Wrapping Up and Reiterations
As a few final words, I’d like to encourage both you the reader, and anyone you may think would enjoy themselves to play Gambit! As a player who’s been both at an absolute worst playing, and playing with or against the best, I’d like to say that practice and gaining game sense through experimenting and introducing yourself into multiple situations is the best way to improve. I could go on and on about strategy and counterplay, tactics and the most ideal and meta loadouts, but it’s all up to your personal mechanical skill and preferences to be as good as you’d like. I hope that this helps you improve, look out to better your gameplay, and achieve what you want!
At the end of the day, Destiny 2 and every other game is well… A game. You should enjoy yourself, whether that be playing with your friends and goofing off, or sweating your heart out and getting some crazy 100 game win streak.


Be the first to comment