
Useful Tips to Start
- When trading with NPCs, pay attention not only to the type of currency, but also to the size of the discount (on the upper left of the icon)
- Prosperity levels can be increased not only with special items, but also for gems. In the “Honey Tavern” building or by clicking on the plus sign in the Prosperity window..
- When sending units to the resource point, the game itself makes the optimal speed of extraction of the unit. But does not look at the size of the troop, and therefore the load of this troop.
- Building the “Yard” also gives 1000 experience to the hero, whose “board” you choose.
- The zZz icon that appears above the builder’s hut indicates that one or more of the builders are free.
- Golden (Seasonal) workers can be upgraded. When selling a seasonal worker, the player receives a special coin with which to add stars to seasonal workers, increasing their % bonus.
- After building “Village Hall 15”, the construction of special statues that increase the damage of troops is opened.
- Double-clicking on the troop icon will highlight all “free” troops on the map.
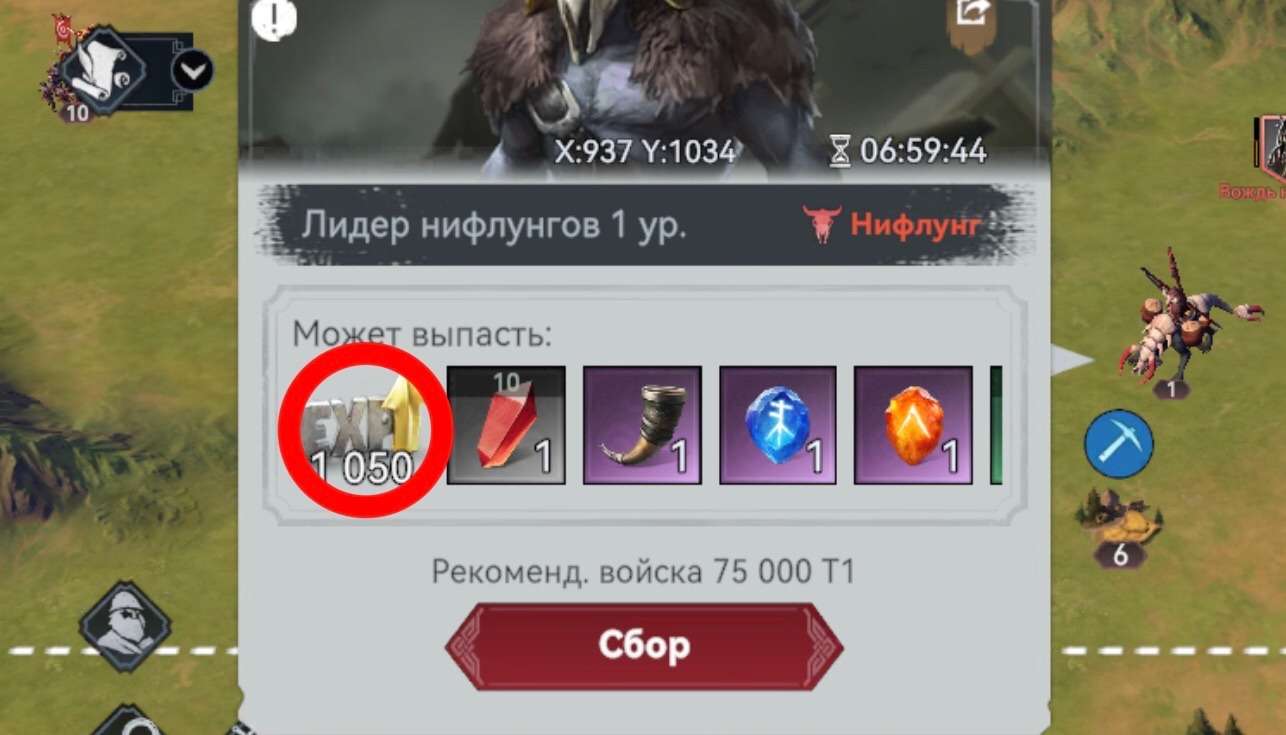
- Each troop participating in the battle receives its own rewards. So 3 troops will get 3 rewards for fighting one Niflung.
- On the bulletin board sometimes there may be a task with a wolf icon, to kill monsters within the village. Attacking such a monster costs no energy, so you lose absolutely nothing no matter how many troops you attack it with (multiplying your kill reward)
- In the “Manage Town” window (the green arrow below the icon) you can move your town over the tribe’s territory once every 3 days for free.
- This window also shows the current season. Seasons affect the extraction of resources, increasing the extraction rate by 10%.
- Starting special materials (paper, rope, etc.) for orders in the construction of the “Workers’ Camp” can be collected in excess. Before completing a task, send workers to collect materials, even if you already have them.
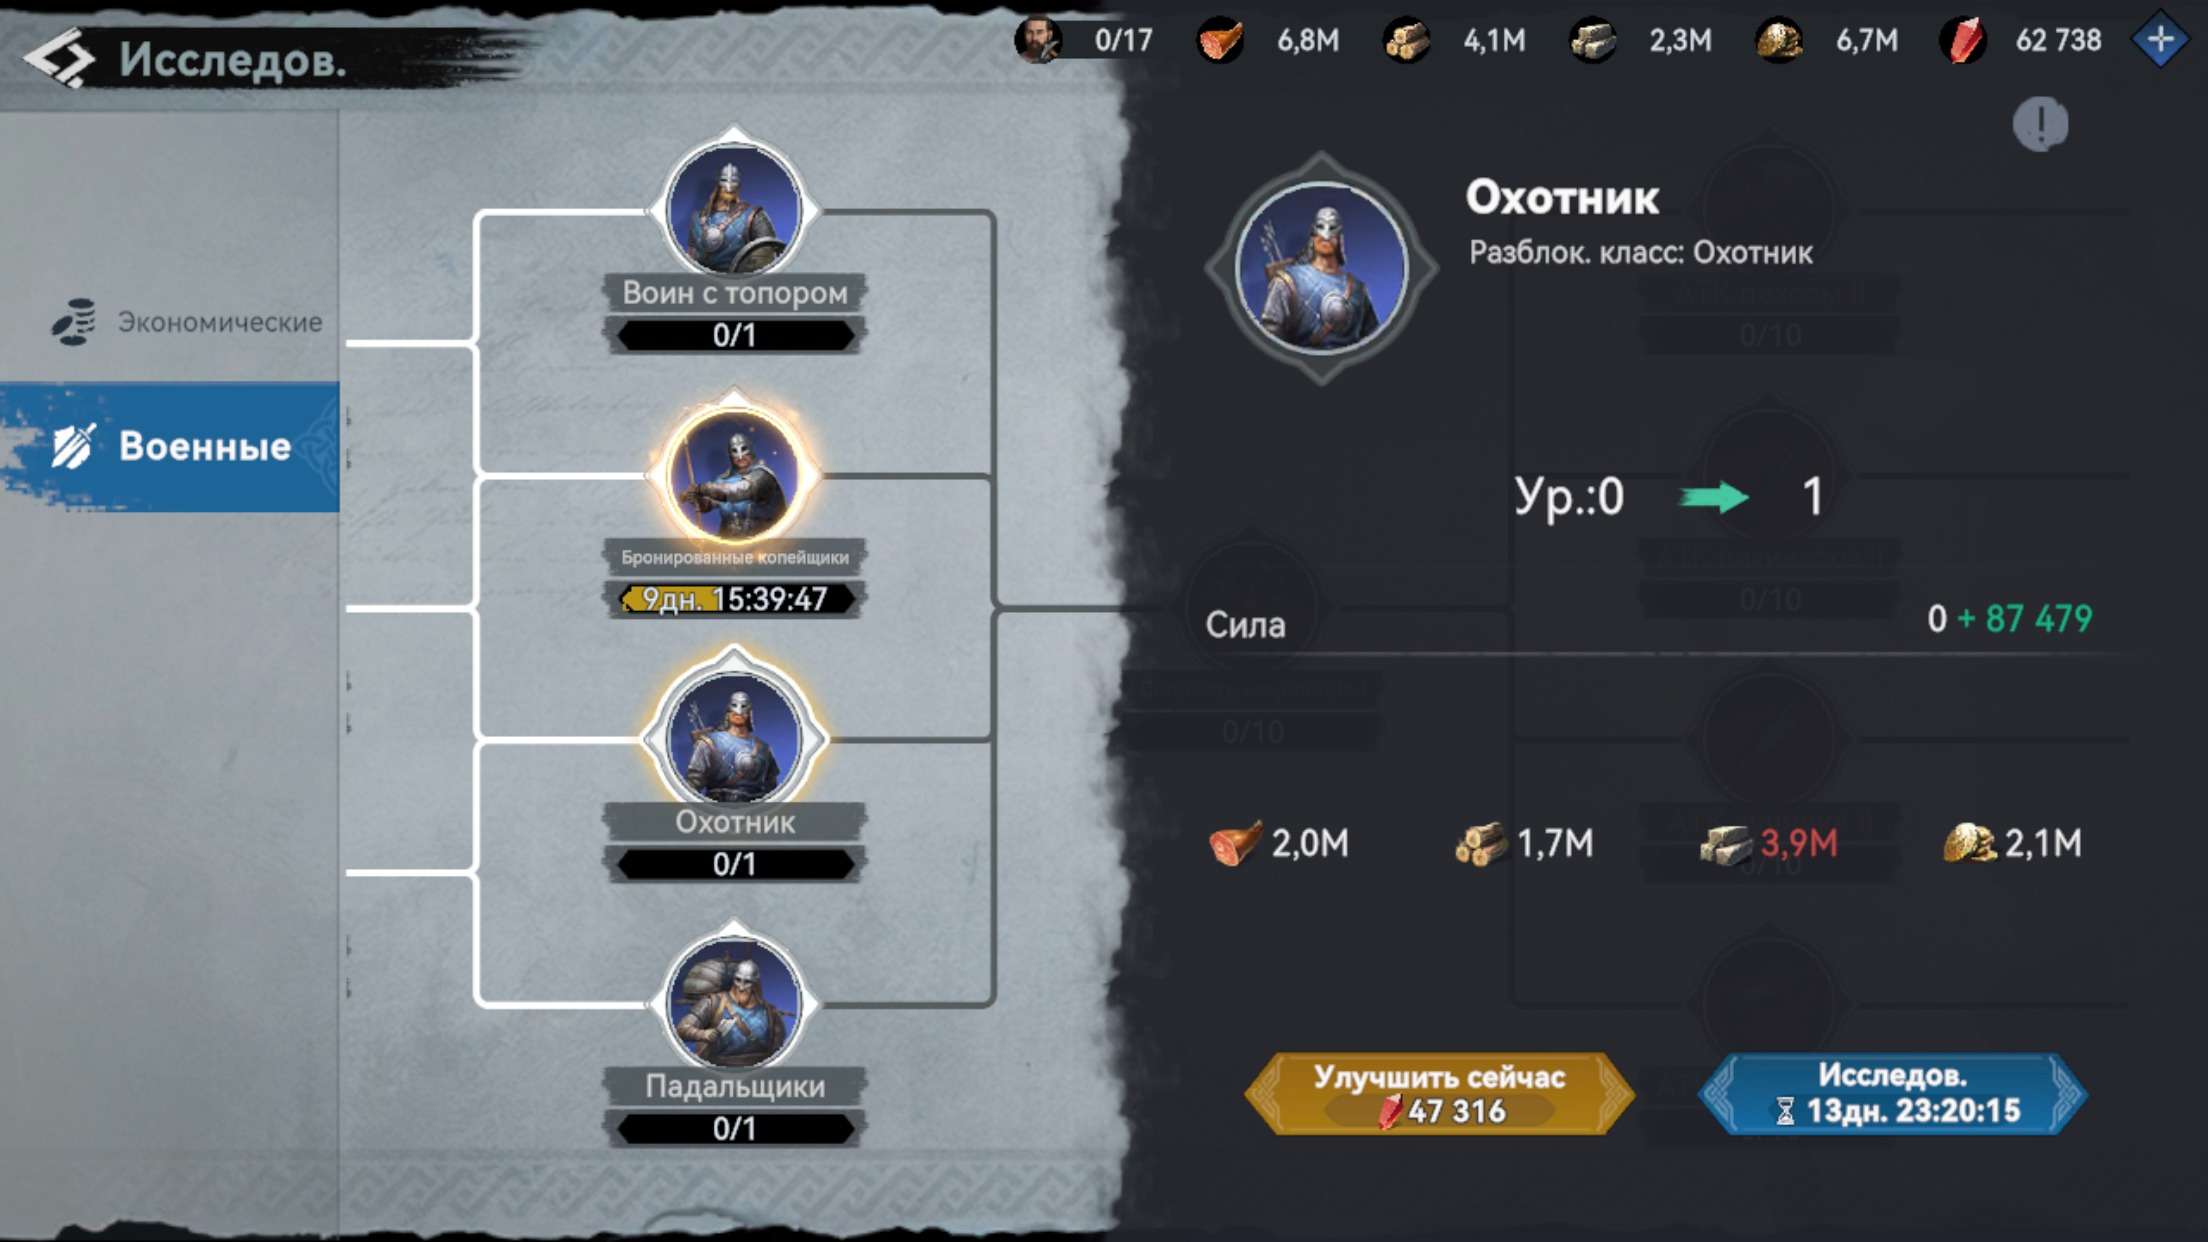
Hero Experience Guide
Hero experience is what you use to level up your hero, increasing his strength and troop capacity. Let’s figure out how to effectively gain a large amount of experience for 8 heroes at a time on a daily basis.
Part 1: Heroes. Level. Experience
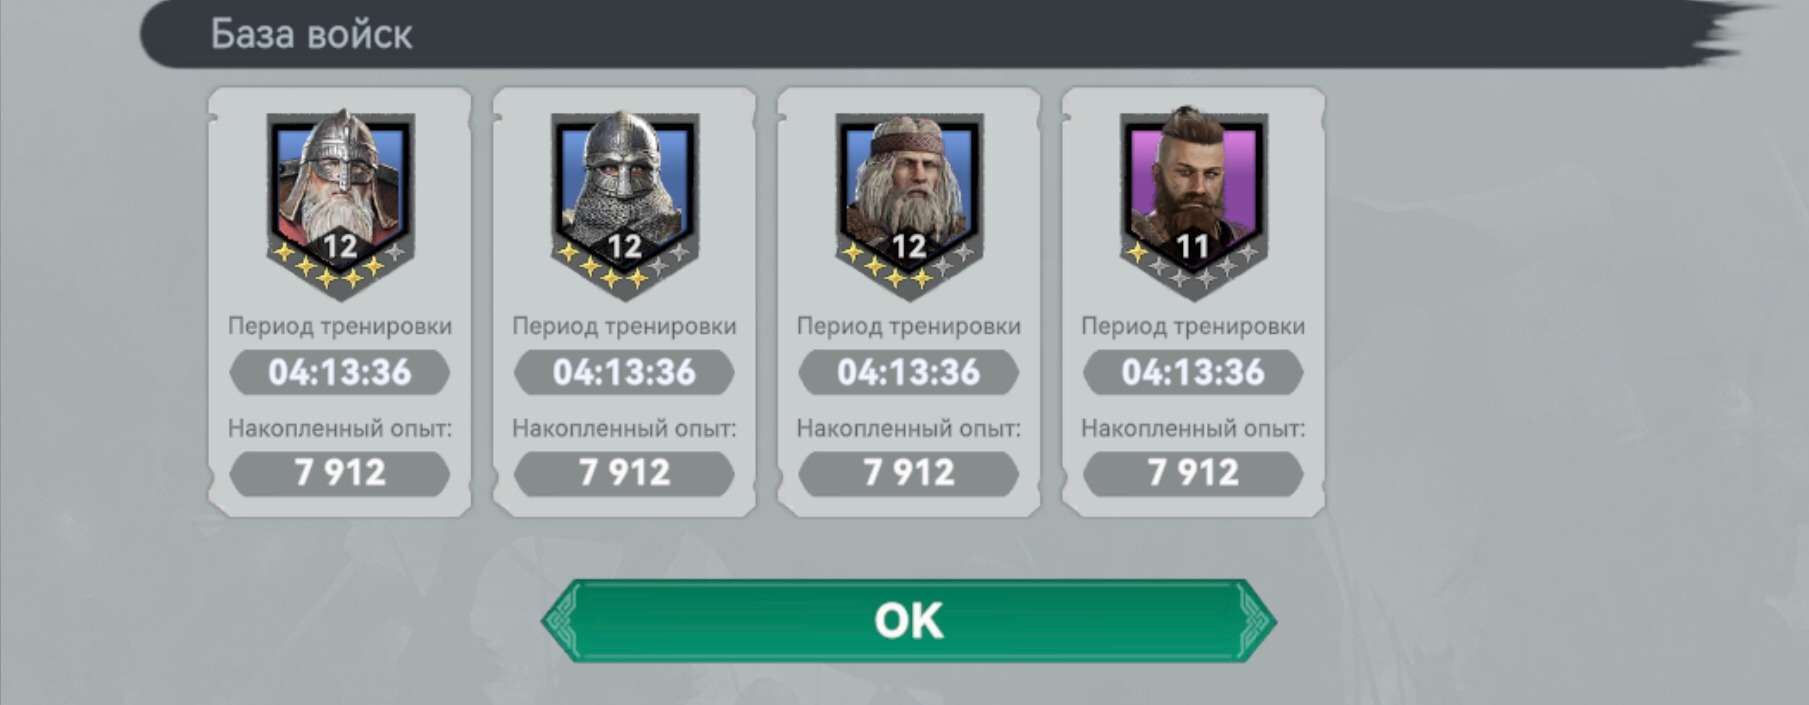
Having trained in the game, you know at least 2 ways to level up a hero. The 1st way is to send heroes to the base of troops, where they are trained and gain experience 24/7.
The 2nd way is to roll heroes in the “call of heroes”, with a chance of dropping out experience books.
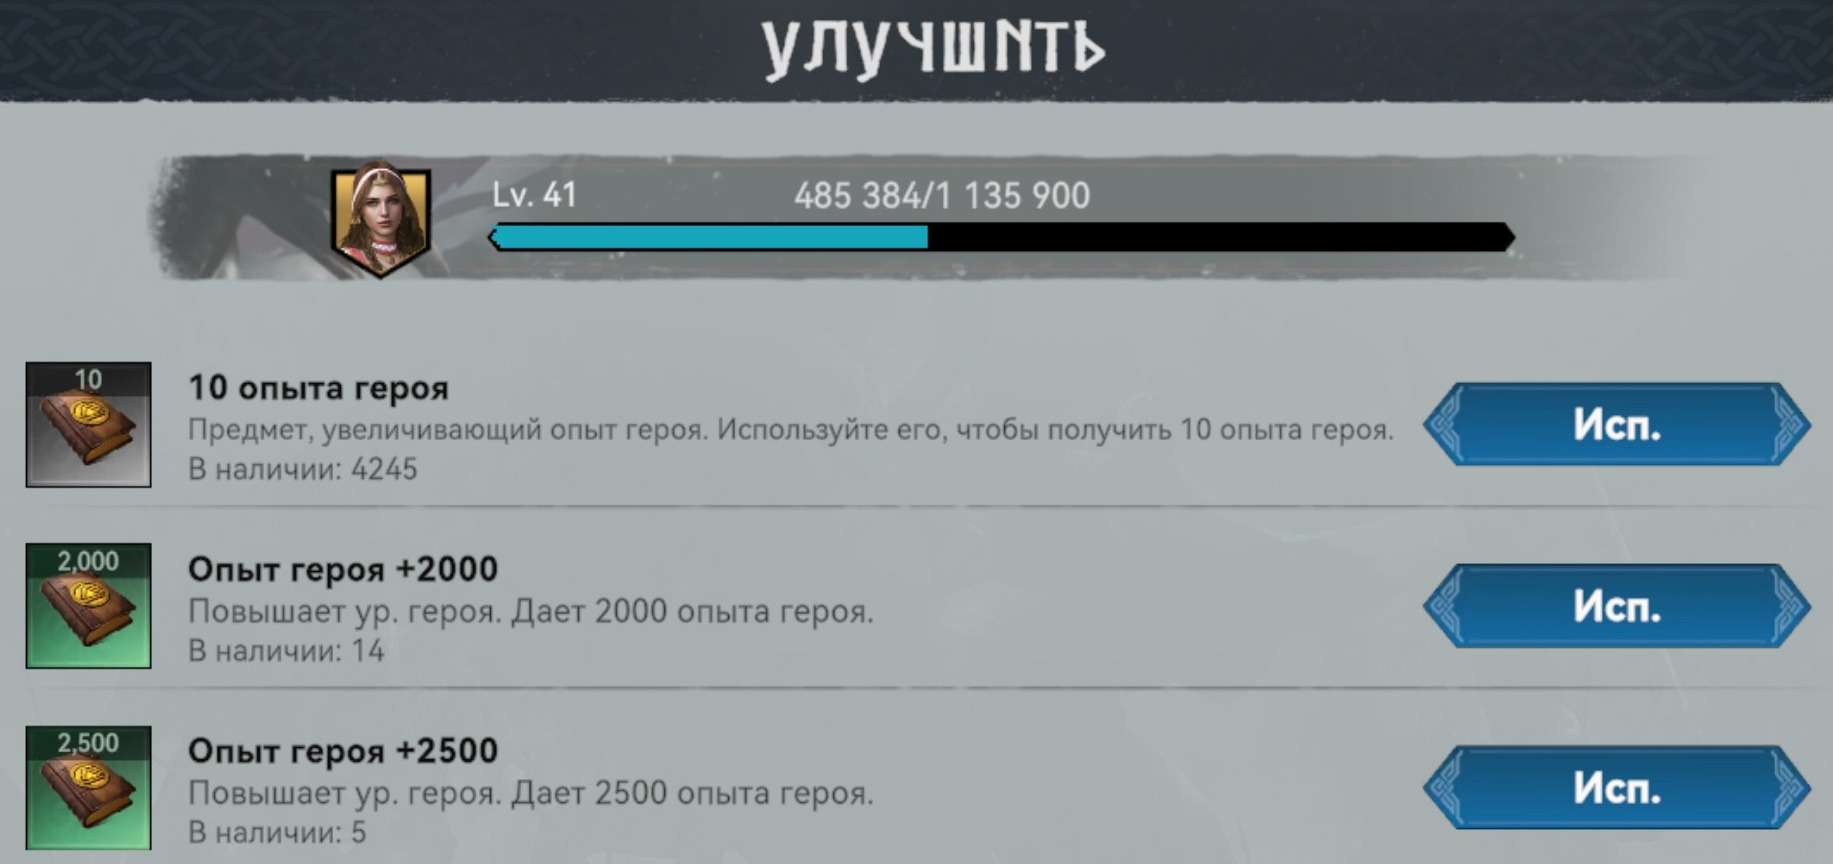
Up to a certain stage of development in the game, you’ll think that this is enough, but when you realize that to increase 1 level of the hero, you need more than a million experience, you have a question – “What to do? I’m are going to answer it.
Part 2: Variations of Experience Farming
There aren’t many variations, but one way is the main way – battering living! Our zoo has an abundance of turtles, octopuses, monsters and so on. Killing them gives you a lot of experience.
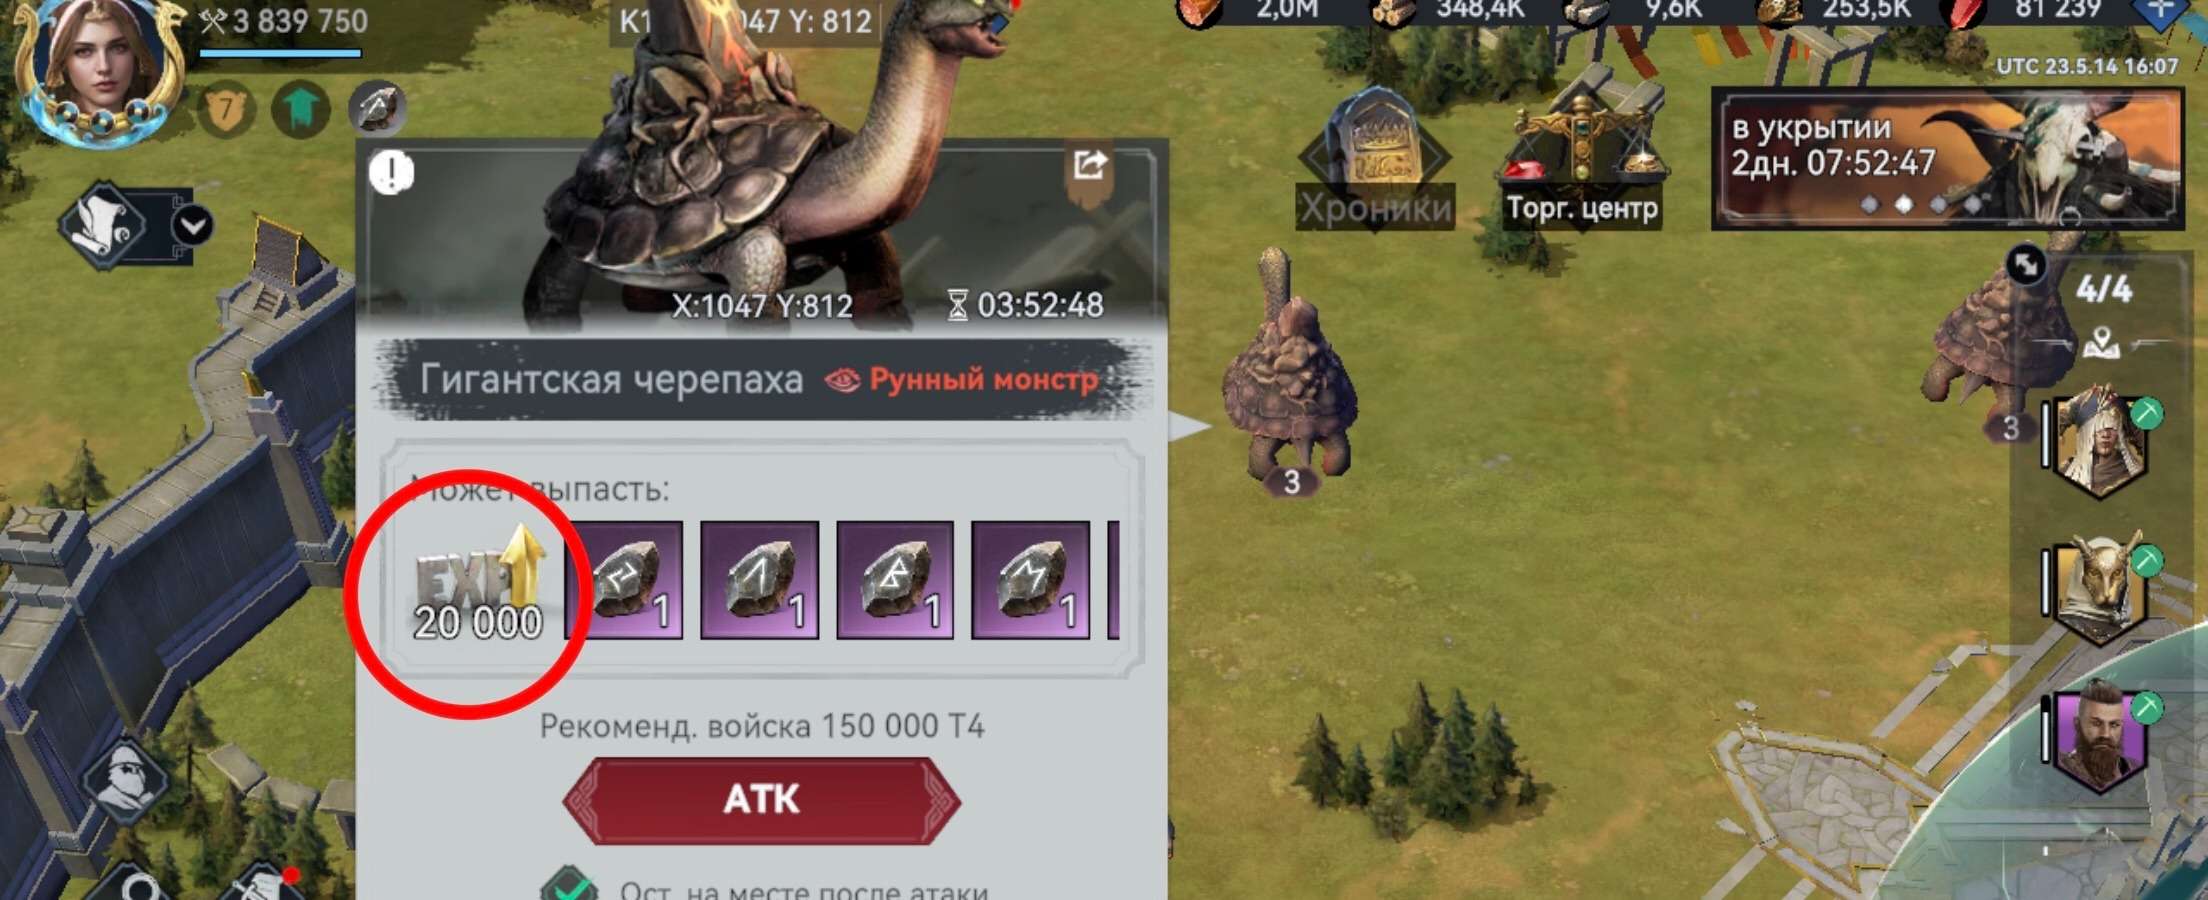
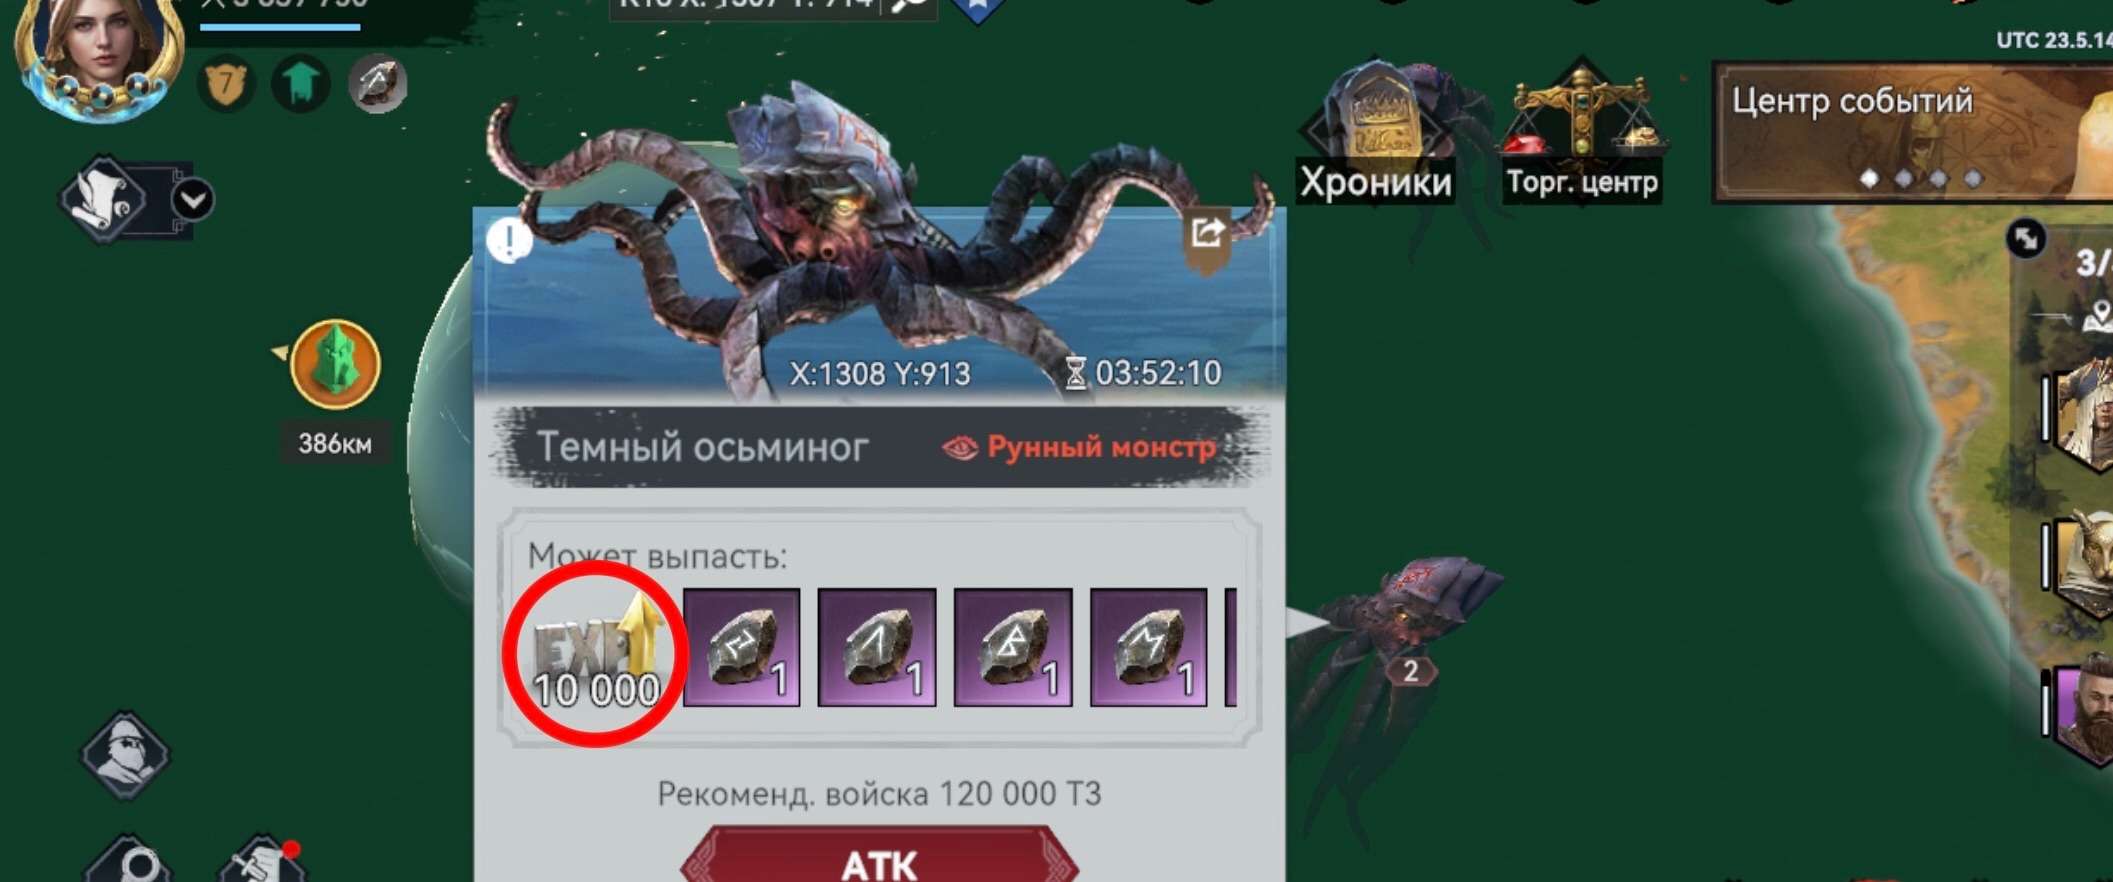
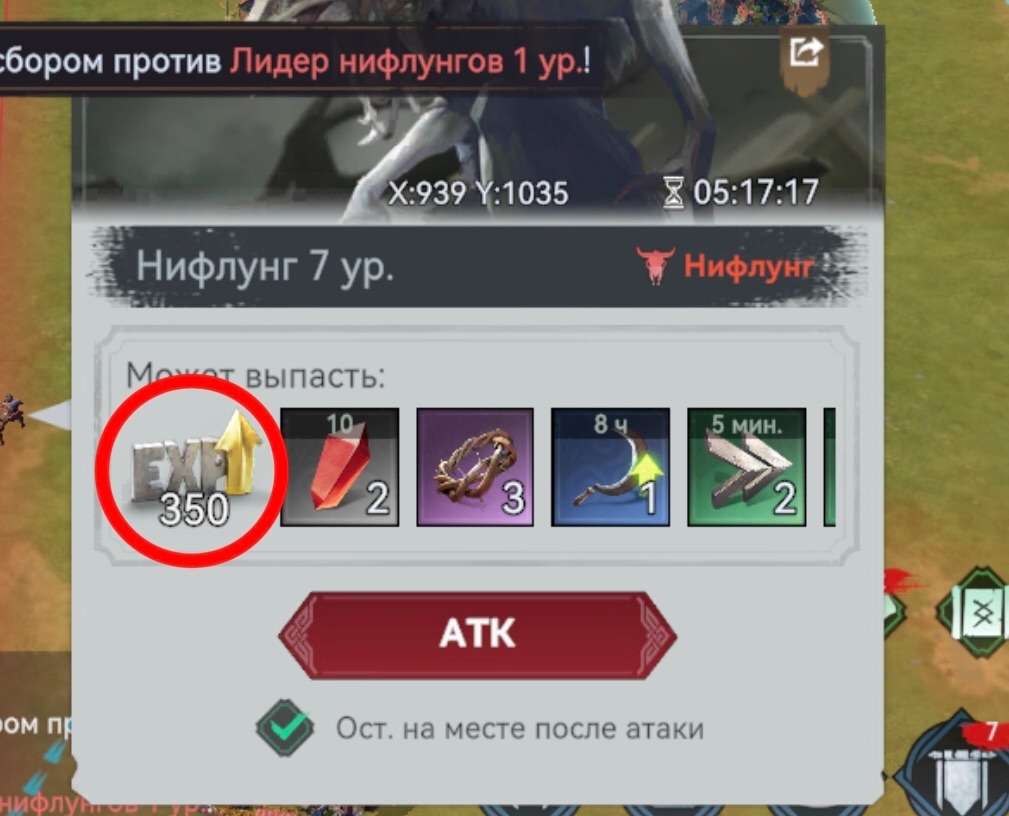
These are all rune monsters.
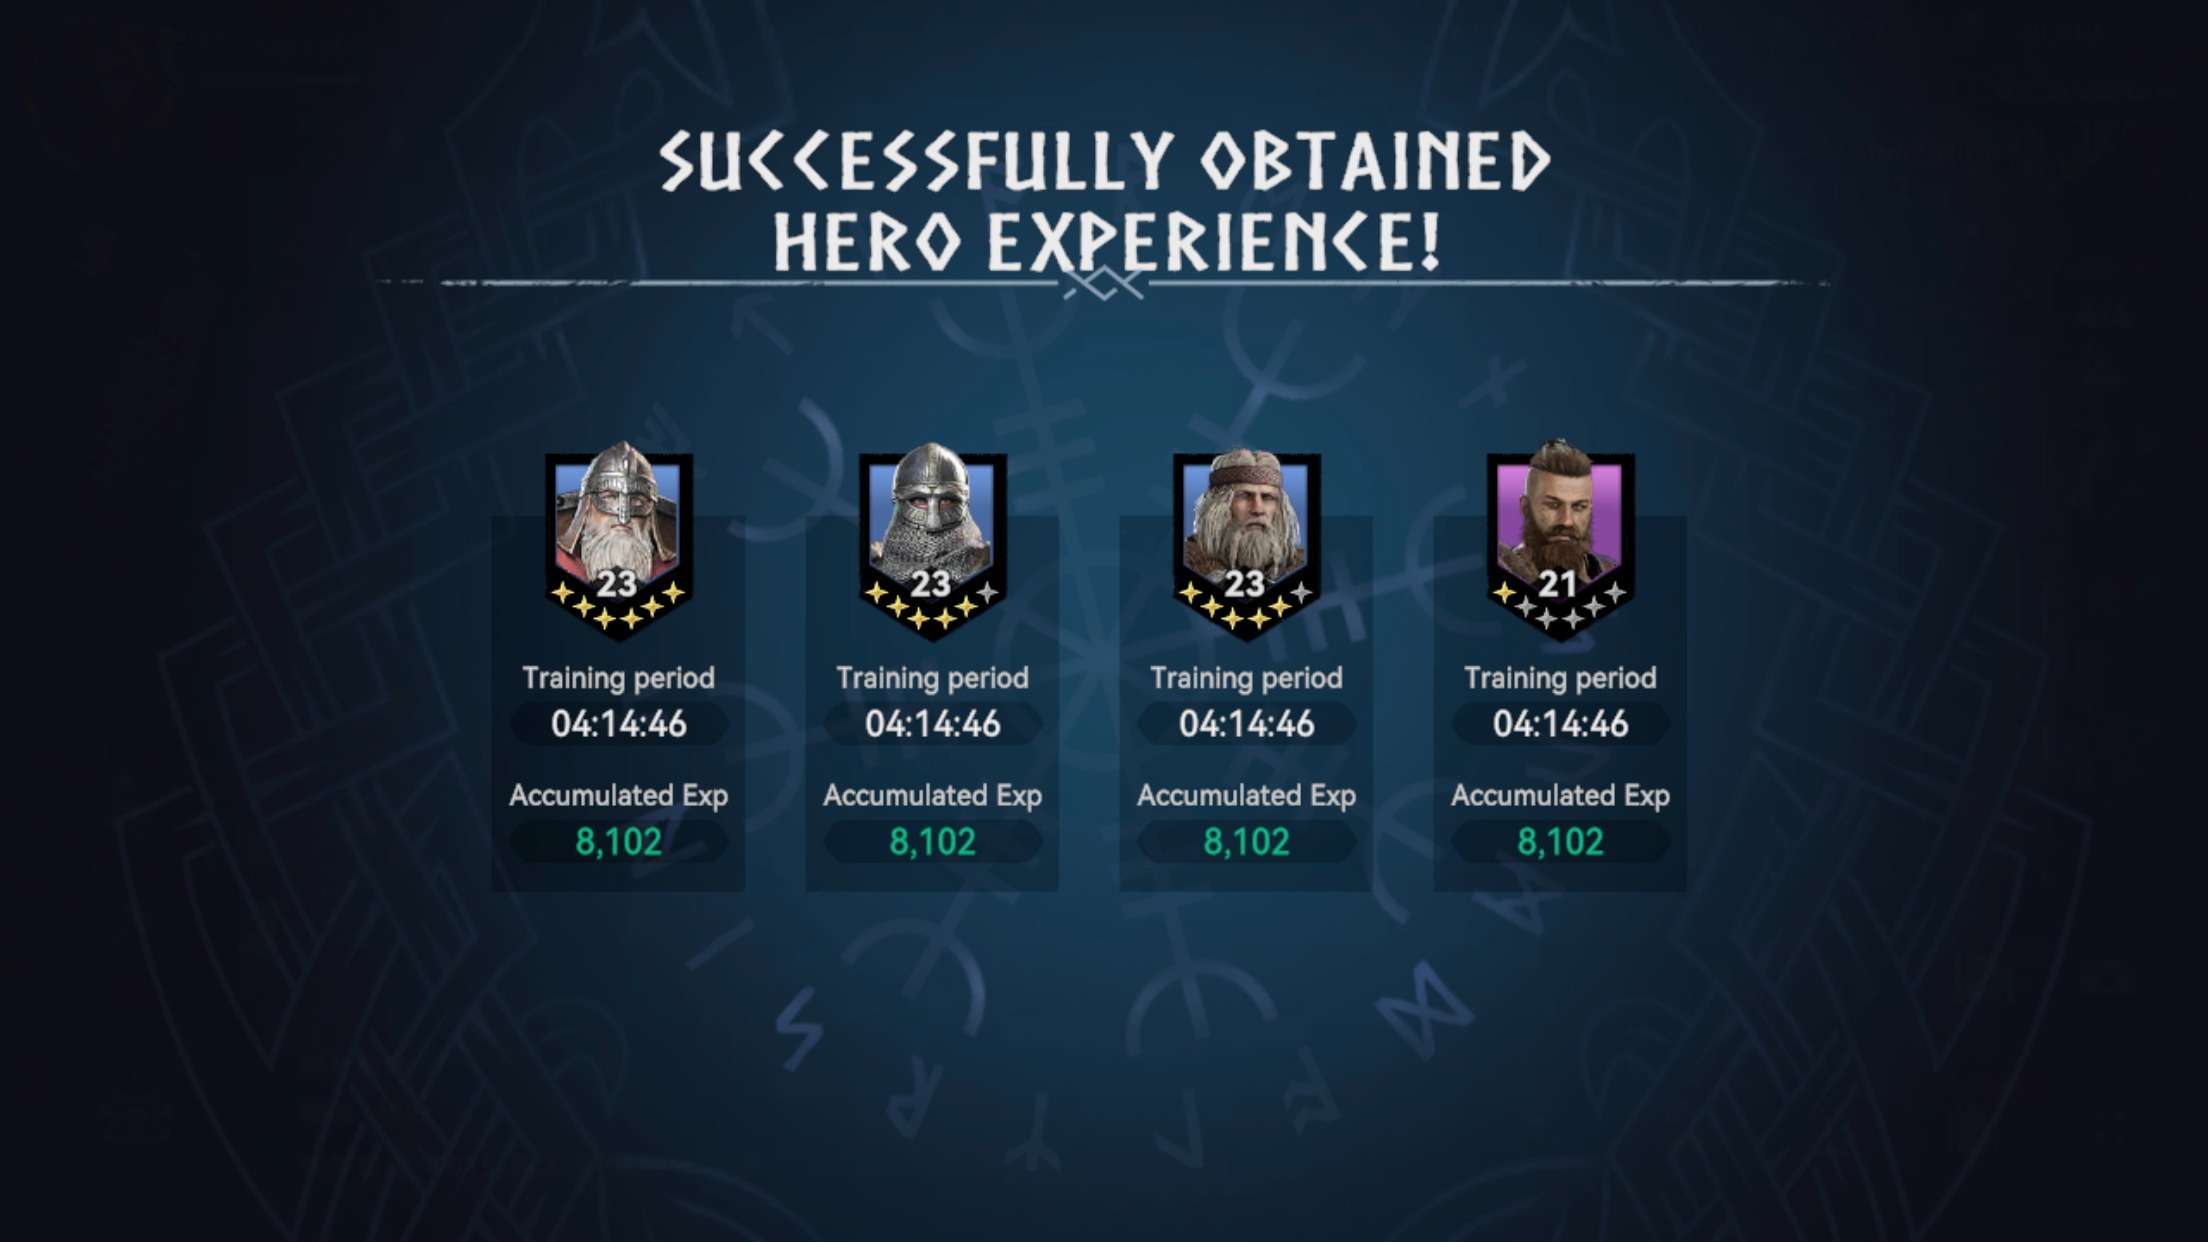
They appear 2 times a day: at 00:00 and at 12:00 UTC time. As you can see, if you kill this rune monster, your squad of heroes will get 20,000 experience each, both primary and secondary, also nothing prevents you from sending all possible squads, and then each squad and each hero in it will get 20,000 experience each. This is one of the game’s basic mechanics for earning hero experience.
You can also get experience from the monsters summoned from the forge. Just keep in mind that the experience you get only for the first 5 monsters you kill, then you will receive only the usual rewards.
So I advise you on rune monsters to go to the whole tribe, so your development will be faster, and on the monsters of the smithy selectively. It is desirable to call from 4 star monsters and call your comrades from the tribe, they can also get experience for your monsters, but taking into account that it is one of the first 5 monsters on his account.
Part 3: Runes
In the process of killing rune monsters, you will receive various runes. There are several of them:
- Gathering Speed (General).
- Gathering speed of stone/tree/gold/yed.
- Healing speed of troops.
- Increase of march speed.
- Experience of heroes +%.
- Increase of troops atk.
And maybe some other enhancements I might have missed.
We’re interested in hero experience at the moment, and by happy coincidence we get a rune from the 1st rune monster for as much as +10% hero experience. We immediately pick it up and attack other monsters with it.
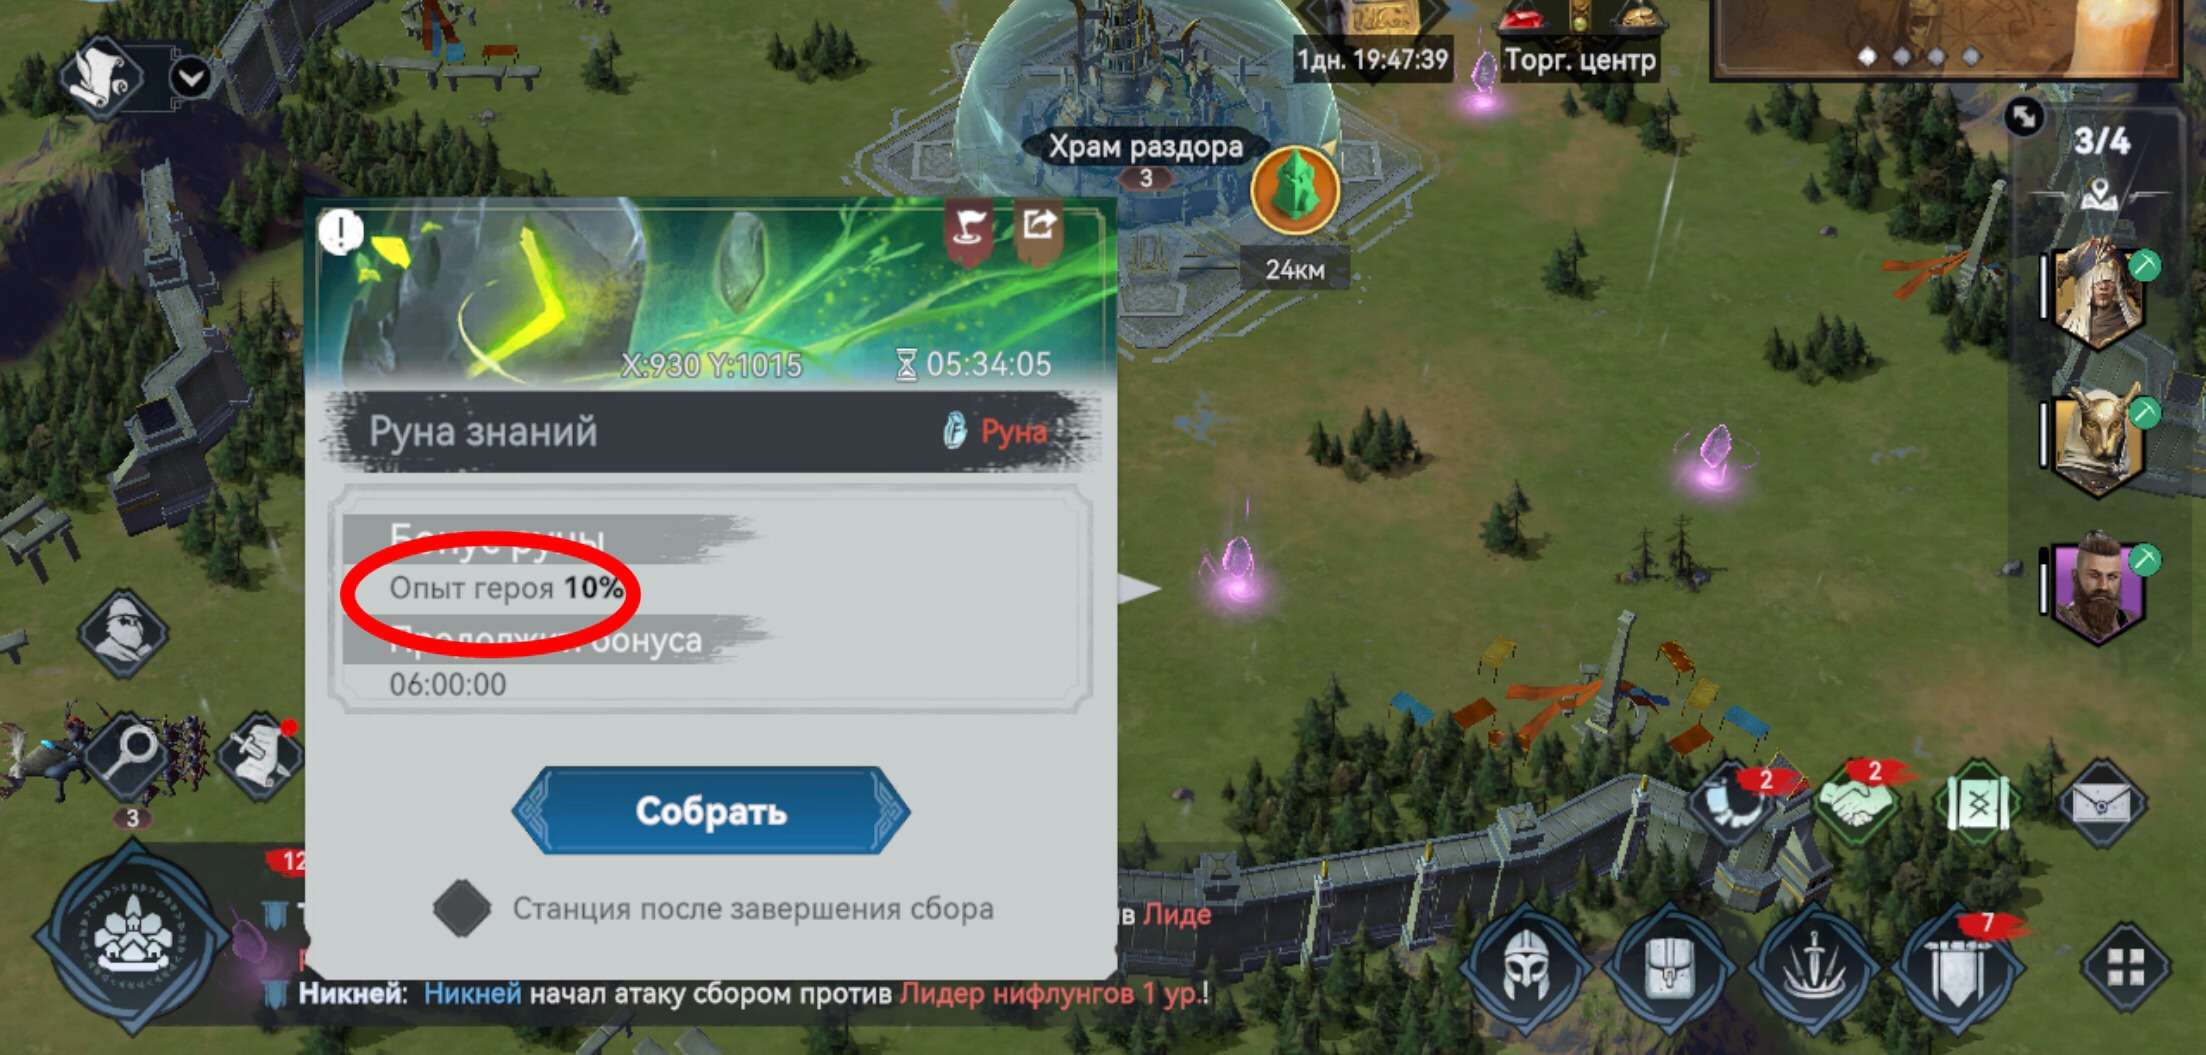
Important! The runes do not stack with each other. you can only pick up 1 rune. Remember this!
In total, for 8 turtles, I got 160.000 hero experience. This is only for 1 hero, and multiplied by 8 (4 squads of 2 heroes) total of 1.280.000 experience total, multiply this by another 2 and we get 2.560.000 experience for the day, total of 8 heroes. This is without taking into account that you can go to the octopus, beat niflungov and their leaders, well, and many other similar activities.
Keep in mind that the closer you are to the center of the map, the stronger the monsters and more experience. Do not forget to go to them every day, call monsters from the forge, go to the niflungs and their leaders, and then you can just gain a huge amount of experience
Part 4: Conclusion
That’s all, glorious Vikings. We’ve figured out how to farm ger experience the fastest way possible. I hope that this guide was useful for you.
Workers Guide
Workers are an essential part of your village. They take part in all processes that take place in your village: building, exploring, prospecting, mining crystals and much more. But how many people know that each worker has his or her own specialization? How many know that they can be improved and made more efficient? A lot, but no one wants to figure it out. So, let’s break it down.
Part 1: Where Are the Workers Located?

Workers are located above the construction button. Clicking this will take you to a large menu of workers.
Part 2: Parsing the Menu
You will have a total of 5 lines in front of you – these are viewing the workers themselves, the construction queue, ascension, dismissal and management of the village (we do not need this).
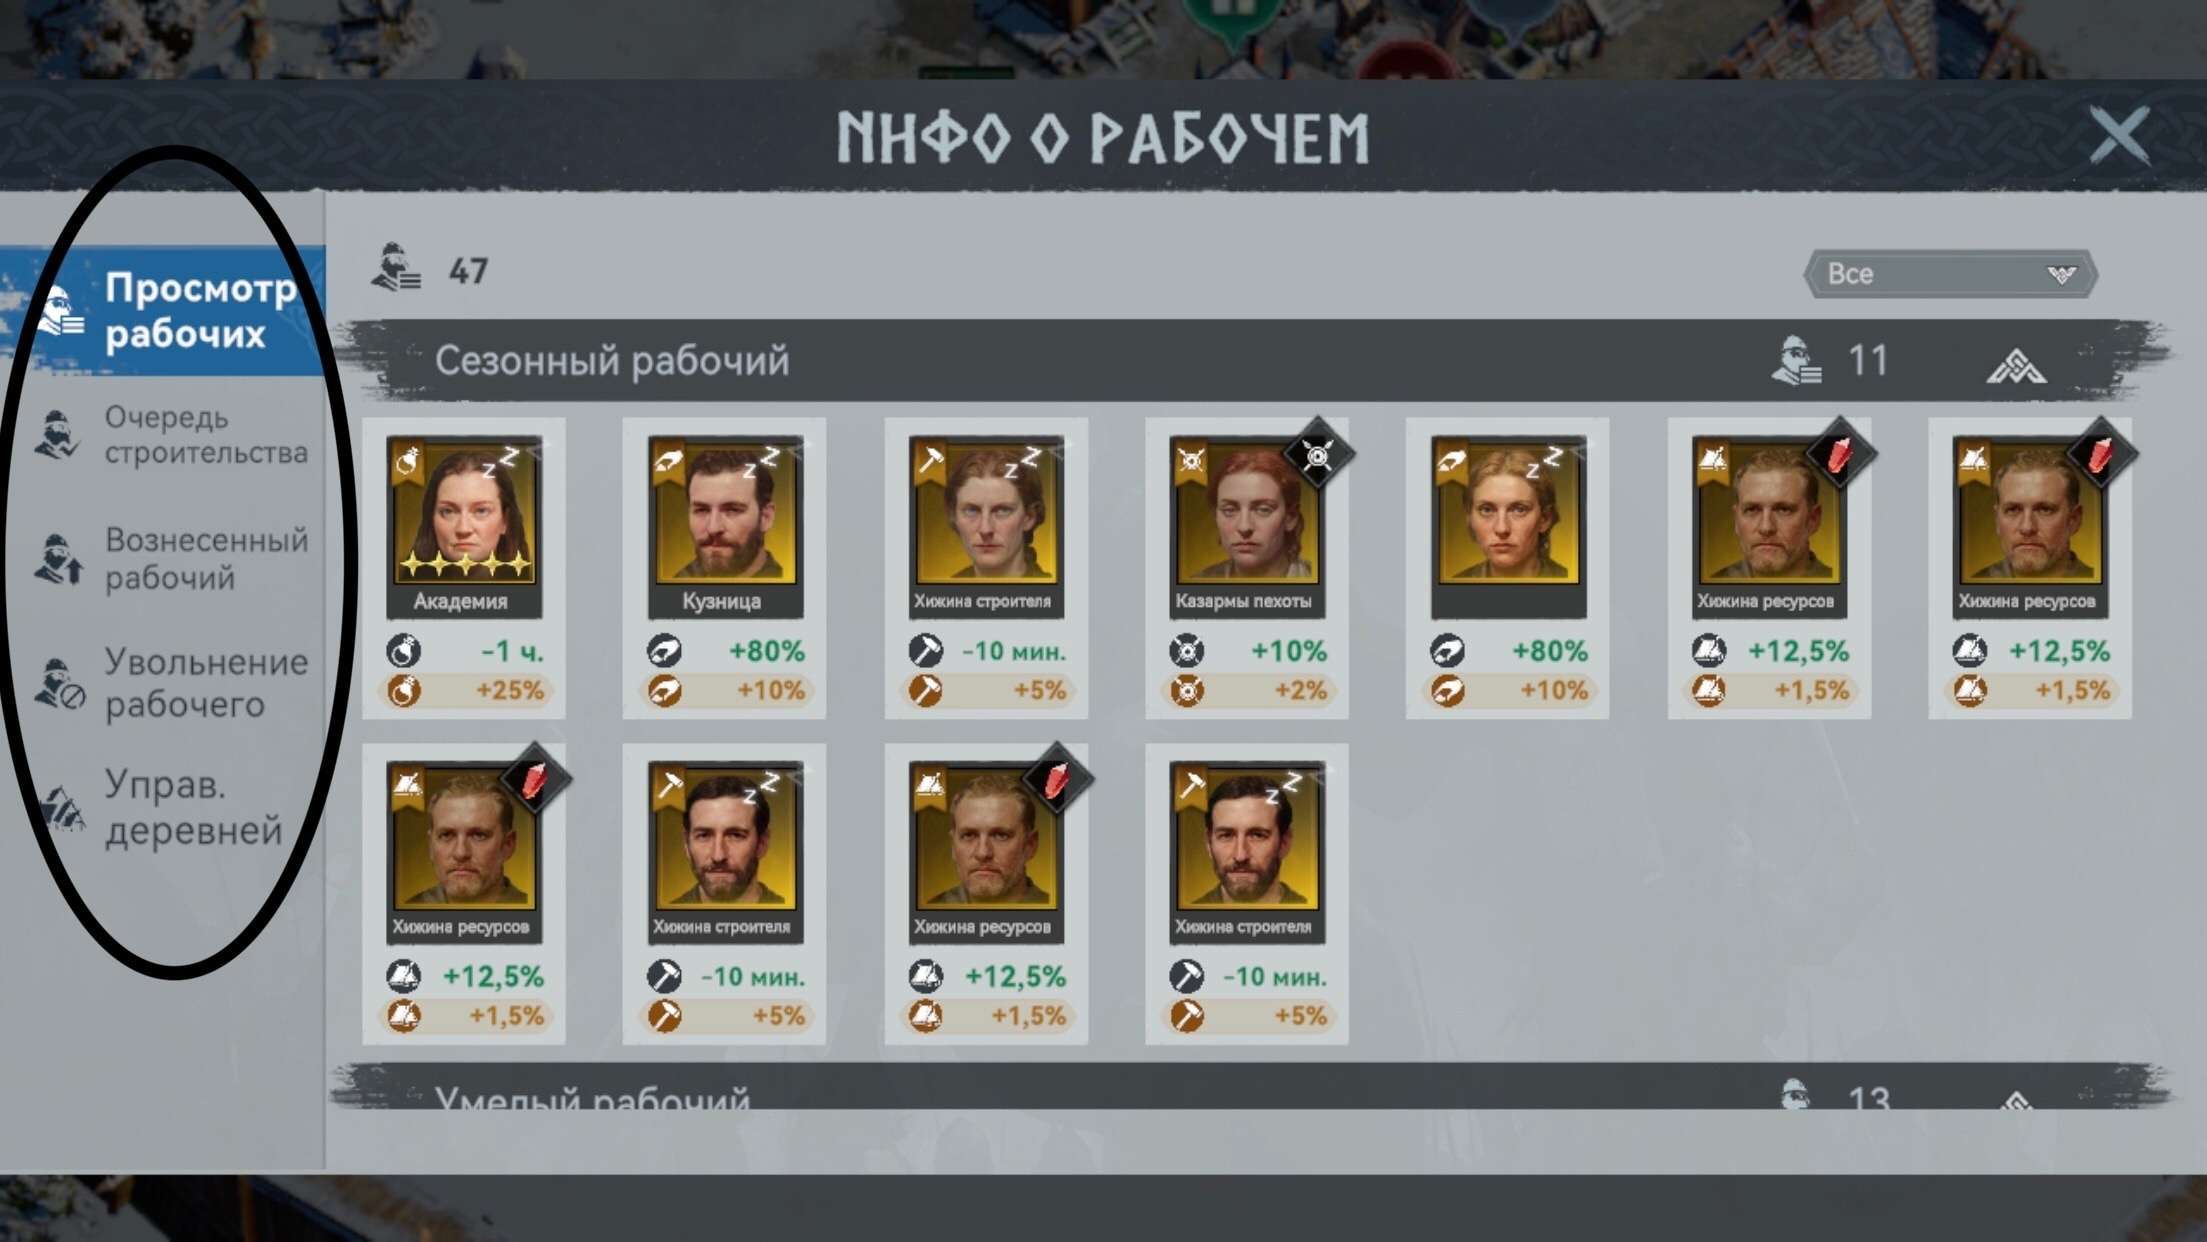
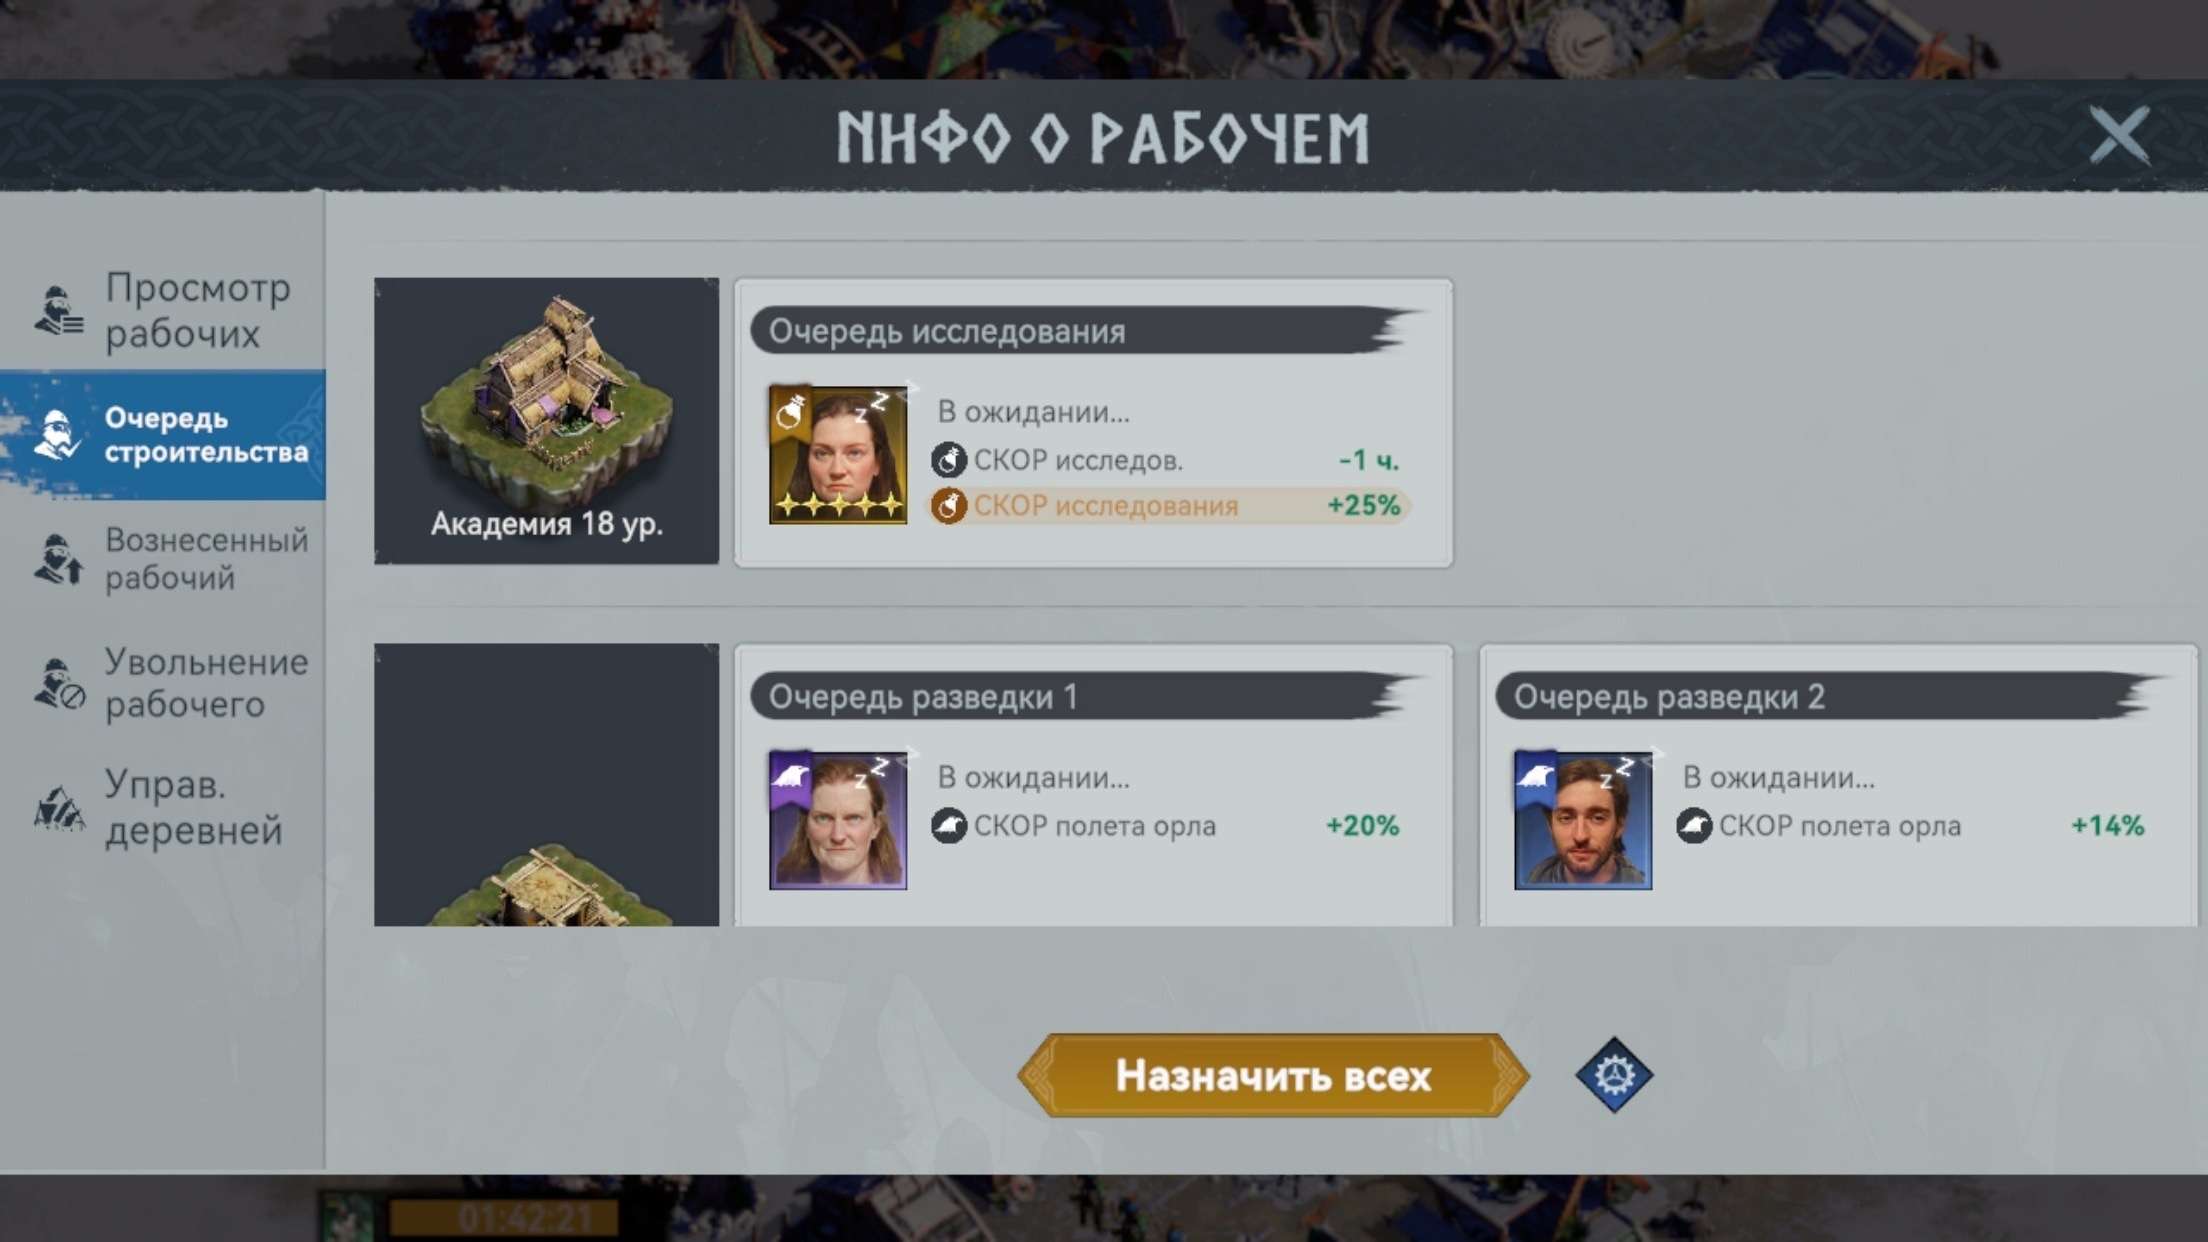

- View Workers – all your workers are located here, whether they are busy or not.
- Construction queue – here you can find the workers distributed to their places of work, as well as the places where you can put a worker.
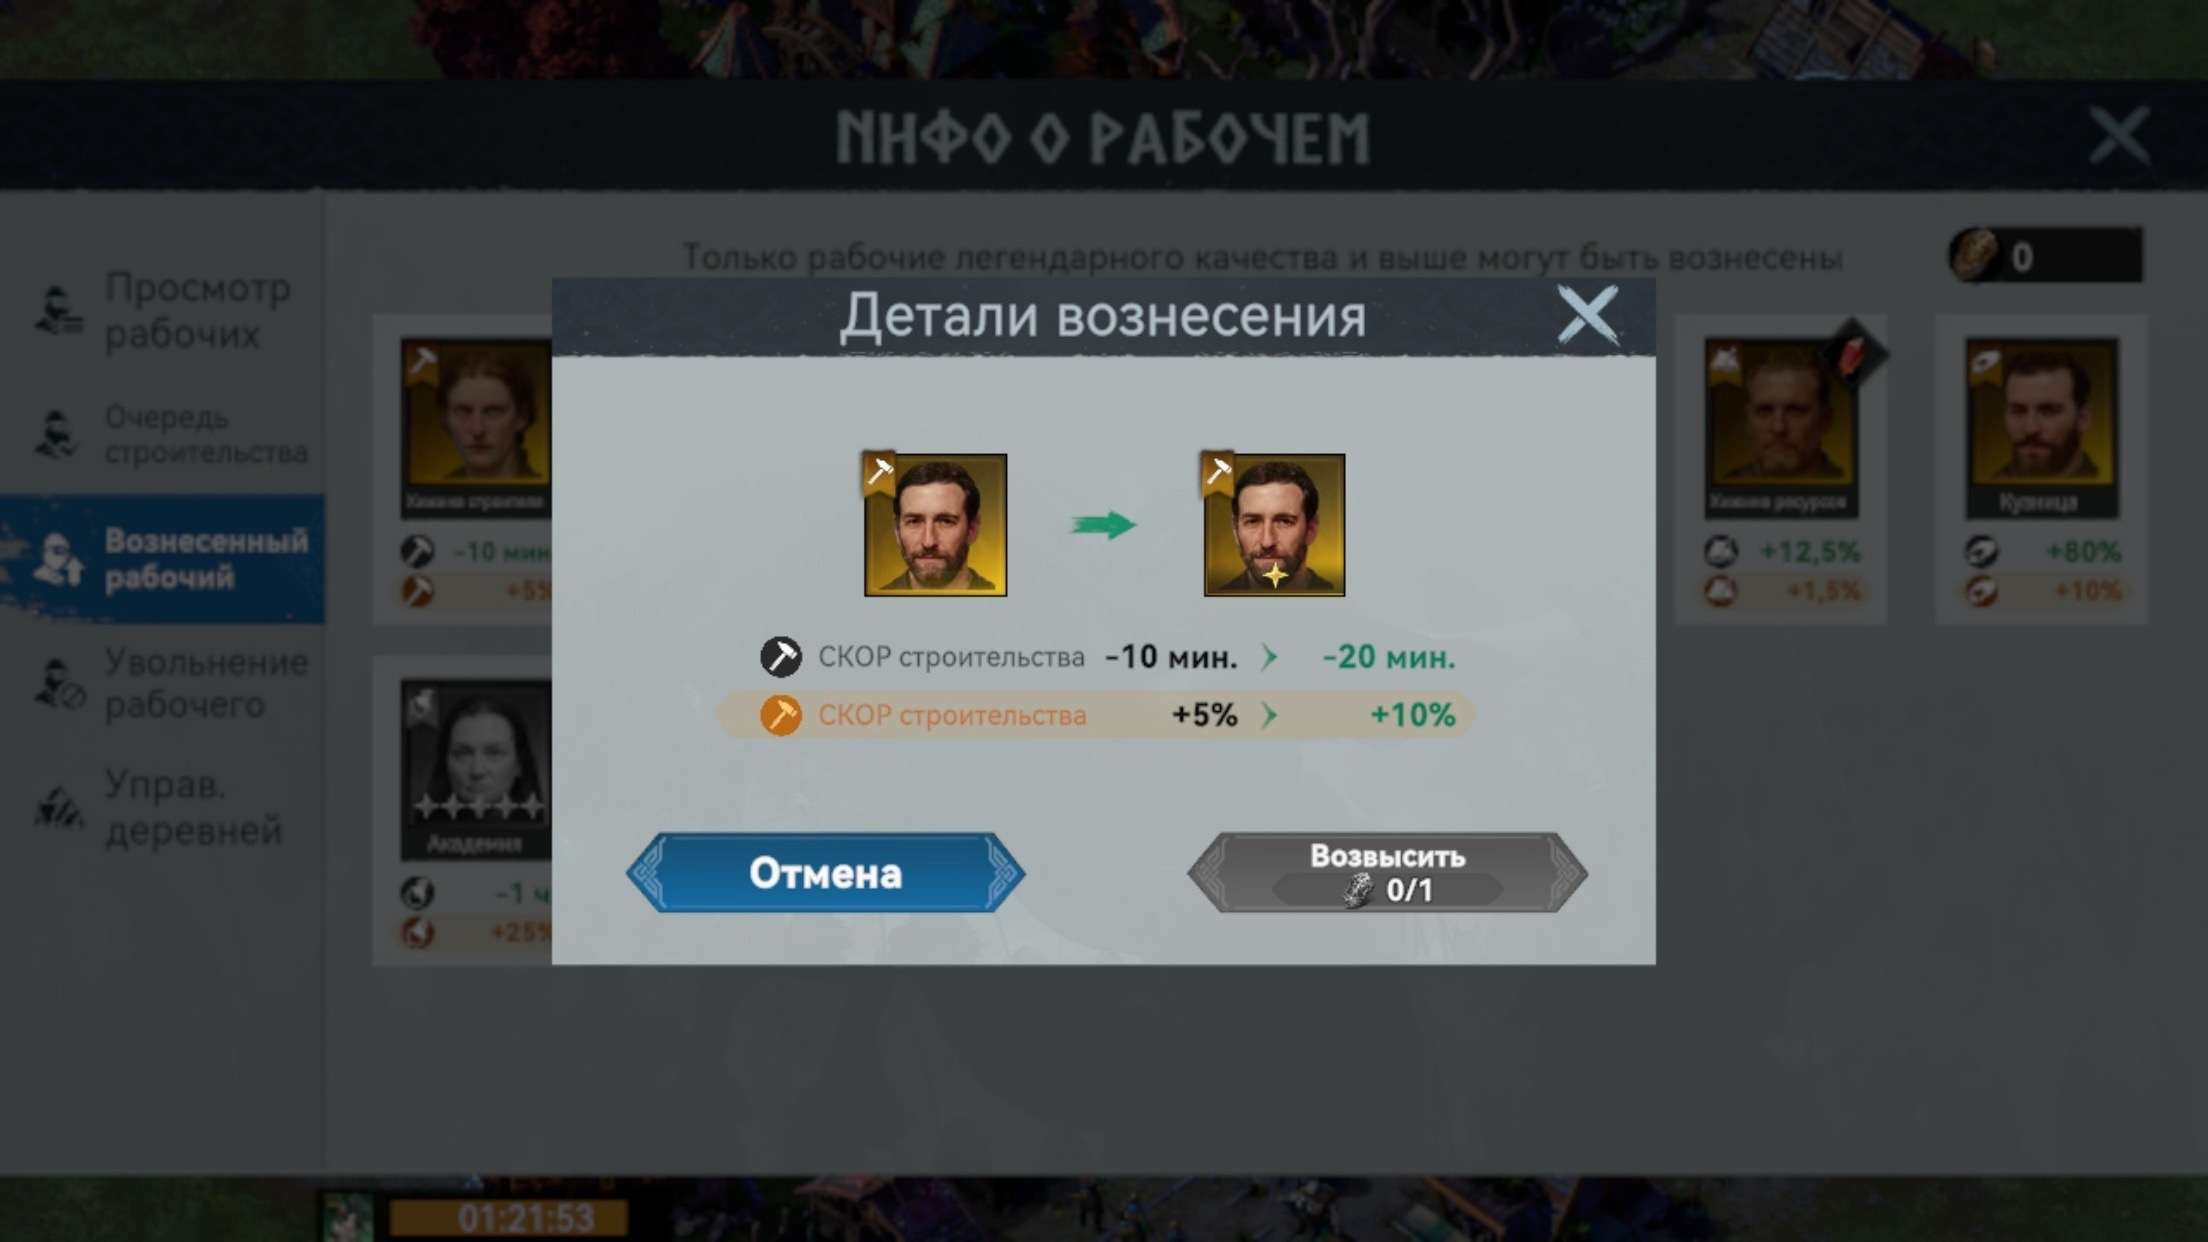
- Worker Ascension – the most interesting part. The place where you can improve workers (seasonal workers only) and thereby increase their efficiency. We’ll come back to this a little later.
- Firing a worker is the place where you fire unnecessary workers to make room for better workers or to improve seasonal workers.
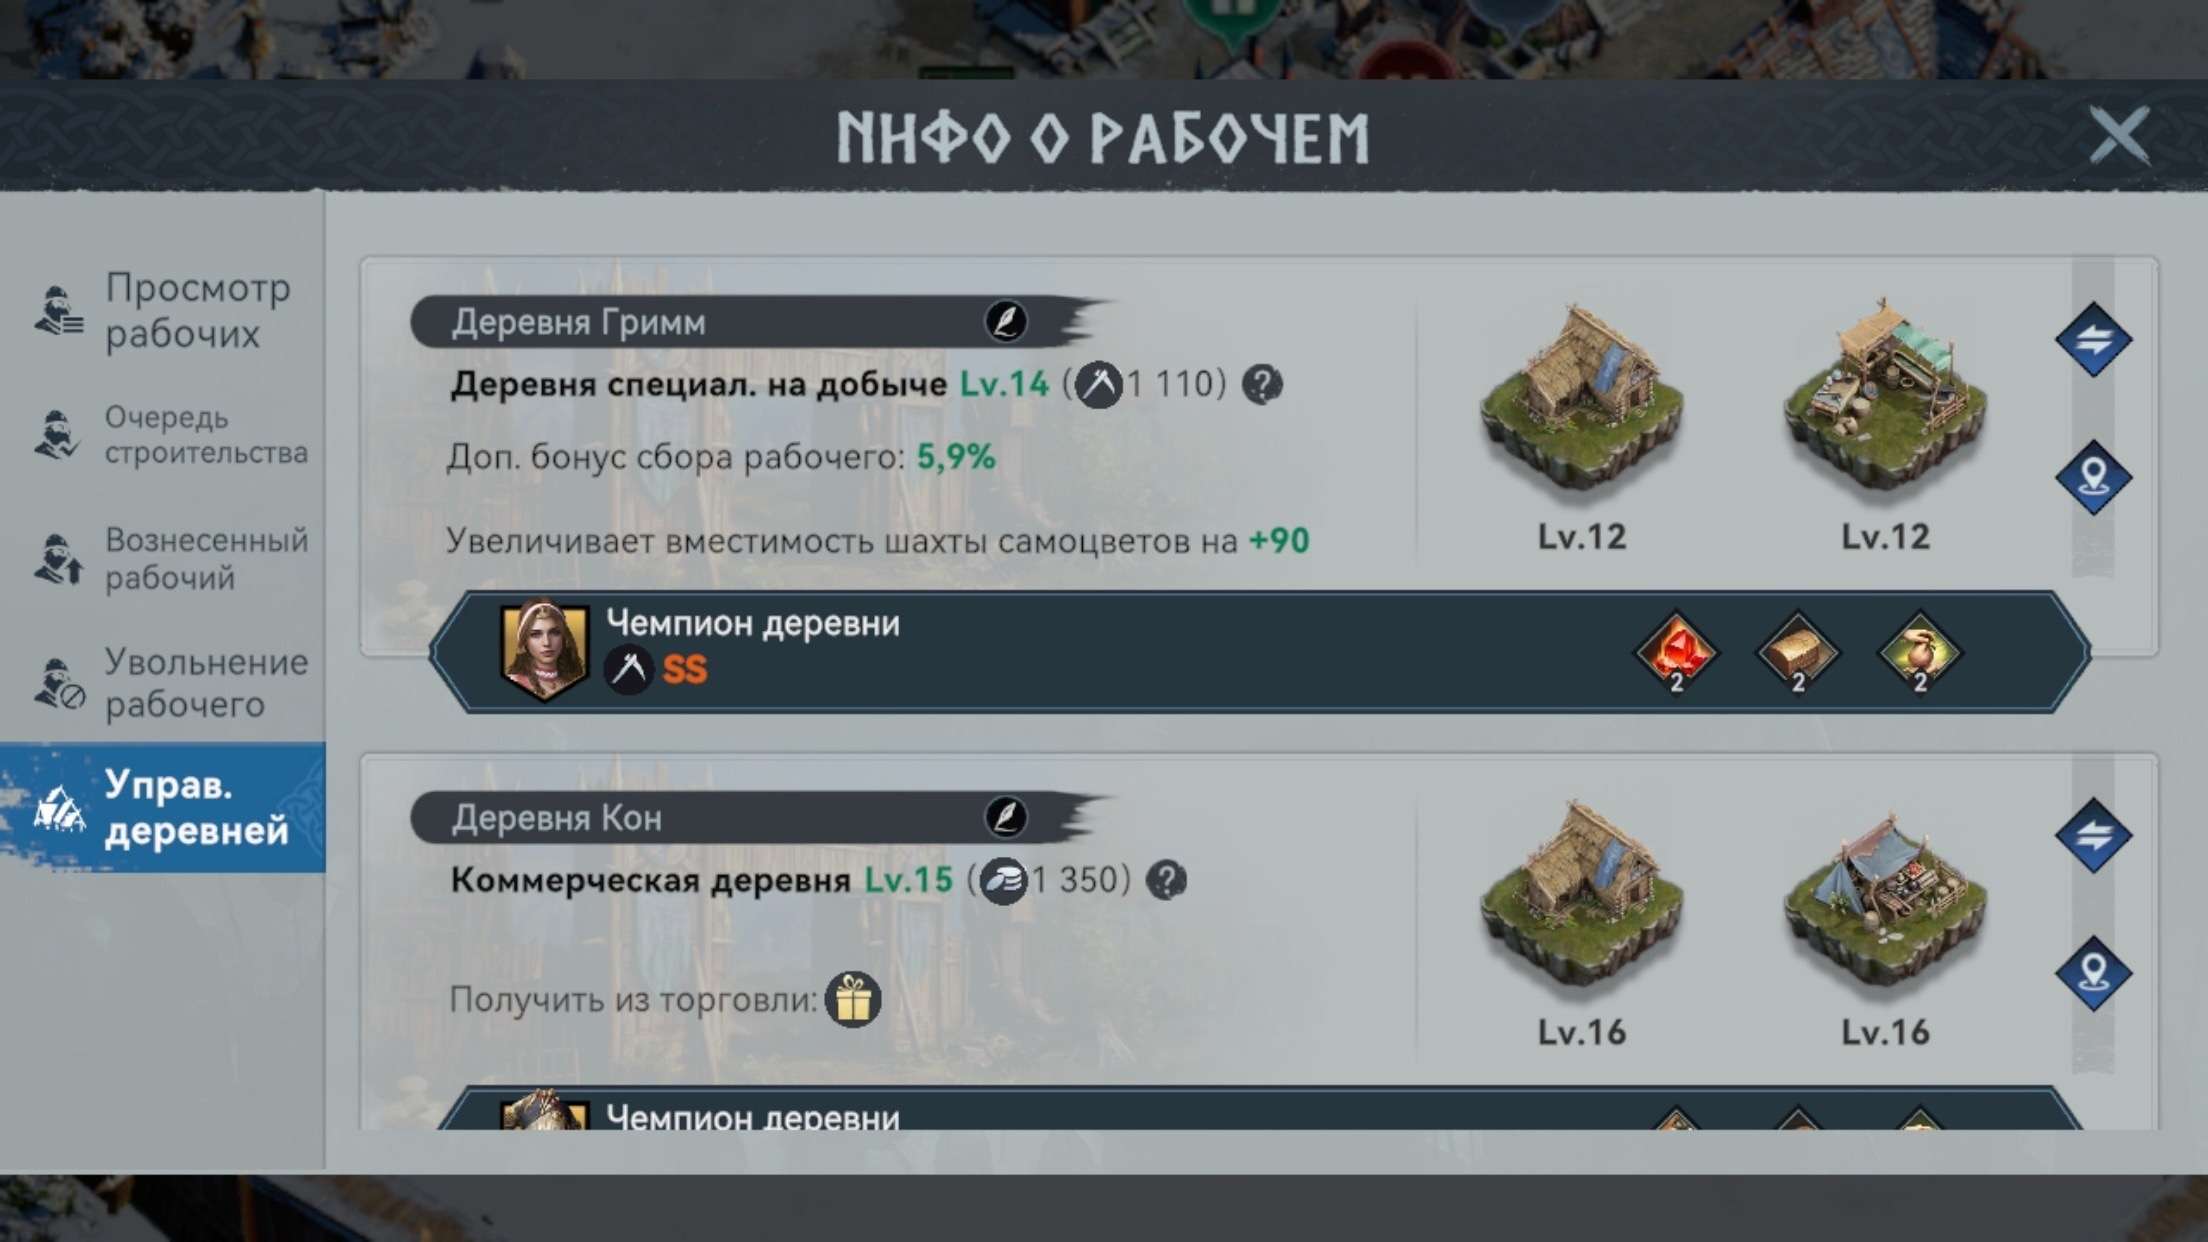
- Village management – the place where you choose to produce your village (we don’t need this for our guide)
Part 3: Building Queue
As I said, this shows busy workers or vacant places where there aren’t any. You will see here the building queue of your main village and secondary villages, the research queue, the scouting queue, the forge queue, the training queue and your secondary village queues (that’s either gathering or trading, etc.).
Also, if you click on the gear, you’ll get a menu of hierarchy distribution in your village. We advise you not to change it, and use it “by specialty”, to avoid stalling your development. This setting is for advanced players.
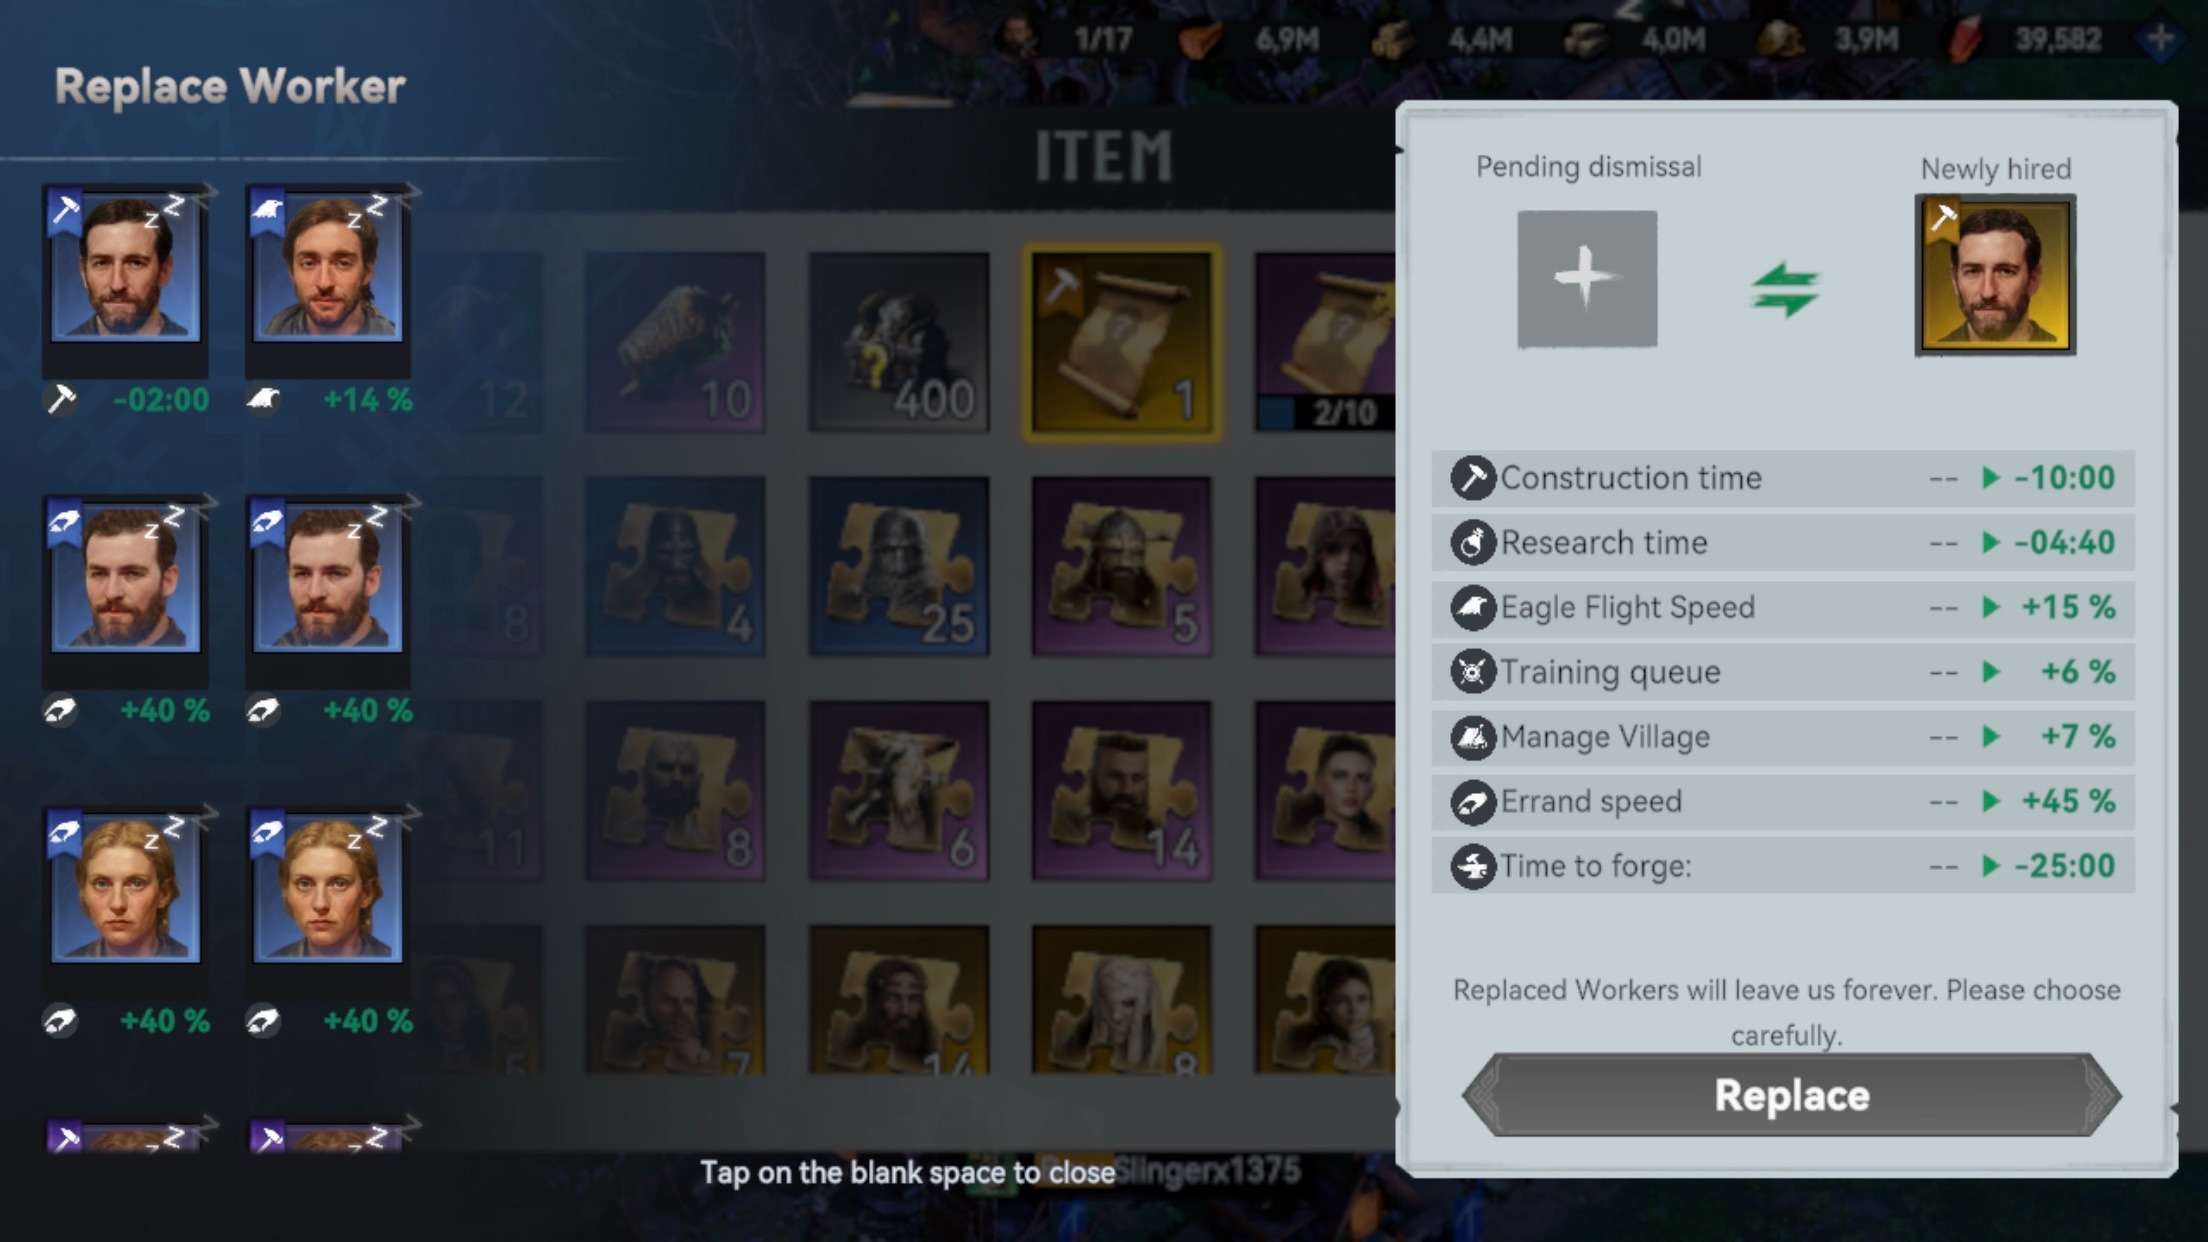
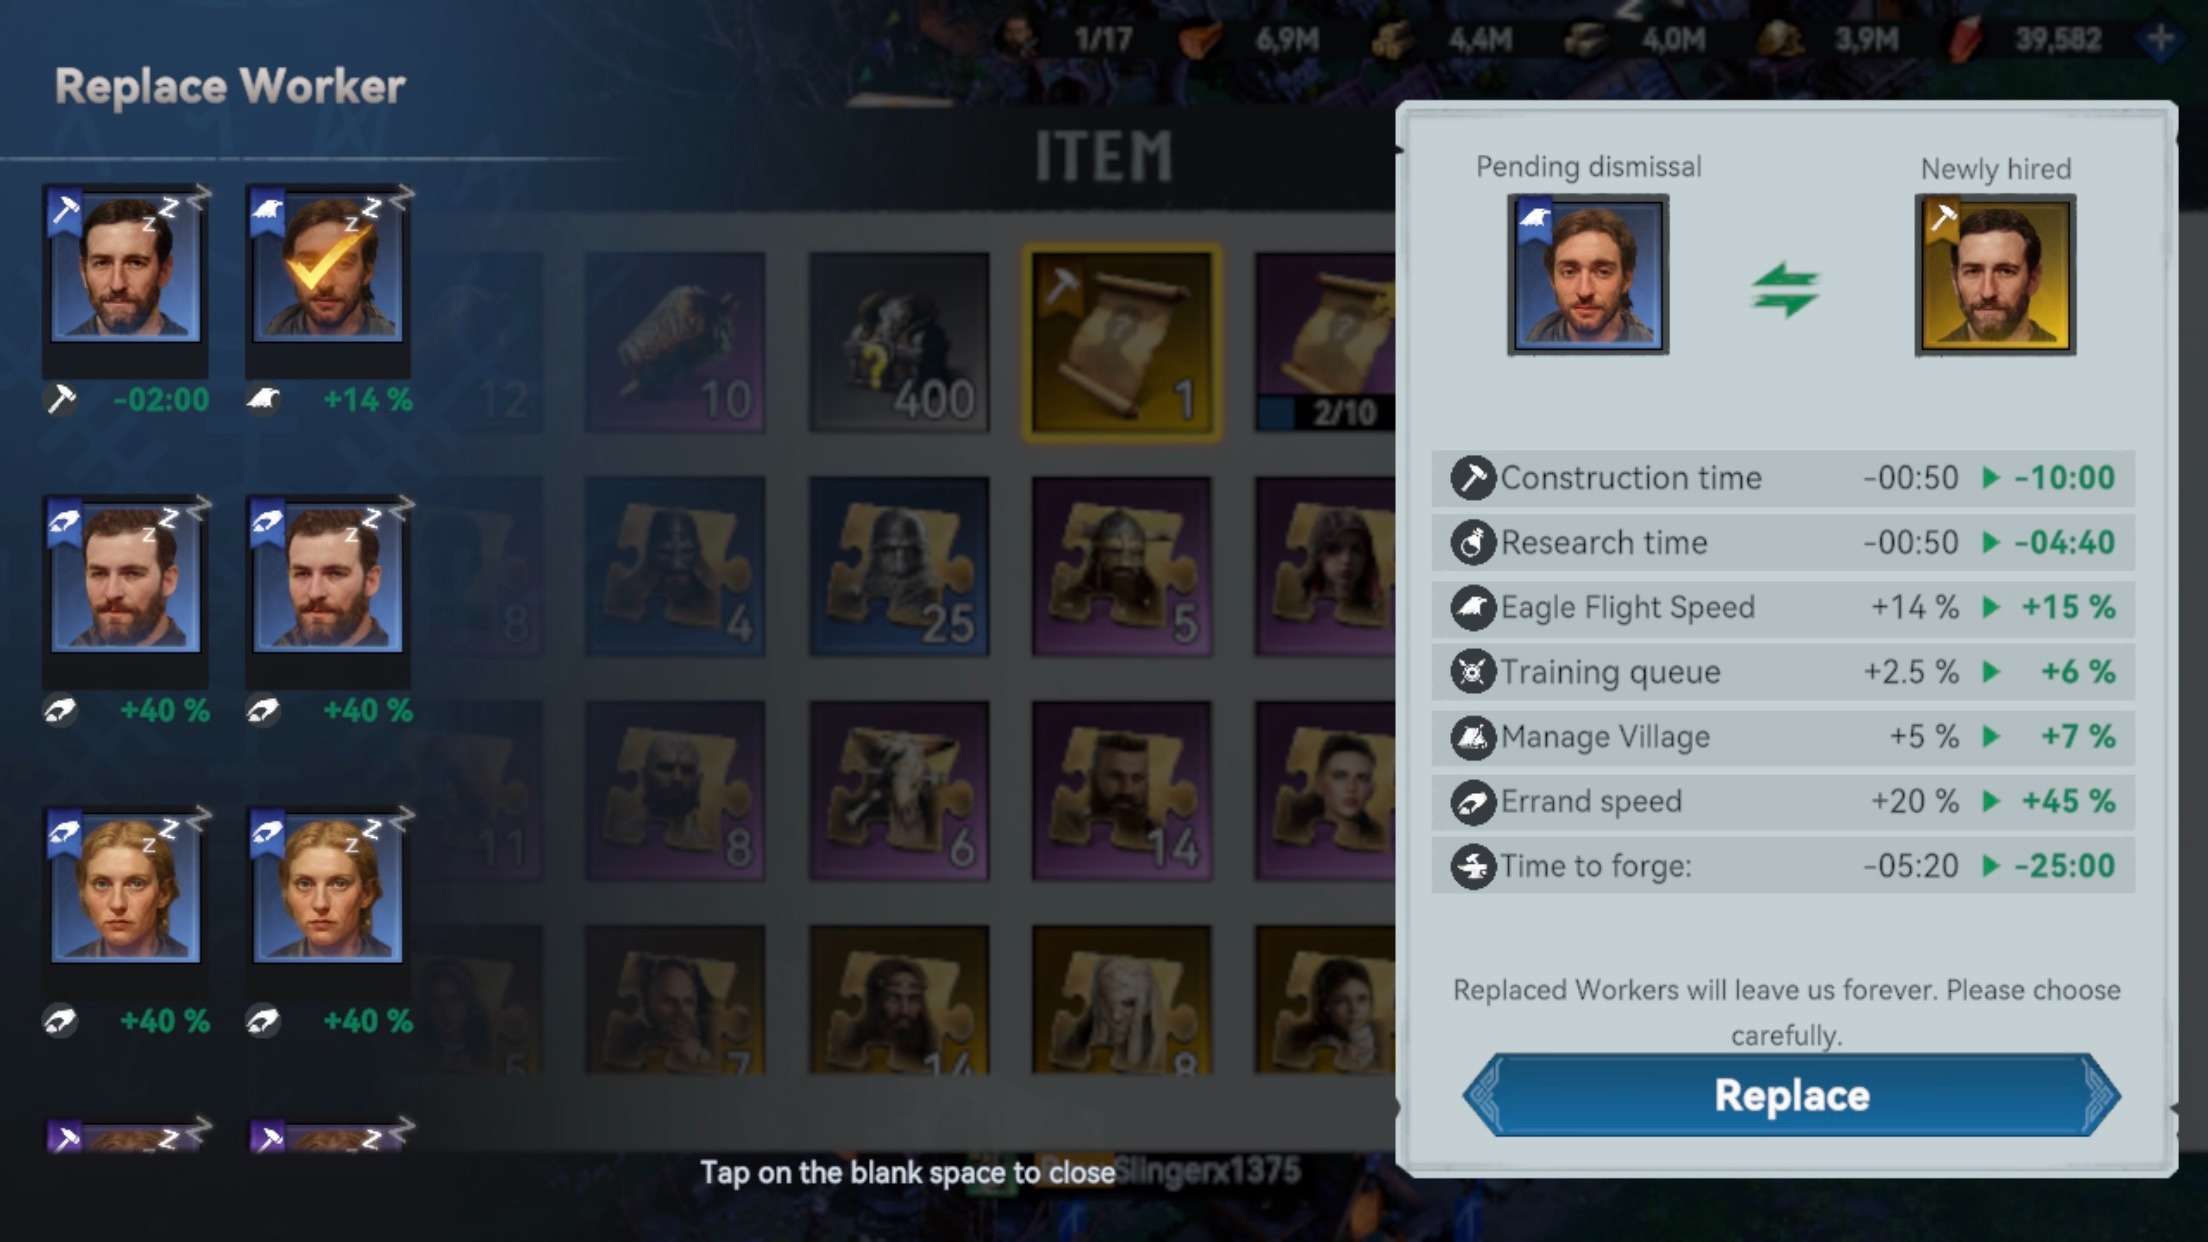
Part 4: Dismissal and Ascension of Workers
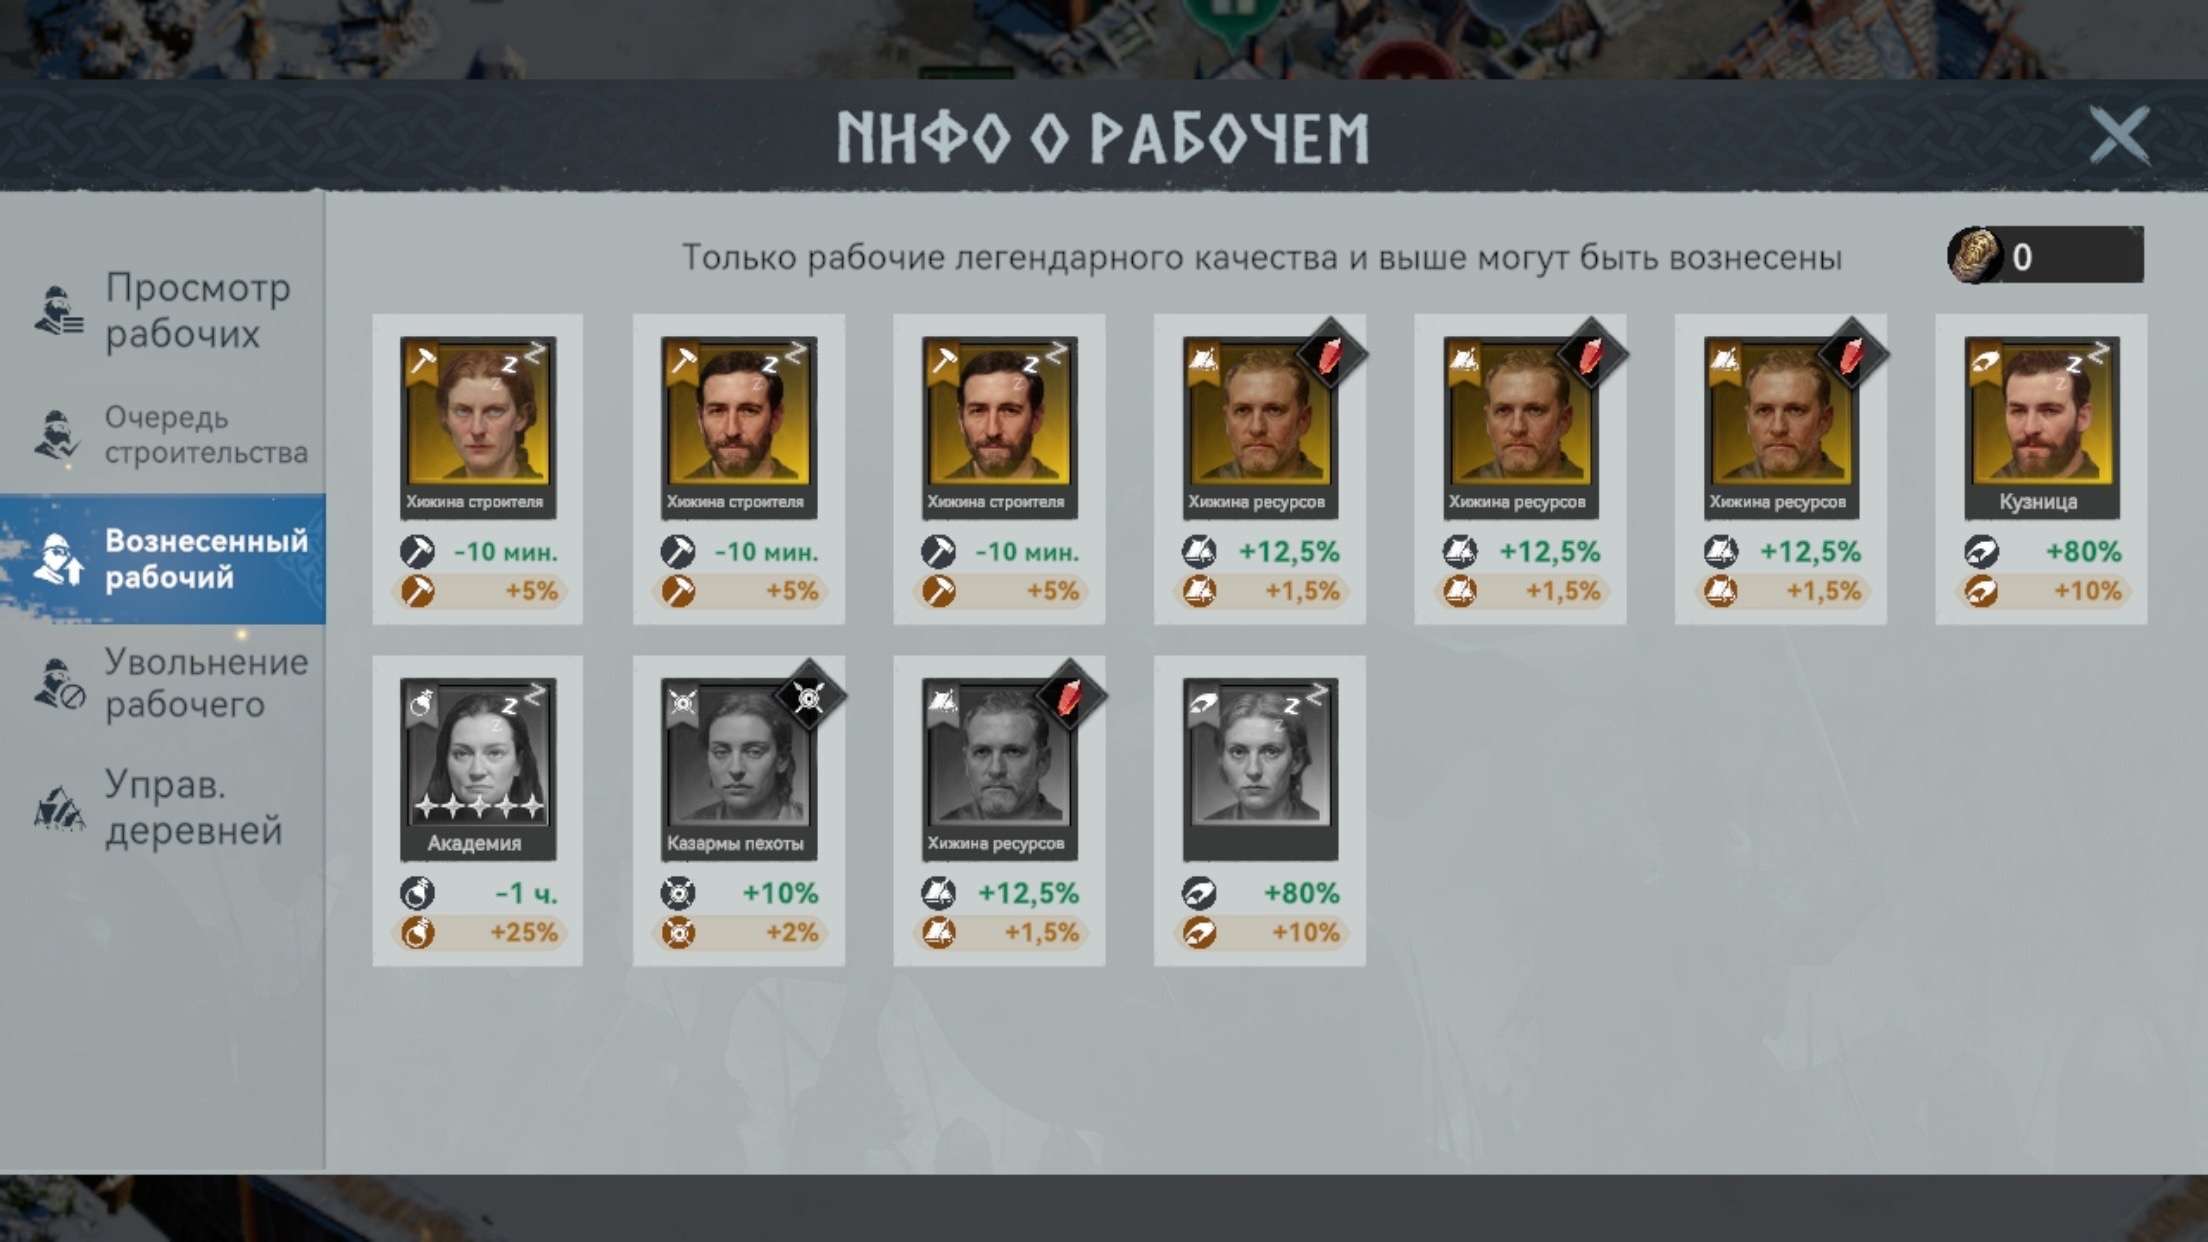
Finally we get to the fun part: ascending workers. Many people don’t know or don’t want to do this because in order to pump up 1 seasonal worker, you’ll also need to fire another seasonal worker. Given their rarity and low drop rate, many people just skip this point, but for nothing!
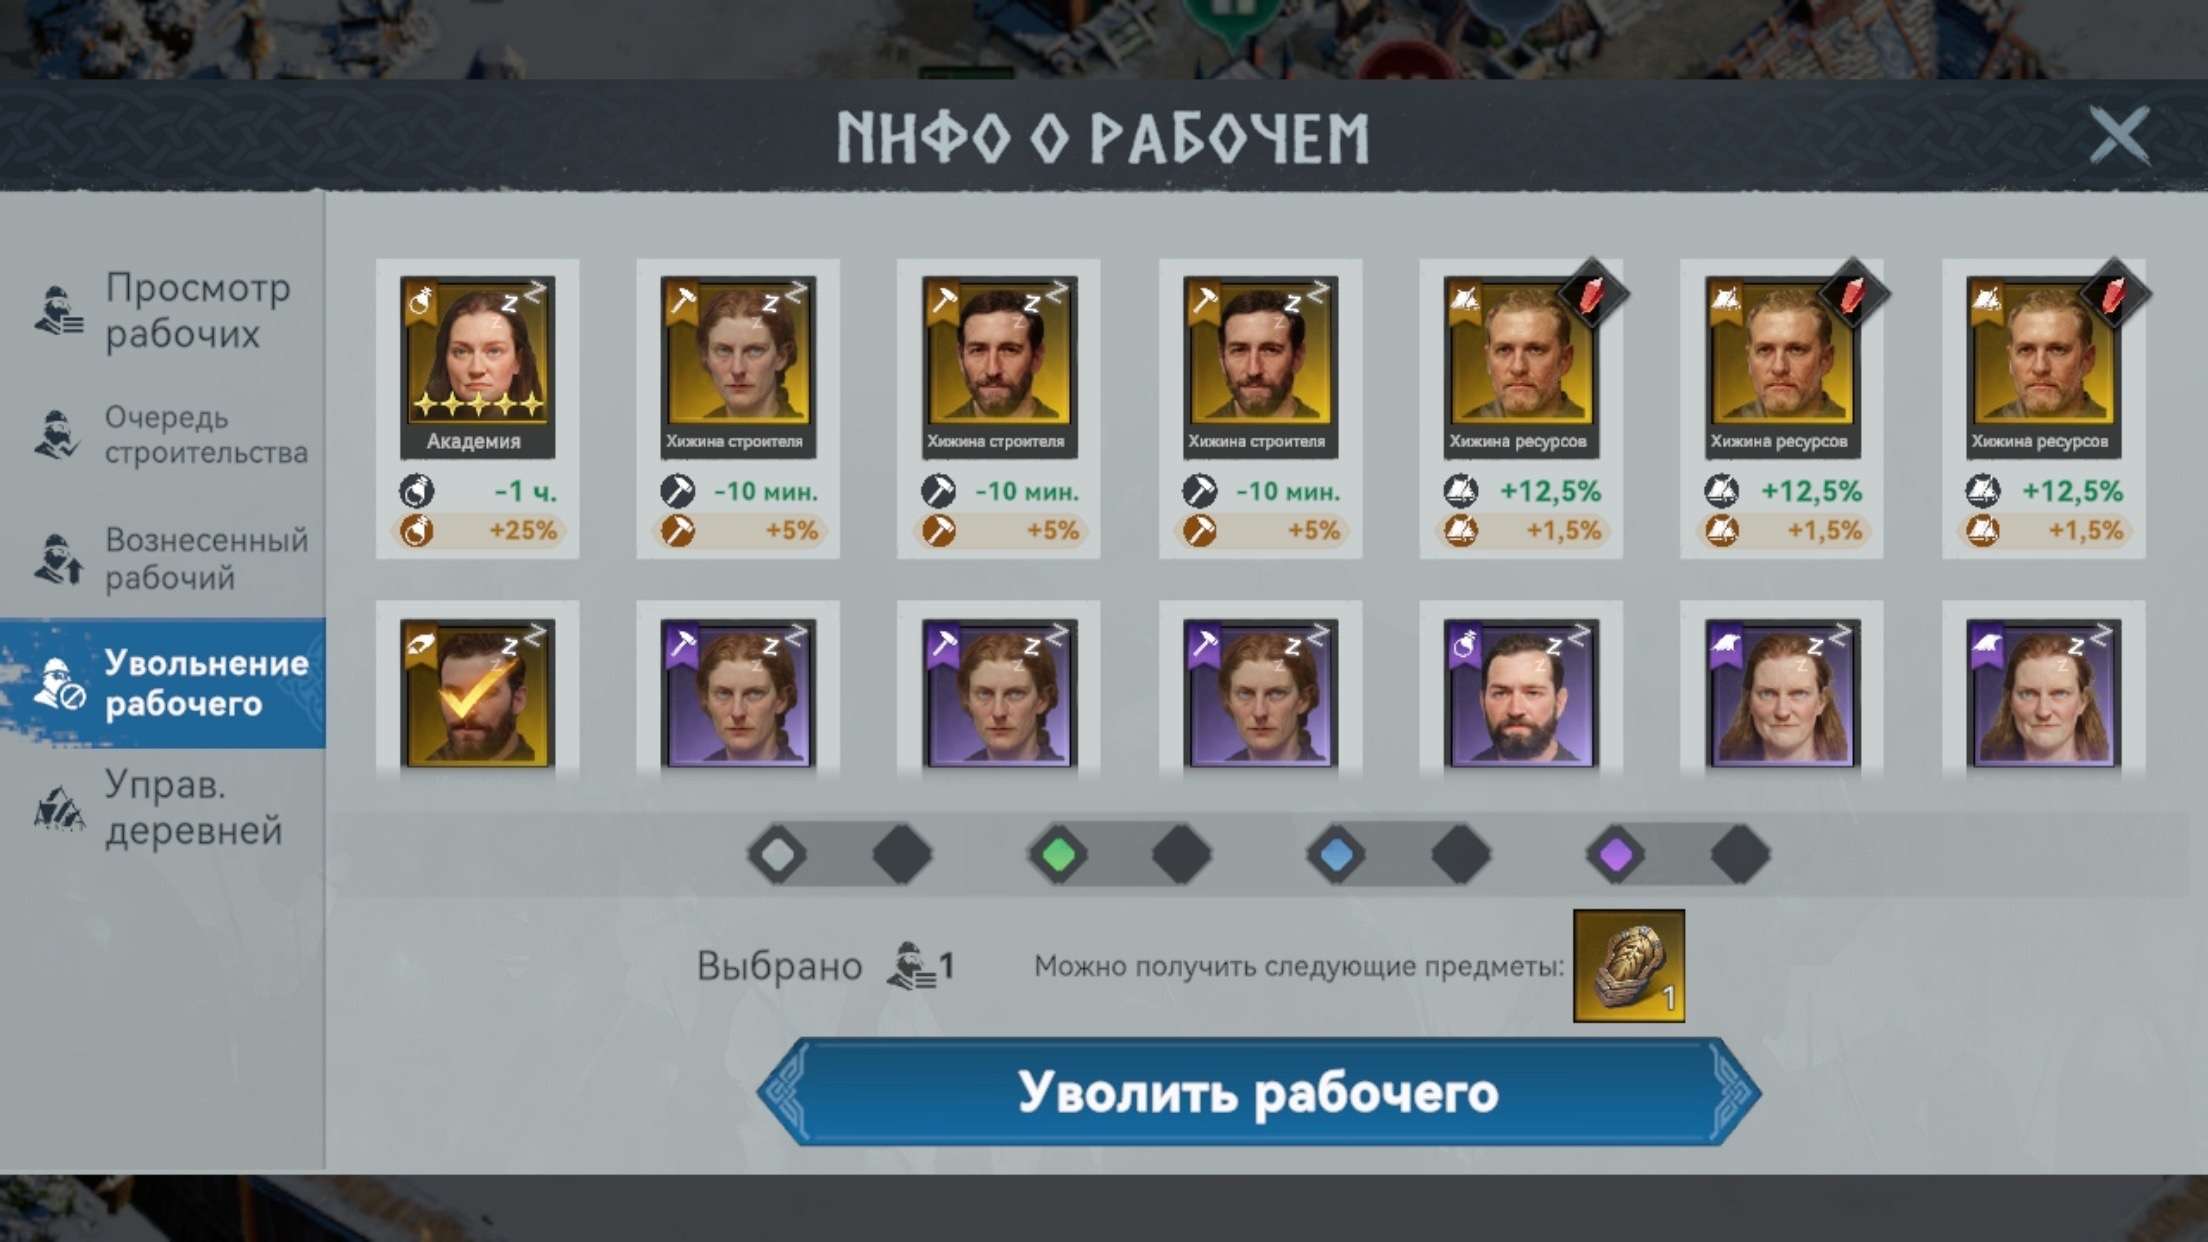
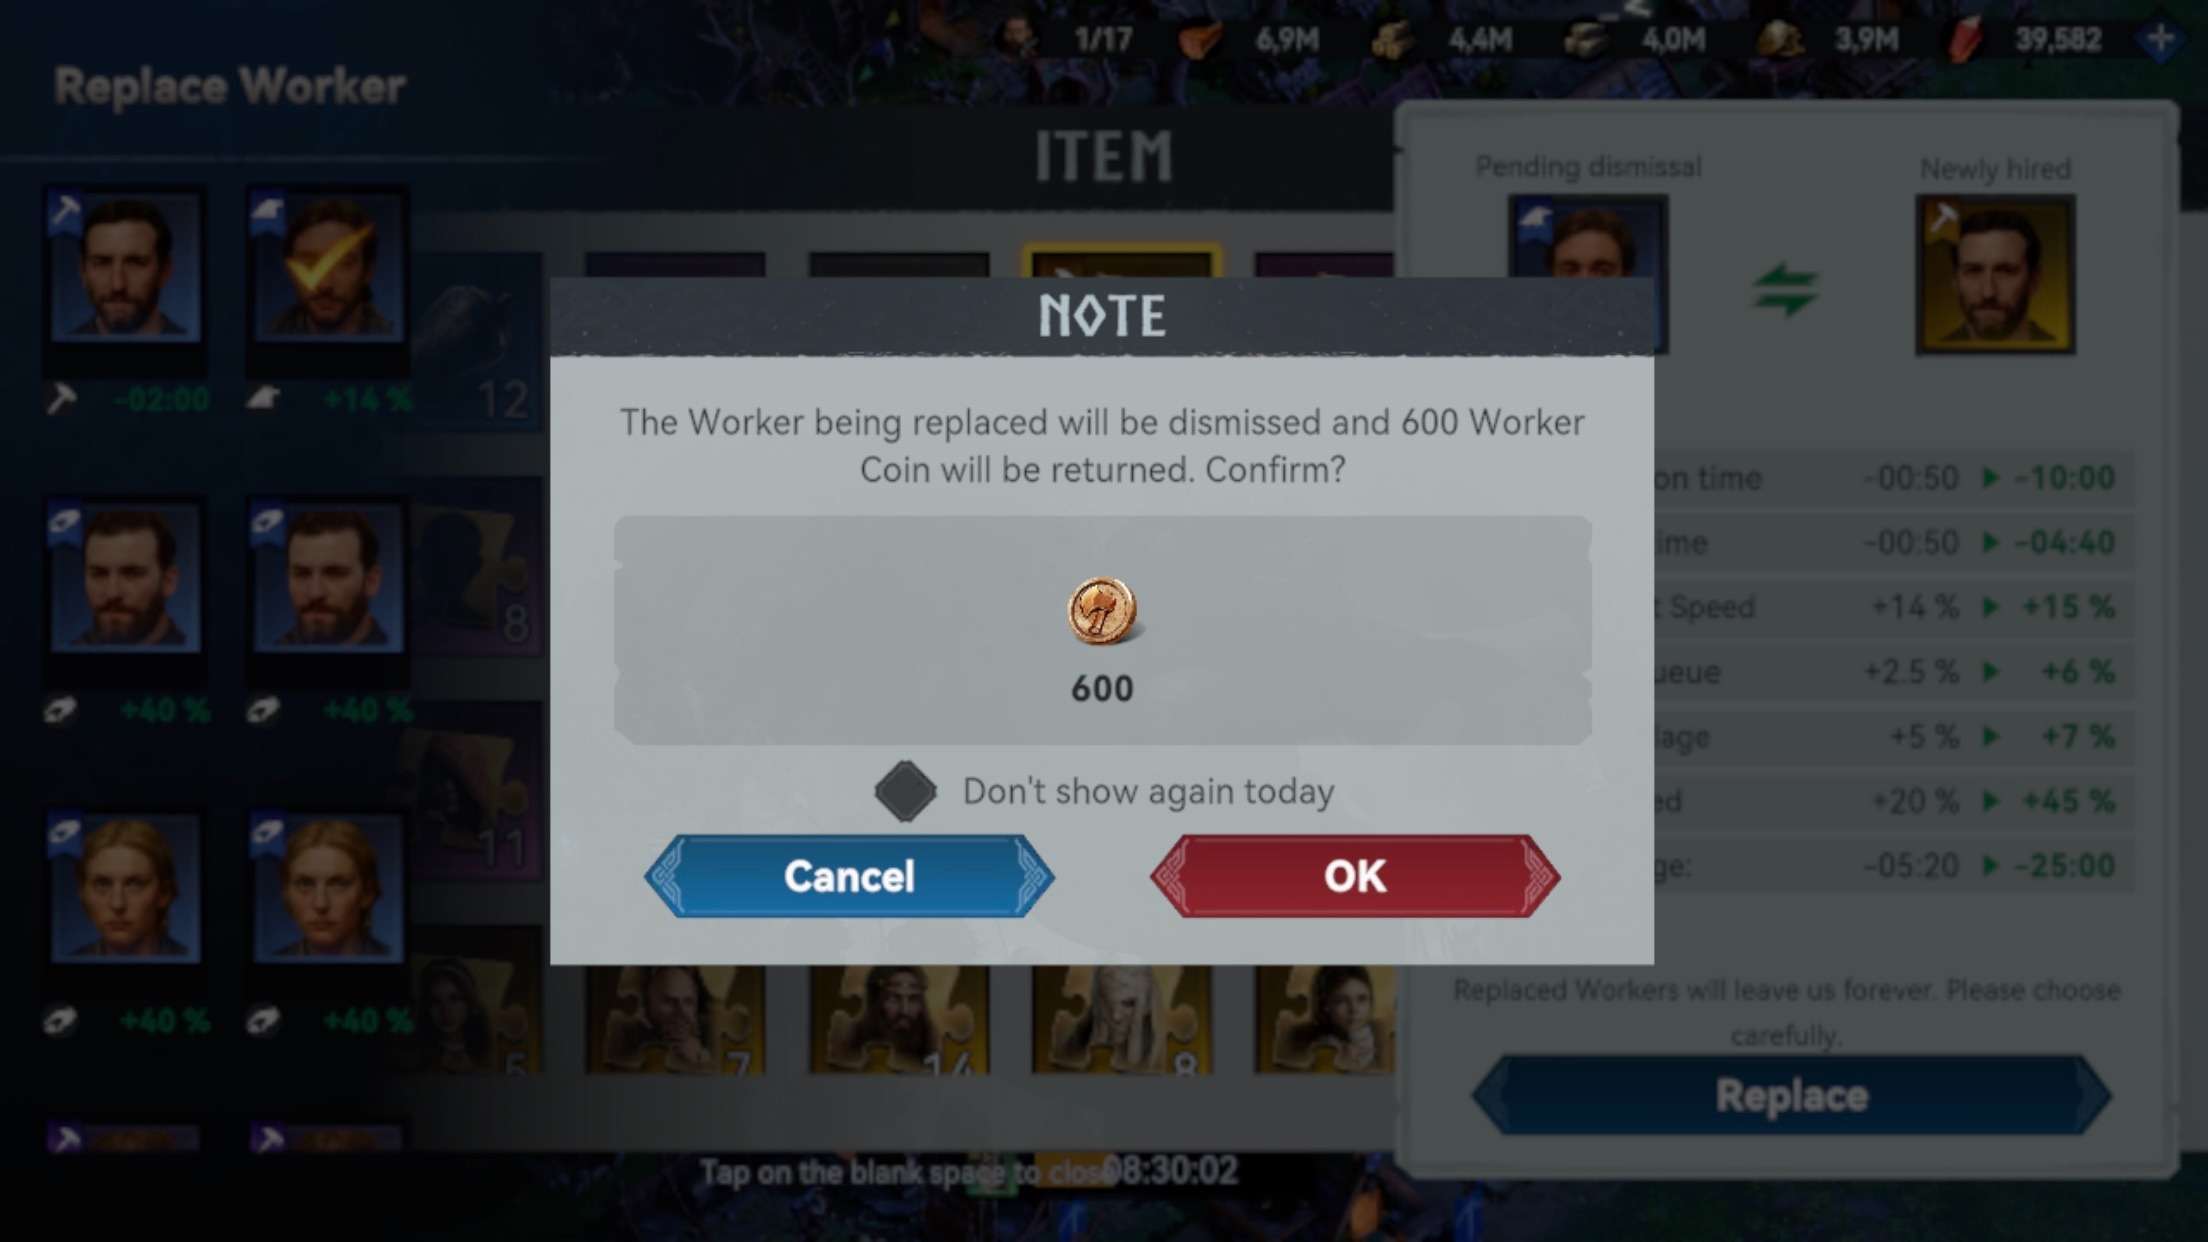
To ascend a seasonal worker, you need a legendary token, obtained after firing another seasonal worker.
At the time I wrote this guide, there were more seasonal workers, I just spent them to fully raise one seasonal worker.
In the picture above, you can see that when you fire a seasonal worker you will be given a token in return, which you will need to ascend other seasonal workers.
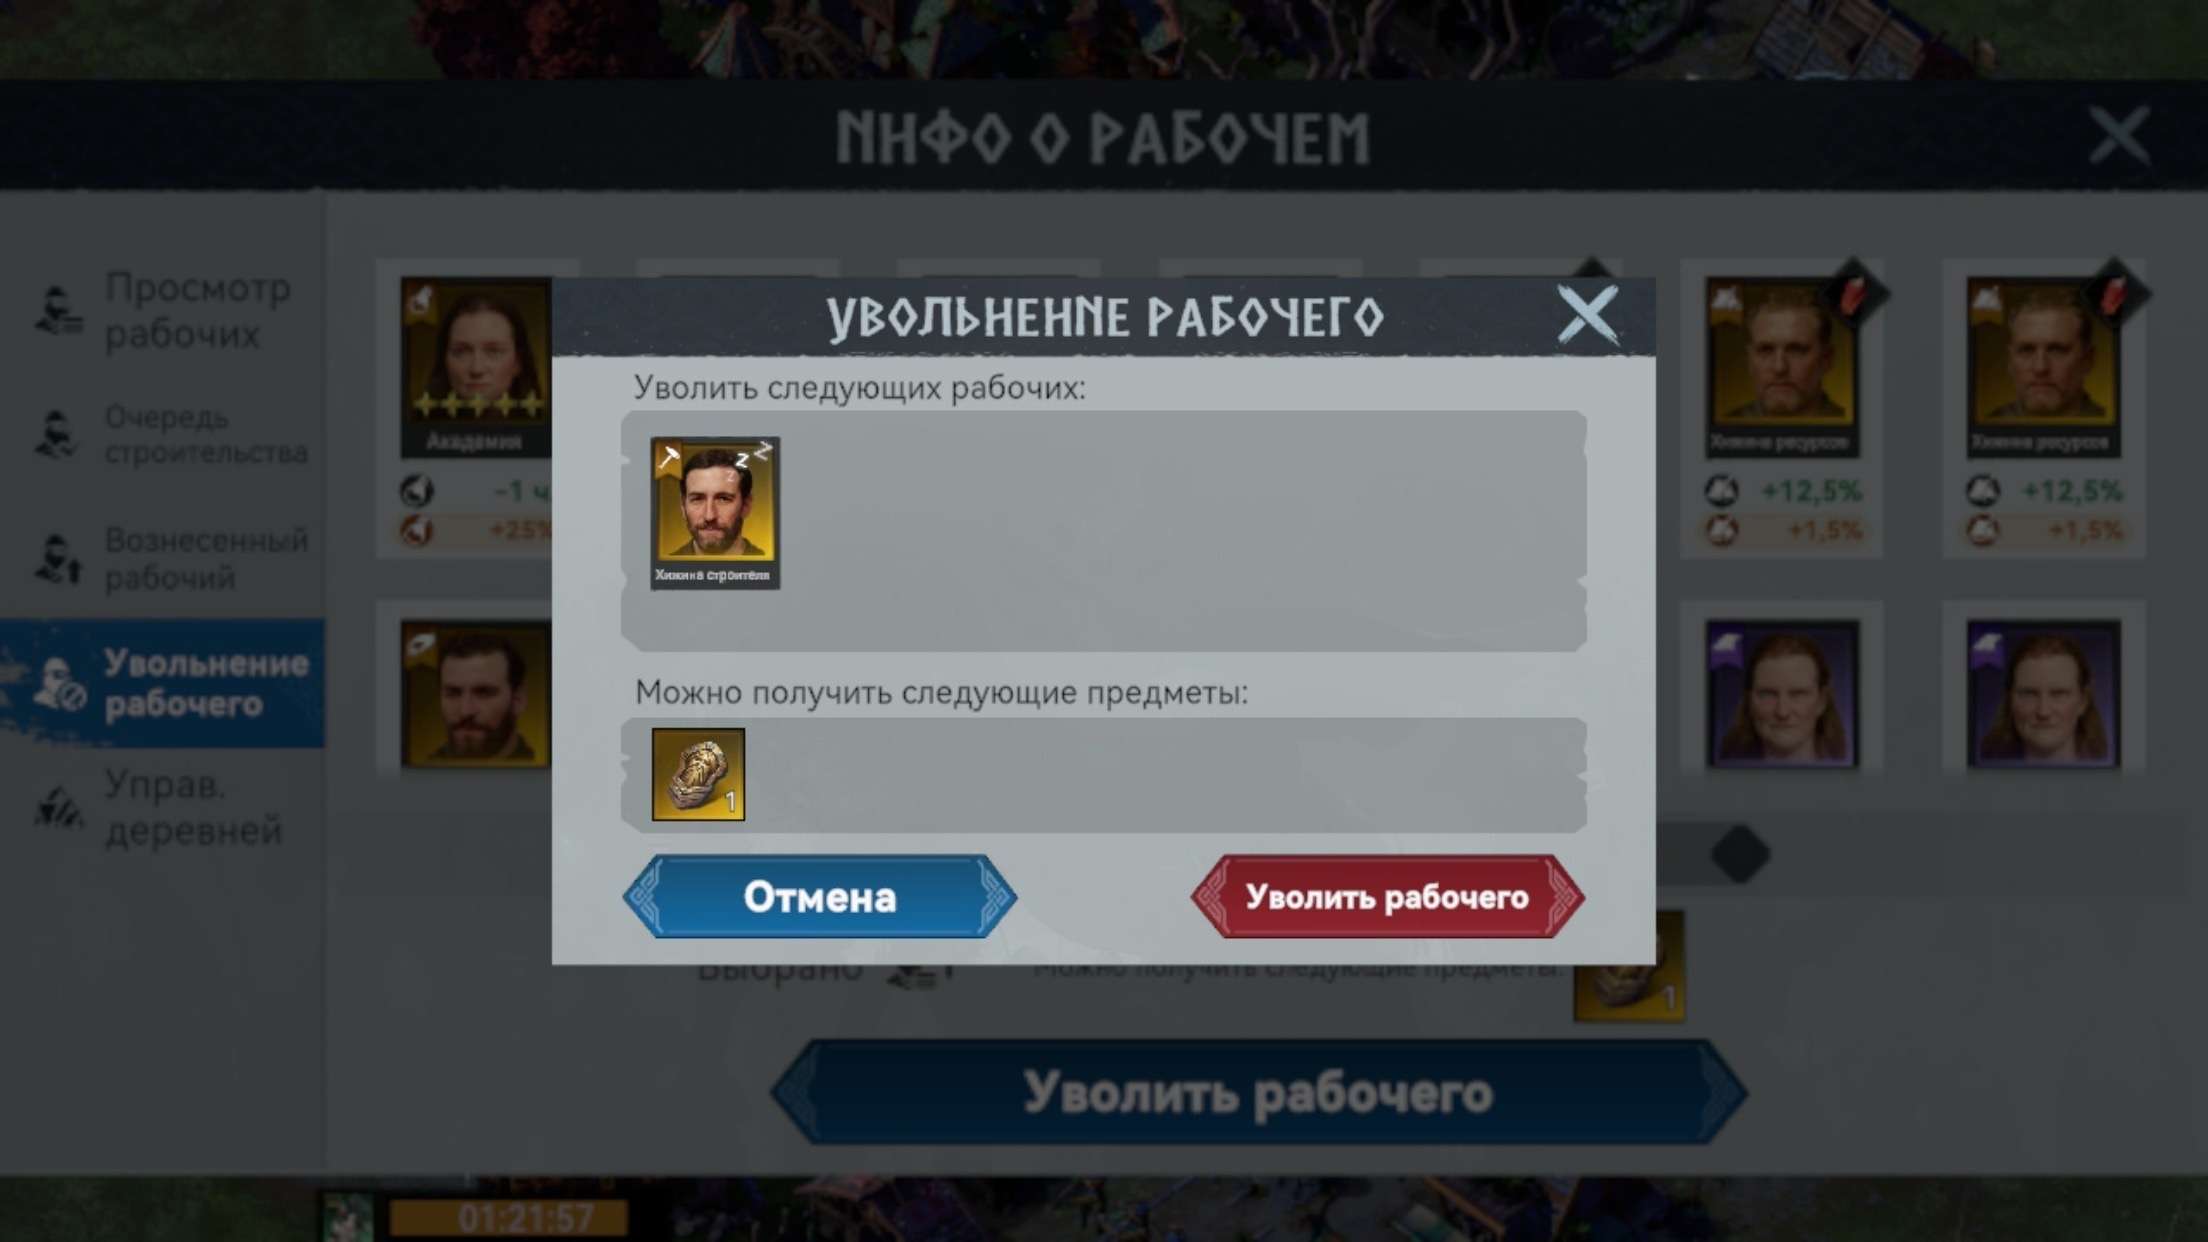
Pay attention to your workers. Fire seasonal workers, don’t be afraid. Suddenly you have 2 seasonal workers to research when only 1 is needed? Or do you have 5 seasonal construction workers with only 4 turns, which means you don’t need 5. Look at your own, maybe you have workers in some specialties in excess, then there is nothing to hoard them, they are useless and you will never use them.
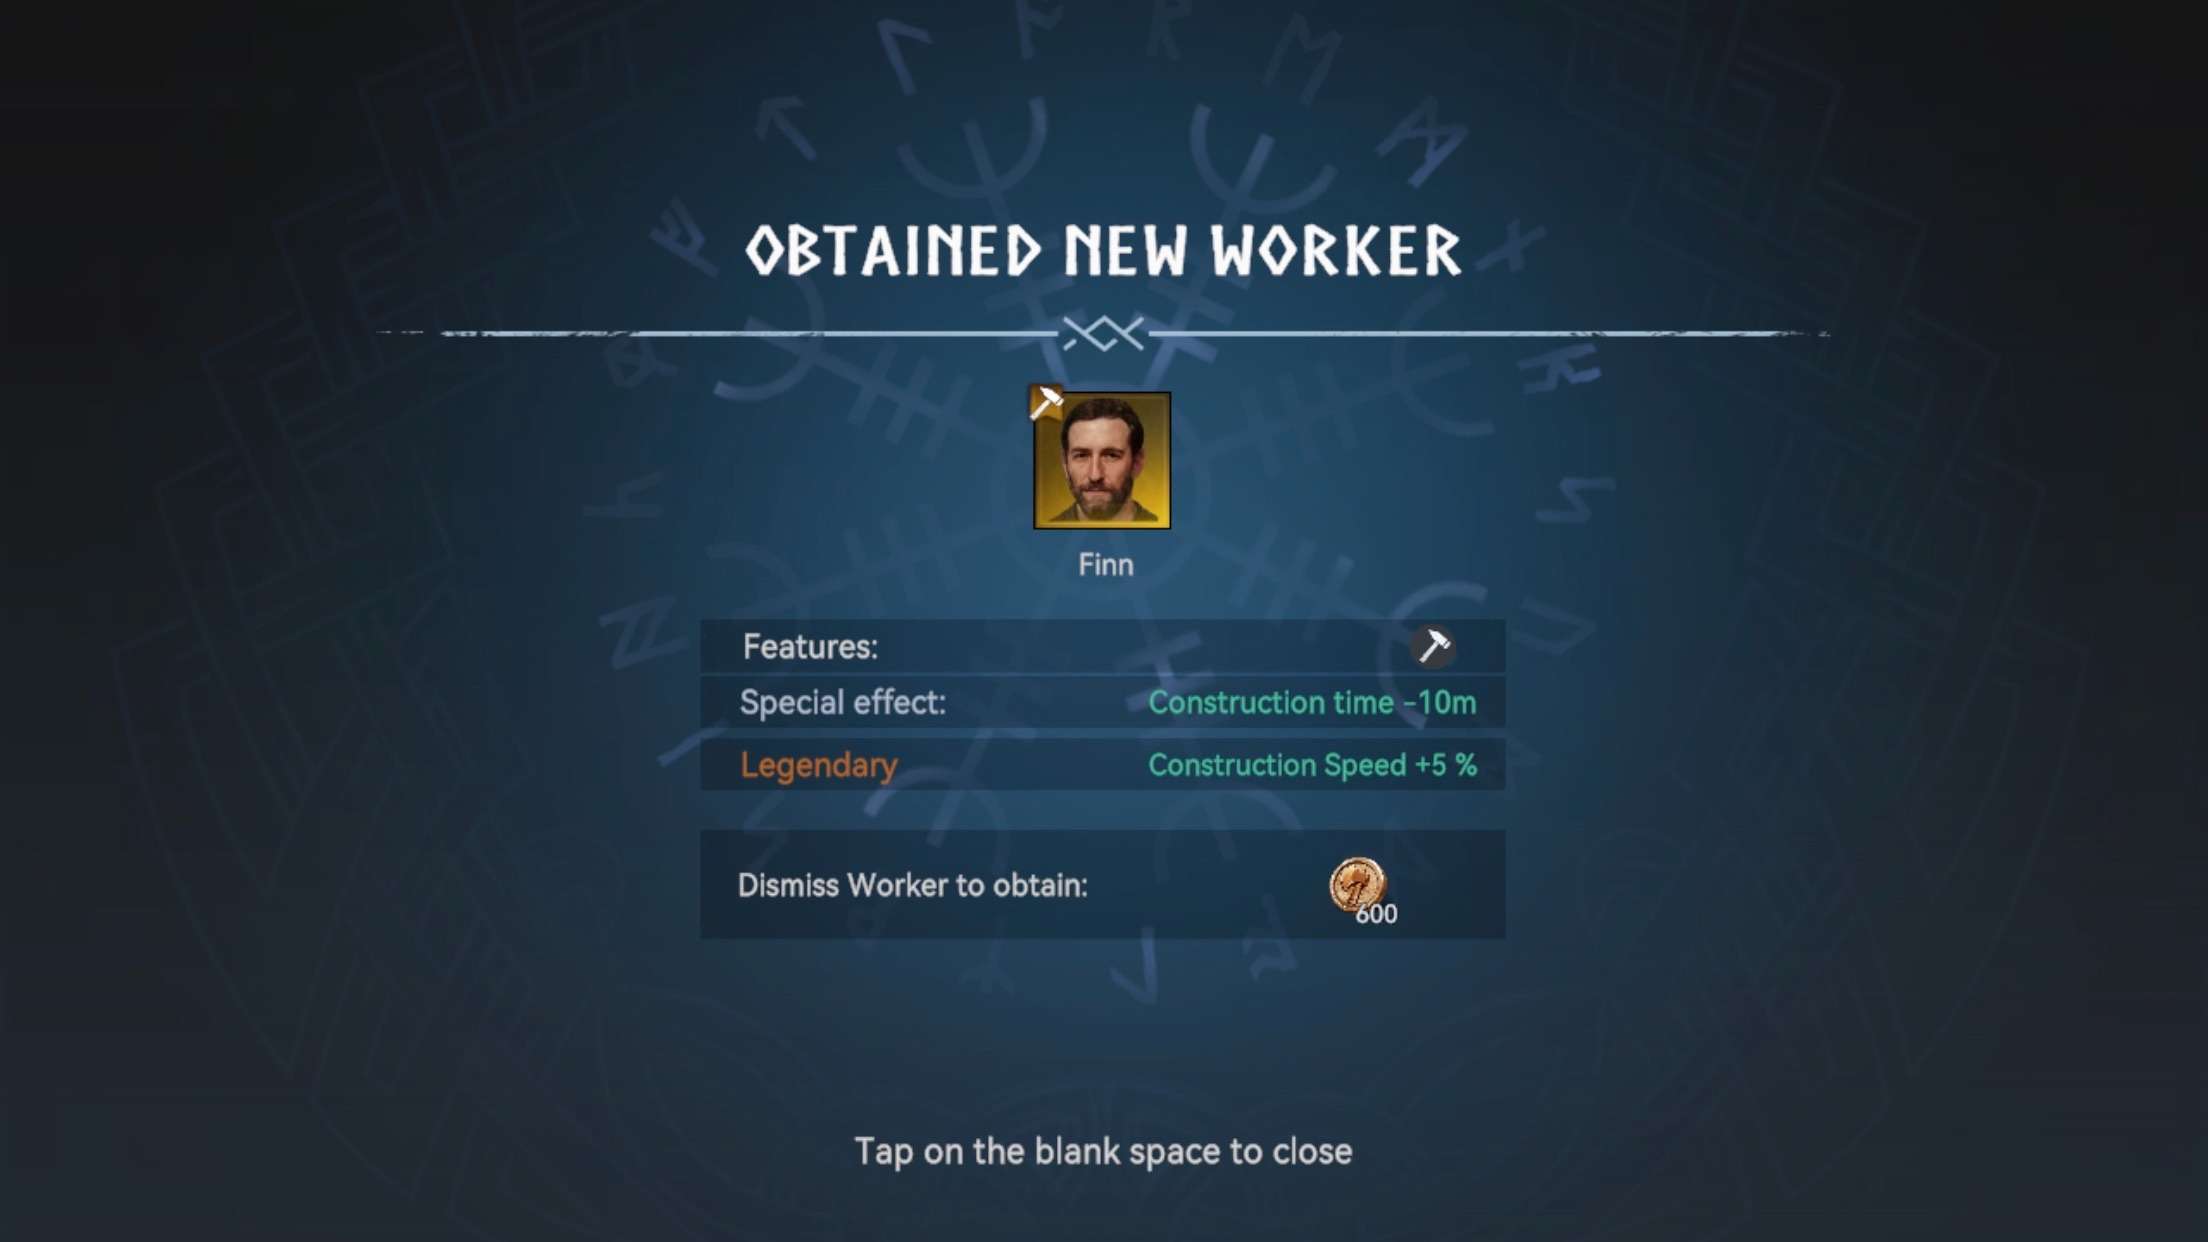
Look at the picture above. Fire the worker you don’t need, raise the worker you need, and increase efficiency! Now we have a worker with 1 star! (max 5)
My only 5 star worker is pumped up for research.

Part 5: Conclusion
Don’t be afraid to fire workers, you definitely need to pump them up, otherwise you’ll take a very long time to build, research, forge or train in the future.
Degree of importance of workers:
- Building (at least one).
- Research.
- Training your troops.
- Forging.
40,000 Skill Experience per Day Guide
If I tell you that 40,000 skill experience per day is realistic, would you call me a clown? Most would say yes.
But the truth is no.
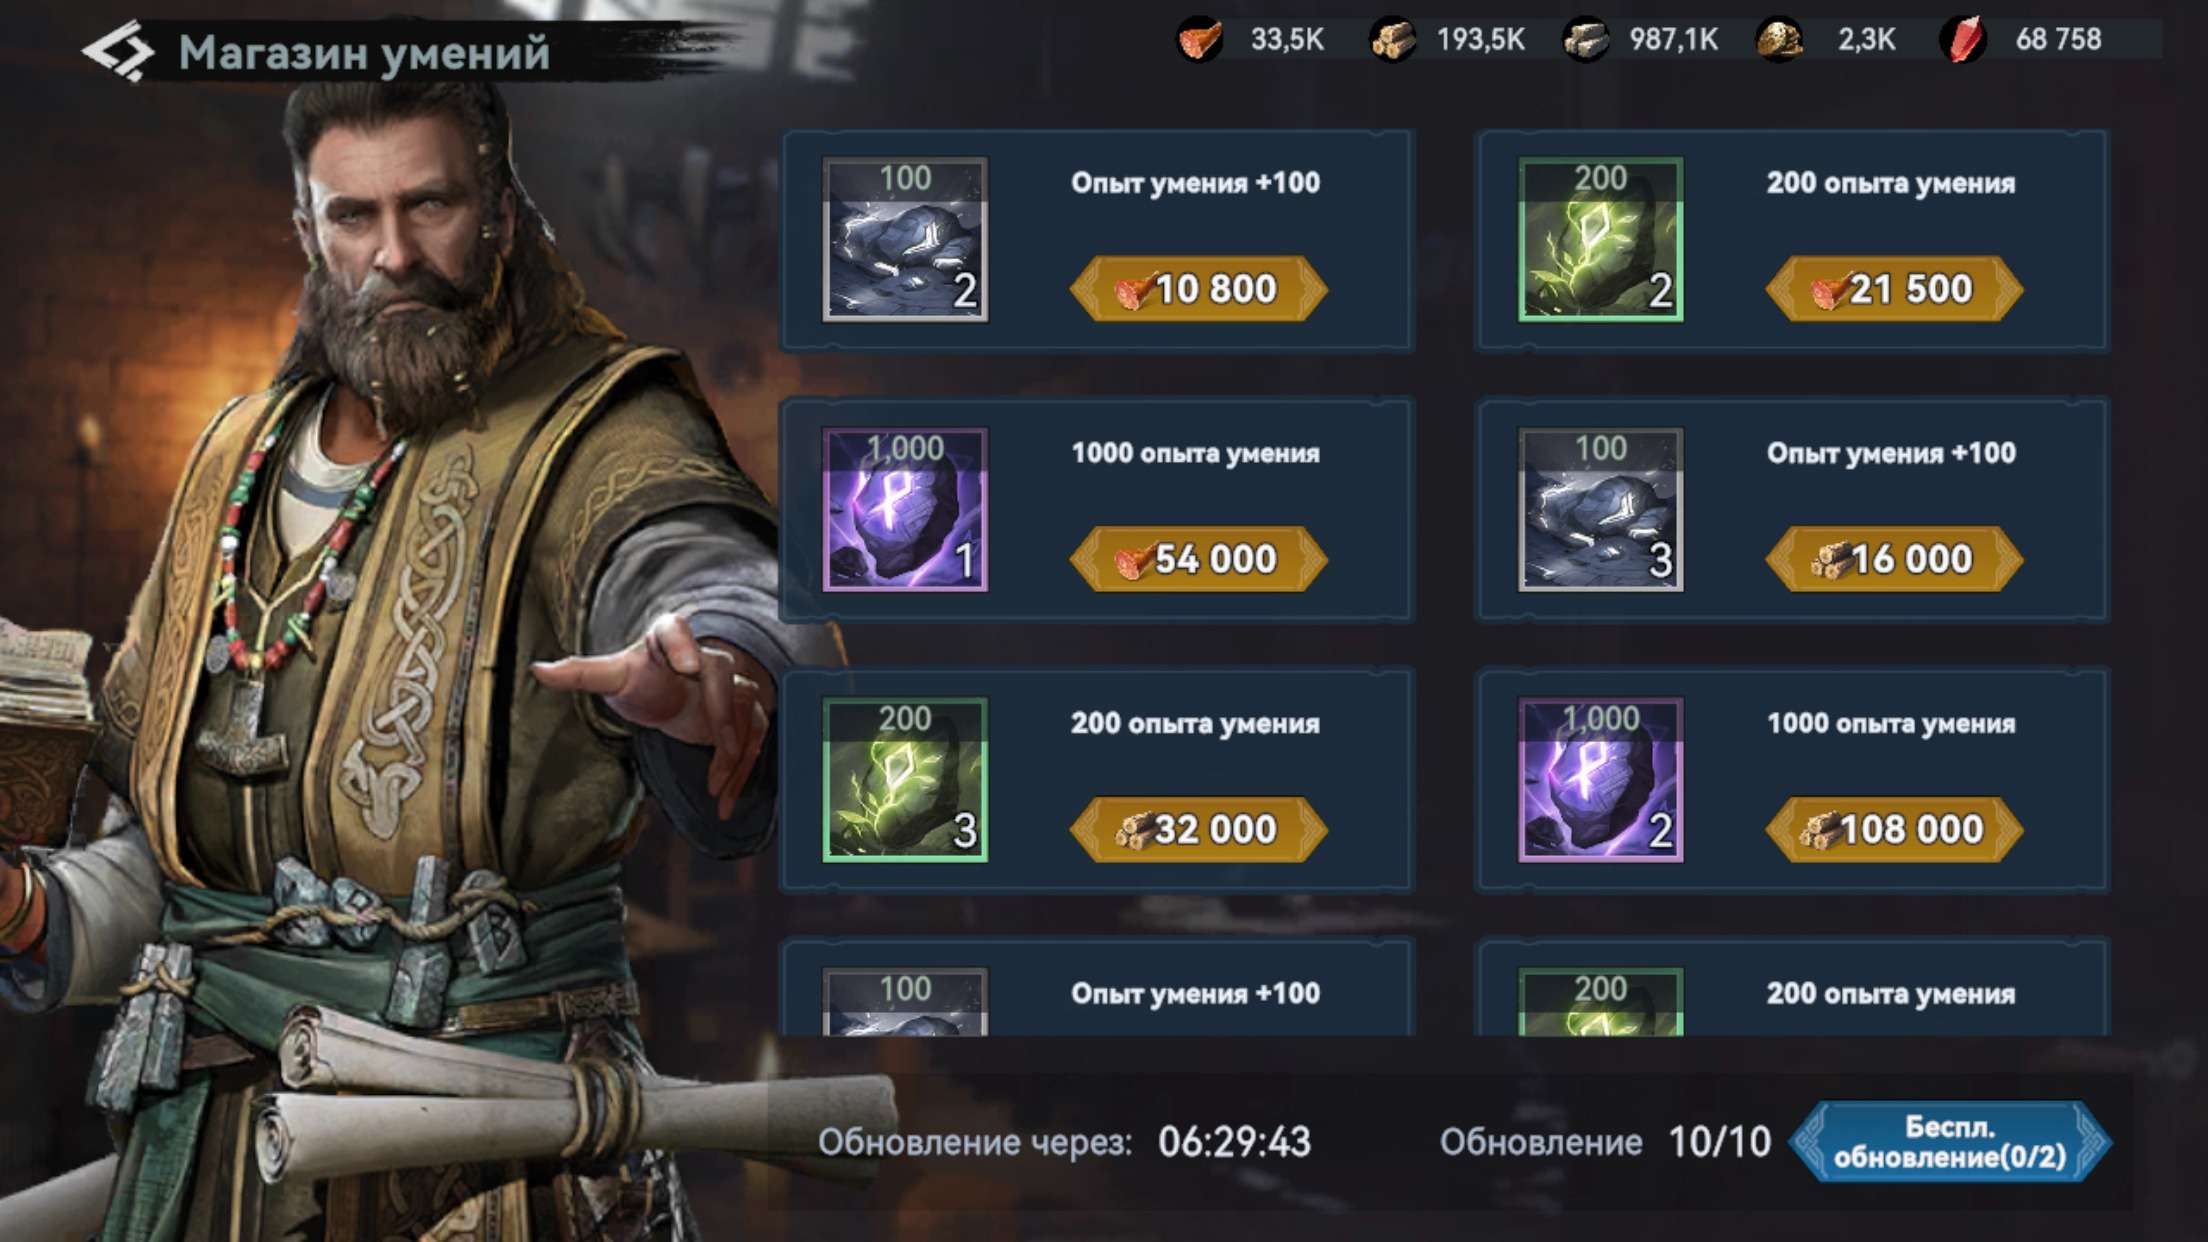
Thanks to the skill store, you can buy back at least 20,000 skill experience per day and if you spend all your crystals, that number will be over 60,000. Don’t be stingy about spending on those experience runes, you’ll get 6000 (approximately) experience with every upgrade, which is a lot, considering the 2 free upgrades and the 200 gems upgrade.
Thanks to this, you will be able to pump a skill up to level 10 in 3-4 weeks. It’s not a long time, believe me.
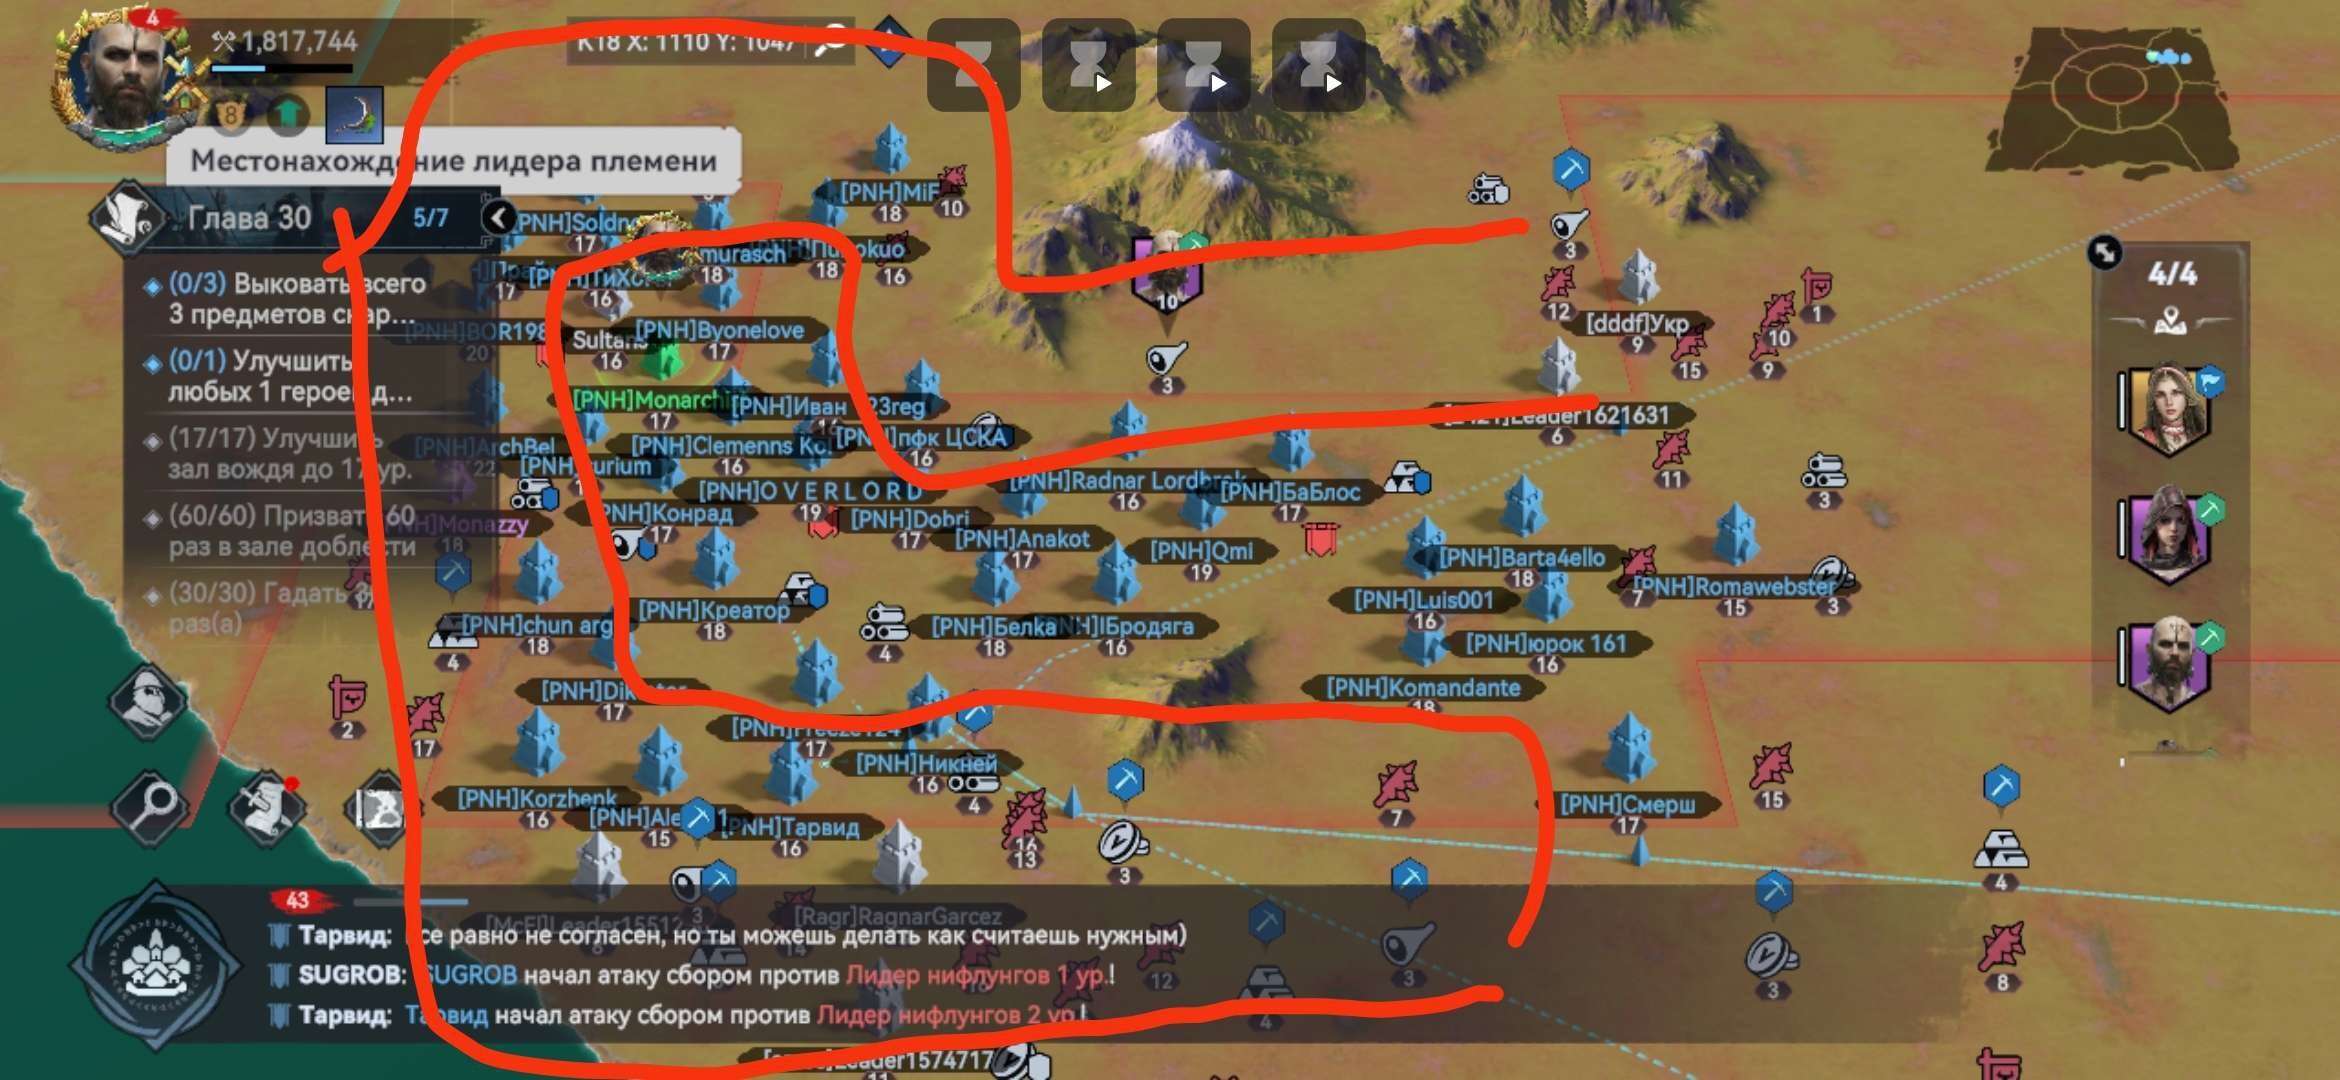
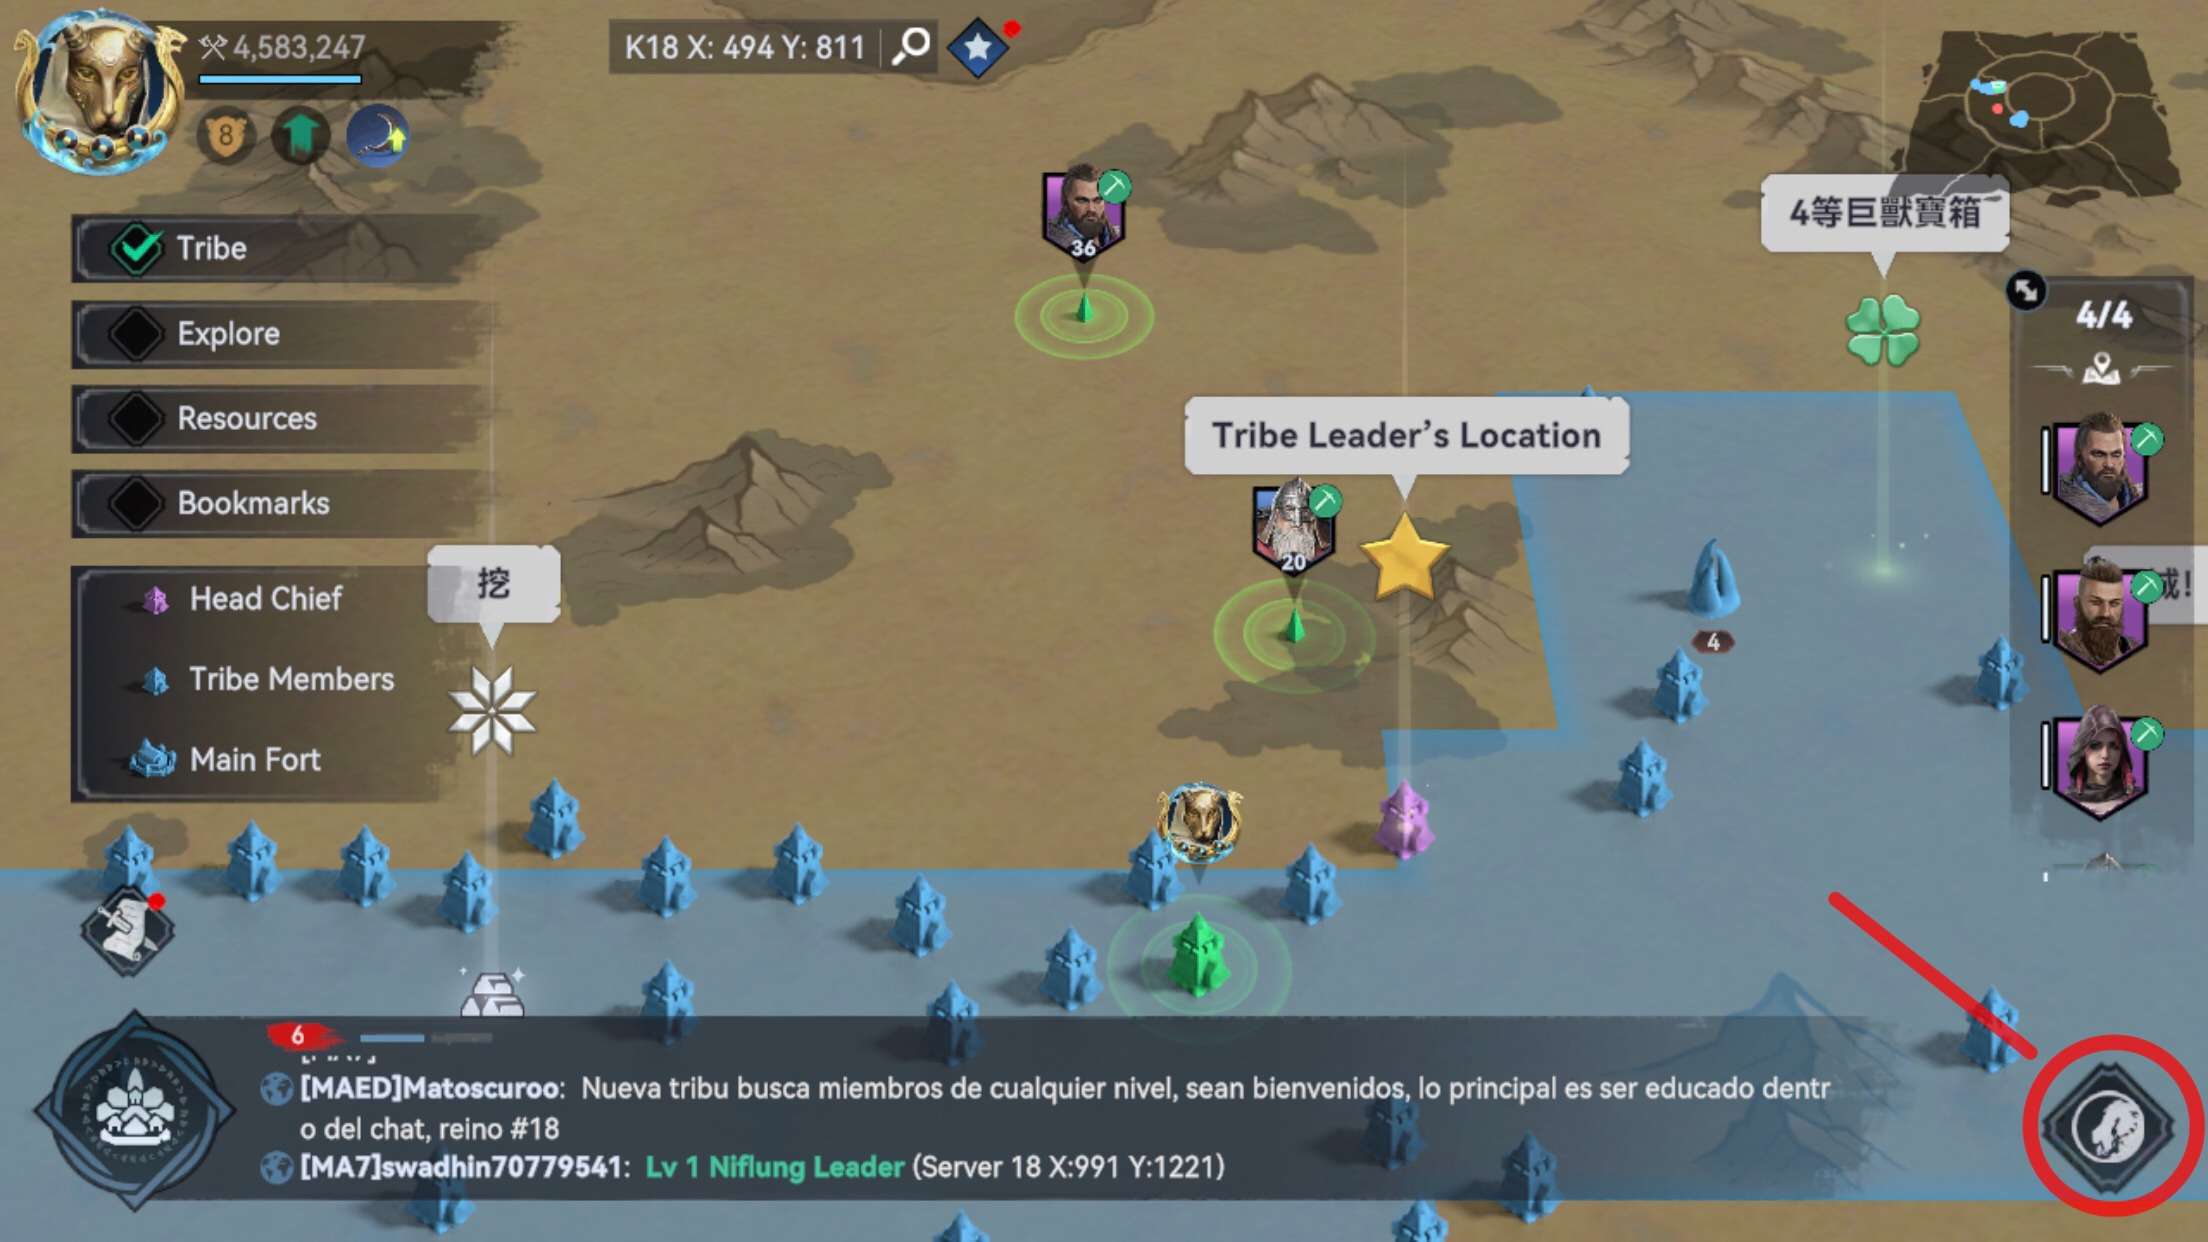
I also advise to be located in the territory of your tribe on this scheme drawn red line. (Screen is irrelevant if anything).
By this arrangement of the castles of the tribe members, within the territory will spawn more resource points. And as we know, in the territory of the tribe to gather resources faster. This scheme is used by many top clans location closer to the center of the map, because there are a lot of resources, their level is more, and this location allows more spawn them.
The best equipment for troops are pikemen
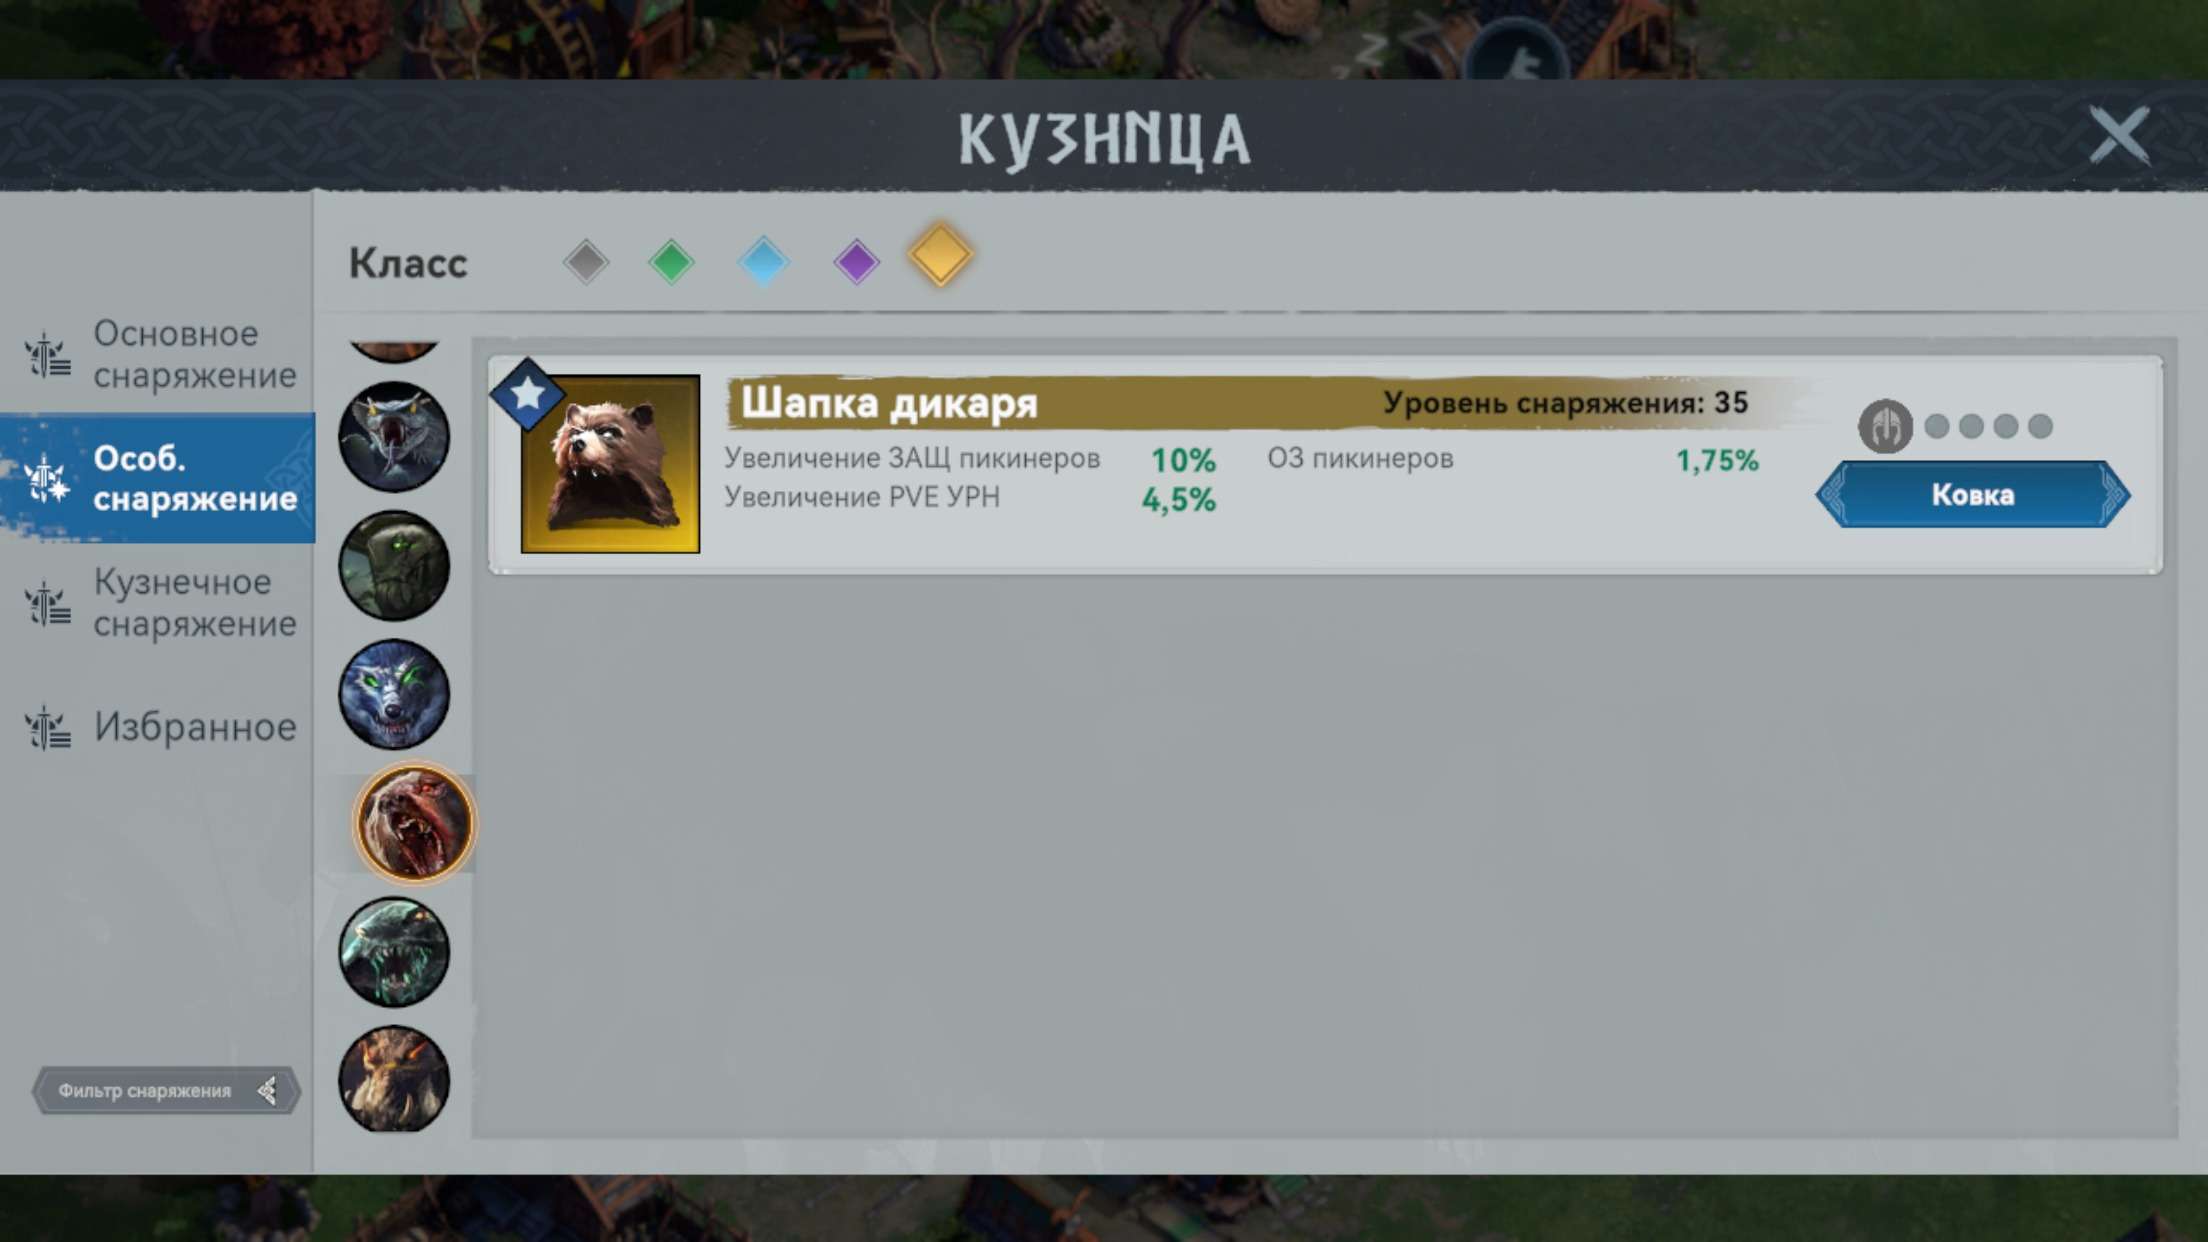
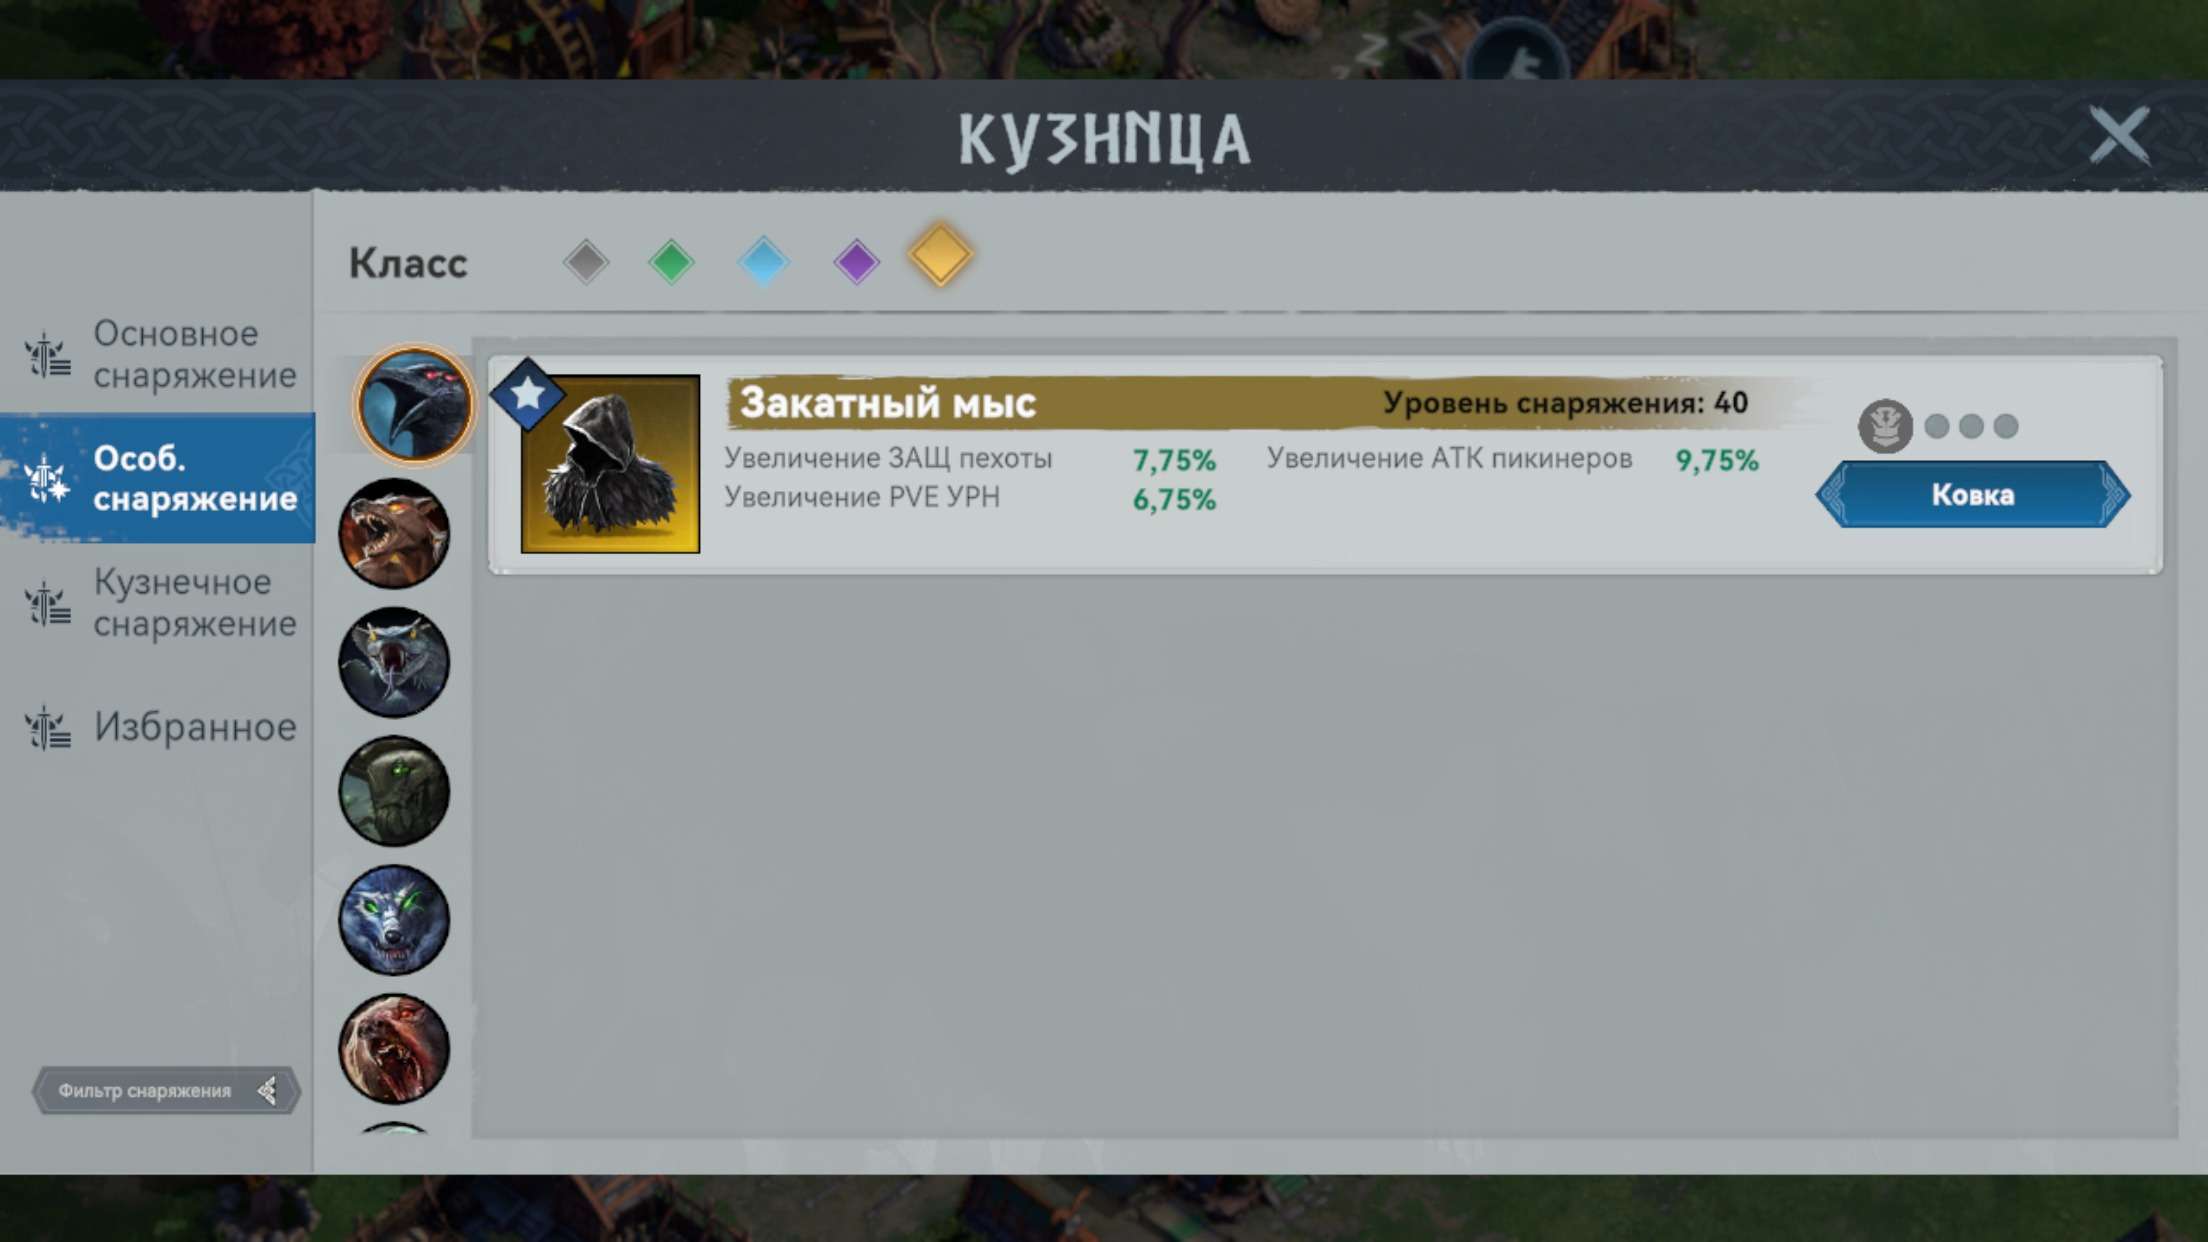
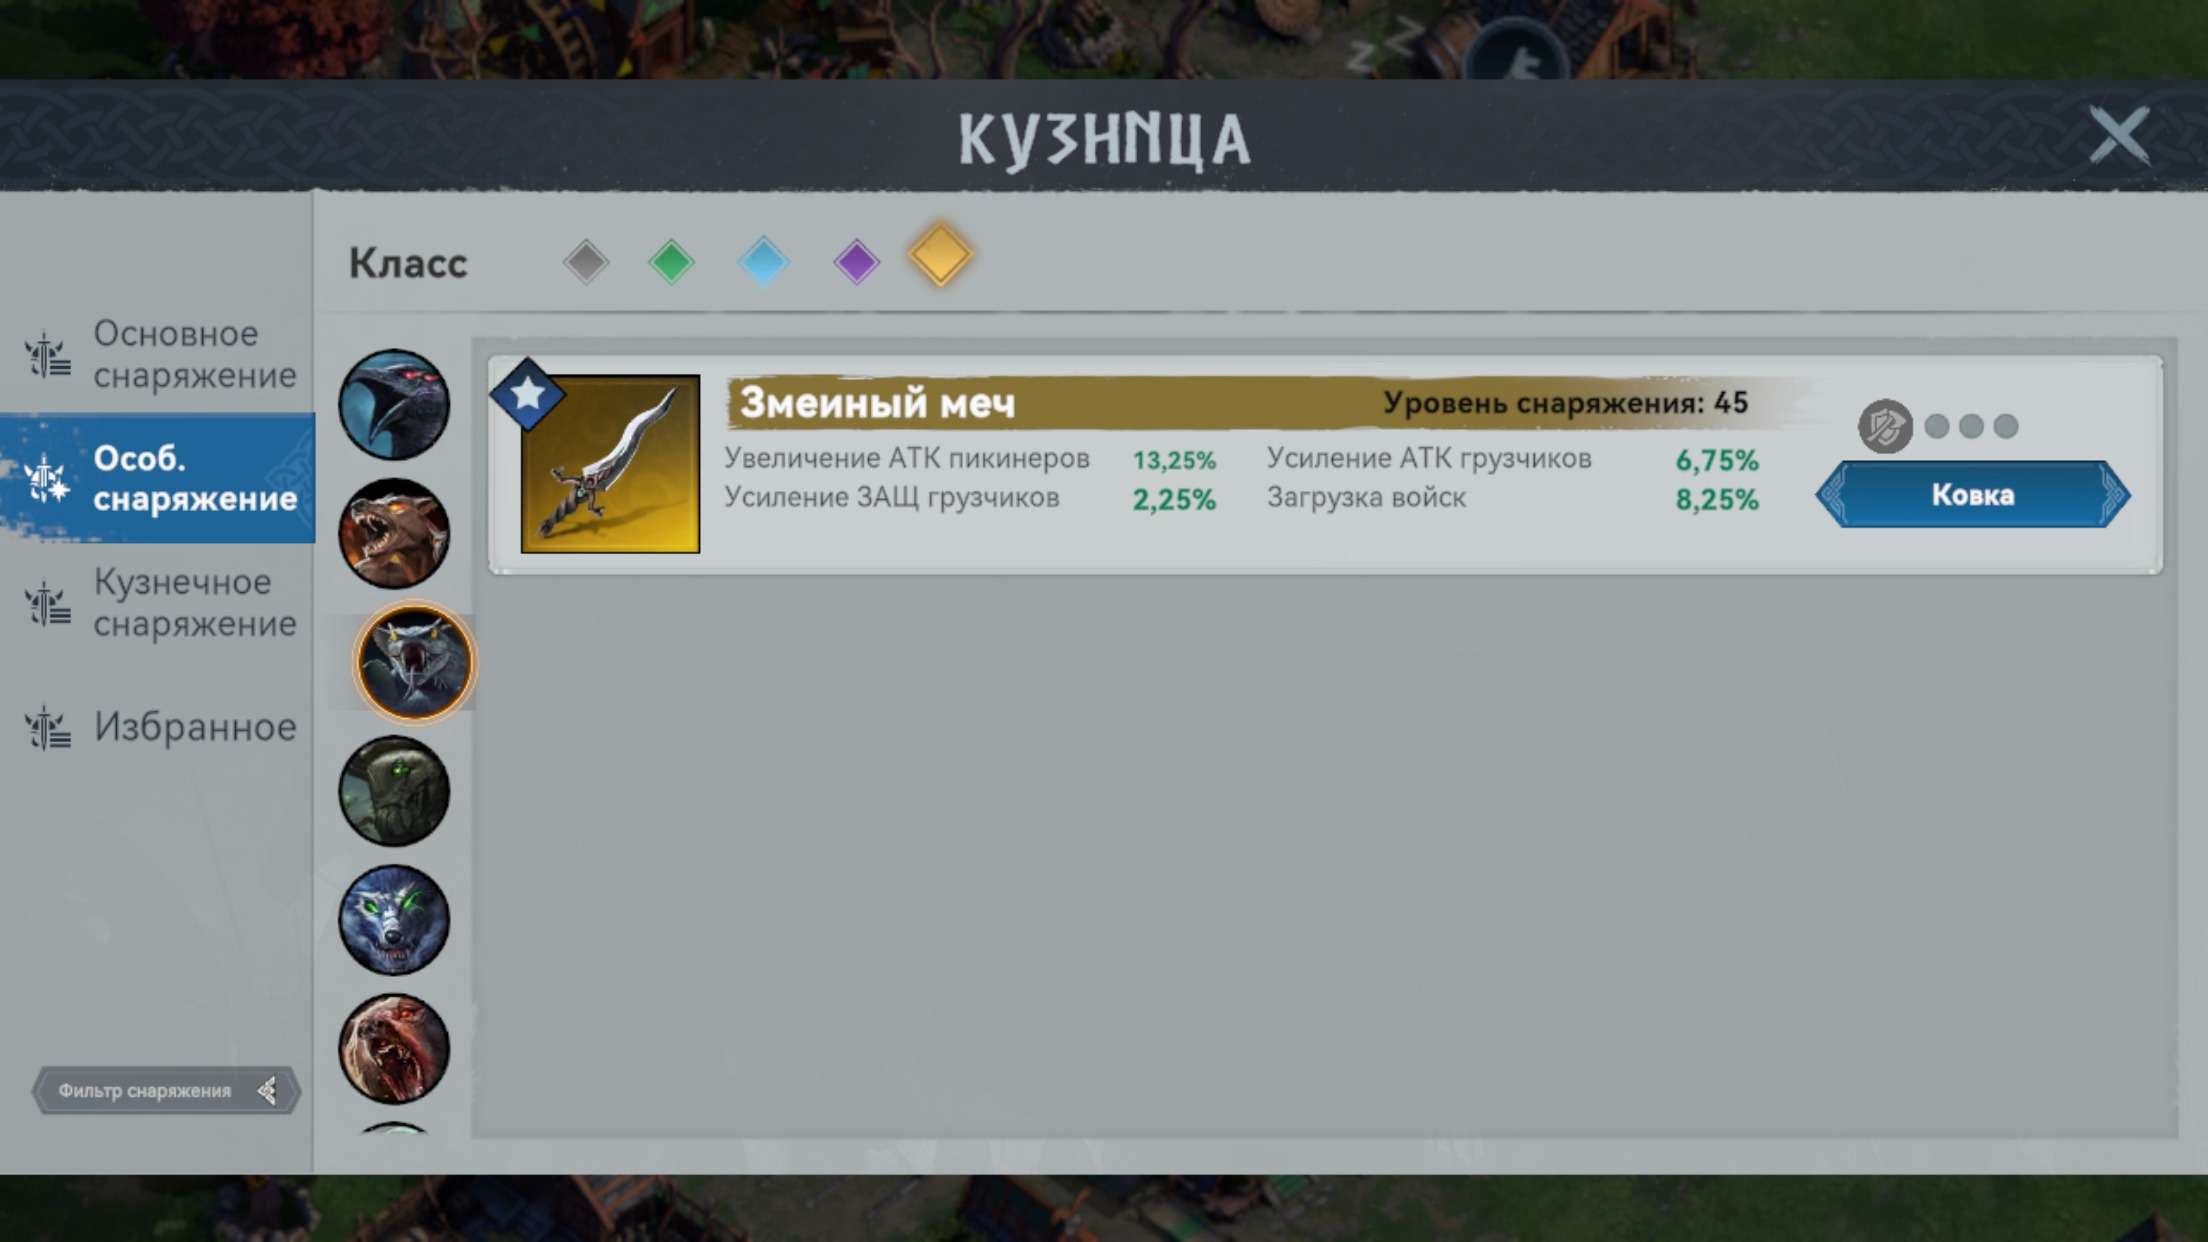
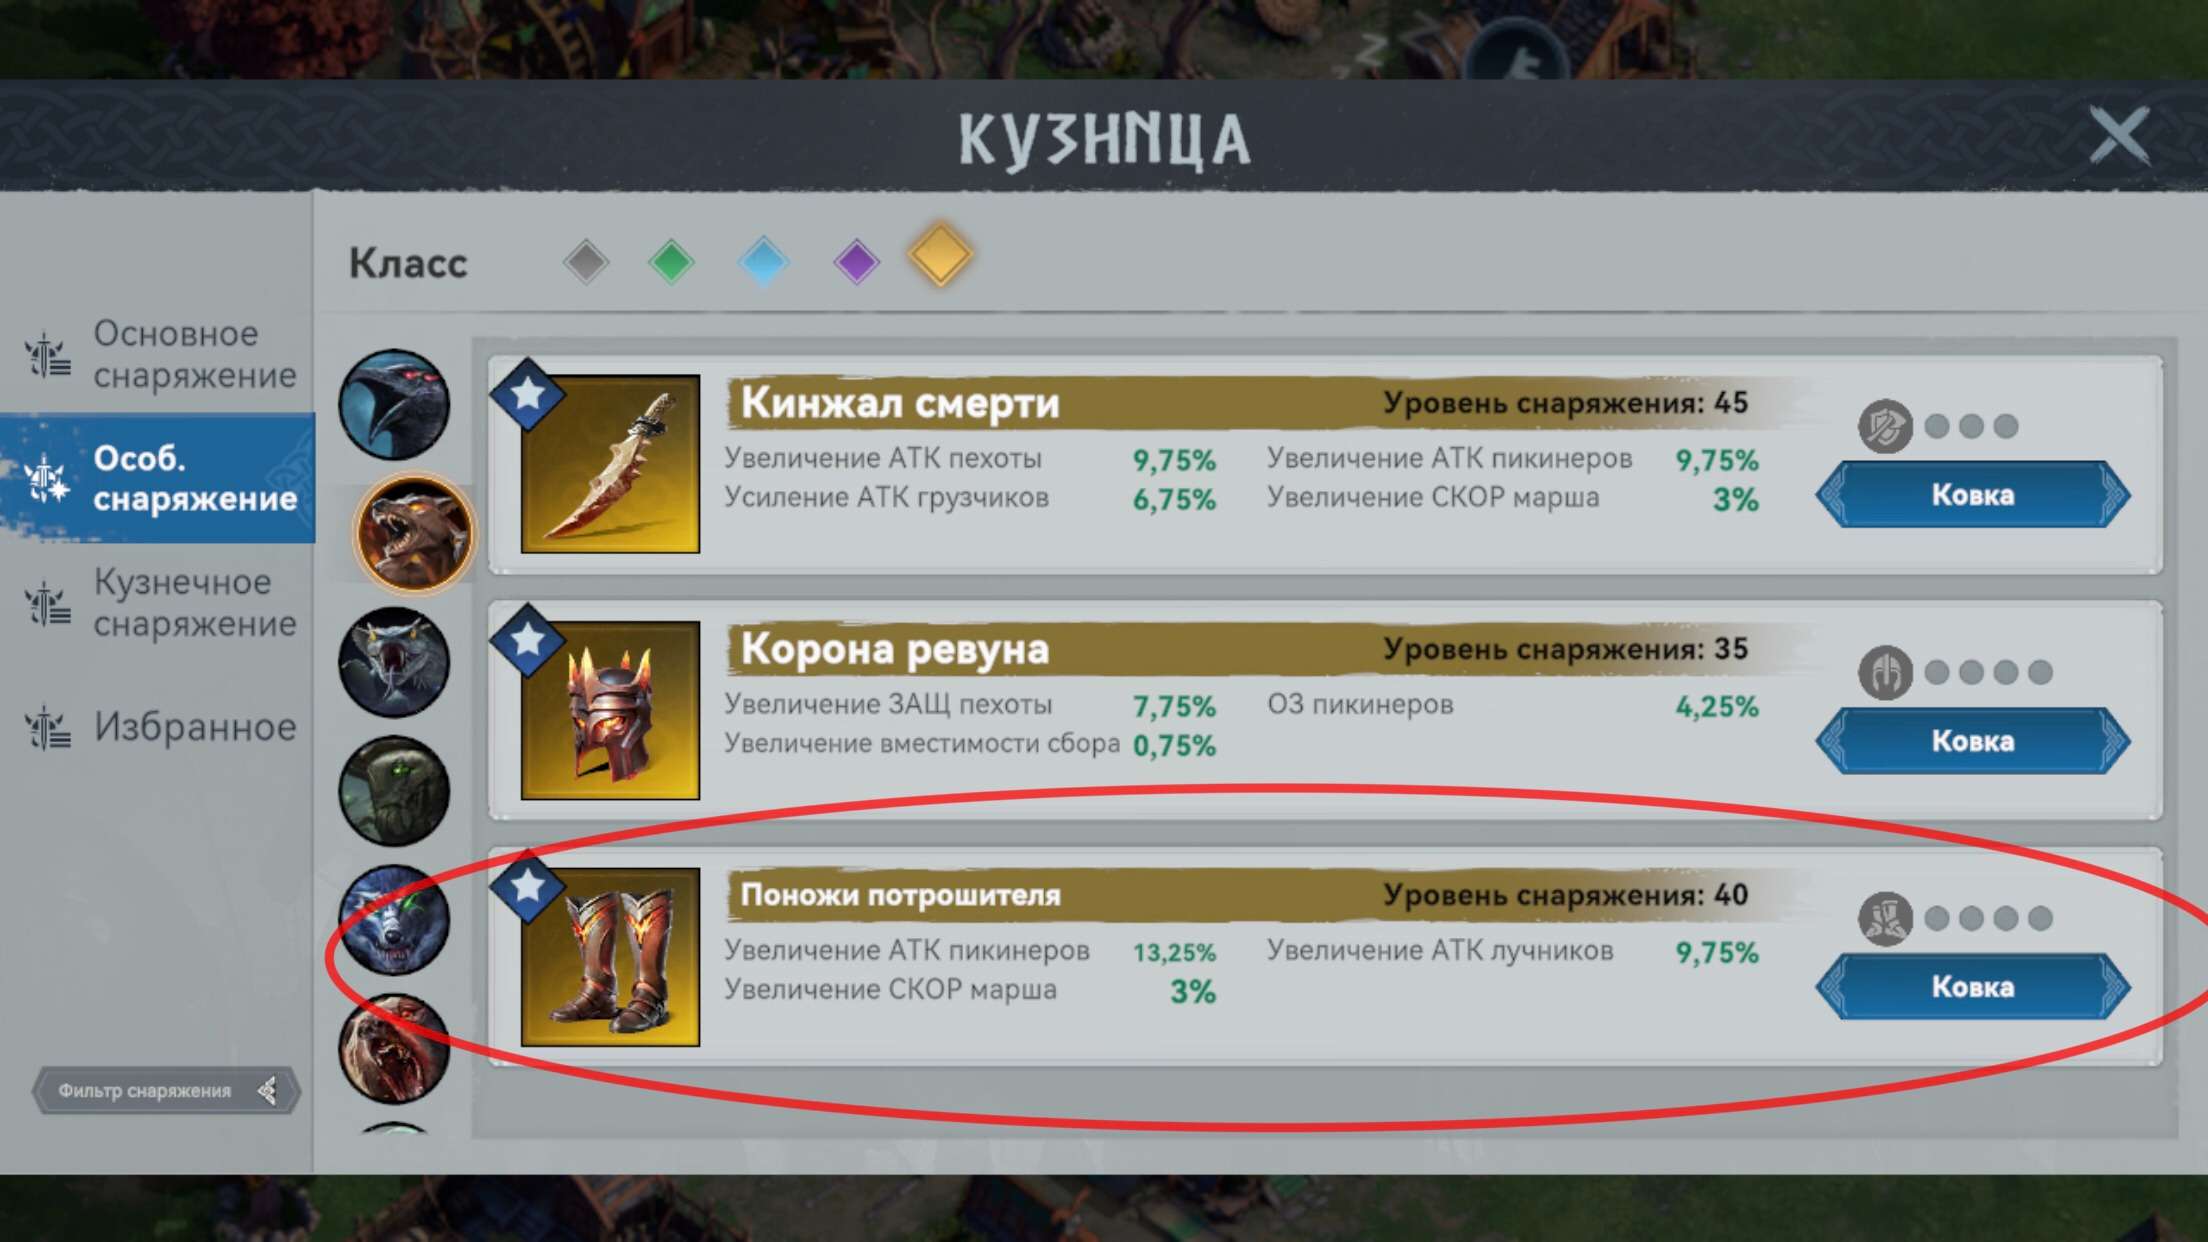
The best equipment for troops is infantry
The best equipment for troops – archers
Fortune Teller Guide
Let’s break down the fortune teller in more detail.
I won’t go into detail, everyone already knows what it’s for, what it gives, how much it gives. We’re going to take apart the most important things.
In principle, the fortune-teller has no use for anything that does not concern troops, construction, and research.
Resources? Plenty of them, and you guess very little of them. Gems? Penny drops.
Cure acceleration? Not constant, given the small number of battles, acceleration is very much. And so on.
Most importantly:
Troops.
- We guess at increasing the capacity, speeding up the speed of training and reducing the amount of resource consumption. ( Basically speed and resource expenditure are also situational, you can do without them!)
- Construction as well as research is similarly situational. You will see a significant reduction in time to build or research, if you have it for weeks, months. You can already cut back a few days there, and the more it takes, the more days you cut back.
So use divination rationally.
Below I will show a divination for the troops. In the screenshot you can see the number of trainees, time and resource costs.
Now guess!

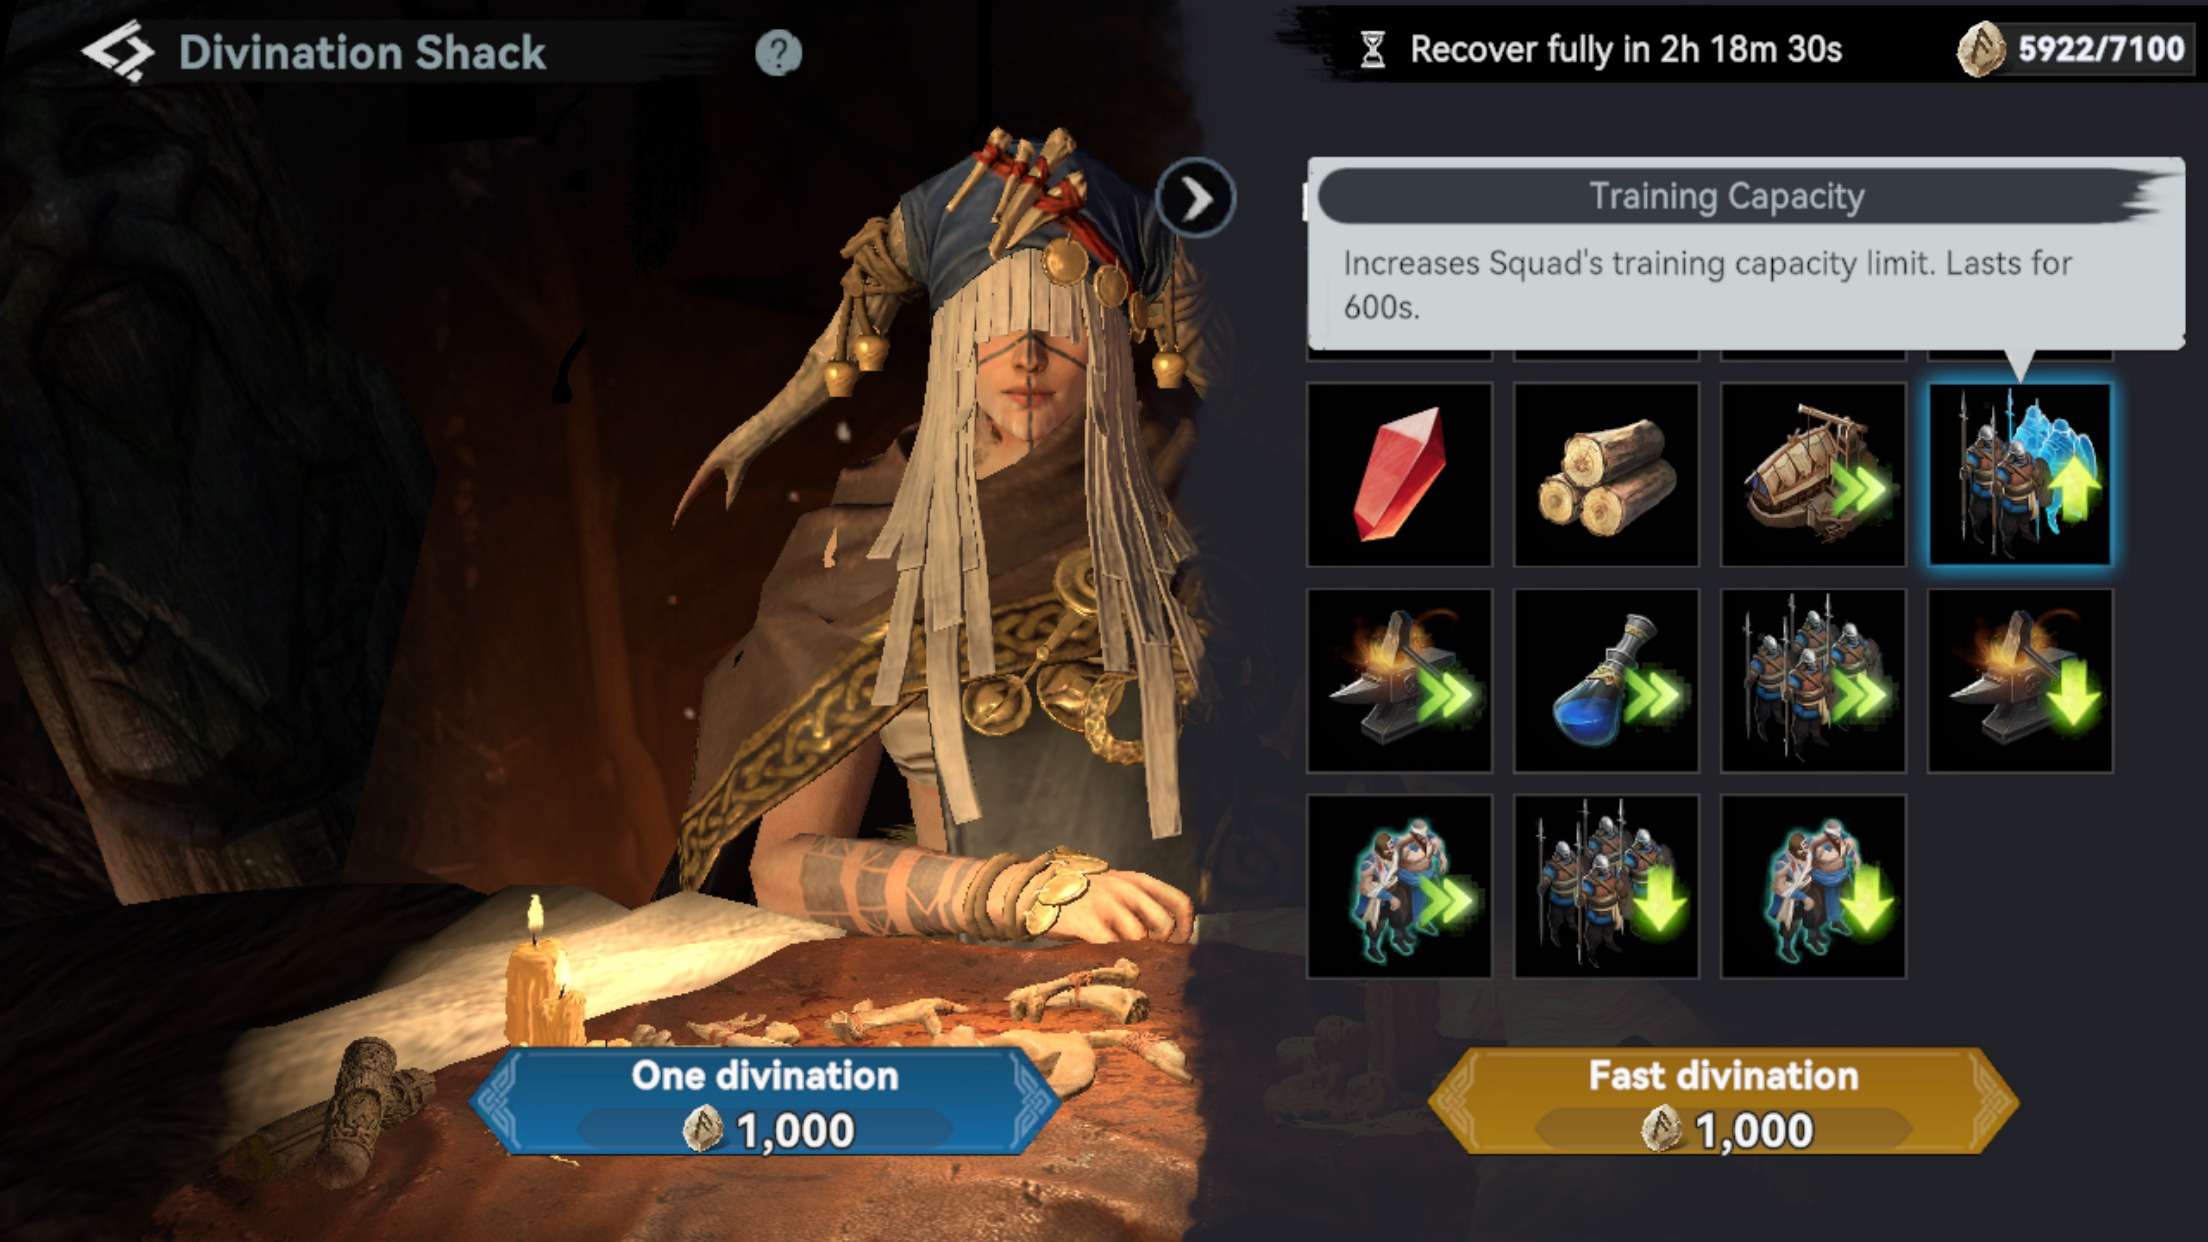
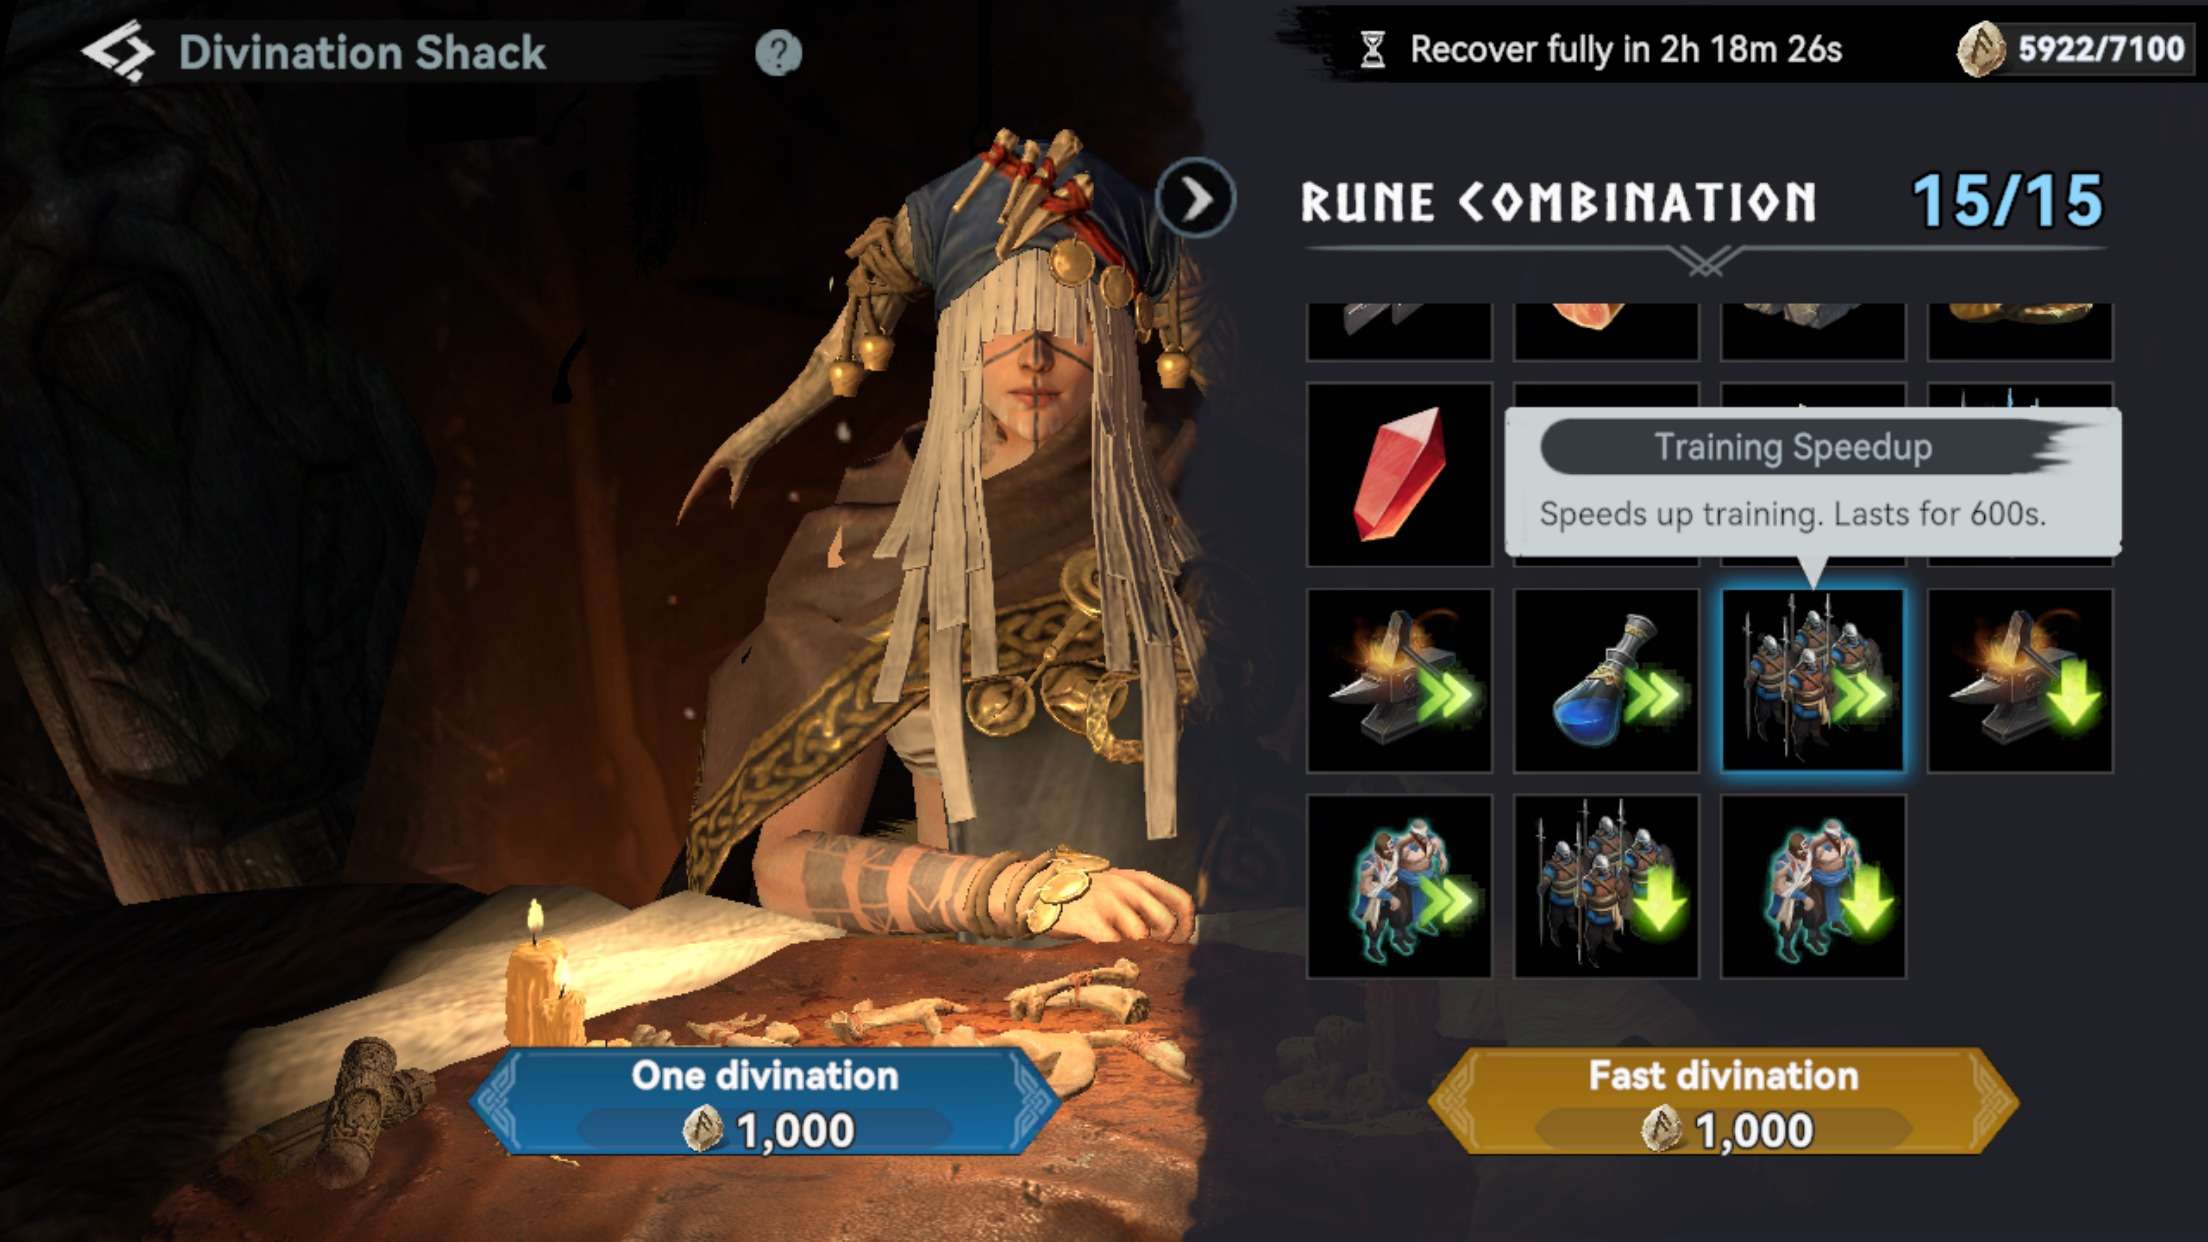
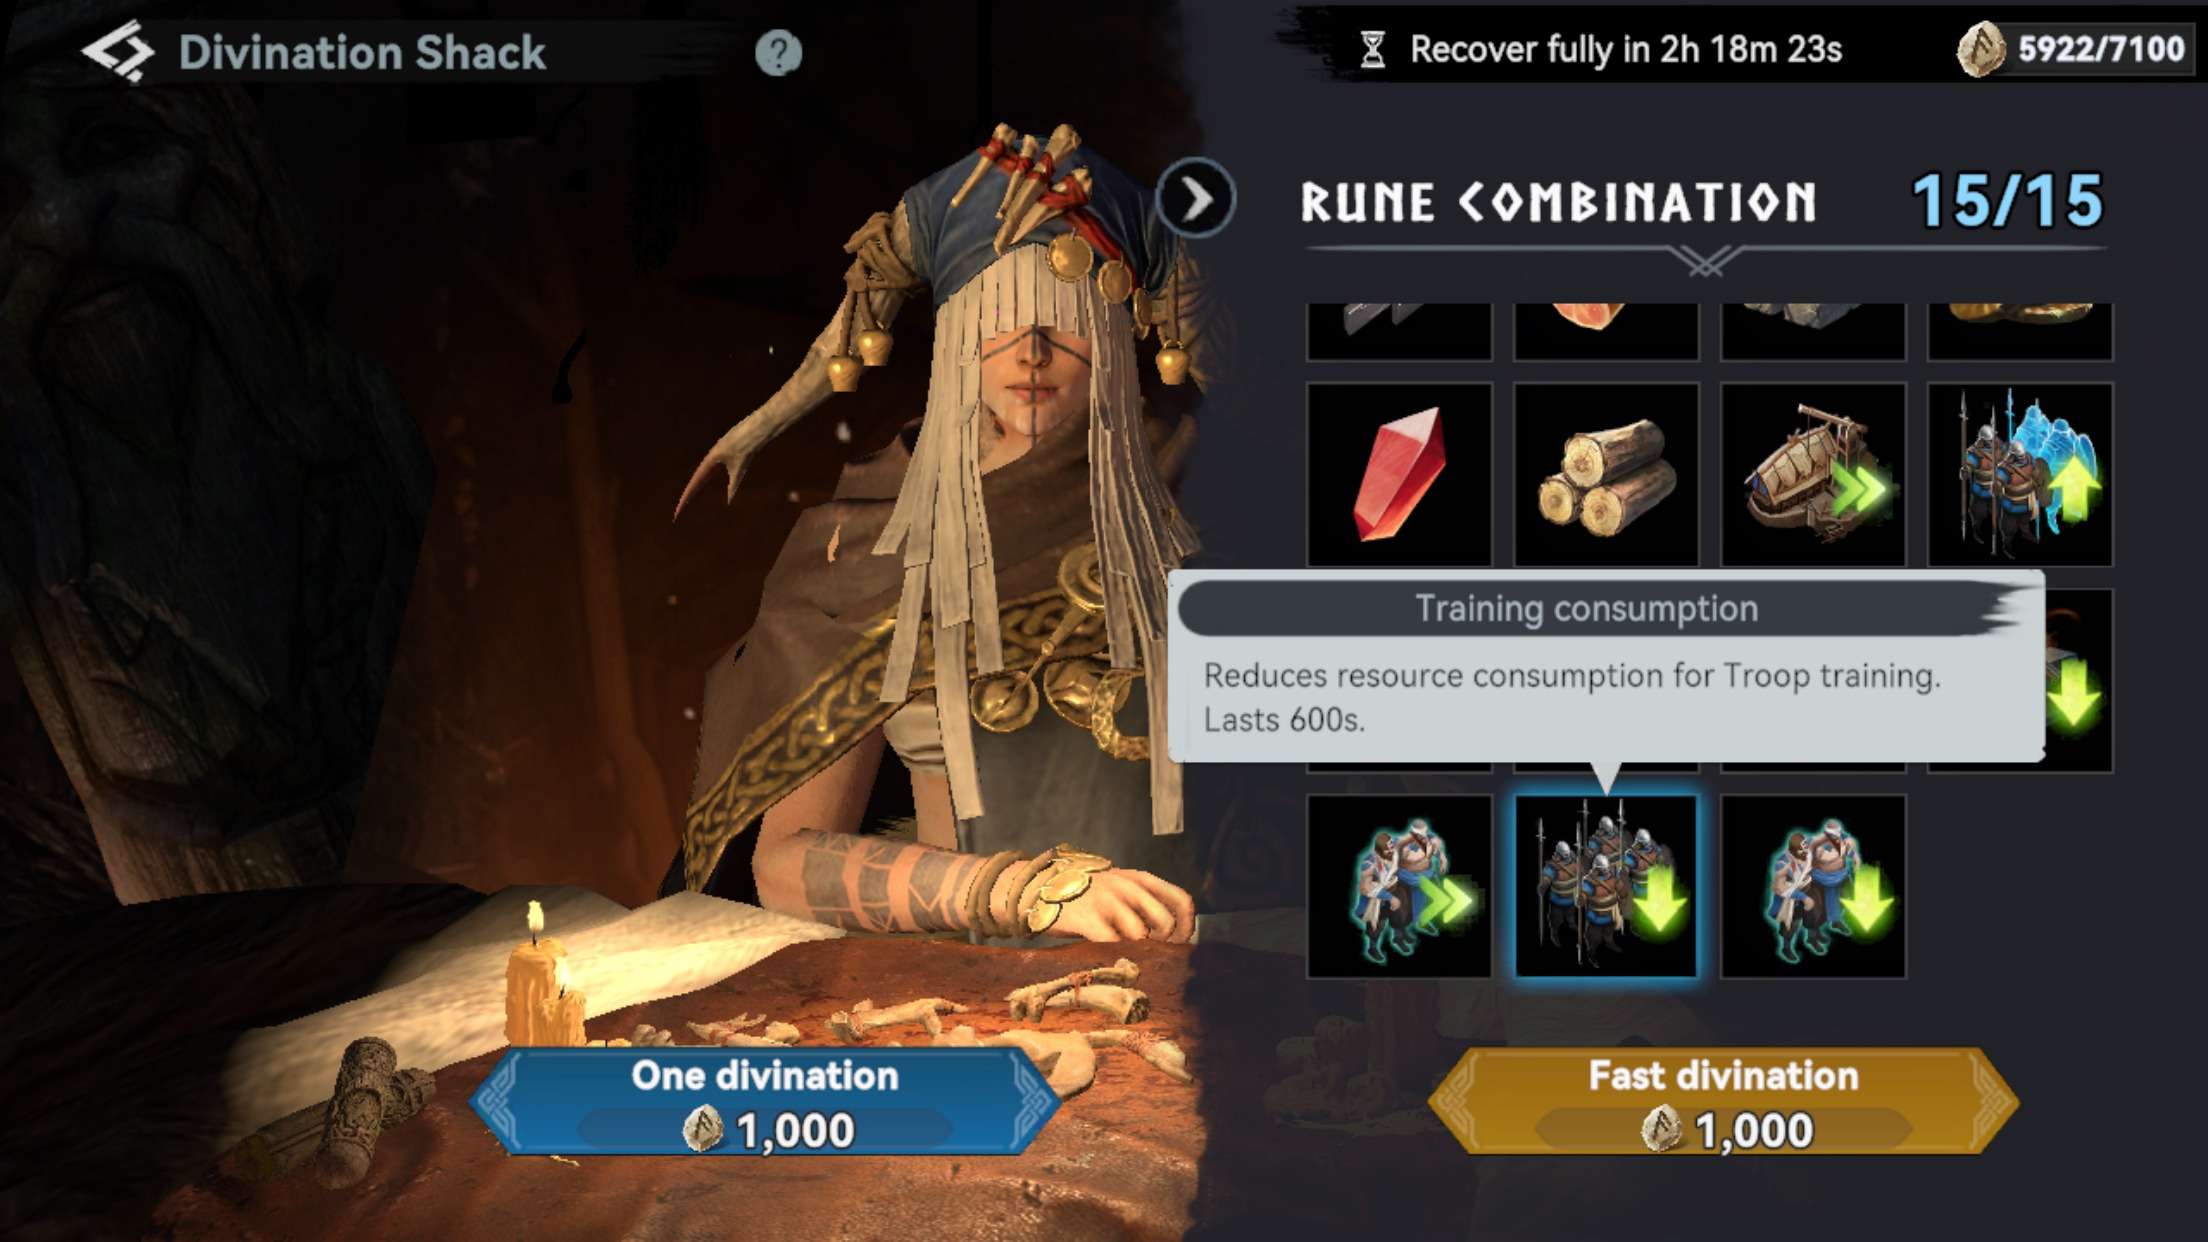
As you can see, the number has increased. Time and resource expenditures have also changed. Really…we won’t notice them. All because they increased the number of troops being trained. Of course, you can guess one at a time and see the difference, but it is negligible. The advantage in our case is only an increase in the number of troops being trained!

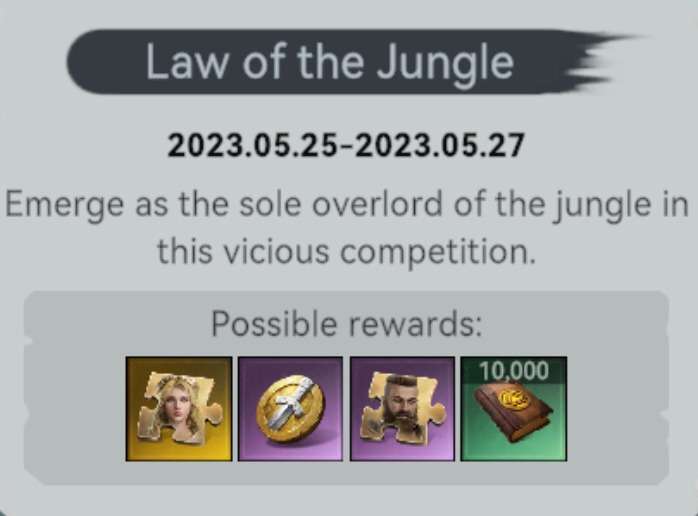
Law of the Jungle Event Guide
This event in the game is cyclical, every 2 weeks.
- When you start the game on the map, there will be 3 other people with you, located in different parts of the map. There is no need to immediately look for them, run after them, it’s better to take care of their own equipment. So you have to find items that give you a buff – protection – attack – abilities.
Just keep in mind that there’s no point in picking up gold gear if it doesn’t fit your type of troops. You will only waste your time.
- Don’t stop attacking all the monsters you see – they give very few points, but it will be much faster than looking for enemies and fighting them.
- To get as many points as possible, you must destroy your enemies, whether they are attacking monsters or fighting 1 against 1. You go into battle and attack the one with the least health and then the one with the most, or the one closest to you. You have to look at the situation.
- When you have low health left, I suggest you run back to where you started, because if you get caught up, you revive in 4 seconds and kill him back.
- When you kill someone you are left with low health. When your health bar is at maximum red, I advise you to “kill” monsters. That way your opponents don’t get points for your kill.
- Be tactful and evaluate the situation you find yourself in.
To summarize:
- Select equipment only for your type of troops.
- Do not gather runes (I have not mentioned it above) which give baffles archers, and you have pikiners. Choose runes only for pikiners.
- Always carry a random teleport, so that at any critical moment you can teleport and get killed by monsters, or drive the opponent to his respawn point.
- Beat monsters, constantly, to “passively” farm points. As well as be able to knock out from them rune or gold equipment for your type of troops.
- Do not kill in the back.
How and Where to Spend Gold
Let’s break down a really ambiguous question that I am often asked by players: “How and where do I spend my gold? I have millions of it.”
Chiefs, I’ll answer that question for you.
In the early stages of the game you are given a large amount of resources, mostly obtained for completing the storyline. You accumulate gold that you have nowhere to spend it. But that’s not true.
You need gold in the “later” stages of the game. When you start researching T3 troops, go to higher levels of buildings. You’ll need a couple million gold just to explore T3 troops, and there’s still training to be done in the future.
So don’t worry that you have a lot of gold, it’s not much, trust me. It’s always going to be in short supply.
I hope you don’t have any more questions about spending gold!
Non-Obvious Questions
Let us continue on the subject of non-obvious questions, although this question is in great demand among all chiefs.
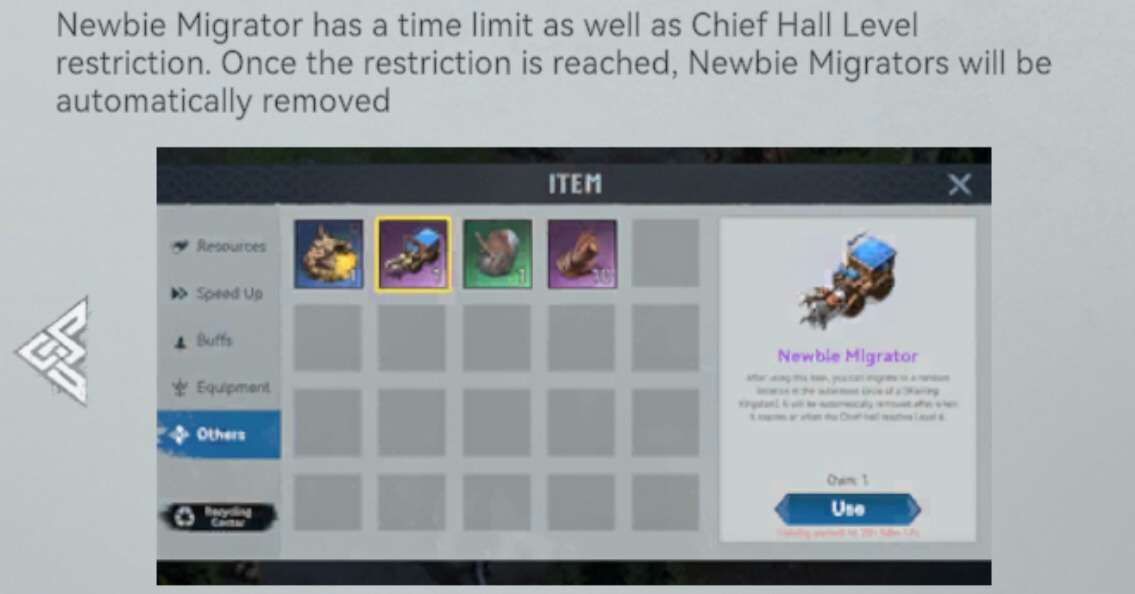
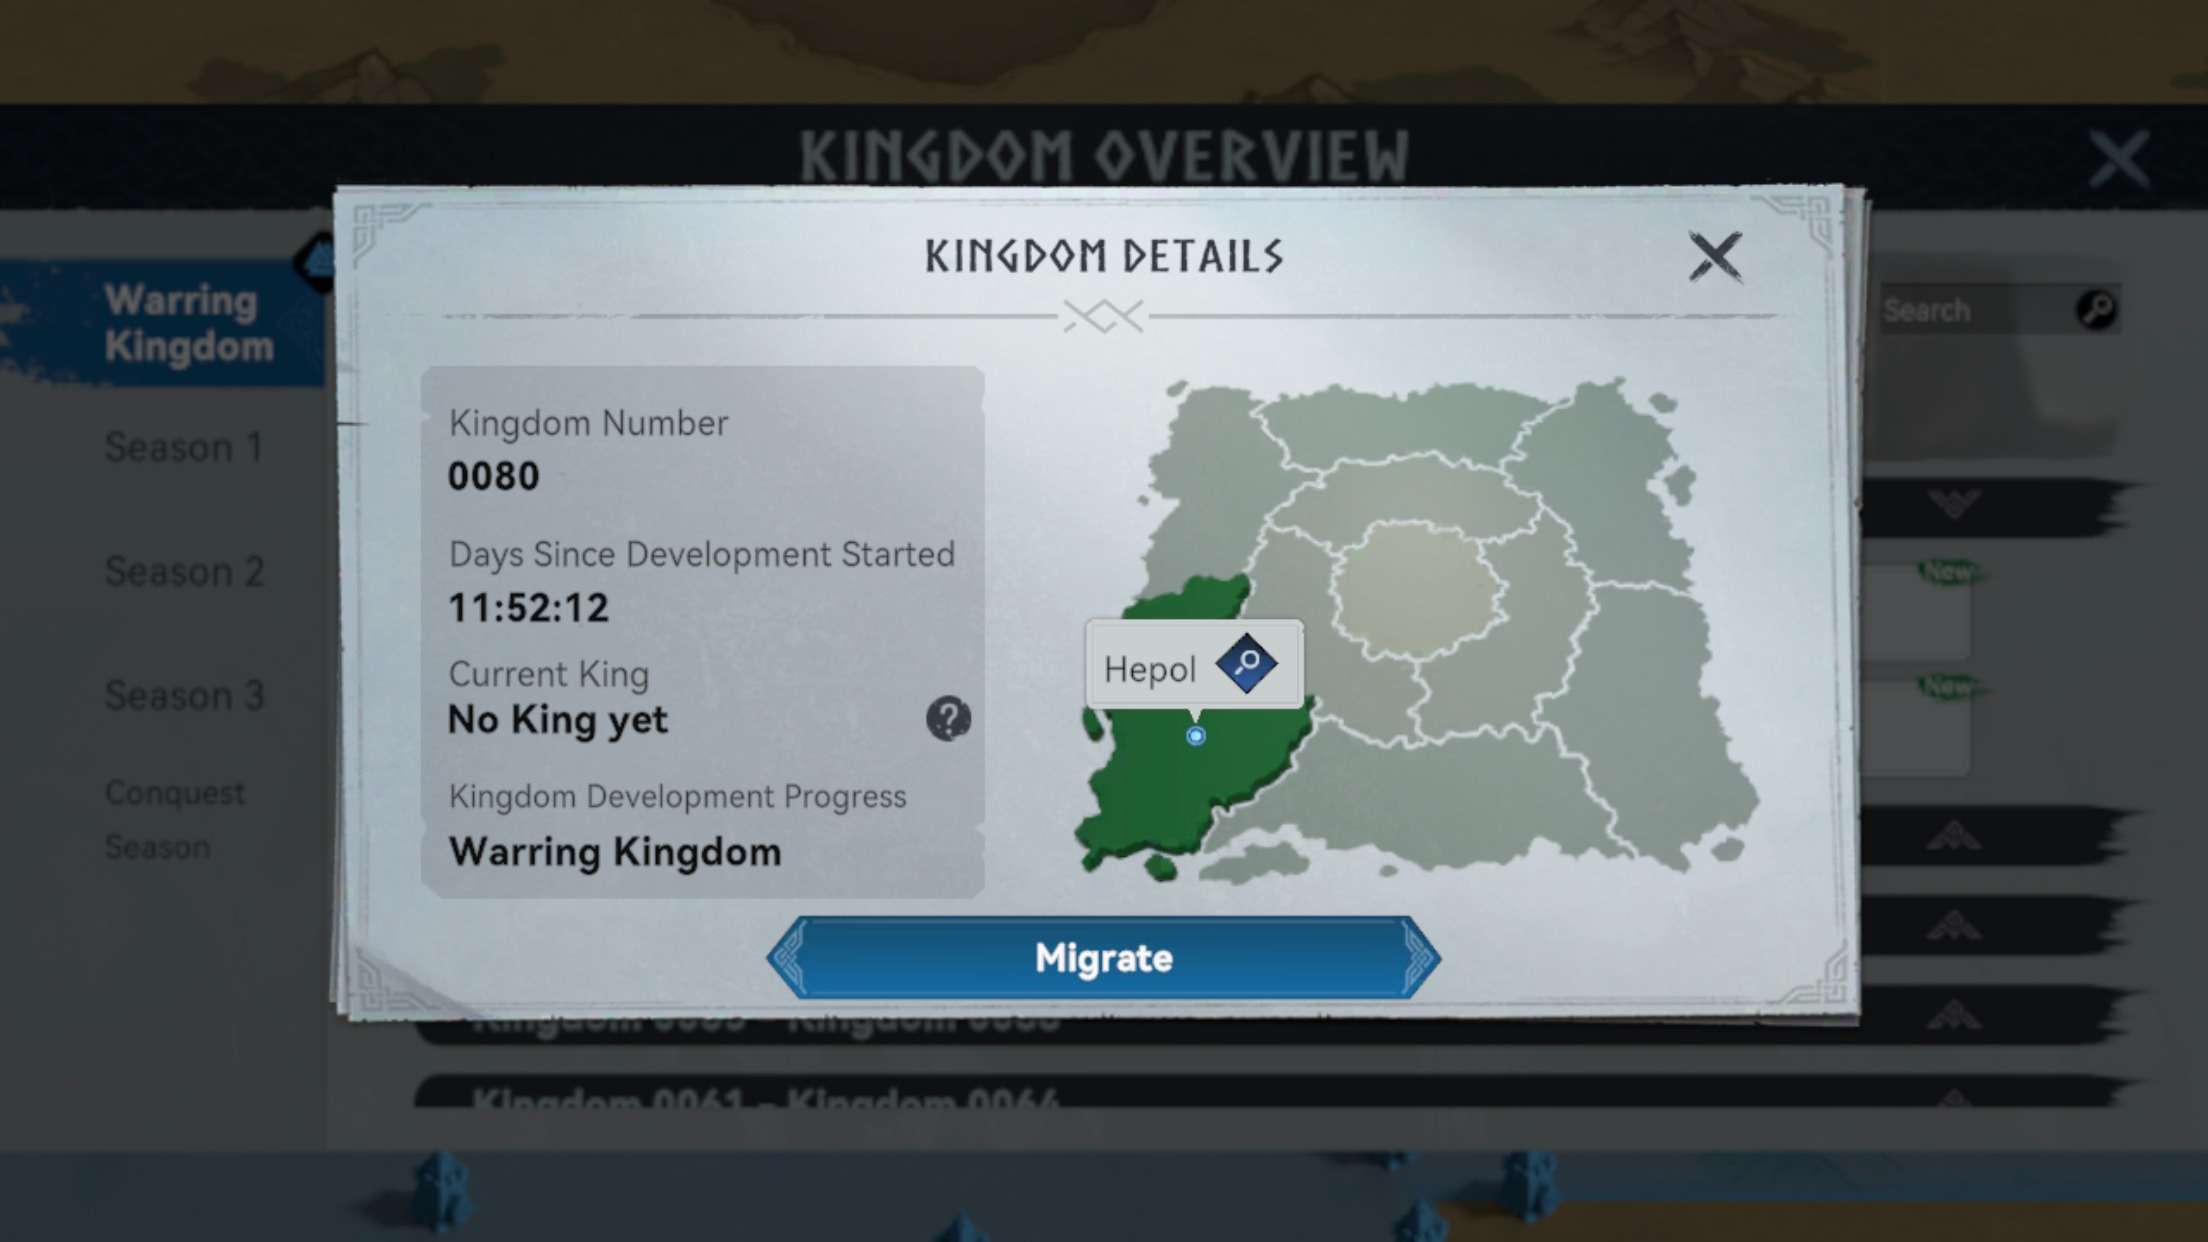
Migration from kingdom to kingdom!Until you reach castle level 8 (at least that’s what it says in the game guide) [Actual 6].
You will be able to migrate to another kingdom using a special “rookie teleporter”, which will burn out within a few days if you don’t use it.
There is currently no migration between late accounts (level 6+ chieftain)! This feature is in development!
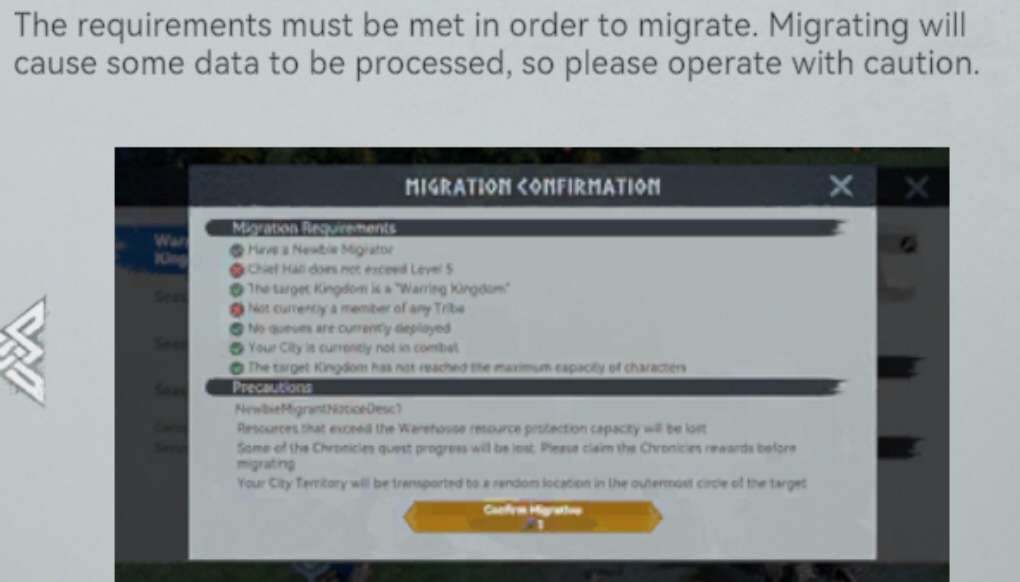
Newbie Migration requirements:
- Own a [Newbie Migrator].
- Chief Hall is lower than Level 6.
- The target server is a [Warring Kingdom].
- The current character is not in any Tribe.
- There are no Troops marching on the map.
- The City is not in a battle.
- The number of characters on the target server has not reached the limit.
Important to know:
- You can only teleport up to level 6. (Or until the “transition to adulthood” notification pops up.)
- You won’t be able to move your castle from saving progress if you don’t qualify.
- You can create a couple more accounts in your kingdom through “Settings – Character”
- Be courteous with your choice of kingdom.
If your friend is in one kingdom and you are in another. Then either fly someone to another kingdom, or if you are in the later stages of the game, create a new account in the desired kingdom.
Basically, these were the main points about teleportation. The next post will break down all of the existing teleports in the game and how to use them.

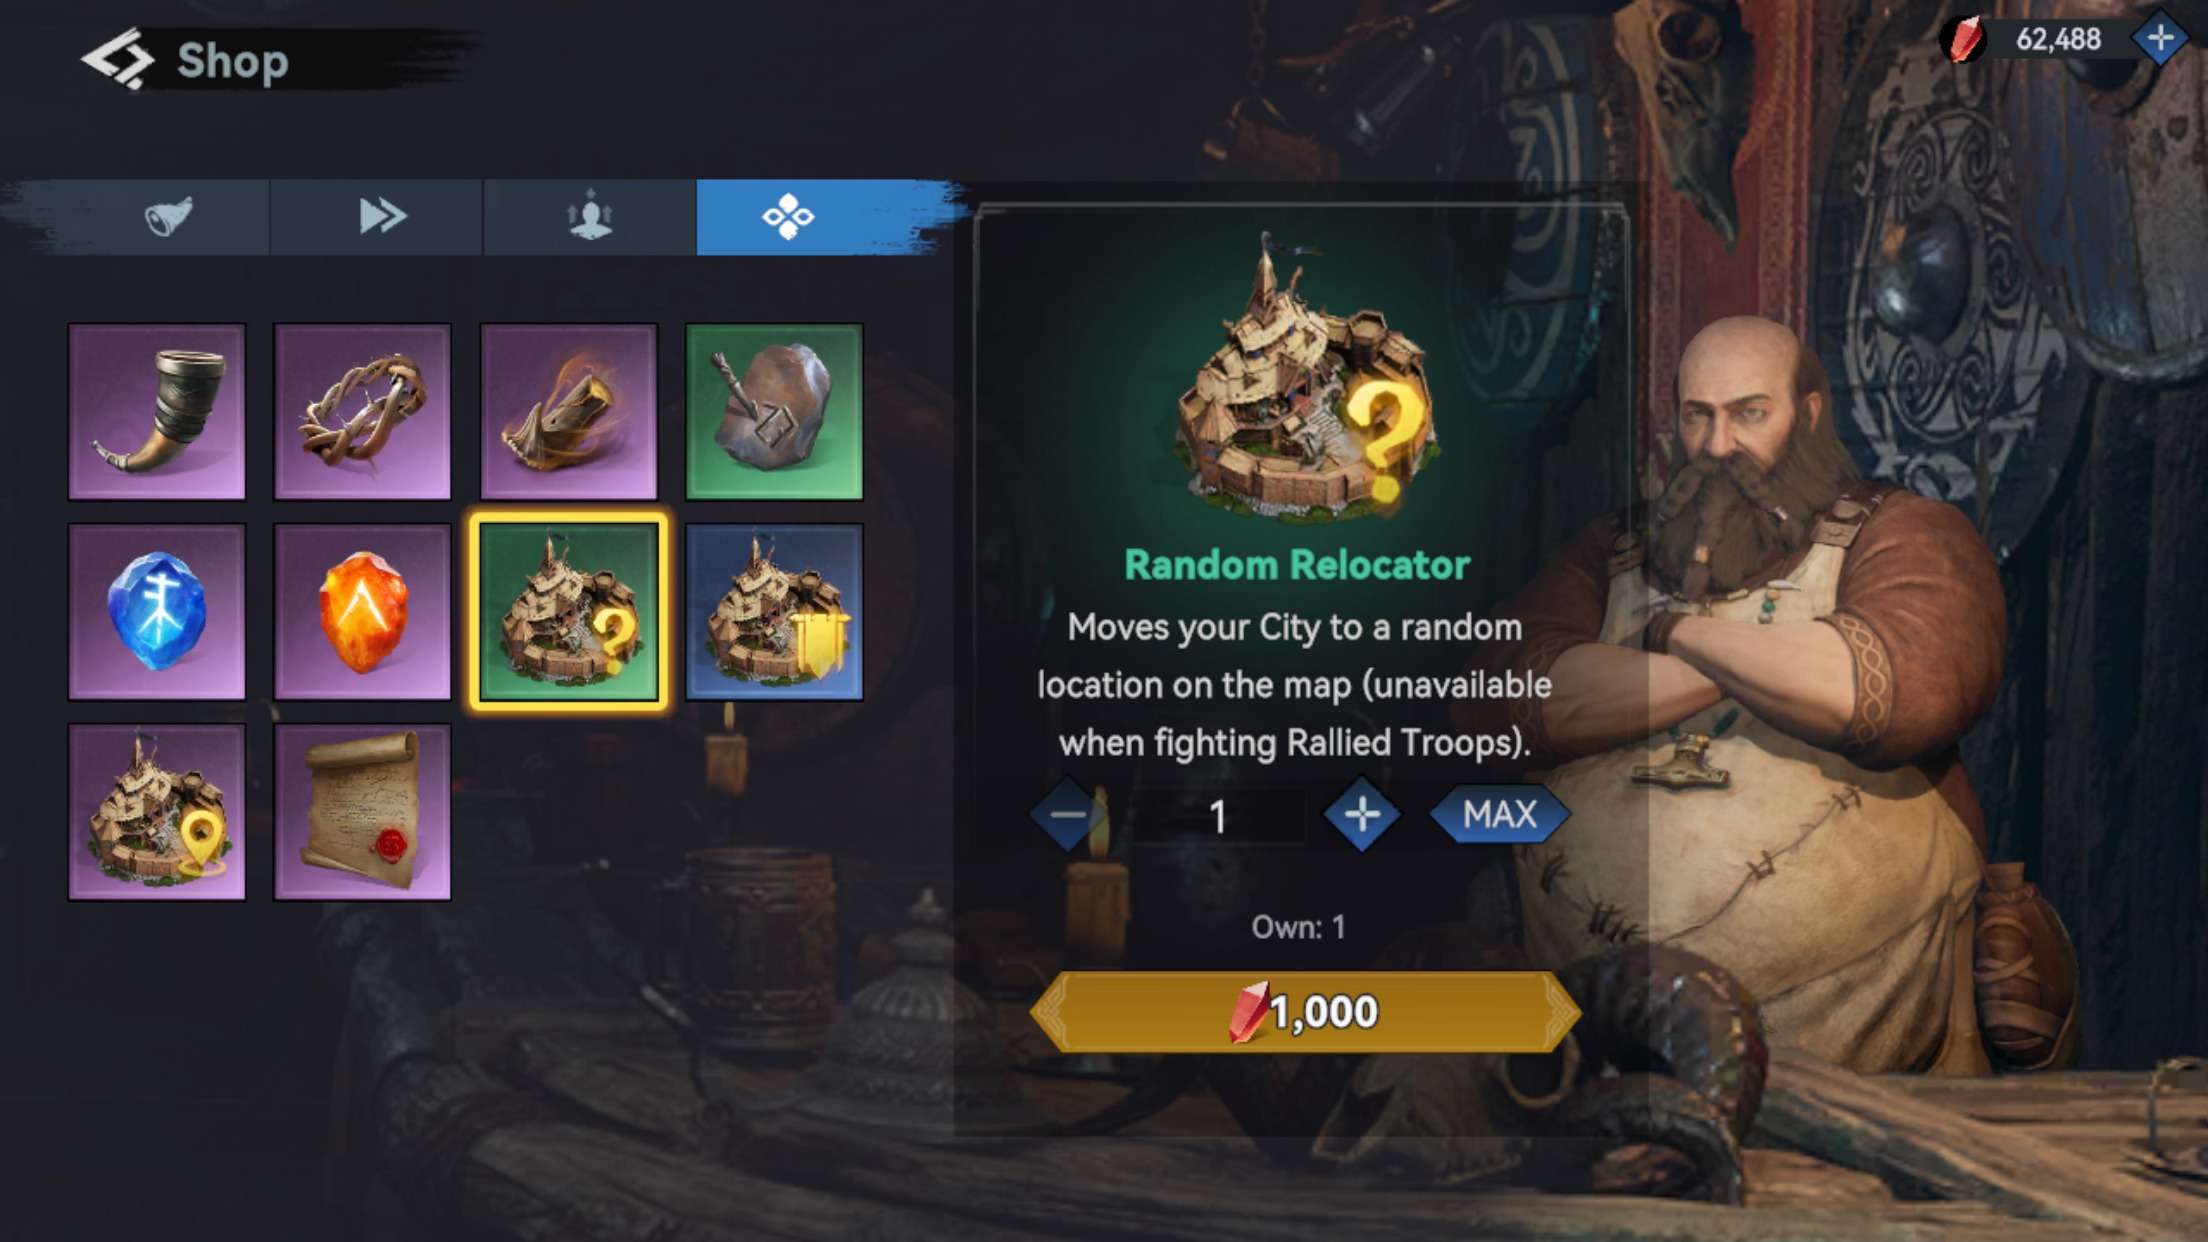
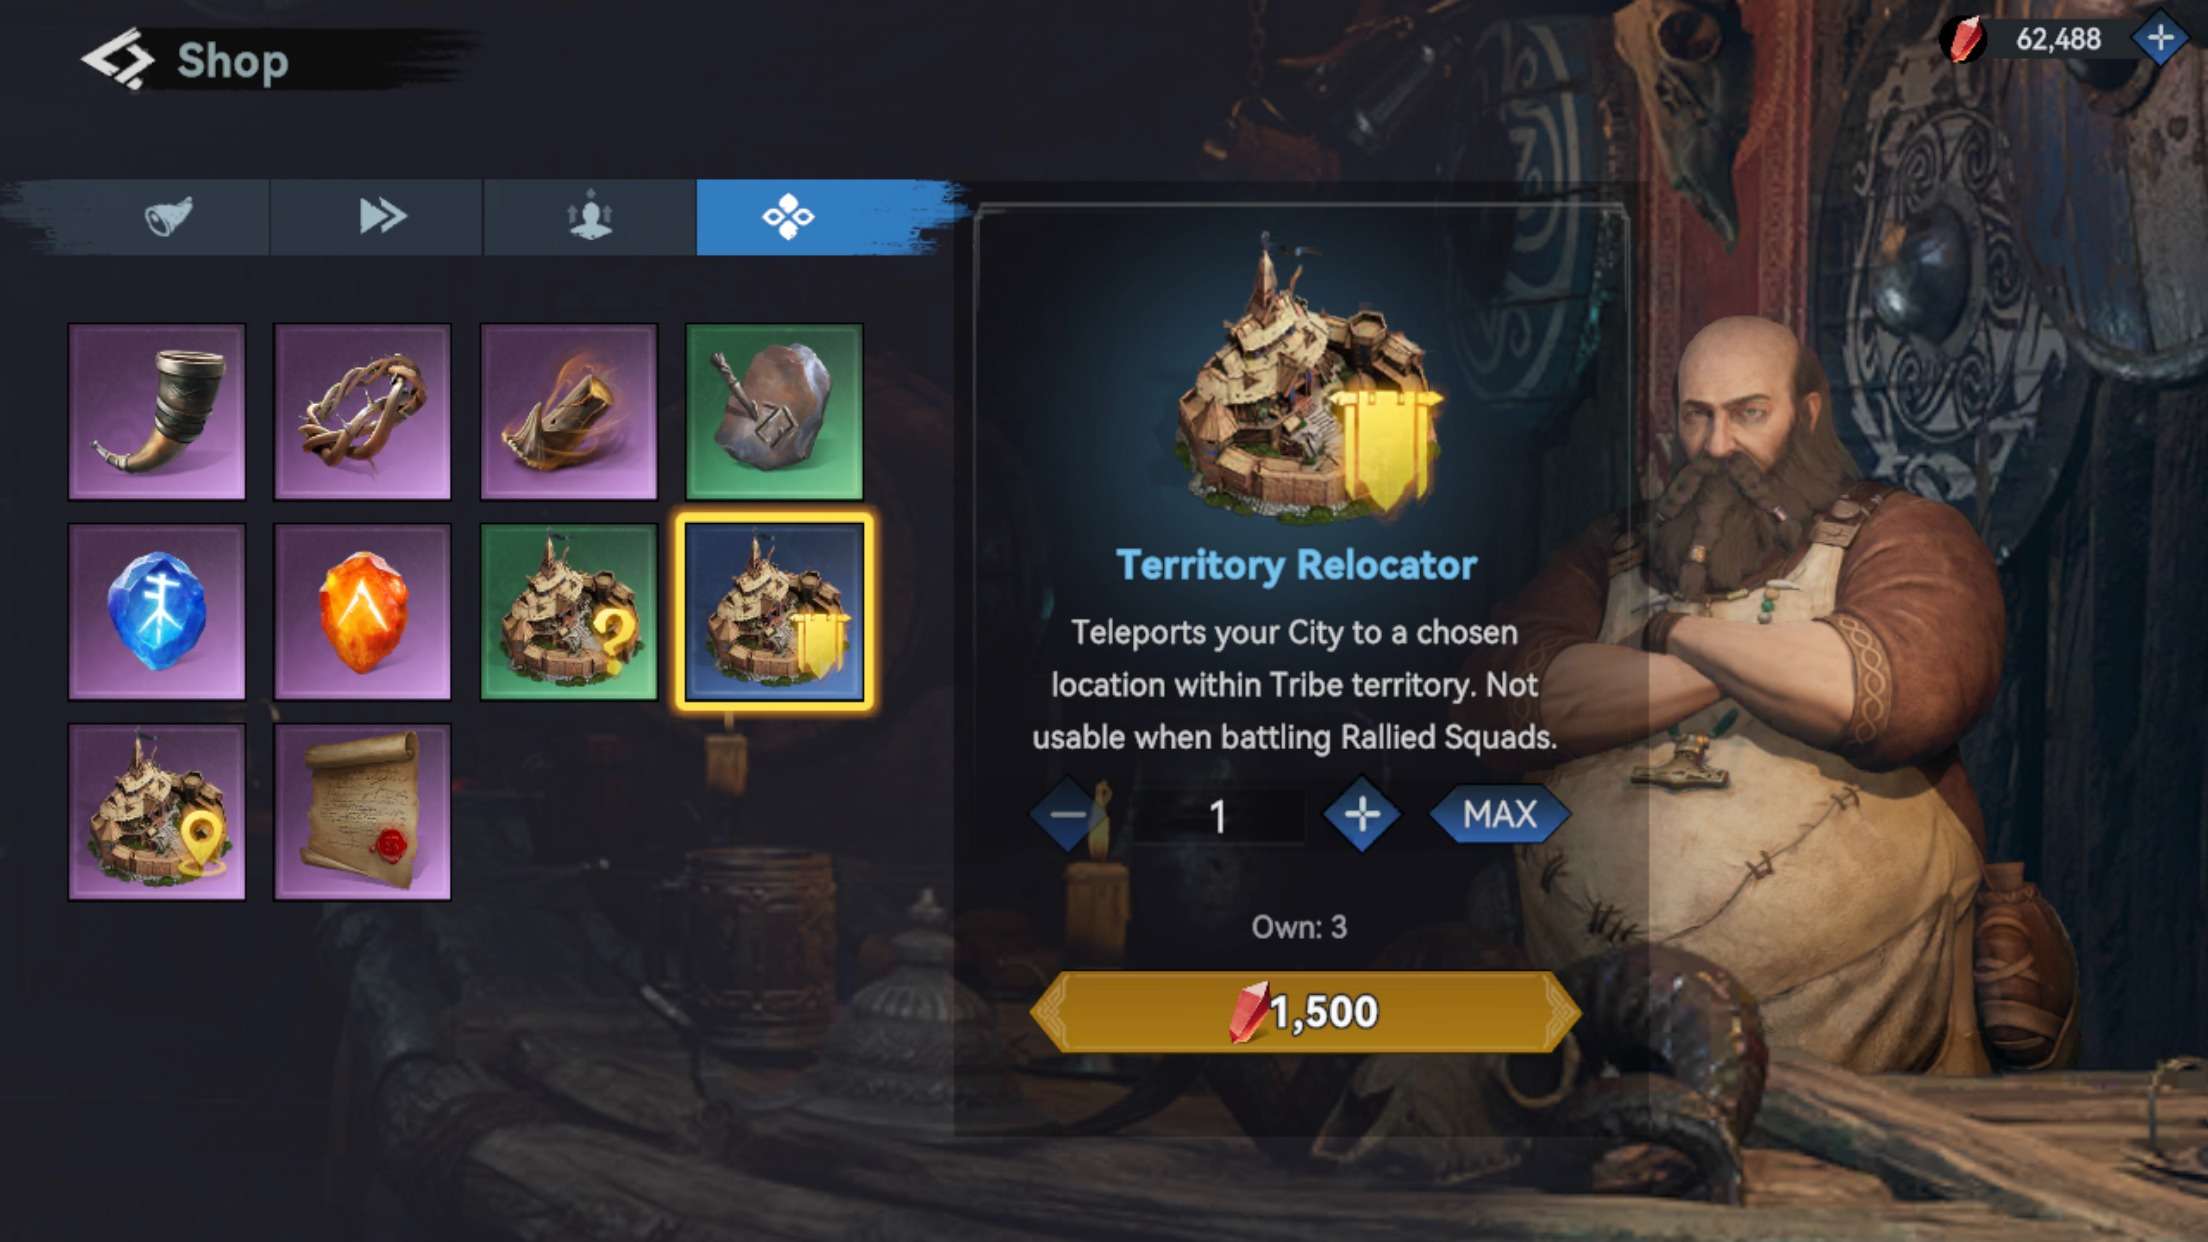
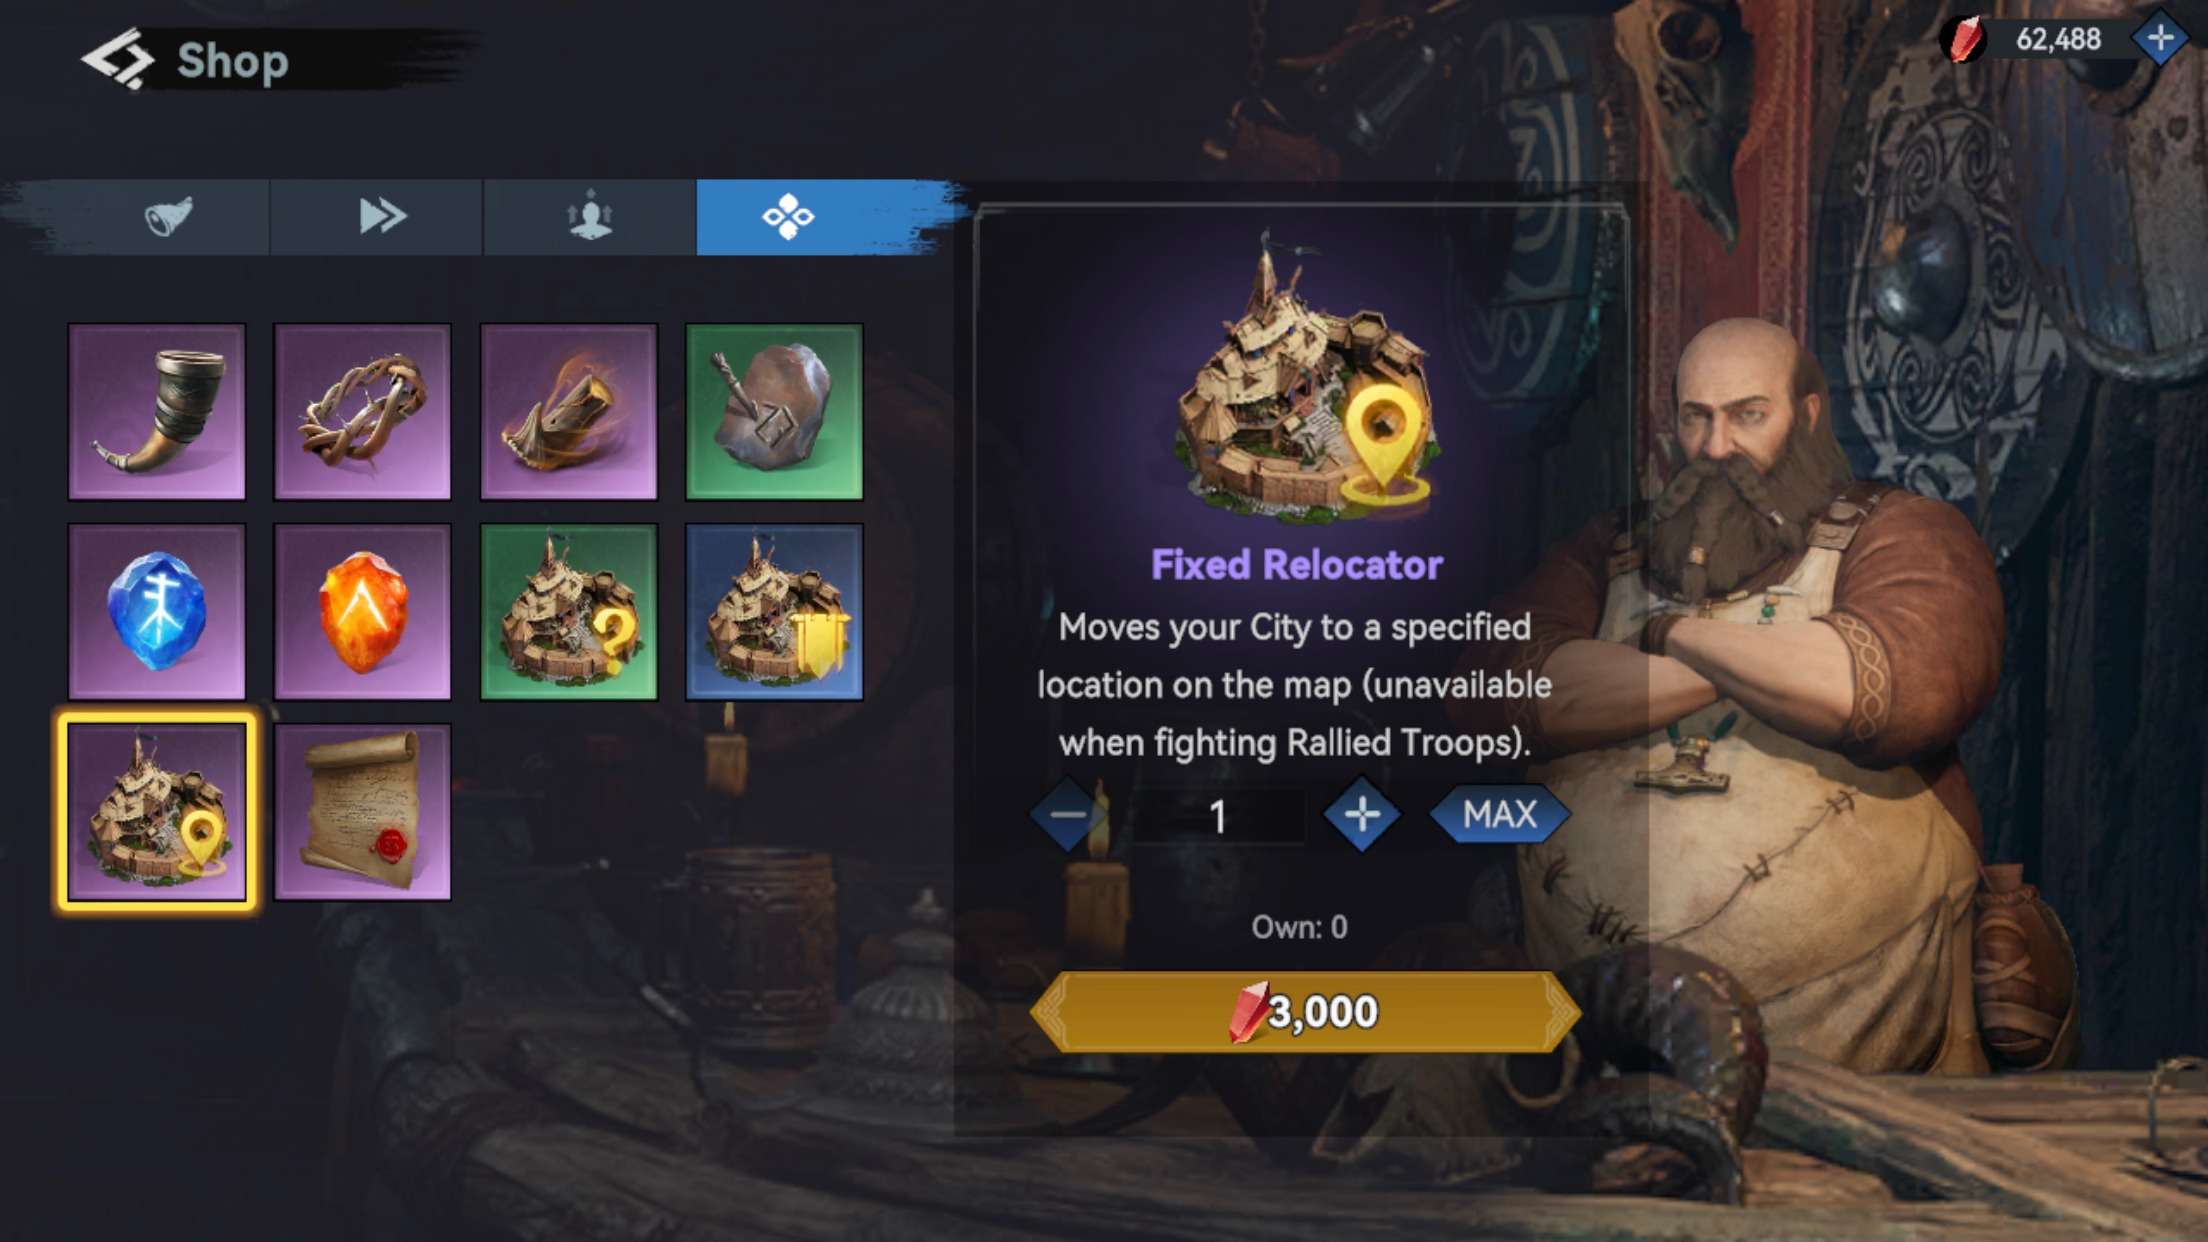
Teleporters Guide
We dealt with what a teleporter rookie is, you’ll deal with the others.
There are 3 types of teleport:
- Random Teleporter — This teleporter, when used, teleports you to a random location in your kingdom.
- Territorial Teleport — This teleports you only to your tribe’s territory.
By the way, you can get a territorial teleporter once every 3 days. Only 2 times. Remember this.
- Advanced (Fixed) Teleporter– teleports you wherever possible.
Advanced teleporter will not transport your castle to another sector if piers are not activated. Don’t forget that!
Also don’t forget about War Frenzy. When scouting or attacking a foreign tribe it is automatically activated and lasts a certain amount of time. The most important thing to know:
- During its activation you cannot move or put on a shield.
- From level 10 of the castle its duration is 9 minutes. +1 minute for each level of the castle.
- If you scout or attack someone again, the counter will be reset.
So be careful and watch out.


Advice on Workers
You can have a maximum of 50 workers in total. When you want to hire 51, you will get a window where you can “replace/fire” any one worker. Until you do this, you cannot hire a new worker.
Fire the lowest quality worker you have (and I think everyone has purple/blue/gray workers) don’t be afraid to replace them.
In the later stages of the game, when 70%+ of workers will be legendary quality, you will need to choose, depending on what worker you dropped: the research, construction, speeding up the forge and so on, but that we all have a long way to go!
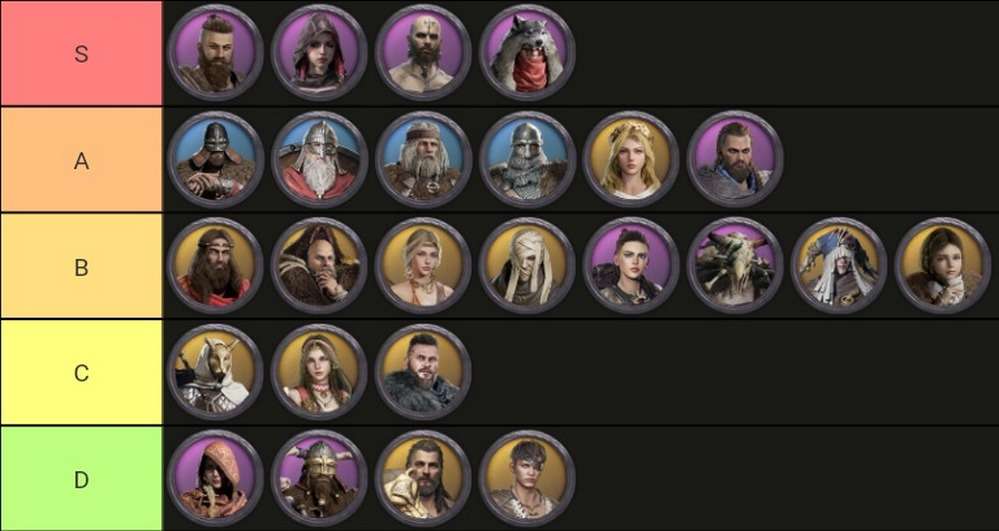
Heroes’ Tir List
Many people underestimate blue heroes. They are free, easy to get, easy to pump, get them at high level and high level, and you will see that they are really useful! Combine them with purple heroes and you can get a pretty strong lineup. (In practice of course it shows that many combine purple/purple and purple/gold)
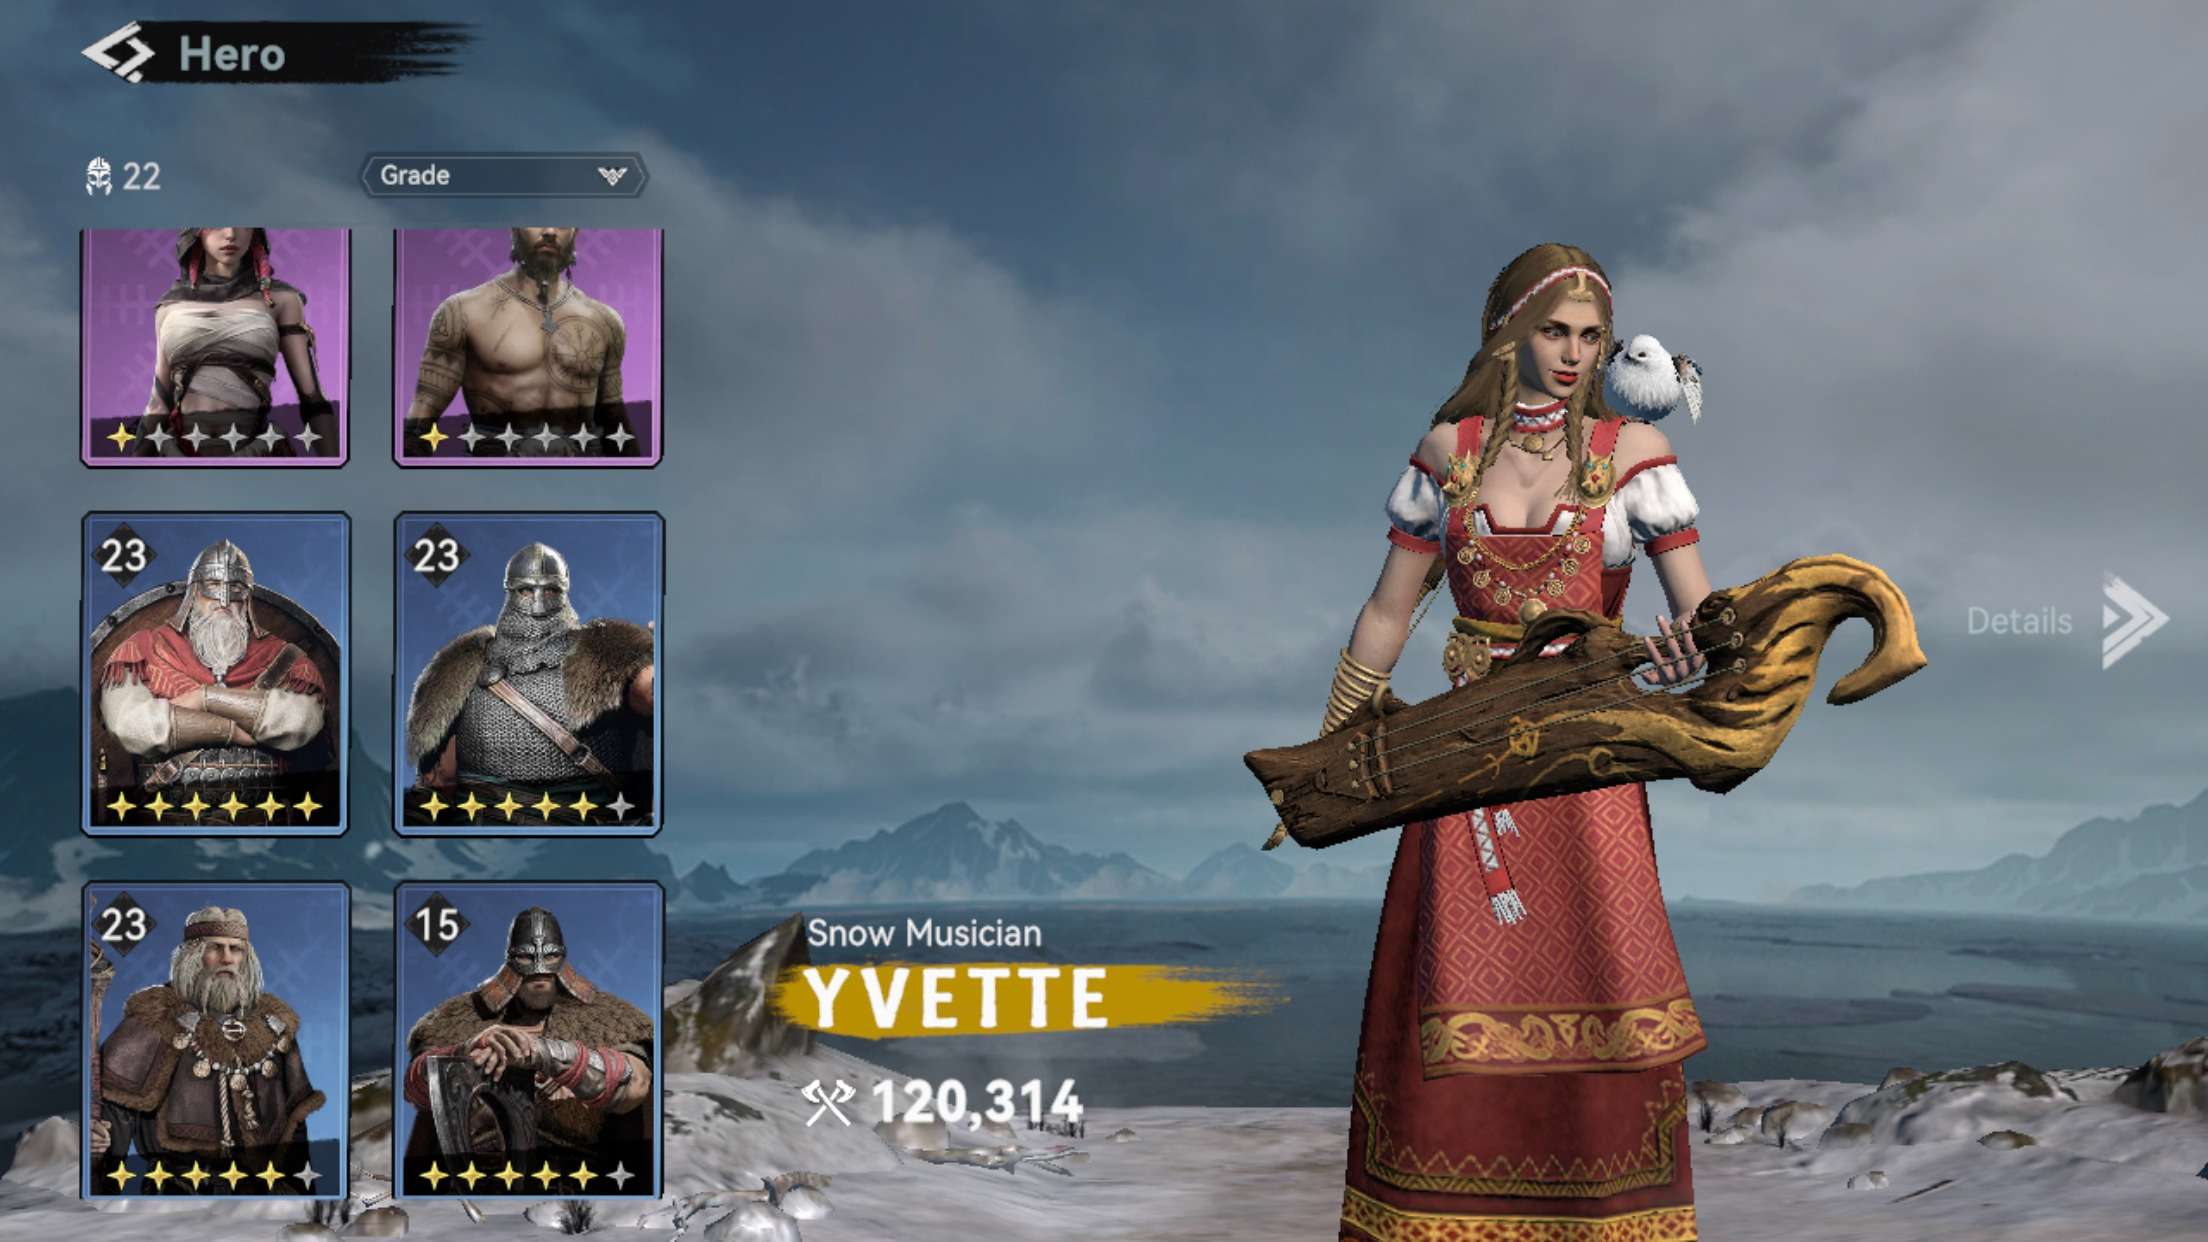
Yellow heroes are very expensive to pump. (I pumped Yvette up to 4 stars only.)
Anyway, I was looking at it from an F2P perspective. That’s why Ragnar, Yvette, Laird made the C list. They are good, especially this specialty ssss.
The b level is kind of worthless, the yellow heroes seem to be good in the lineup, but they are hard to pump, and that’s the only reason they are on the b list. Whereas purple heroes are easier to improve on this list. Of course it’s all 50/50. It’s a matter of who’s interested.
As for the D level list, you don’t have to say. Given that there are heroes that are not yet available in our kingdoms. On the first servers they are, on later servers they are not. I certainly know all the heroes that will be there, but I won’t tell you – it doesn’t matter right now.
So use it, and reminds me this is my TIR list, my opinion, and I do not say that it is 100% true. There is definitely no “IMBA HERO”. Any hero is good, for any other situation. That’s why you have to choose wisely, pump wisely and keep an eye on situations where these heroes can have more “impact” than others.
If you’re interested in the “tier list assembler” ( ahahaha, How ridiculous does that sound), here you go.
Viking Triathlon Guide
This section will be considered by many copypasta, but I’m not to blame that this event only appeared to me. (By the way, the boat never came, sorry, sunk probably – it’s the fault of the poor management of the construction company to build drakars)
Let’s get to the triathlon.

We have 3 stages:
- Building buildings, improving research, recruiting troops.
- Use accelerations.
- Recruiting in the Hall of Valor (heroes/skills) and pumping Heroes through hero shards.
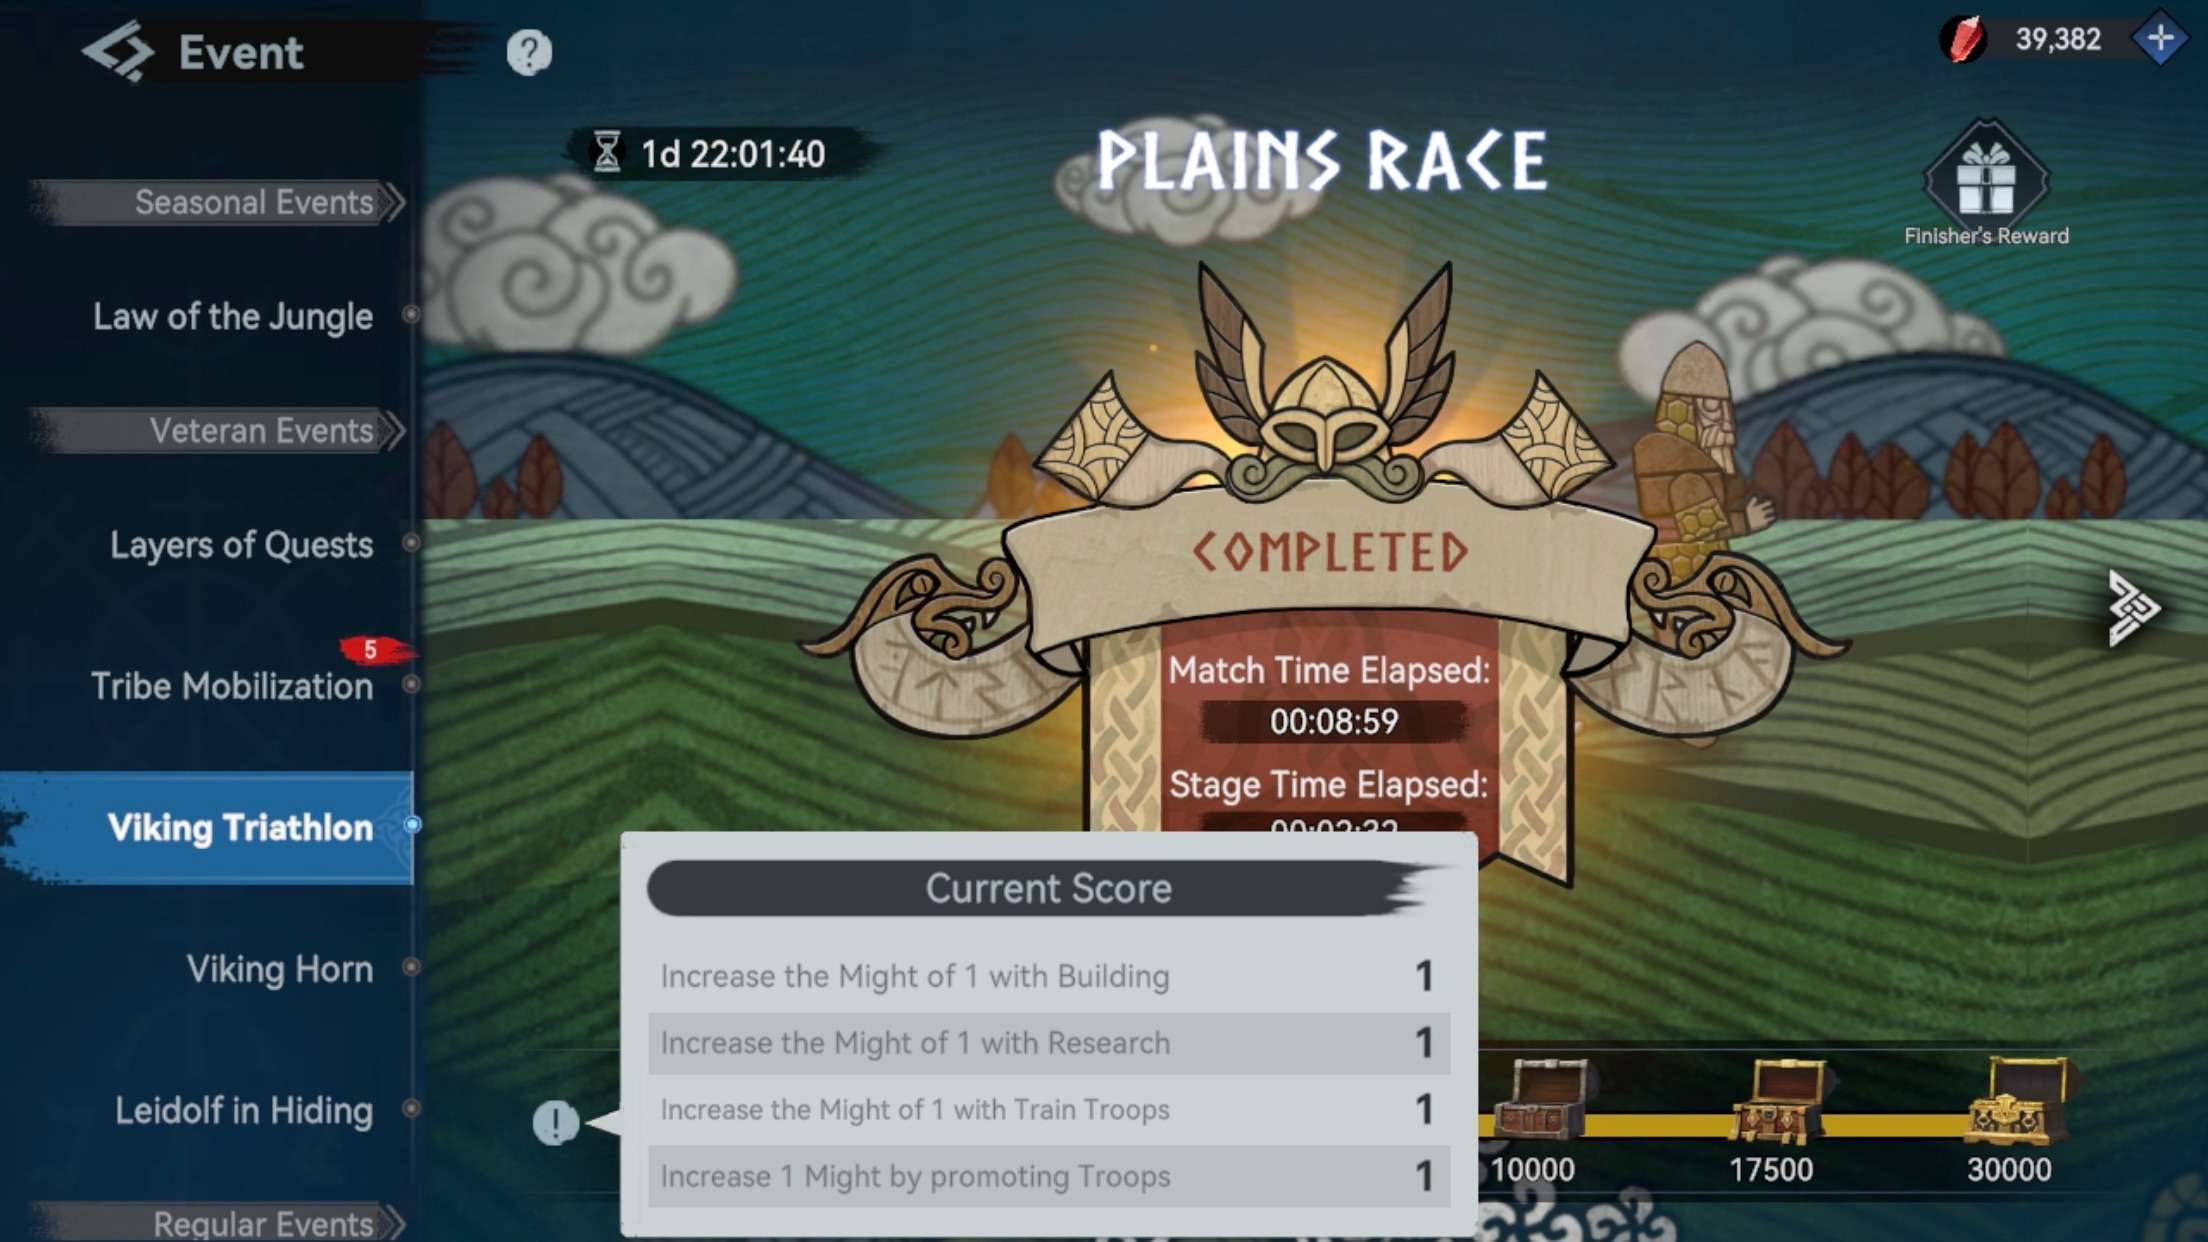
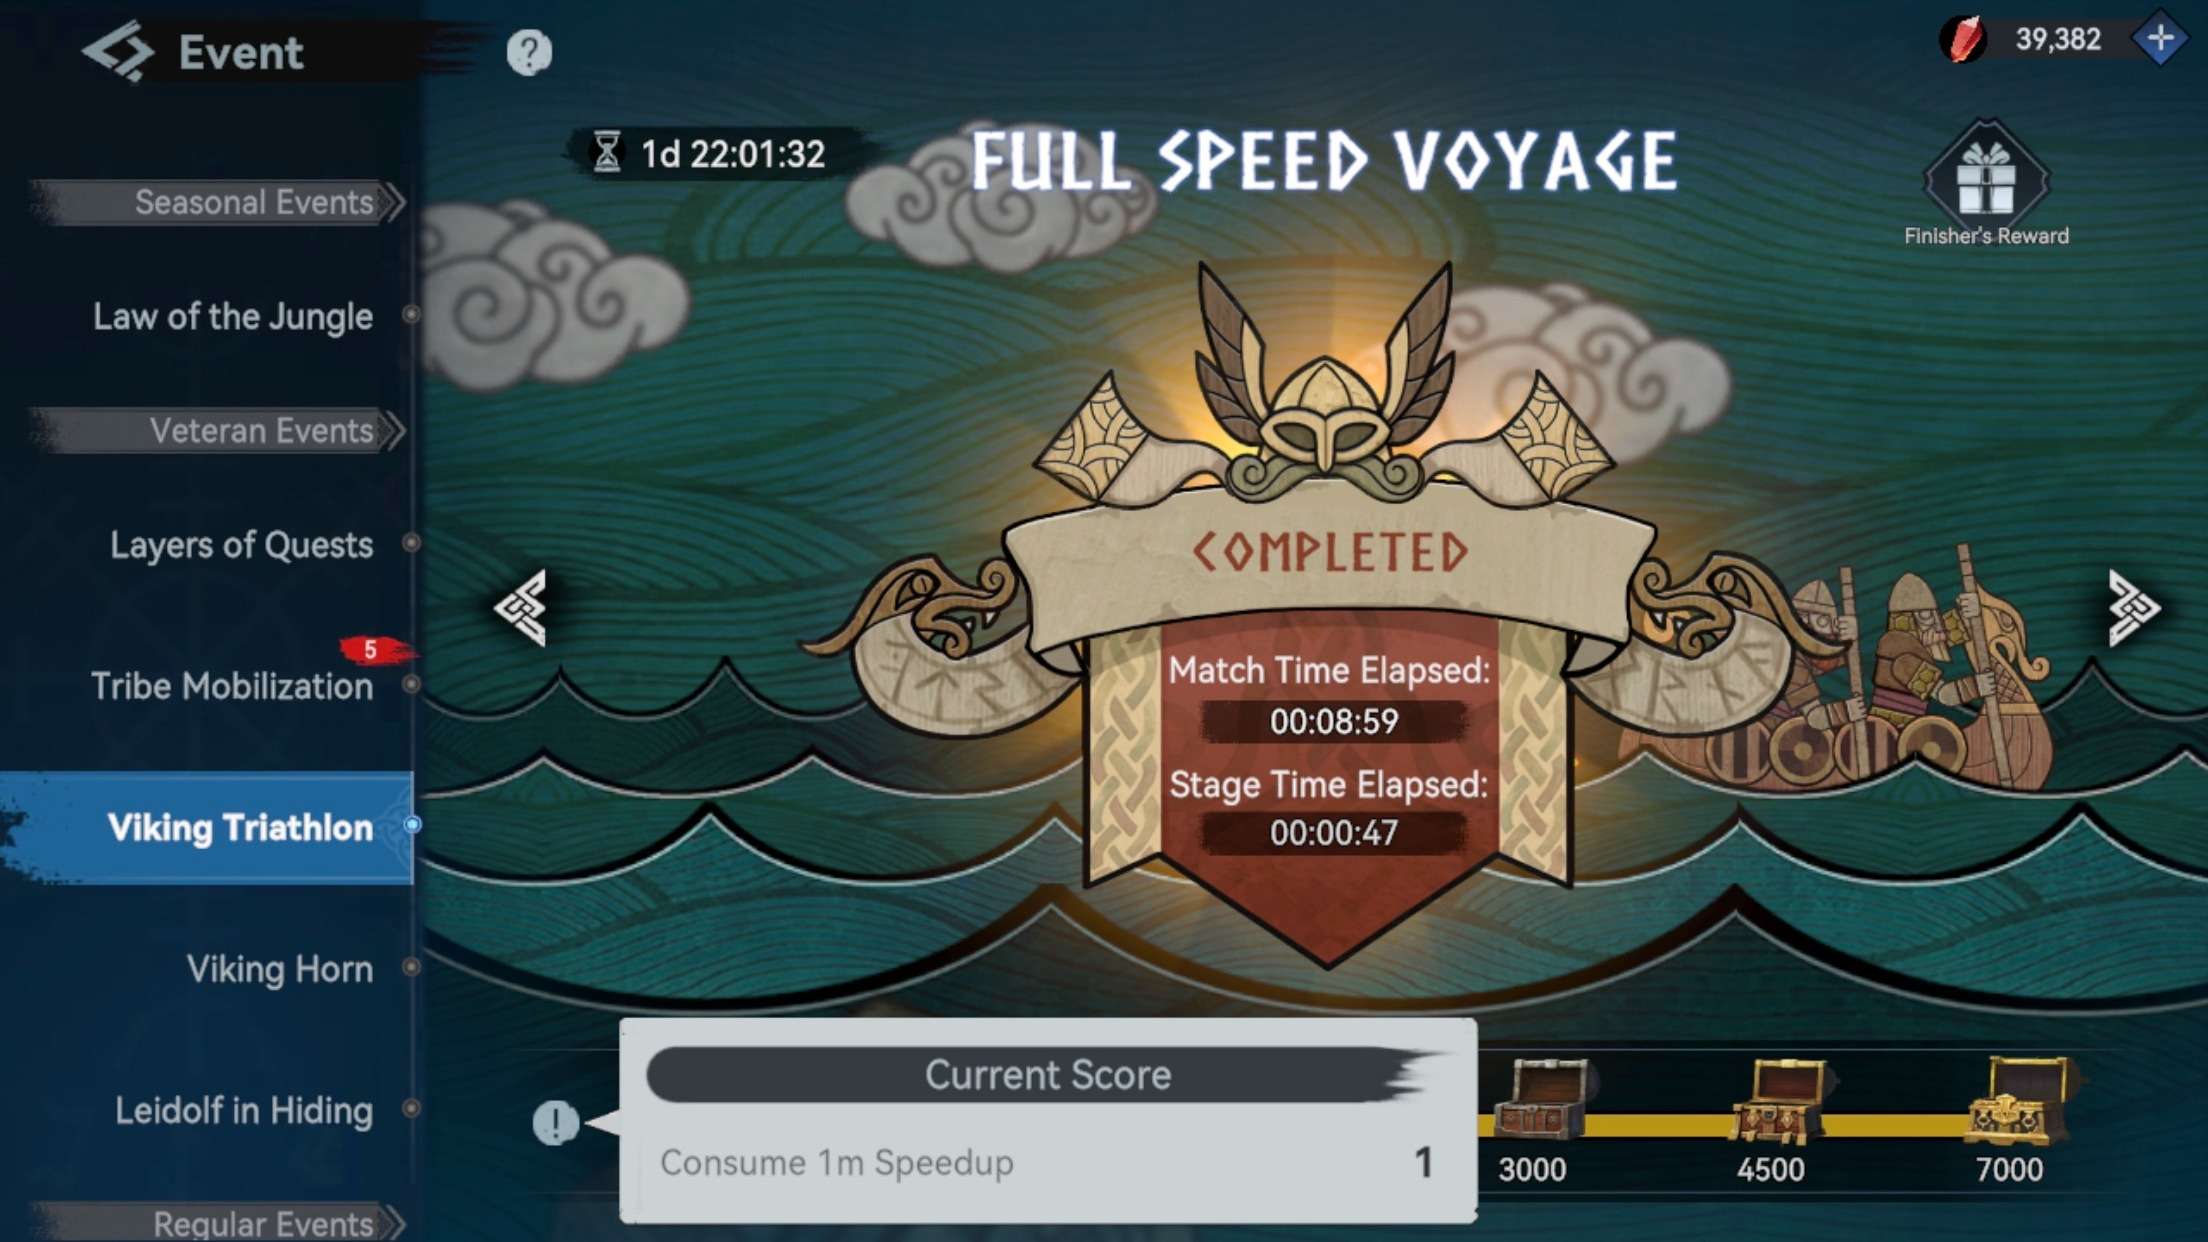
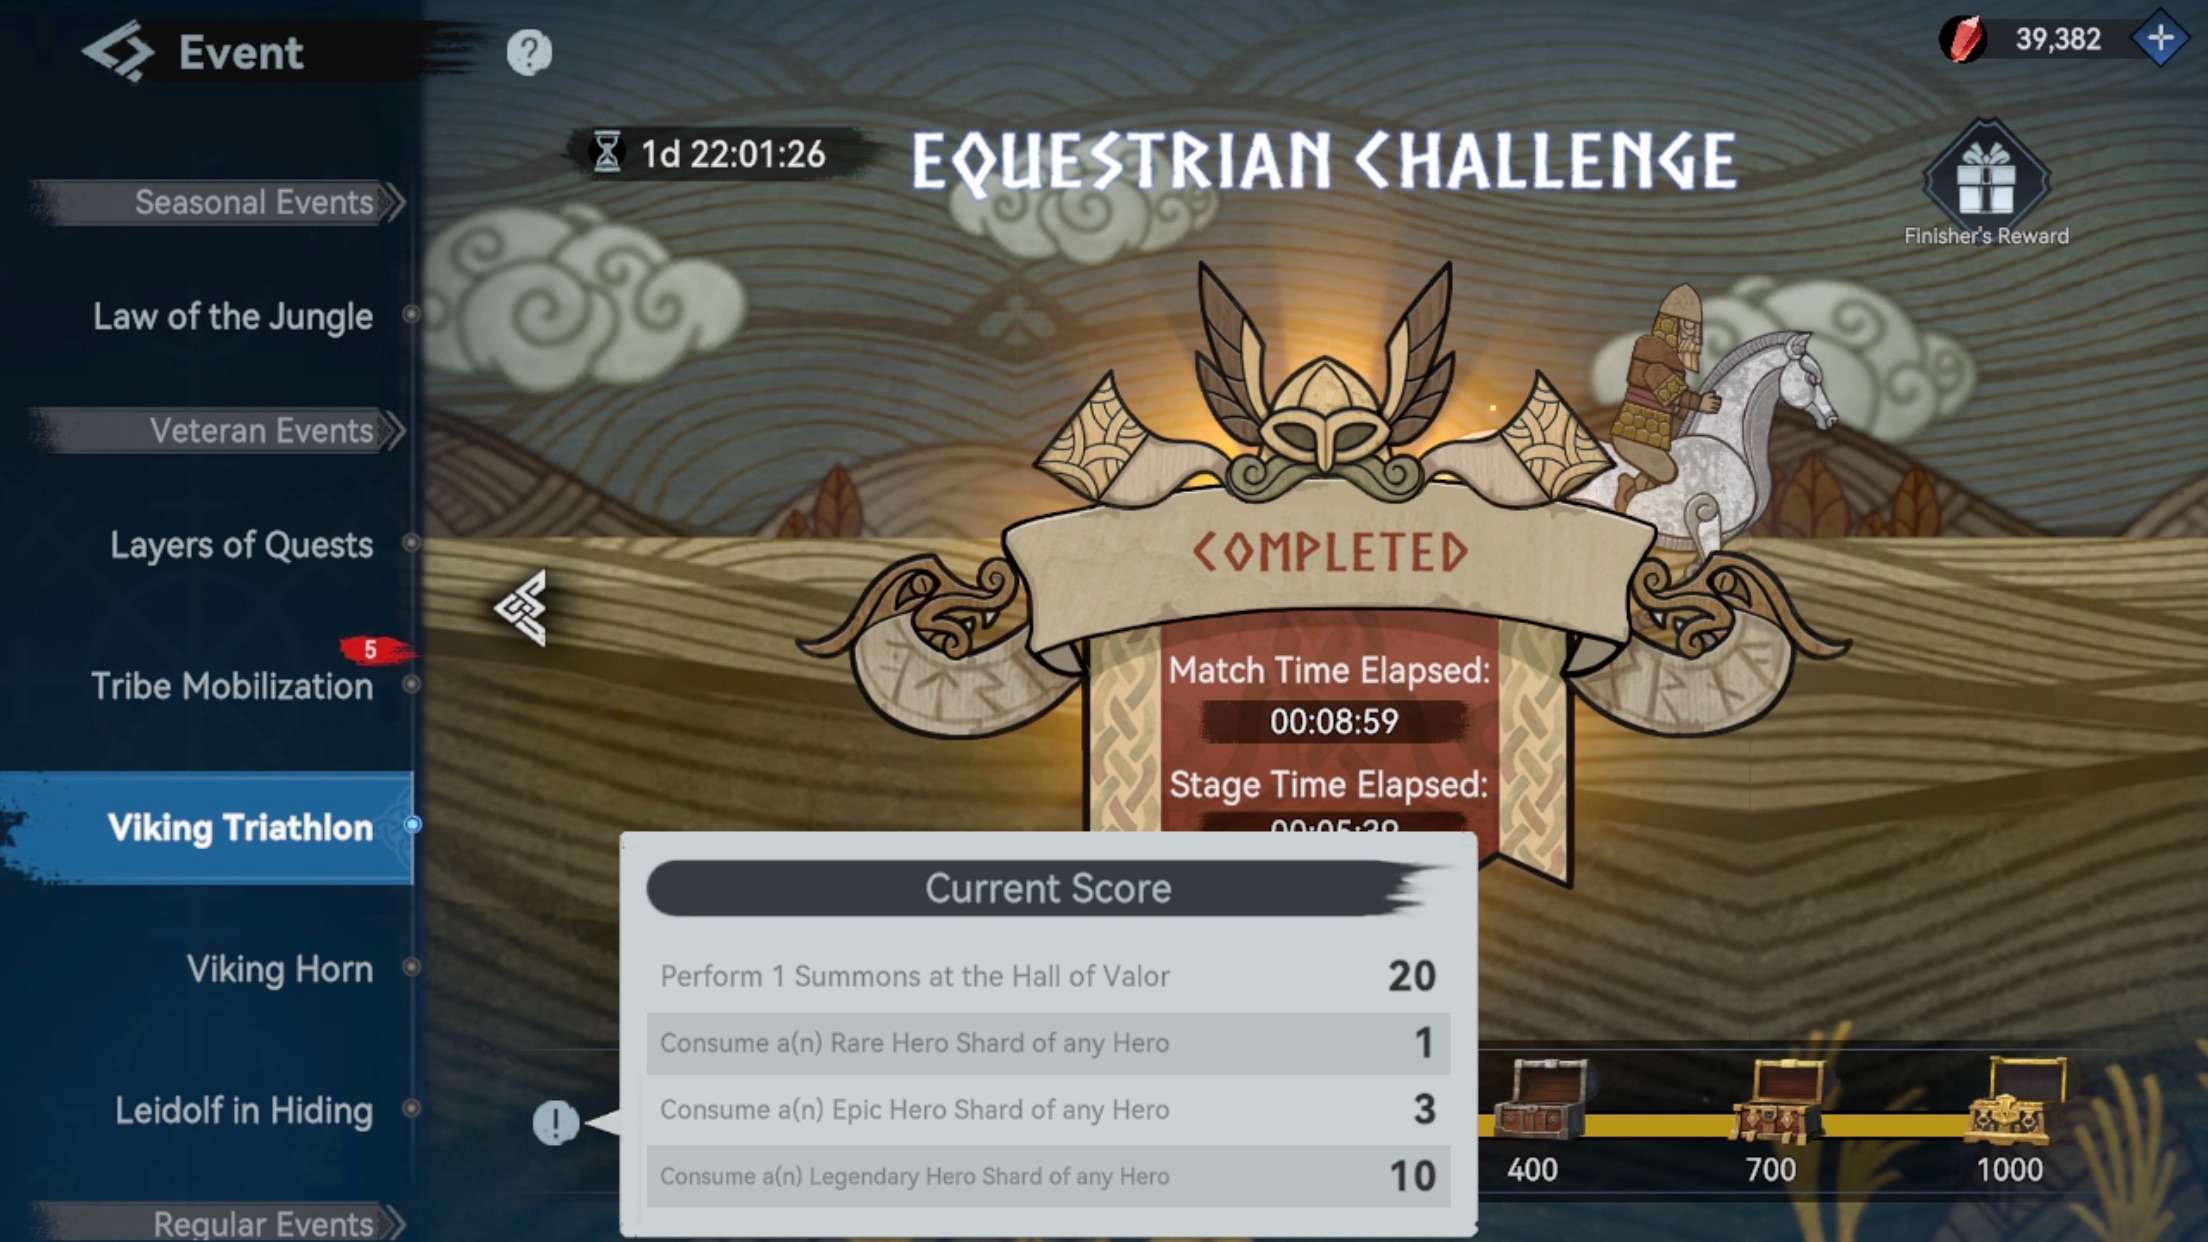
Only 3 stages, so I advise everyone to prepare in advance, especially on the call in the hall of valor and improving the heroes, a lot will be required. There is no special advice, the main you have already heard – prepare for this event.
I advise you to start a week before the event to have some kind of long-term research, so that by the beginning of the first stage you can finish it, and during that time you should be saving up acceleration stones for the 2nd stage and for the 3rd stage, of course, so that you can save up the stones for the summoning.
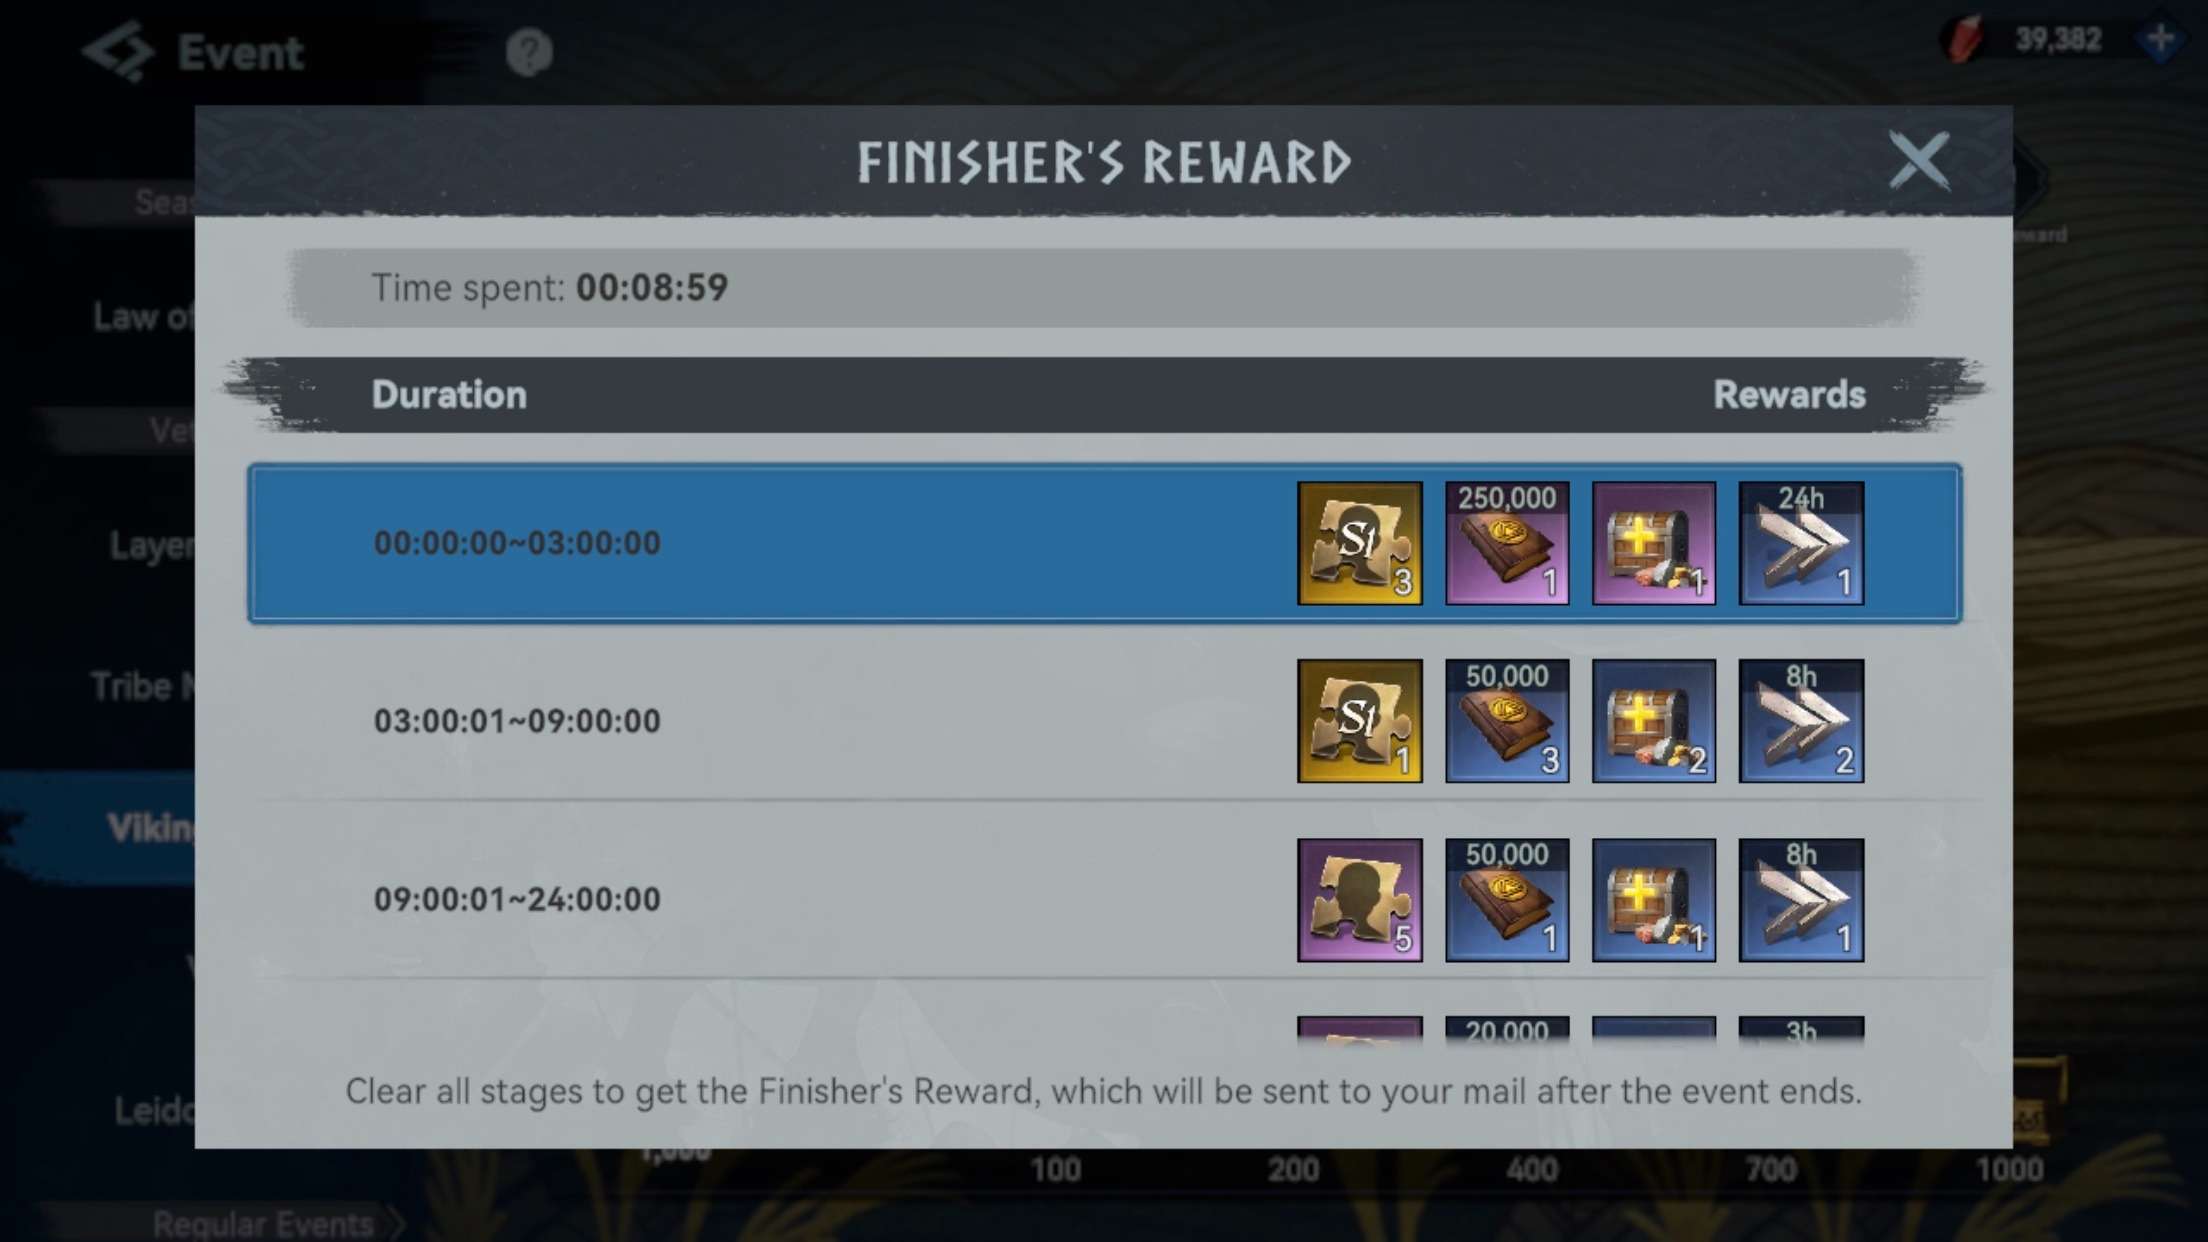
The most important thing is to complete all stages in 3 hours, then you get the maximum reward shown in the screenshot. (It is not as hard as it seems)
That’s all, good luck, chiefs!
How to Capture Cathedrals, Towers and Anything Else
Using the Niflung Leader as an example, I’ll show you how easy it is to capture cathedrals, towers, and anything else that is captured by rally troops.
As you know, the more troops a player has, the more troops he can hold and the better chance he has of capturing a structure. But what to do if the forces are not in your favor and you want to capture an “impregnable fortress”? It’s very simple:
Recall and summon your troops into an active rally taking the battle!
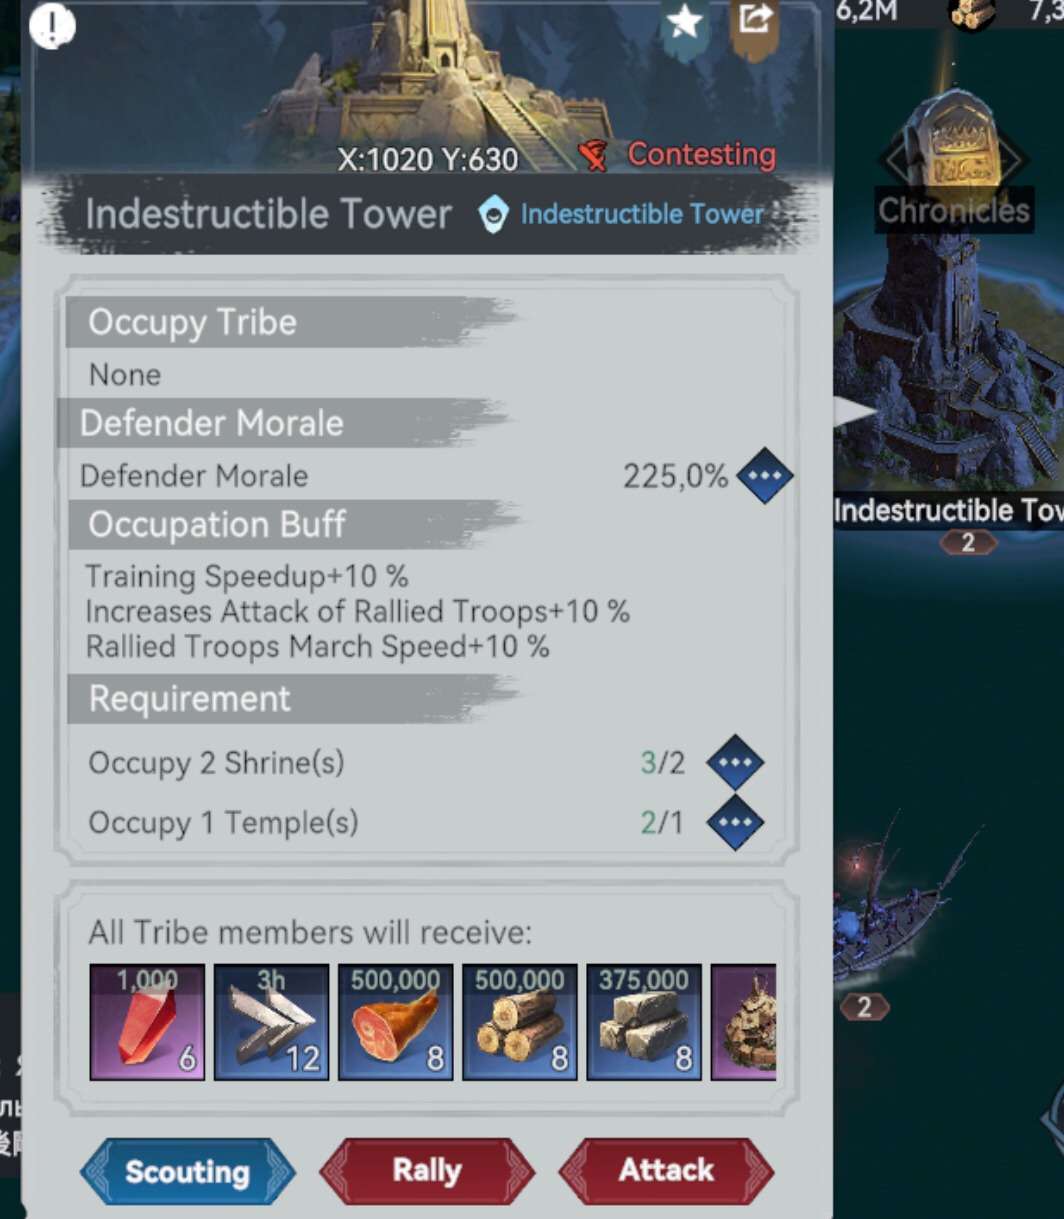
The mechanics are quite simple, and it works without fail. It will be successful if all participants of the rally act together and without commands themselves understand what to do, how to do it, and as quickly as possible to do it.
Need:
- Choose a participant who accommodates a large number of troops.
- Explore the armament and understand how many troops and what kind of troops they are.
- Be sure to kill the defenders of the building, which give “morale”, it is very important, because with these guys will be hard.
- Prepare secondary units, and you can even more, depending on the number of your troops.
- Recall your squad, when it is almost broken in the rally, send at this time the secondary squad, while it will fight heal the main squad and send it in place of the secondary squad. And so everyone changes back and forth.
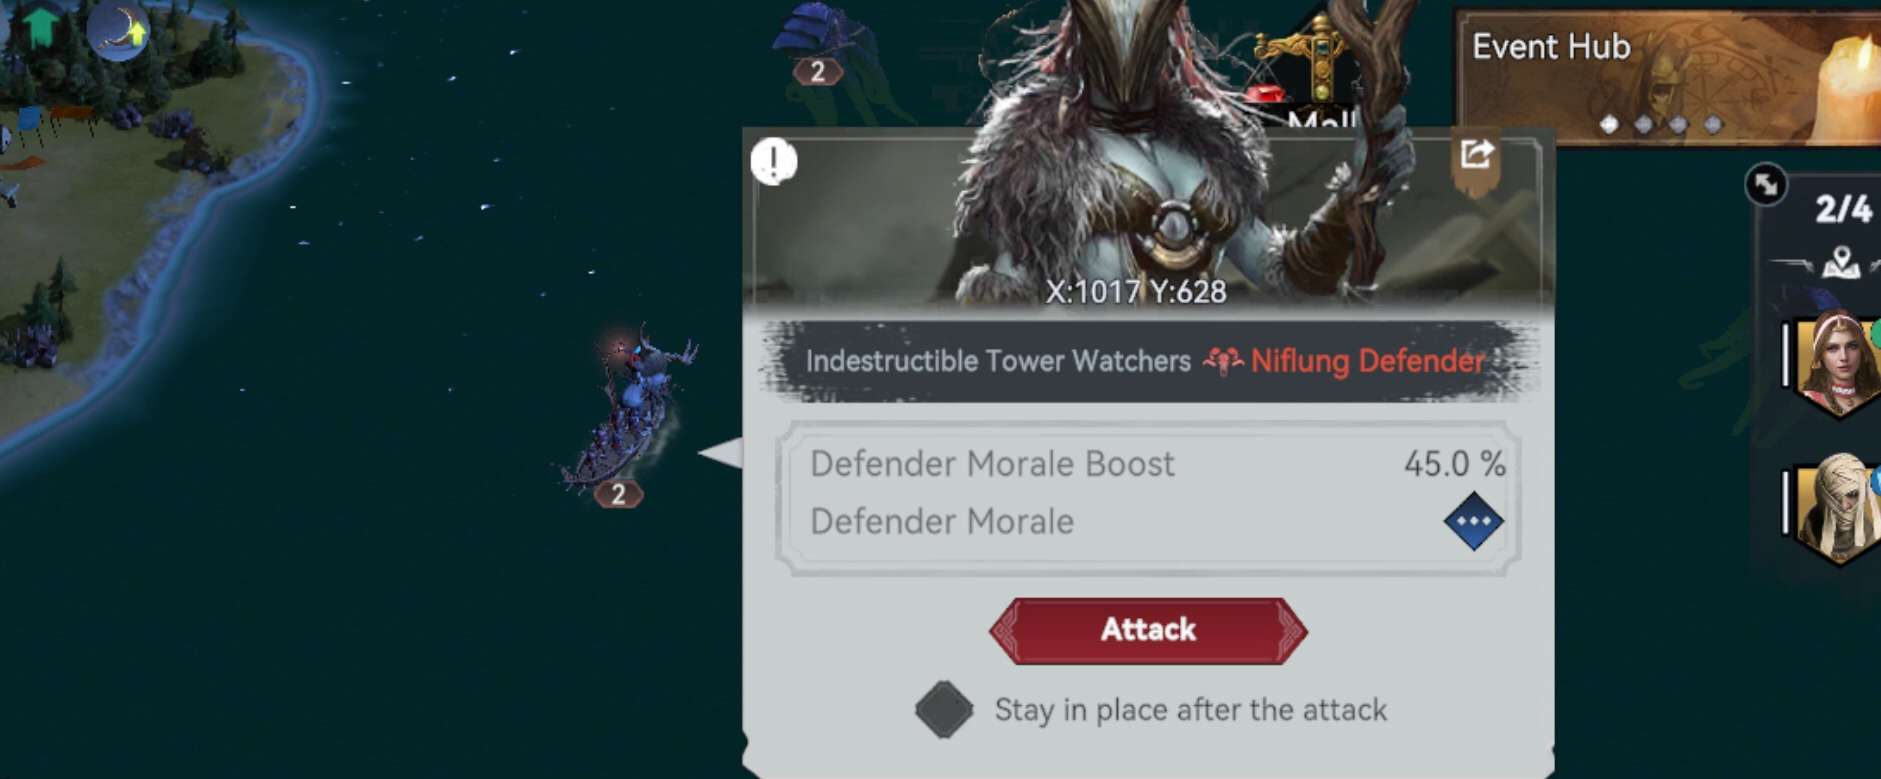

Unfortunately I can not show this mechanics on the tower, because all of our own we captured, and others do not touch. But see the analogy with the Niflung Leader.
- I send a squad to the rally.
- I place a secondary one near the target of the attack.
- My main squad decreases health (I did not wait until the health drops as much as possible, I would not wait for that), I order him to retreat and in the meantime replenish the collection of the secondary squad.
I think the mechanics are understandable terribly simple, should not be a problem. This is one of the reasons why we have already captured many things in our kingdom without any difficulty, thanks to this mechanic.
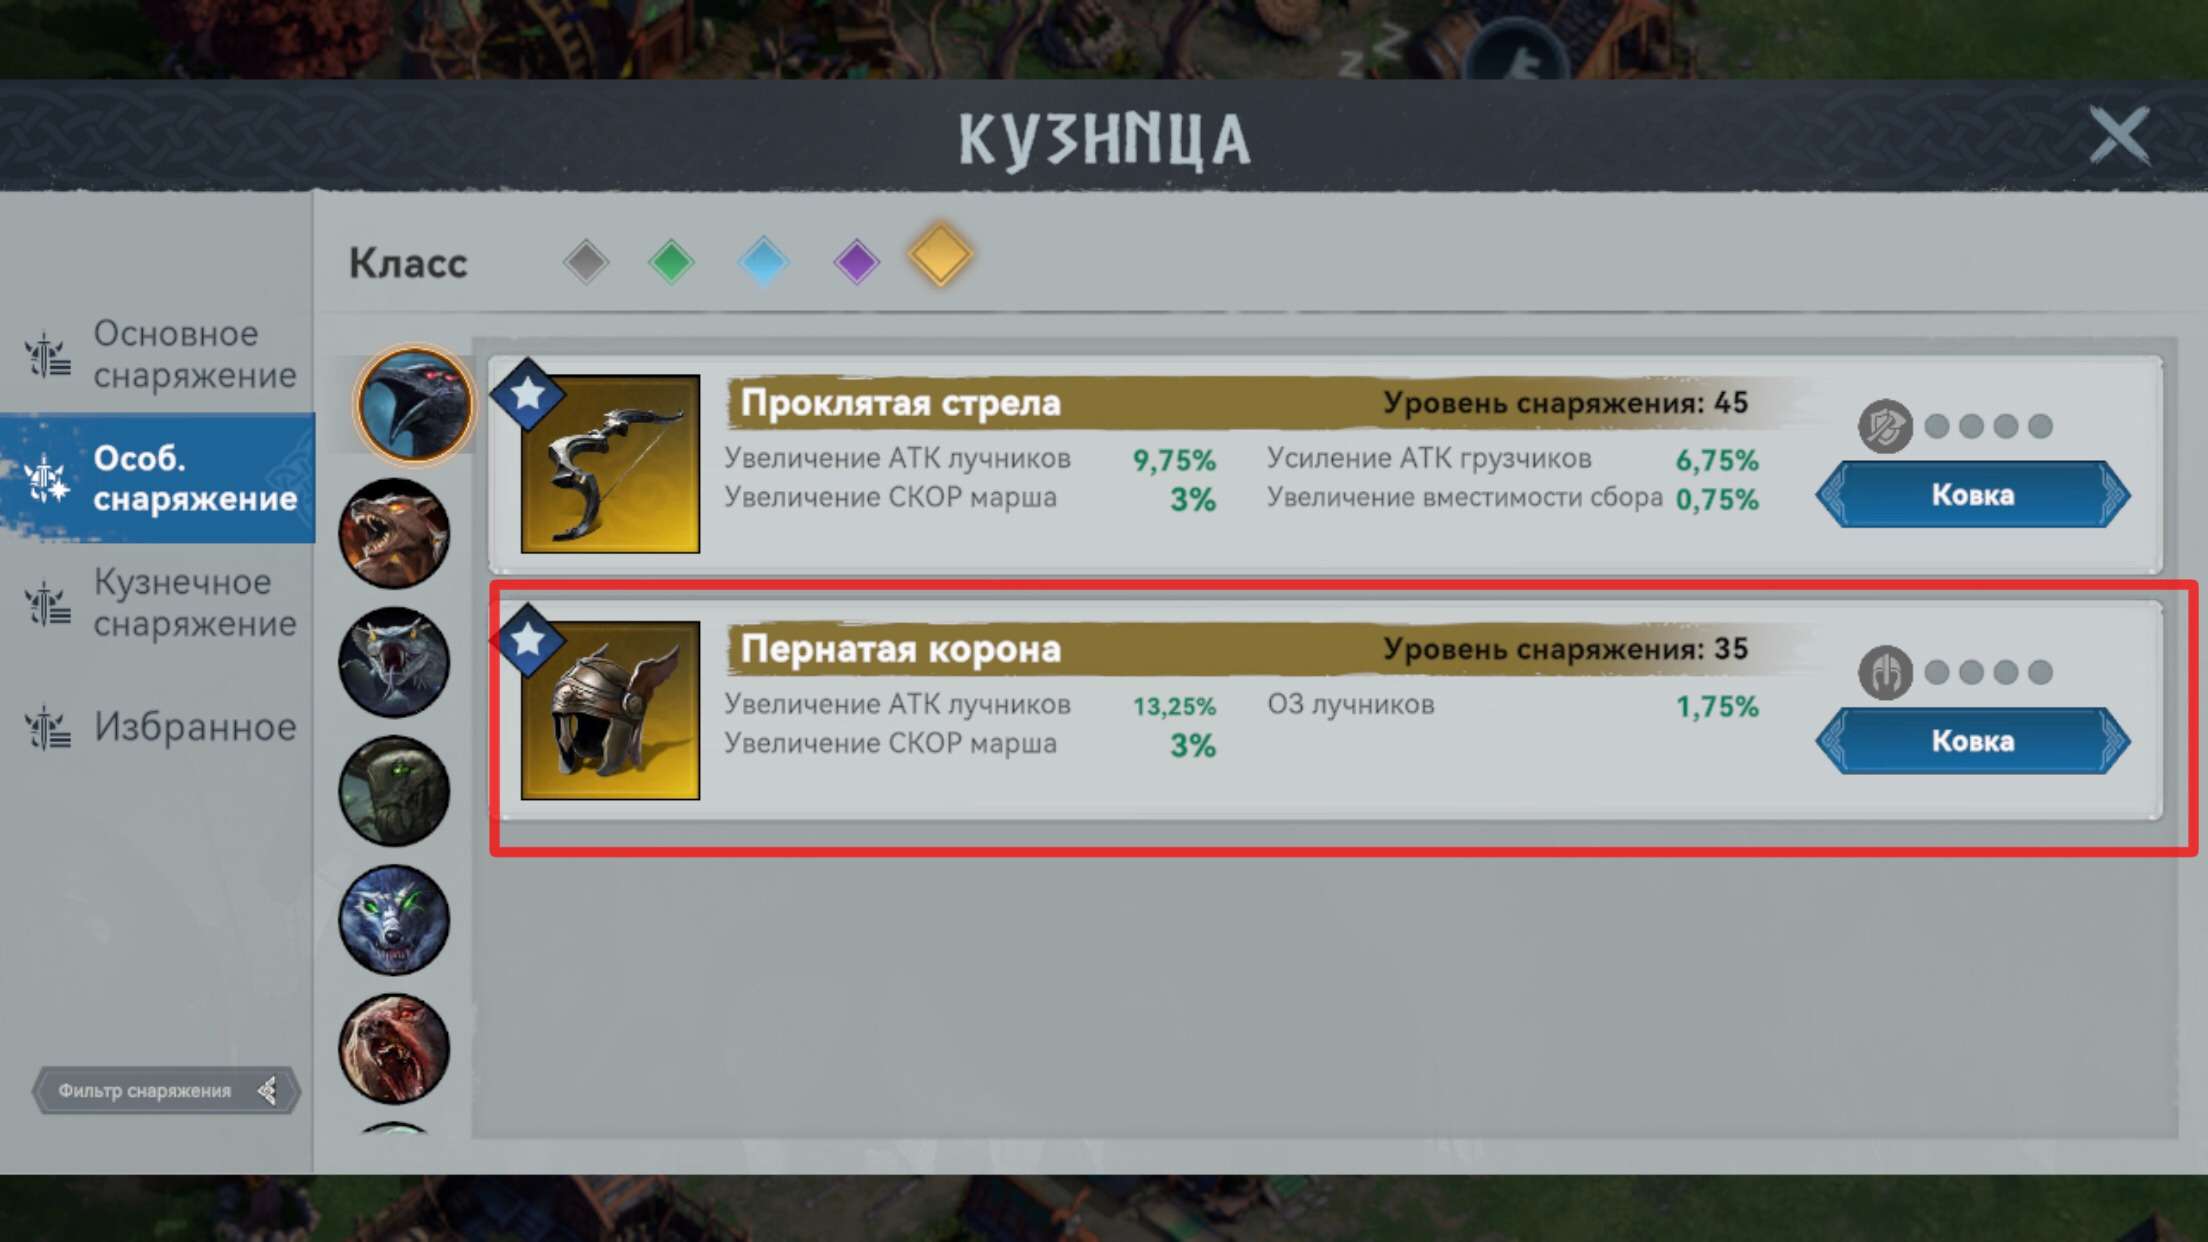
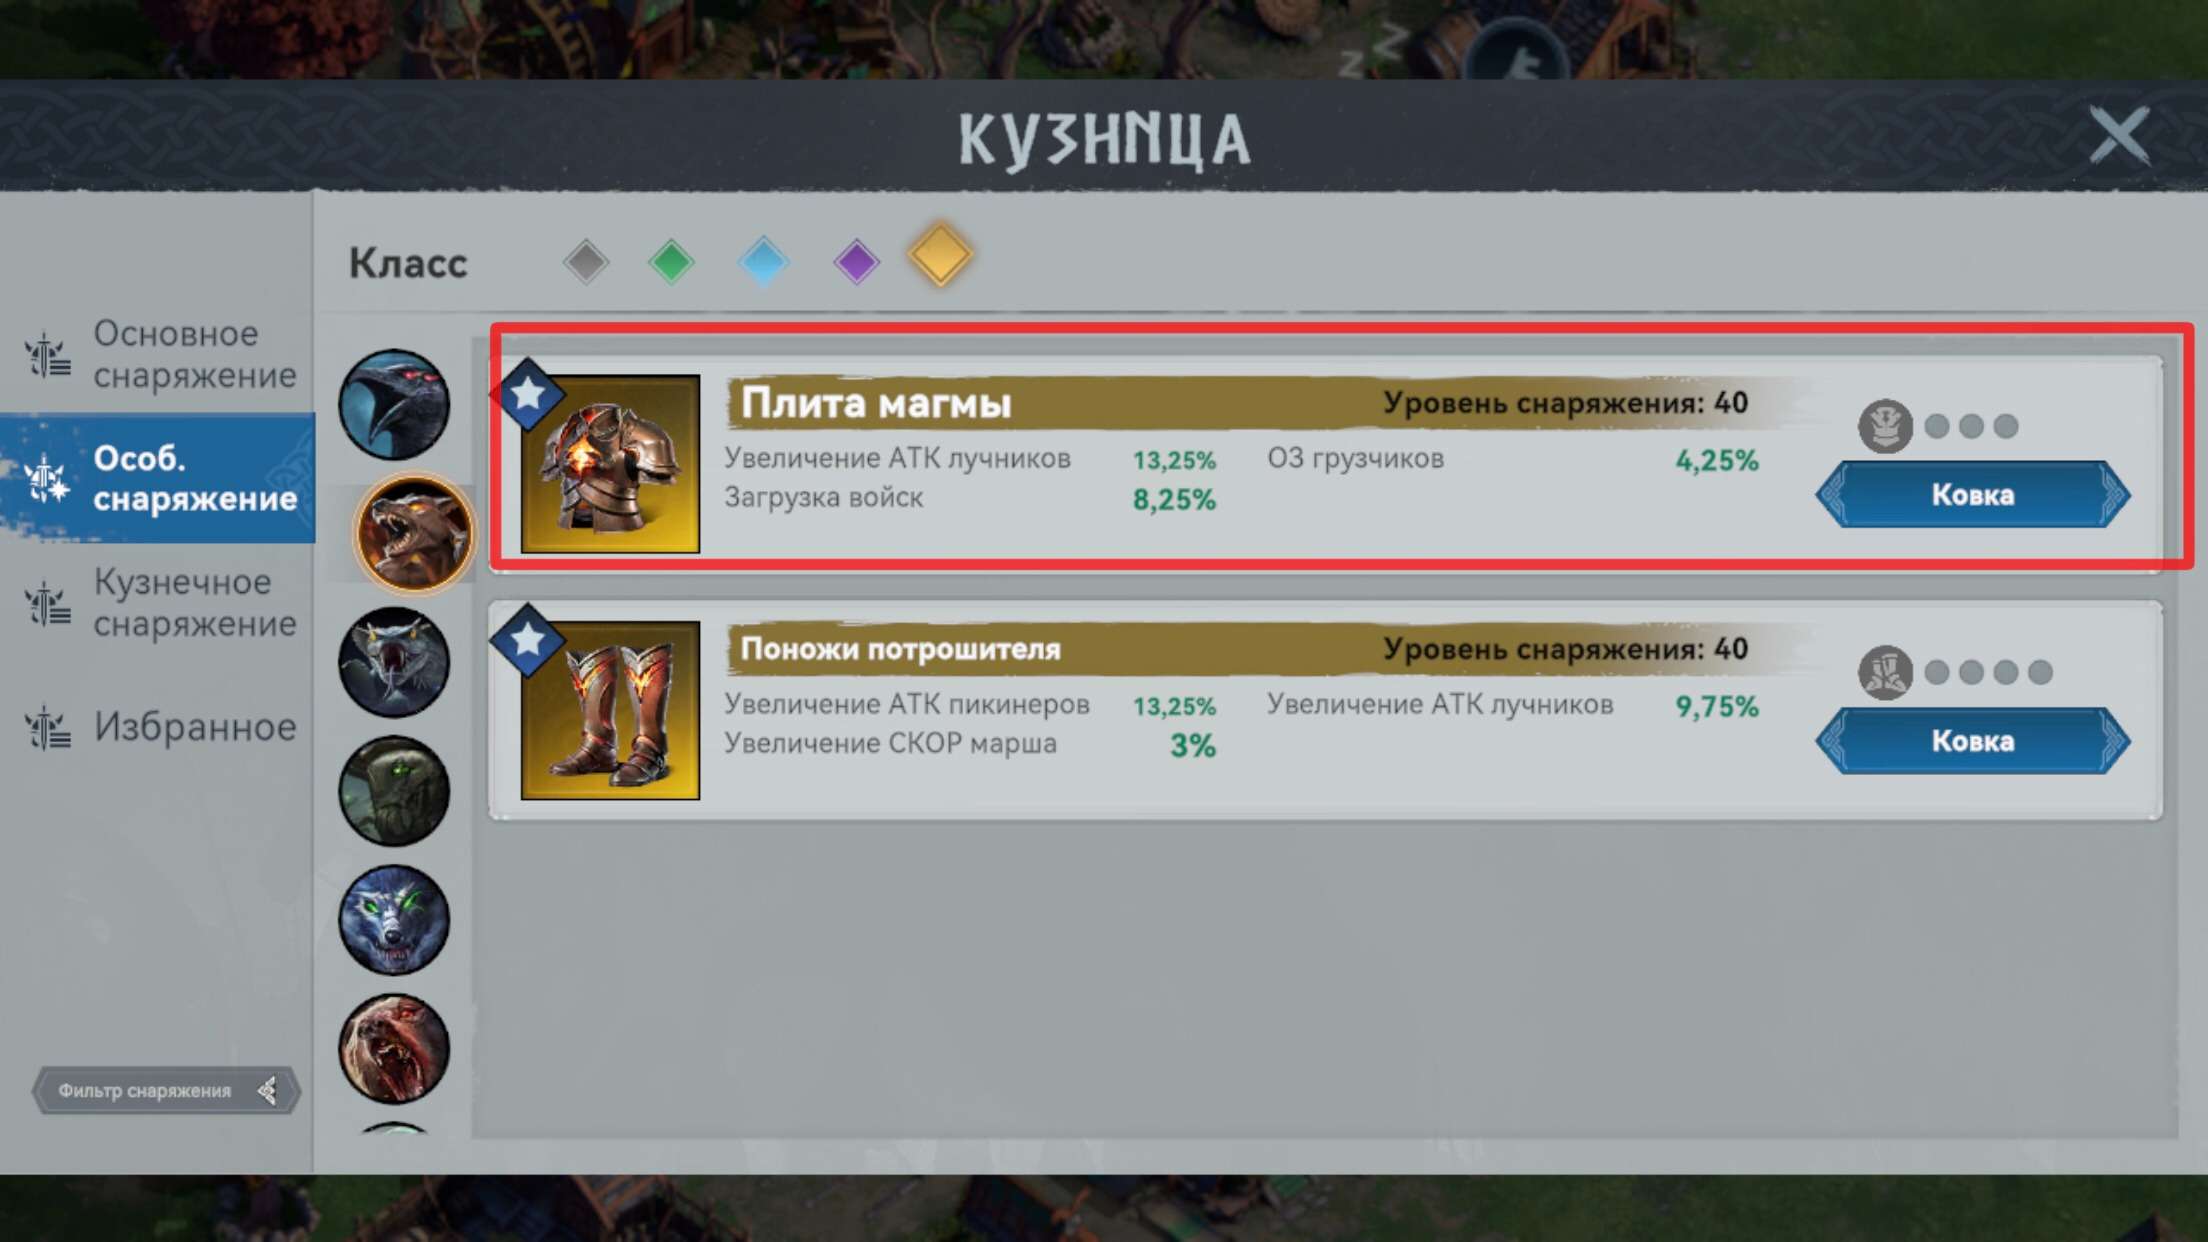
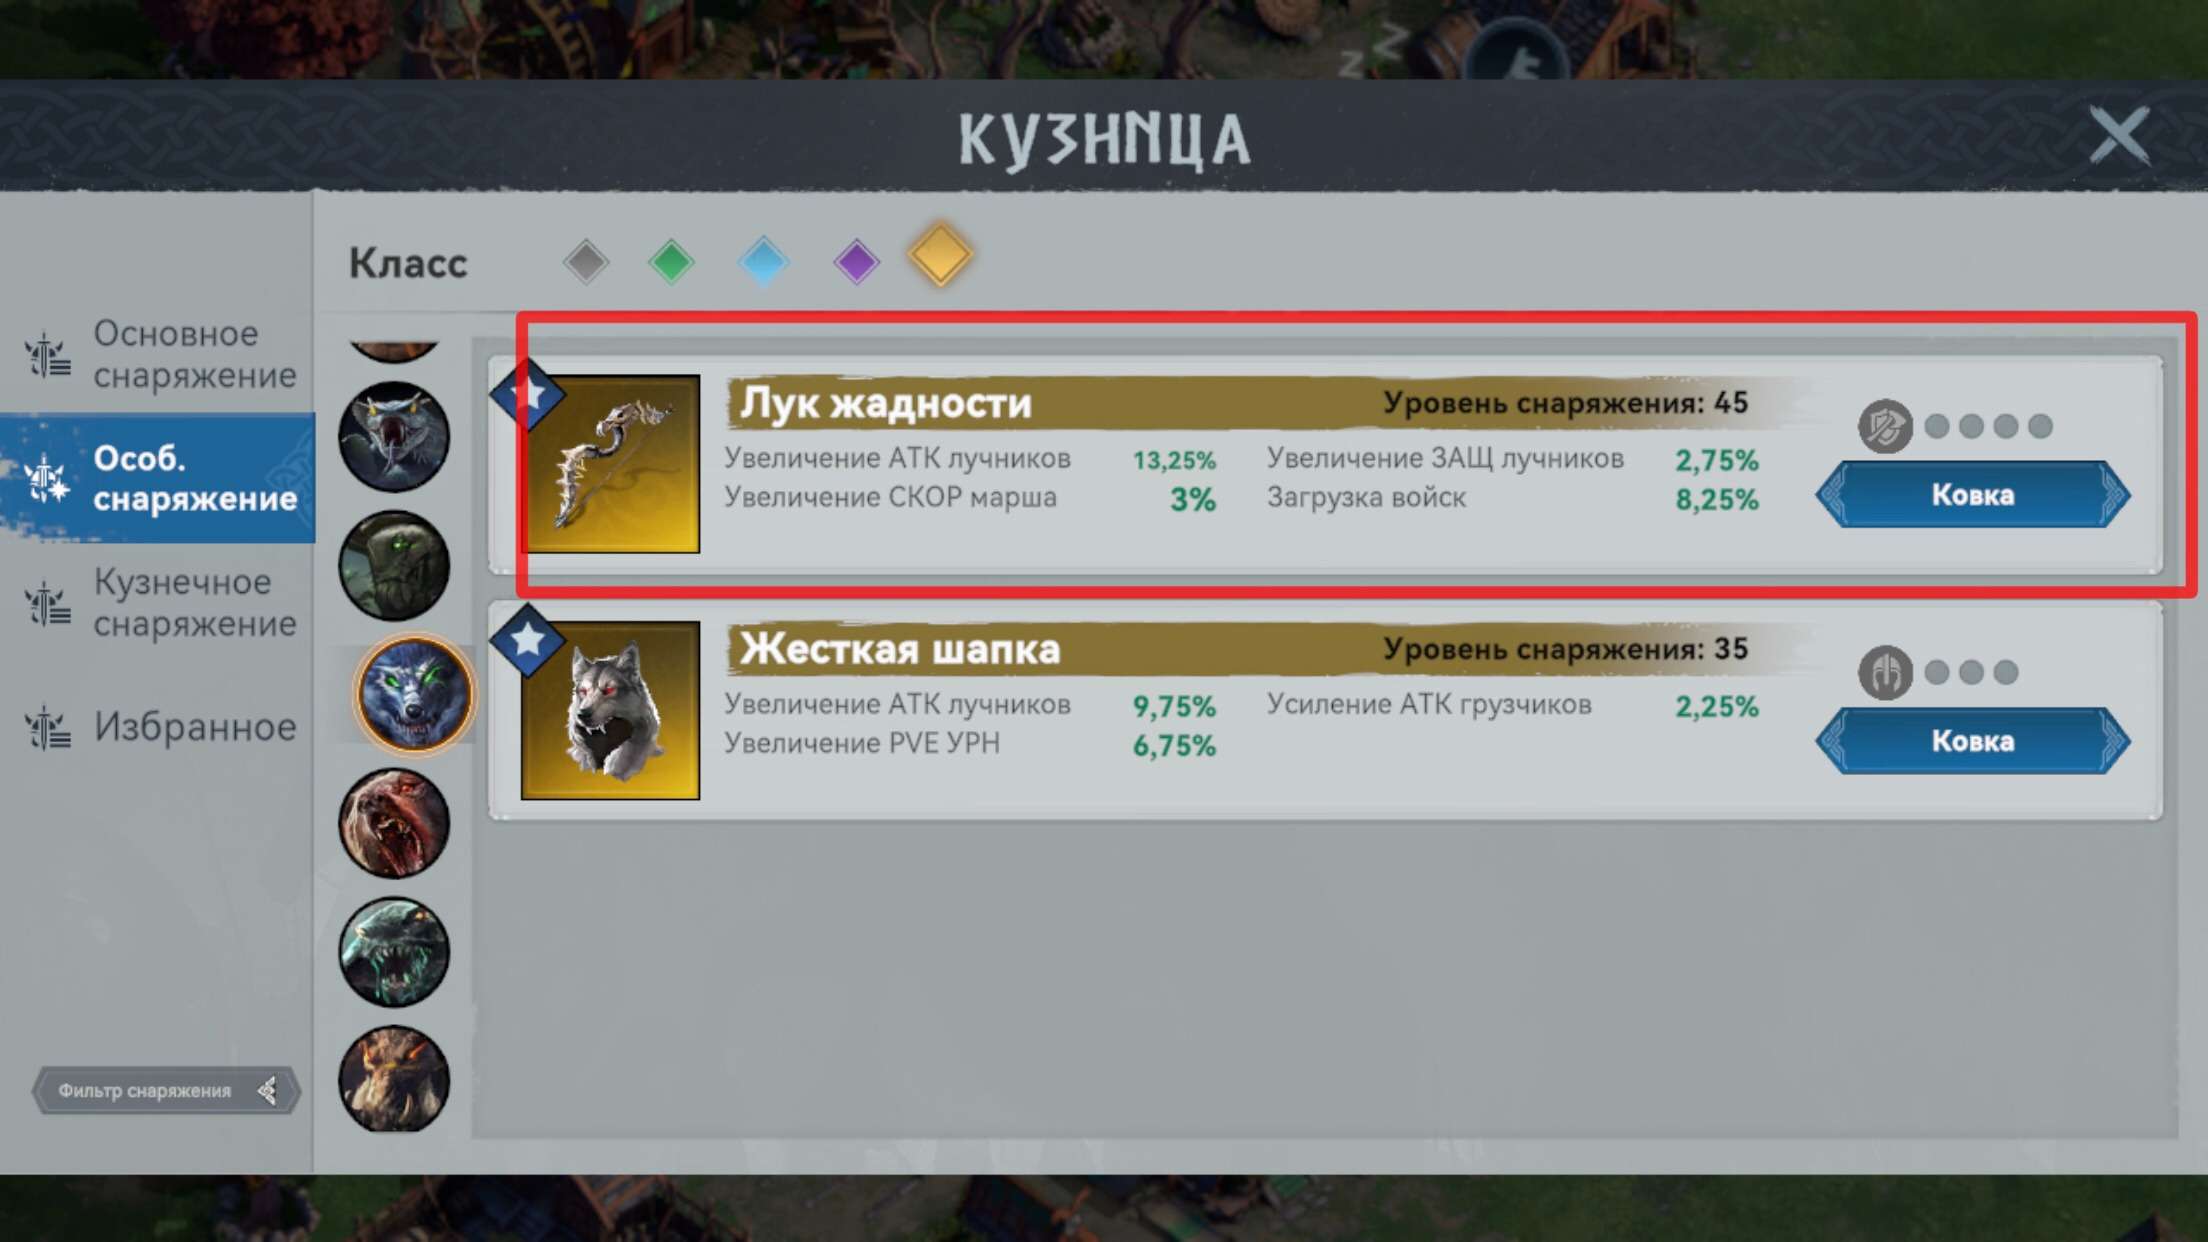
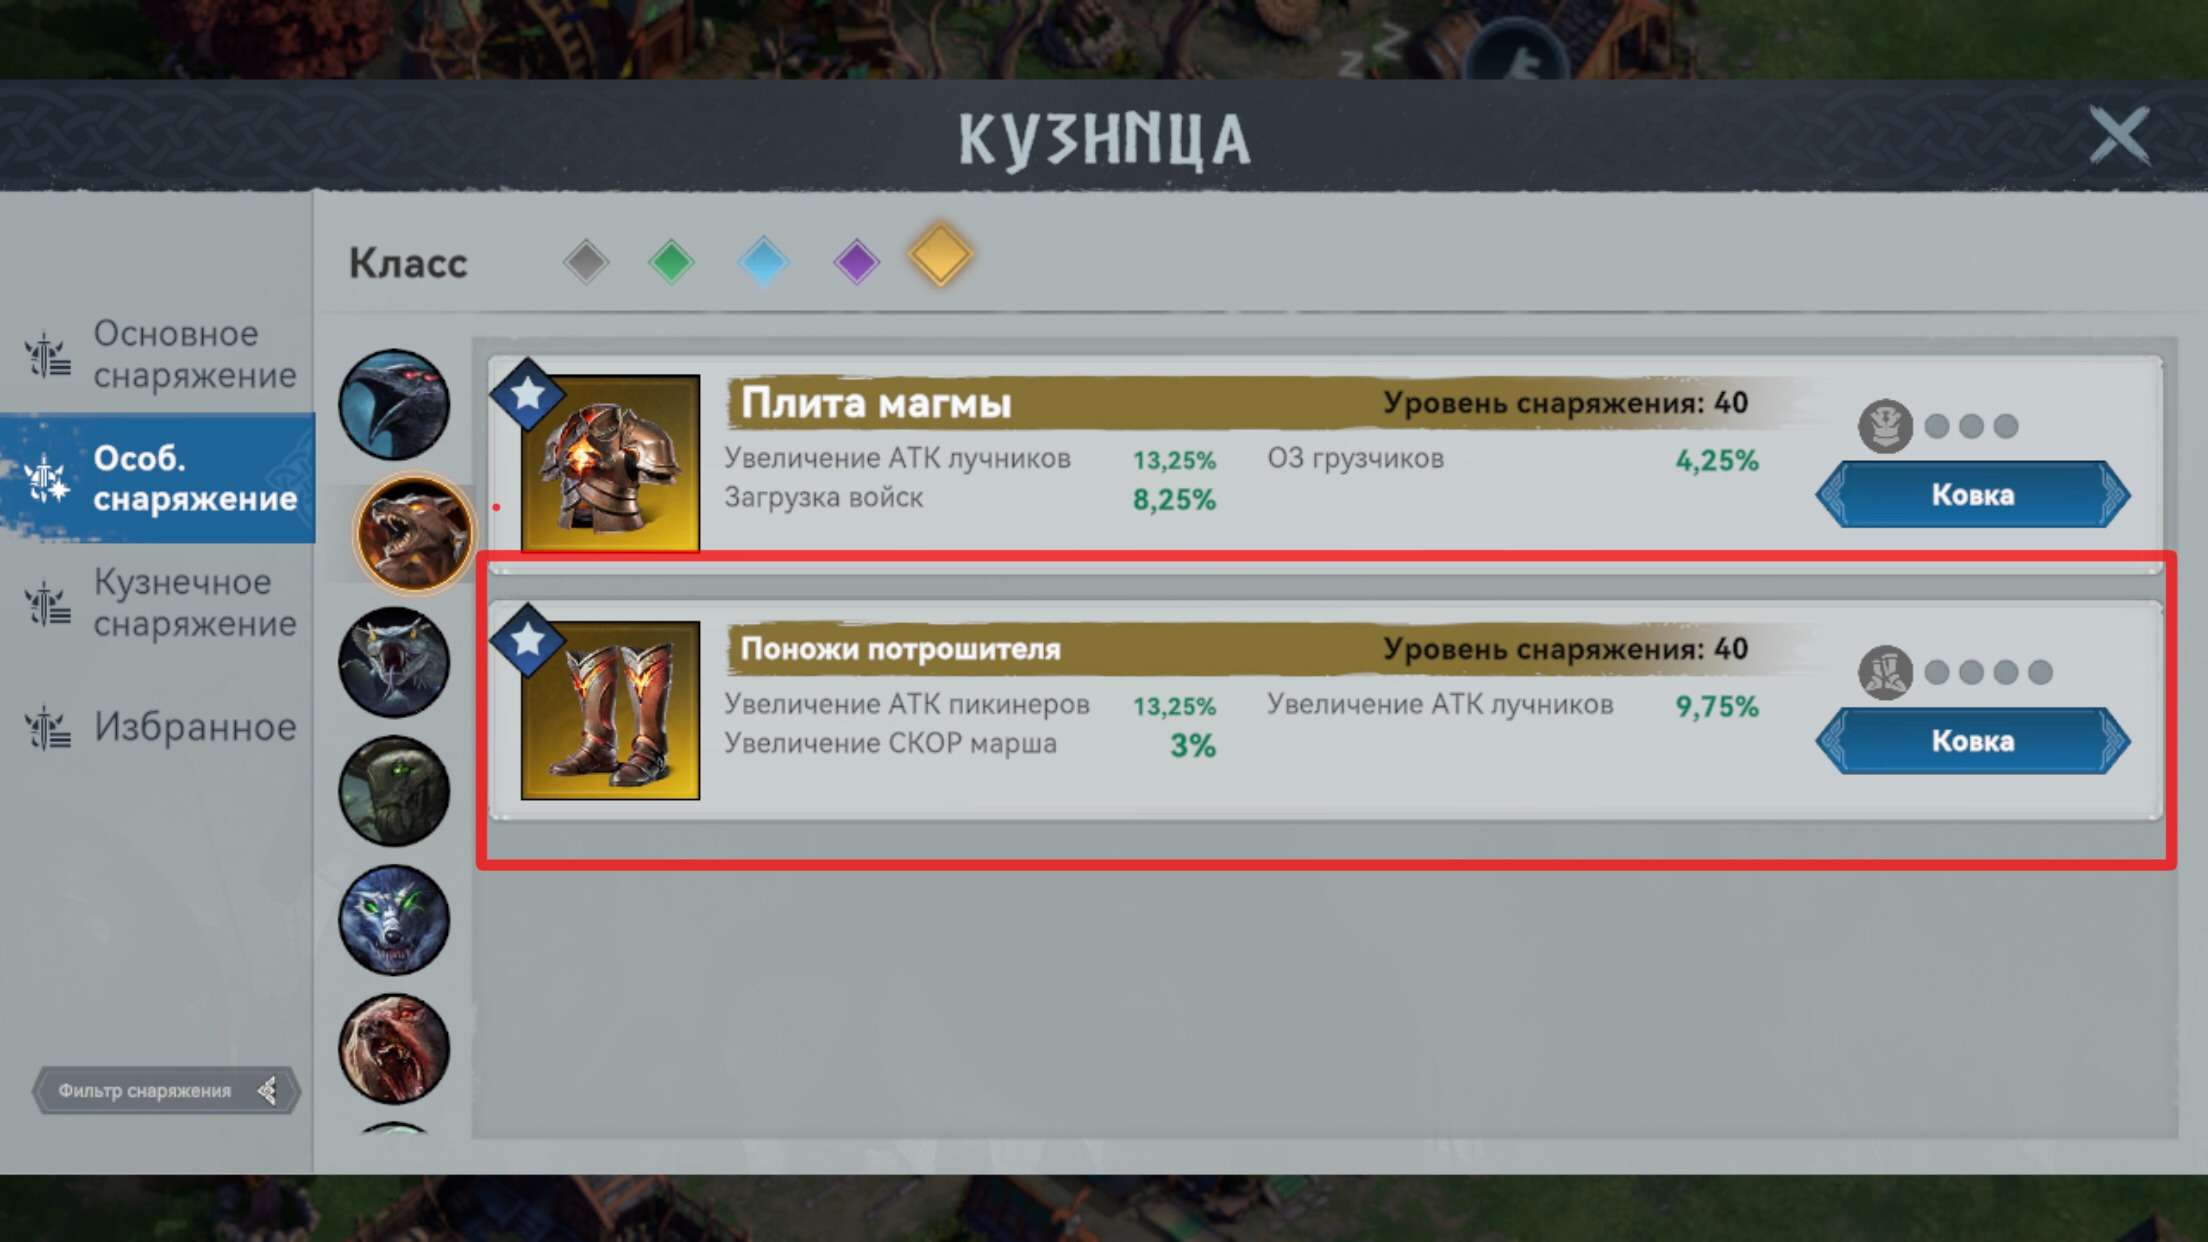
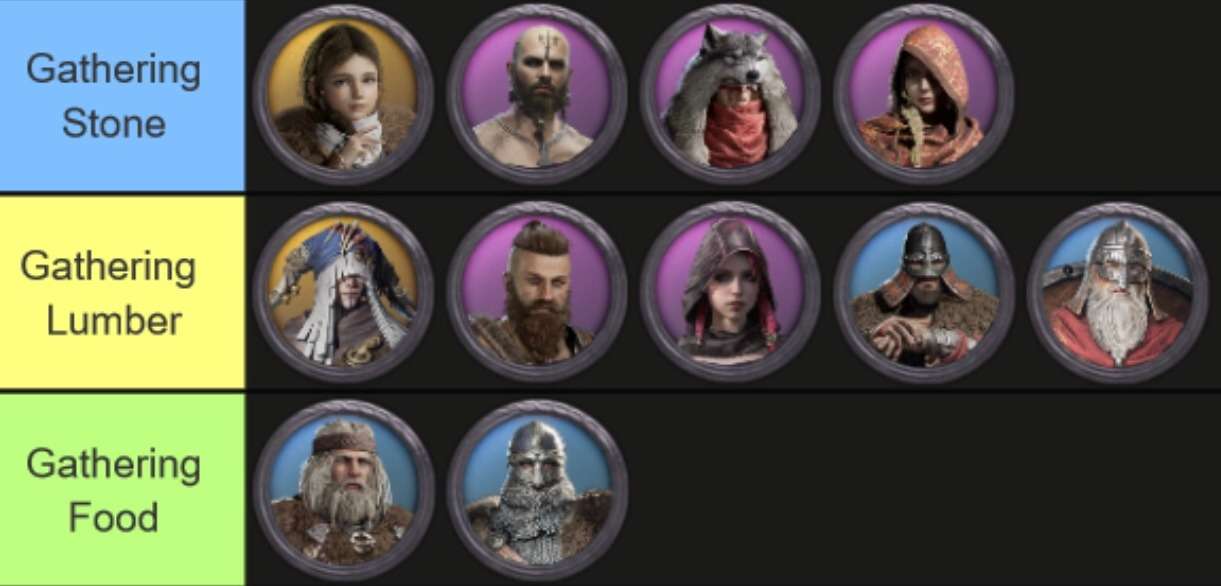
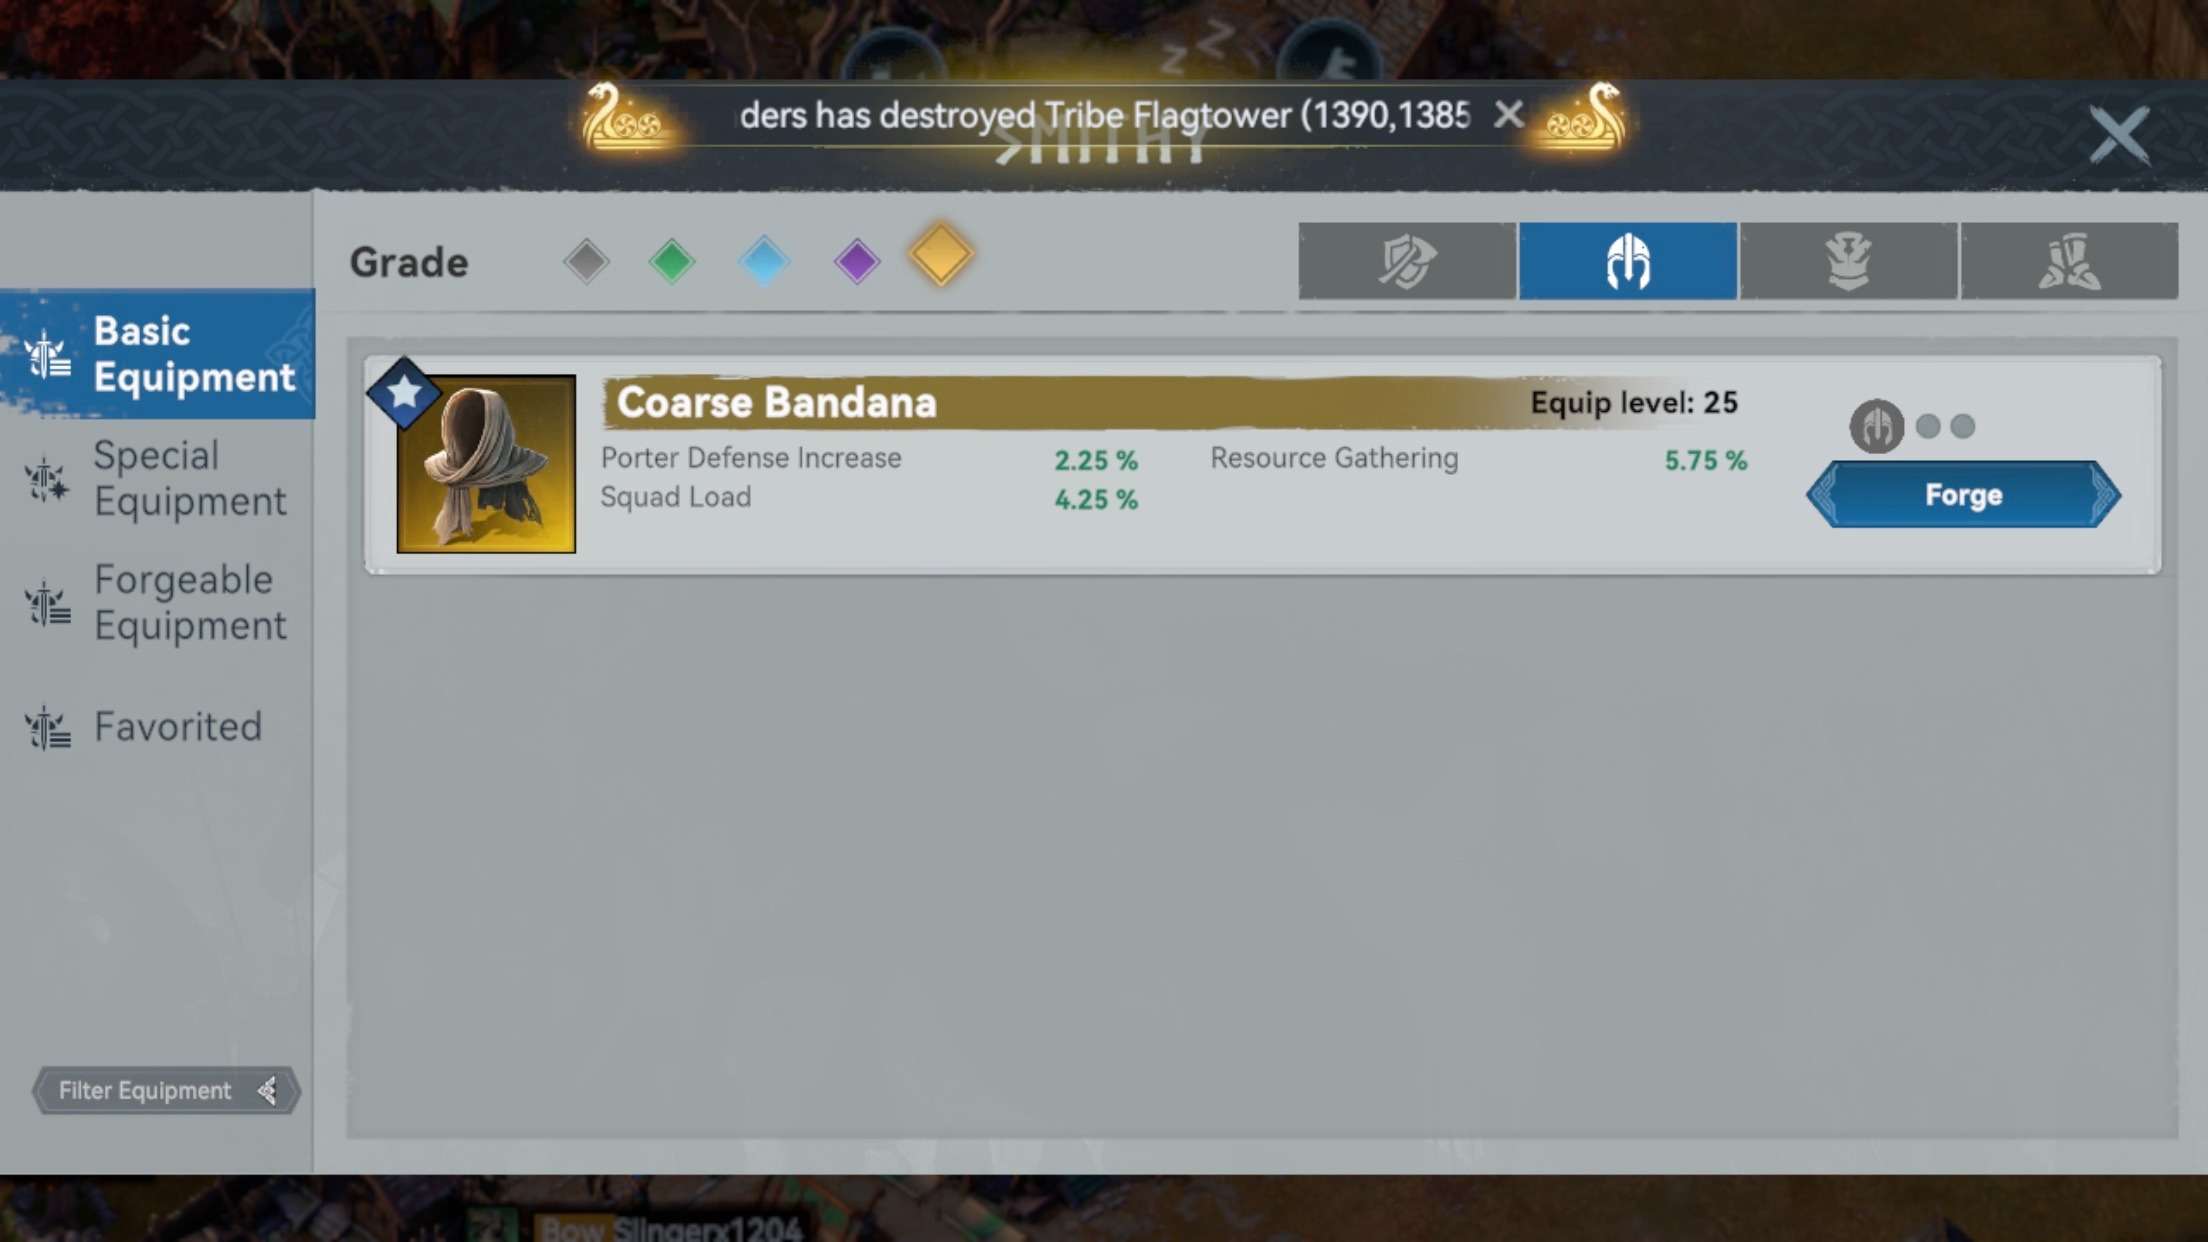
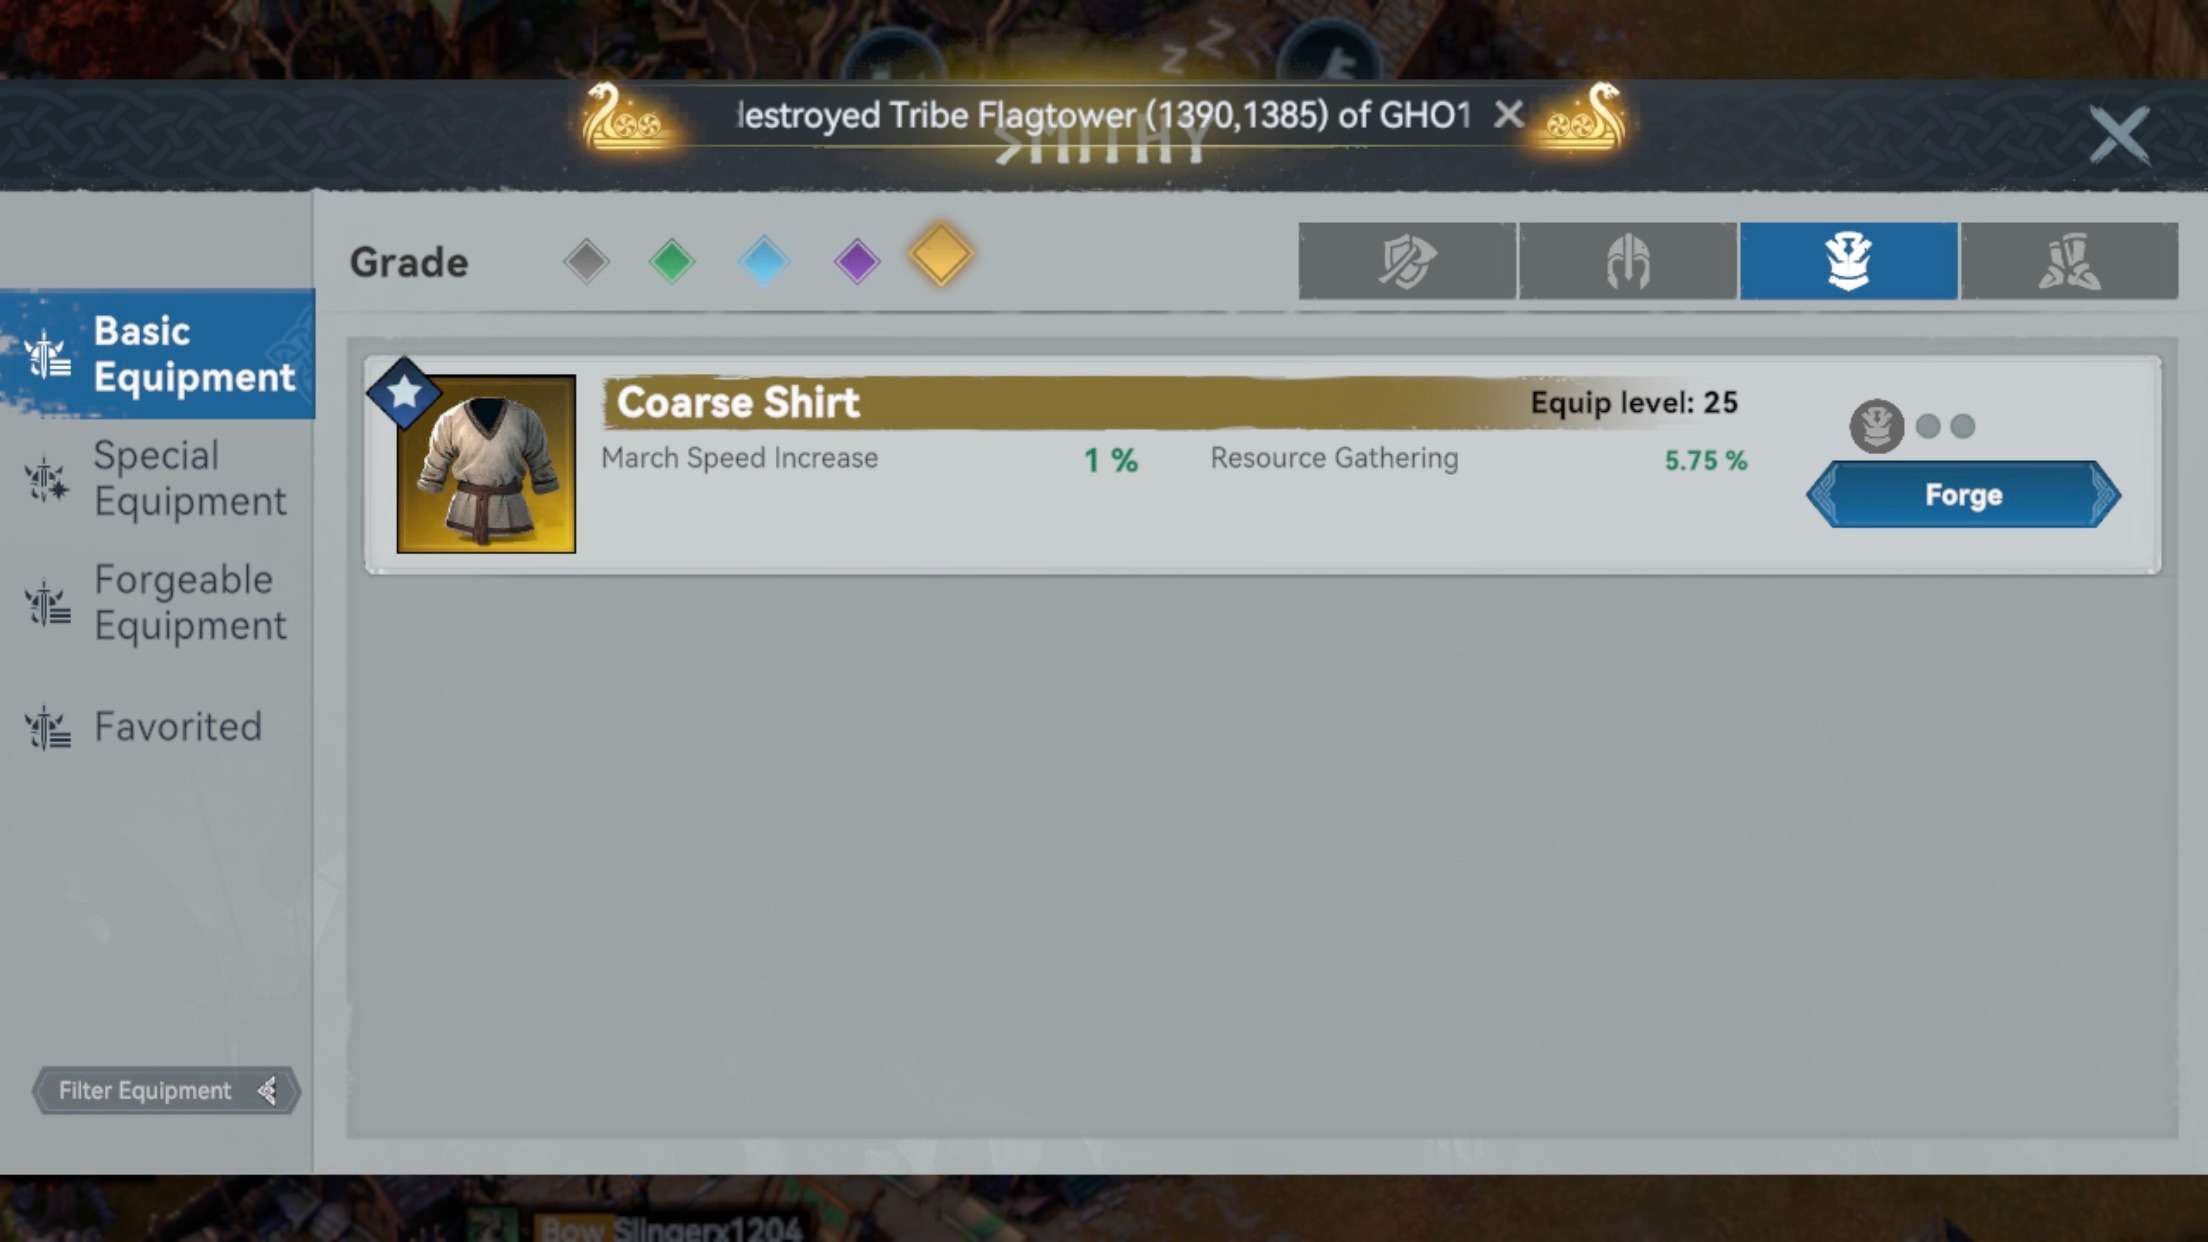
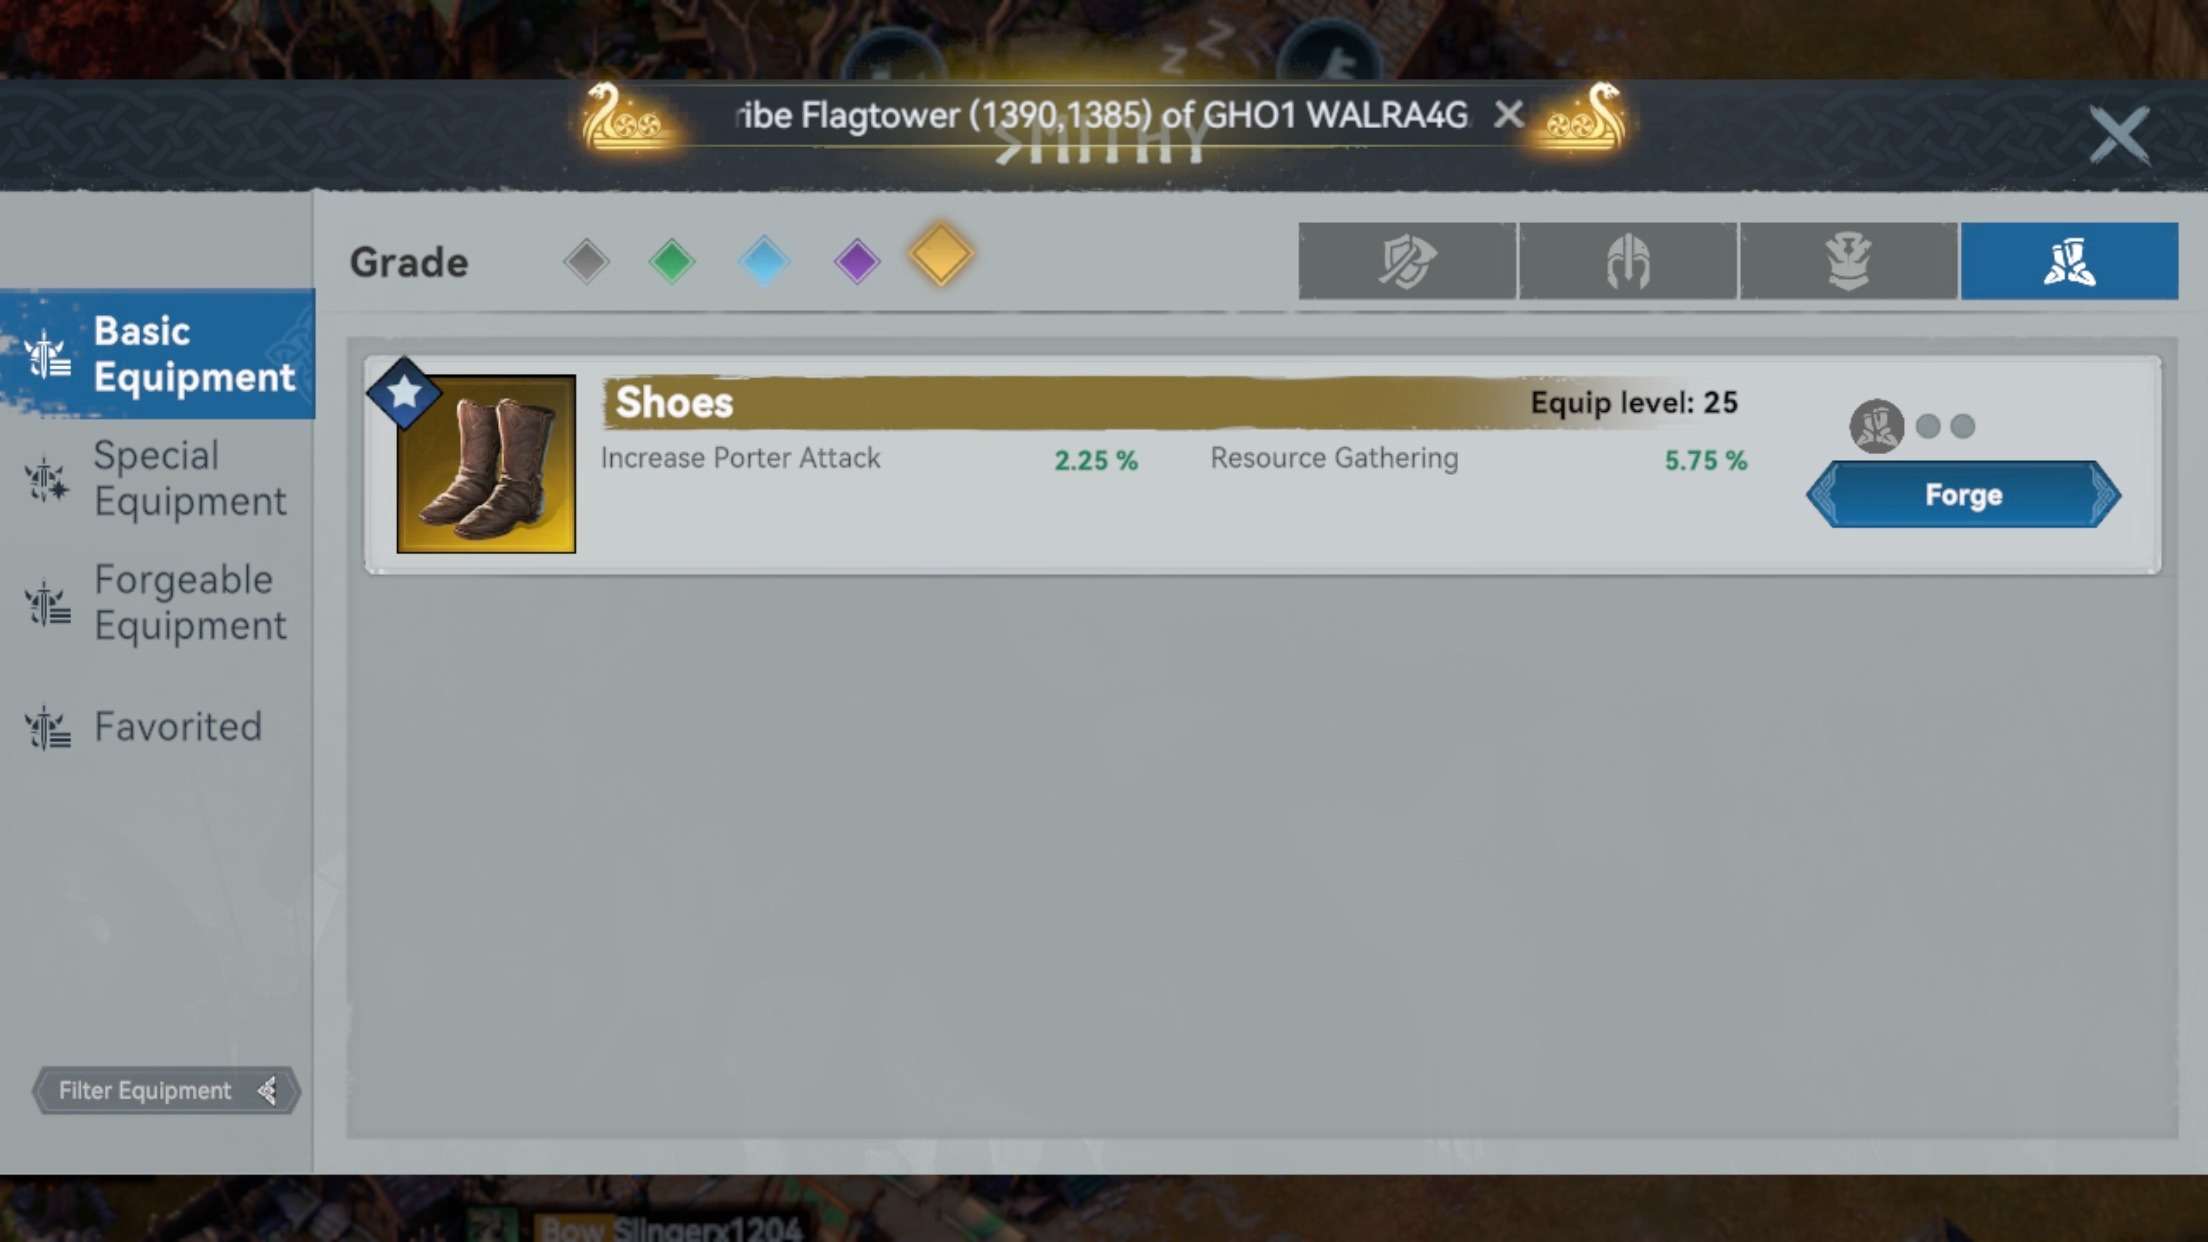
Pickers Guide
Don’t forget to pump up your pickers, and forge picker gear for them!
Train your gathering heroes at the hero base to passively level up. It won’t take much to level 30, but sometimes experience books can help too.
This improvement will help your heroes and warriors to collect all the tiles as much as possible, and not to leave 10-20 thousand as others like to do, and still get after them, but be able to collect clean up as fast as possible.
Use and do not forget!
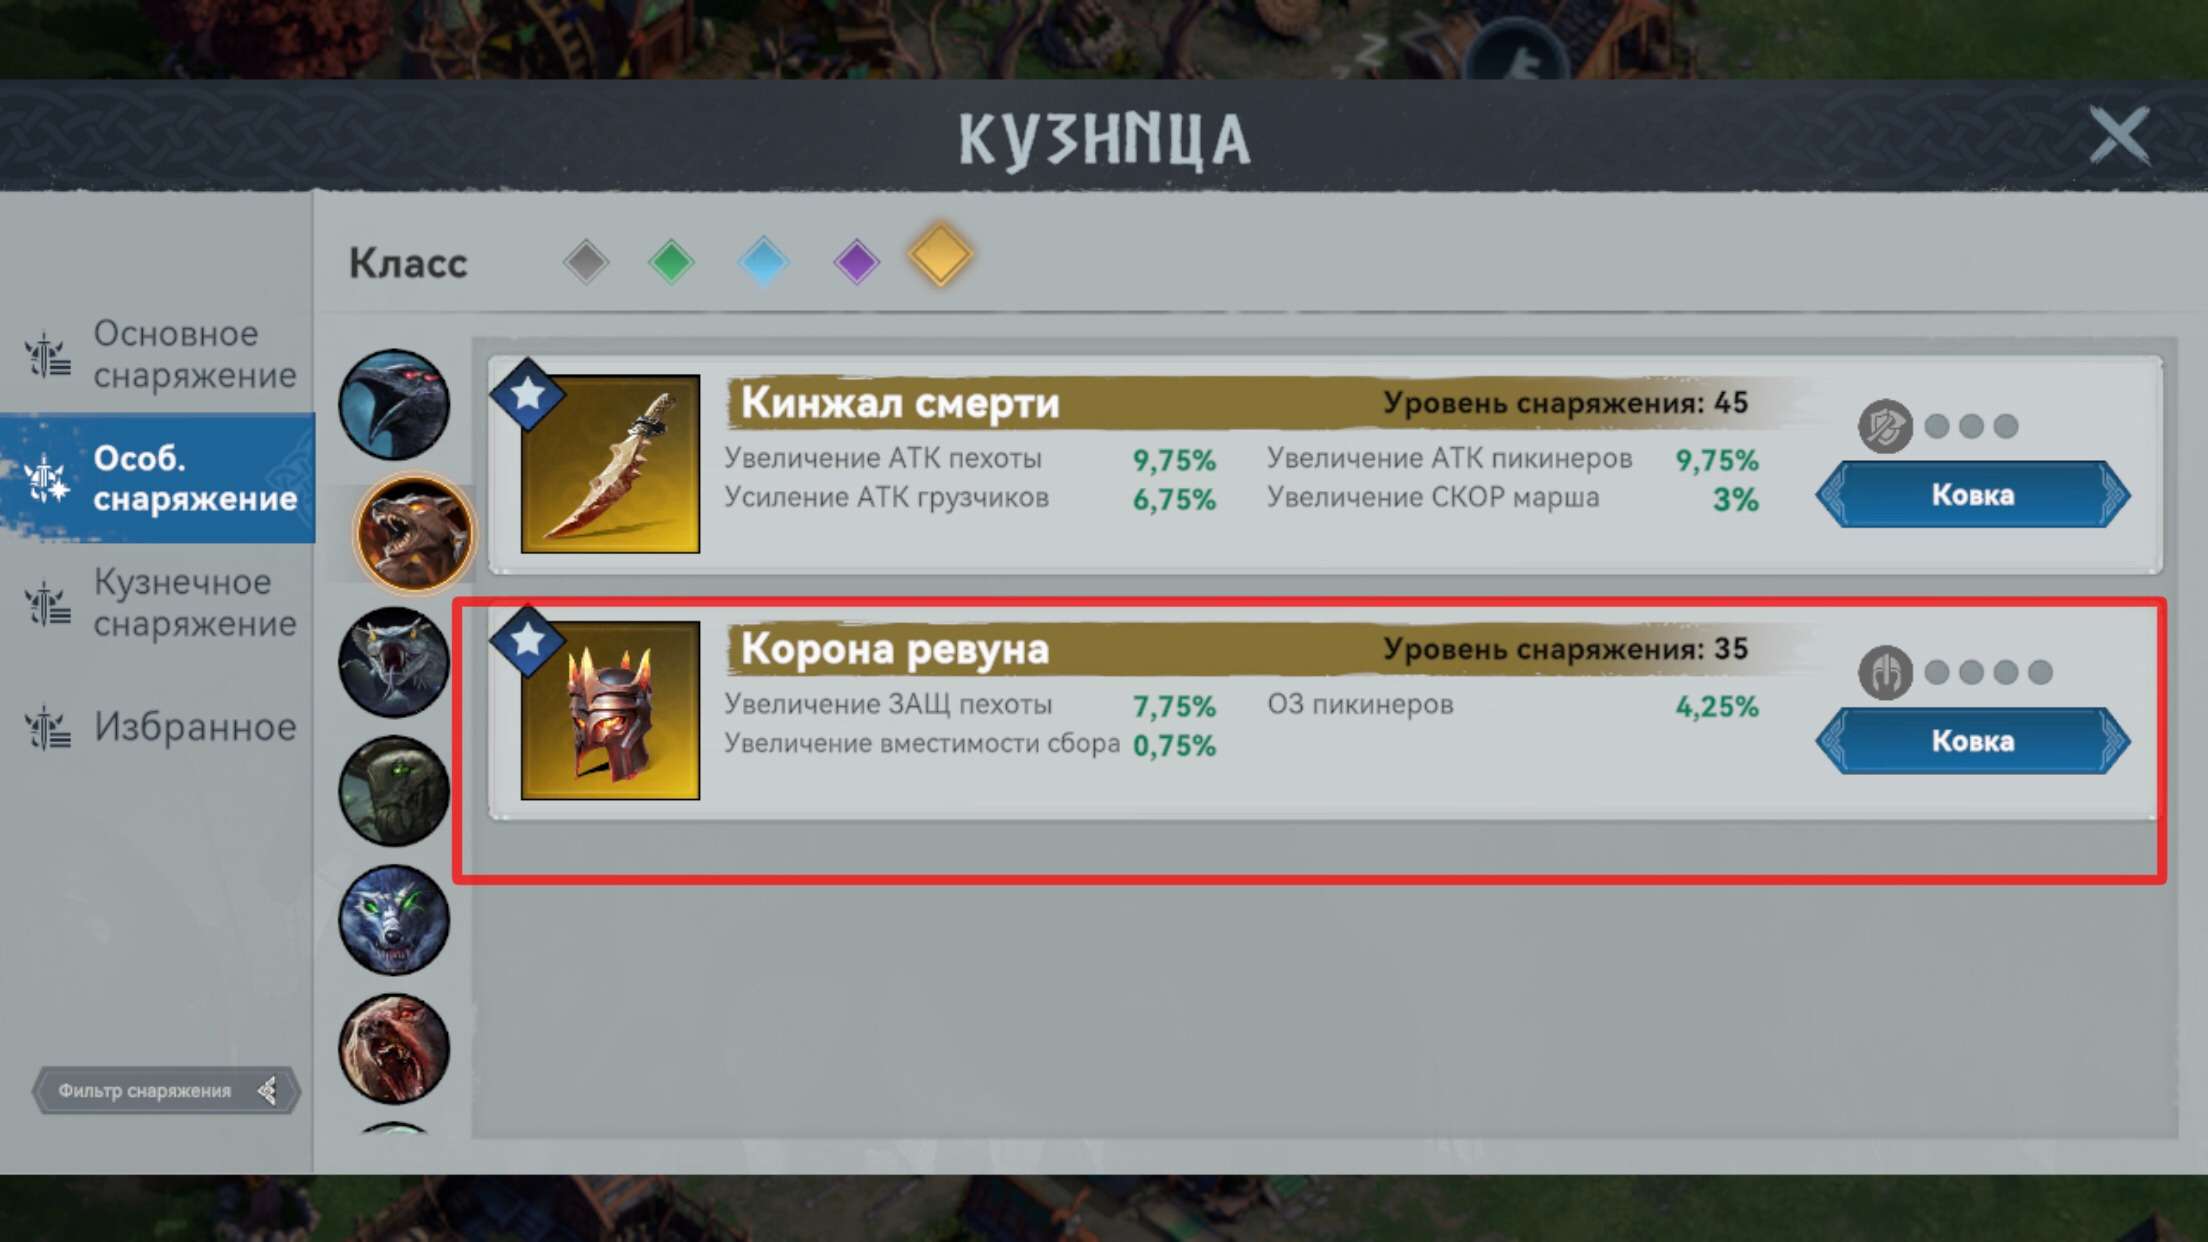
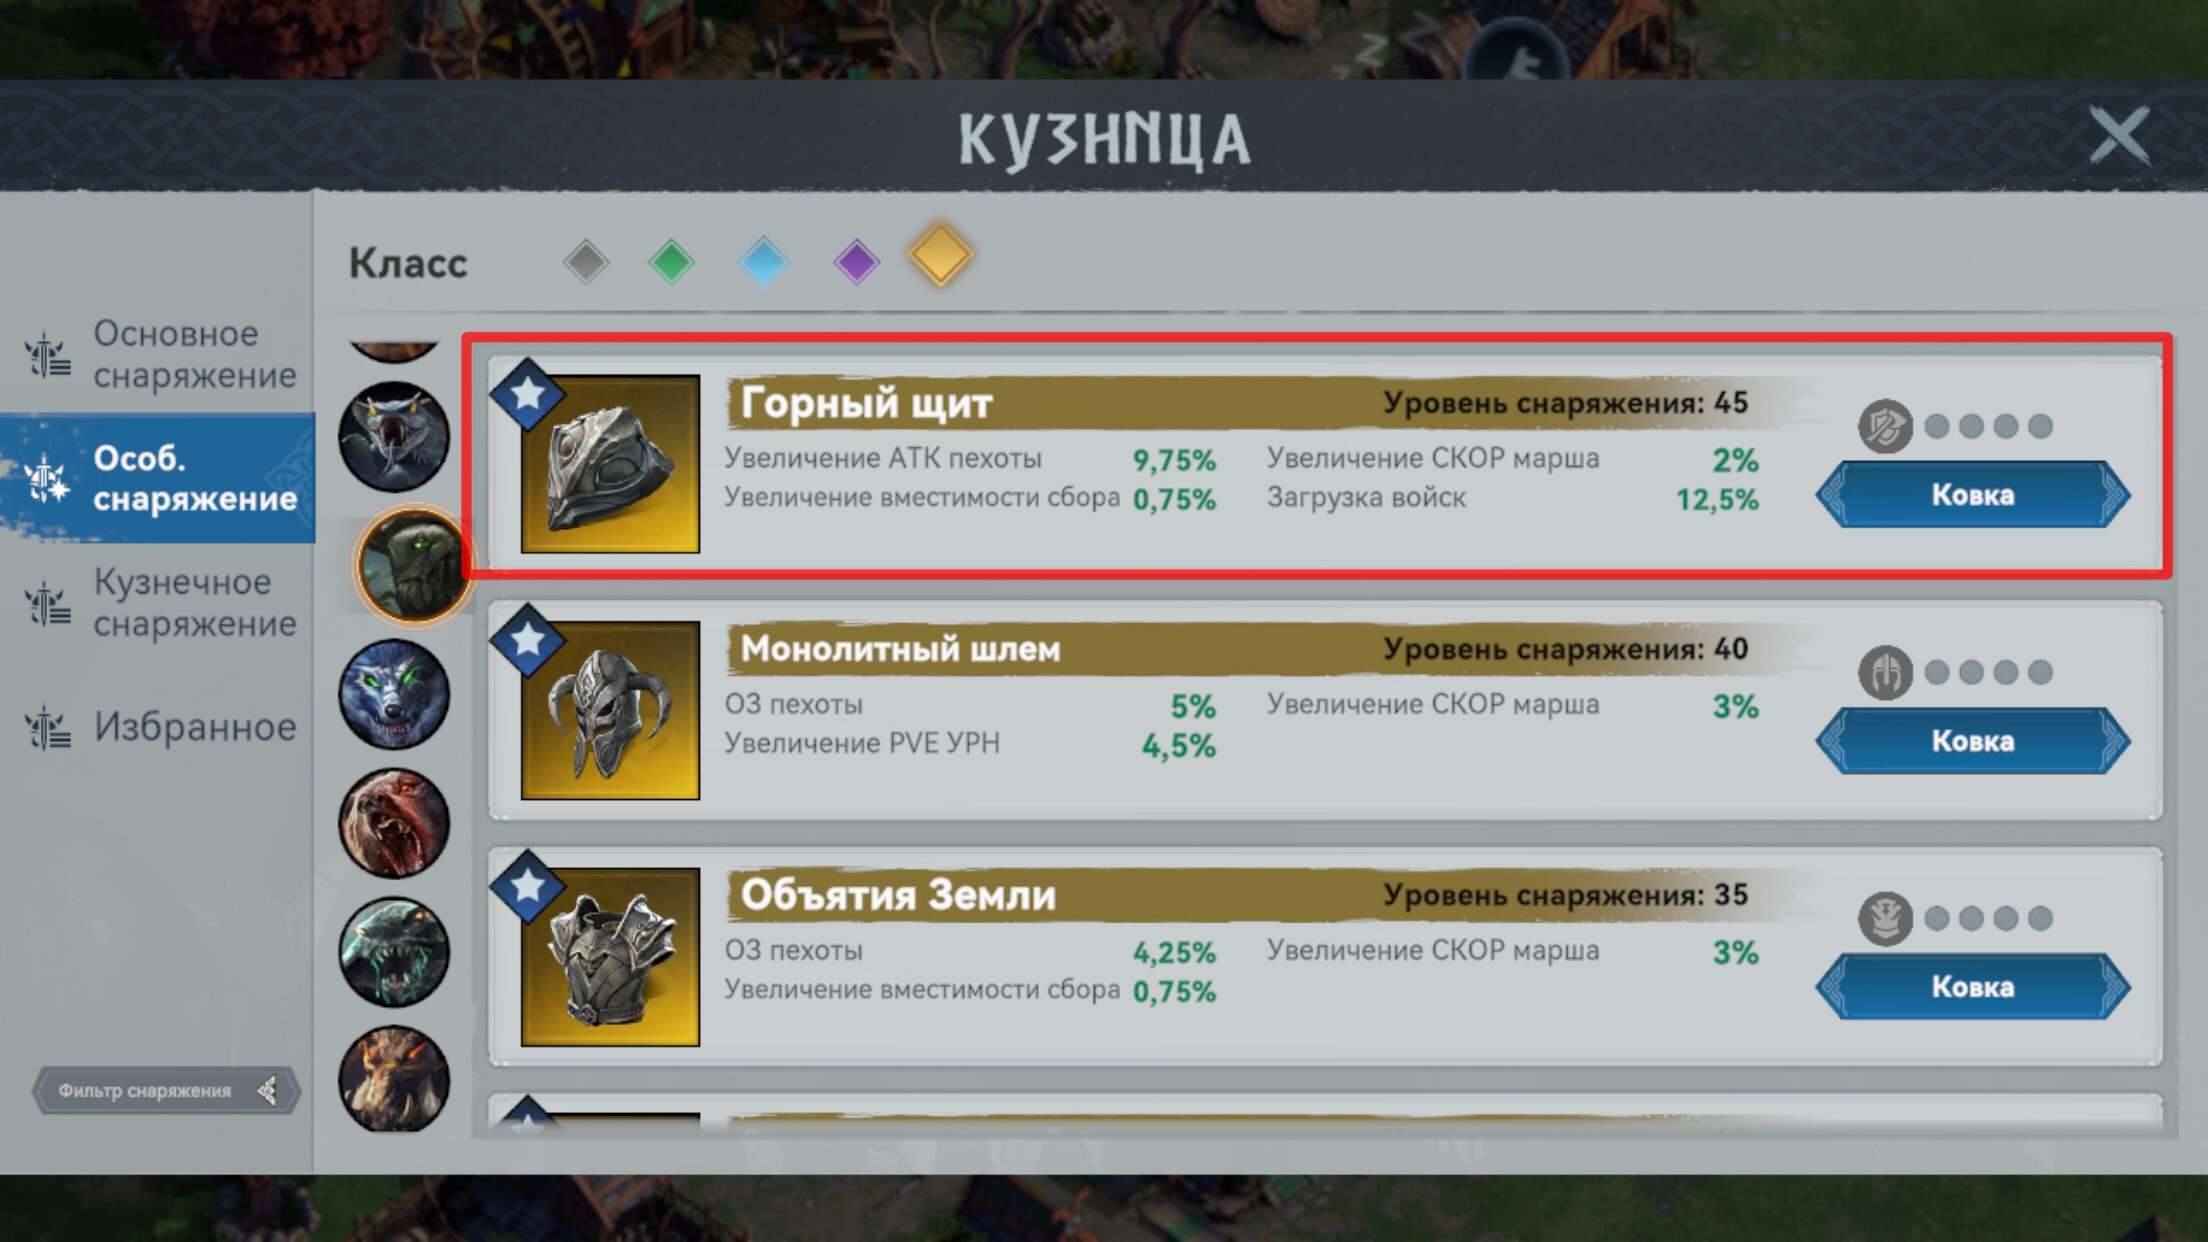
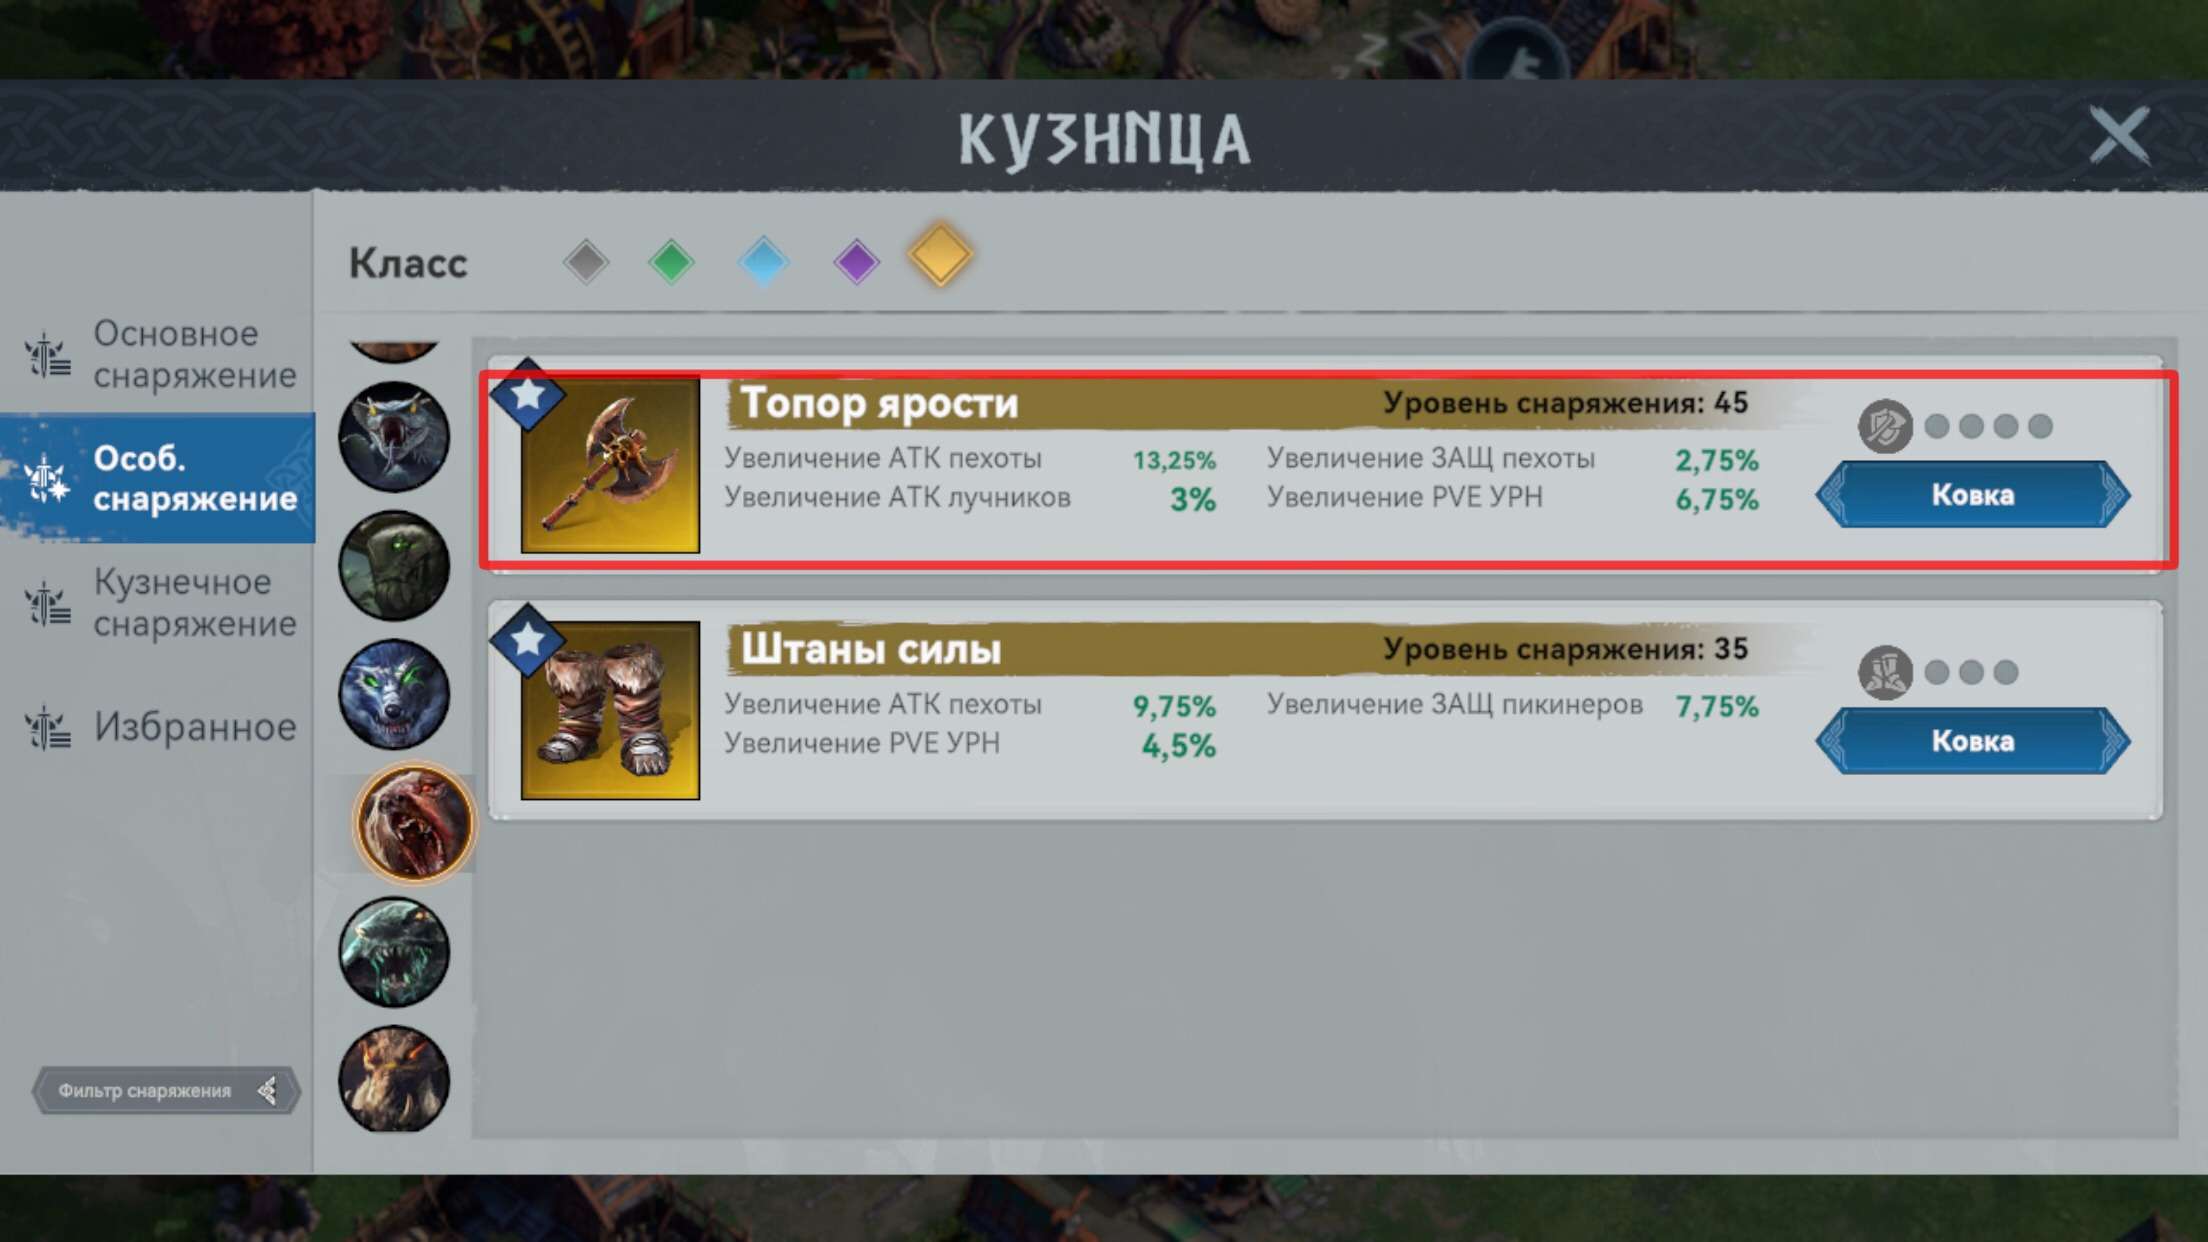
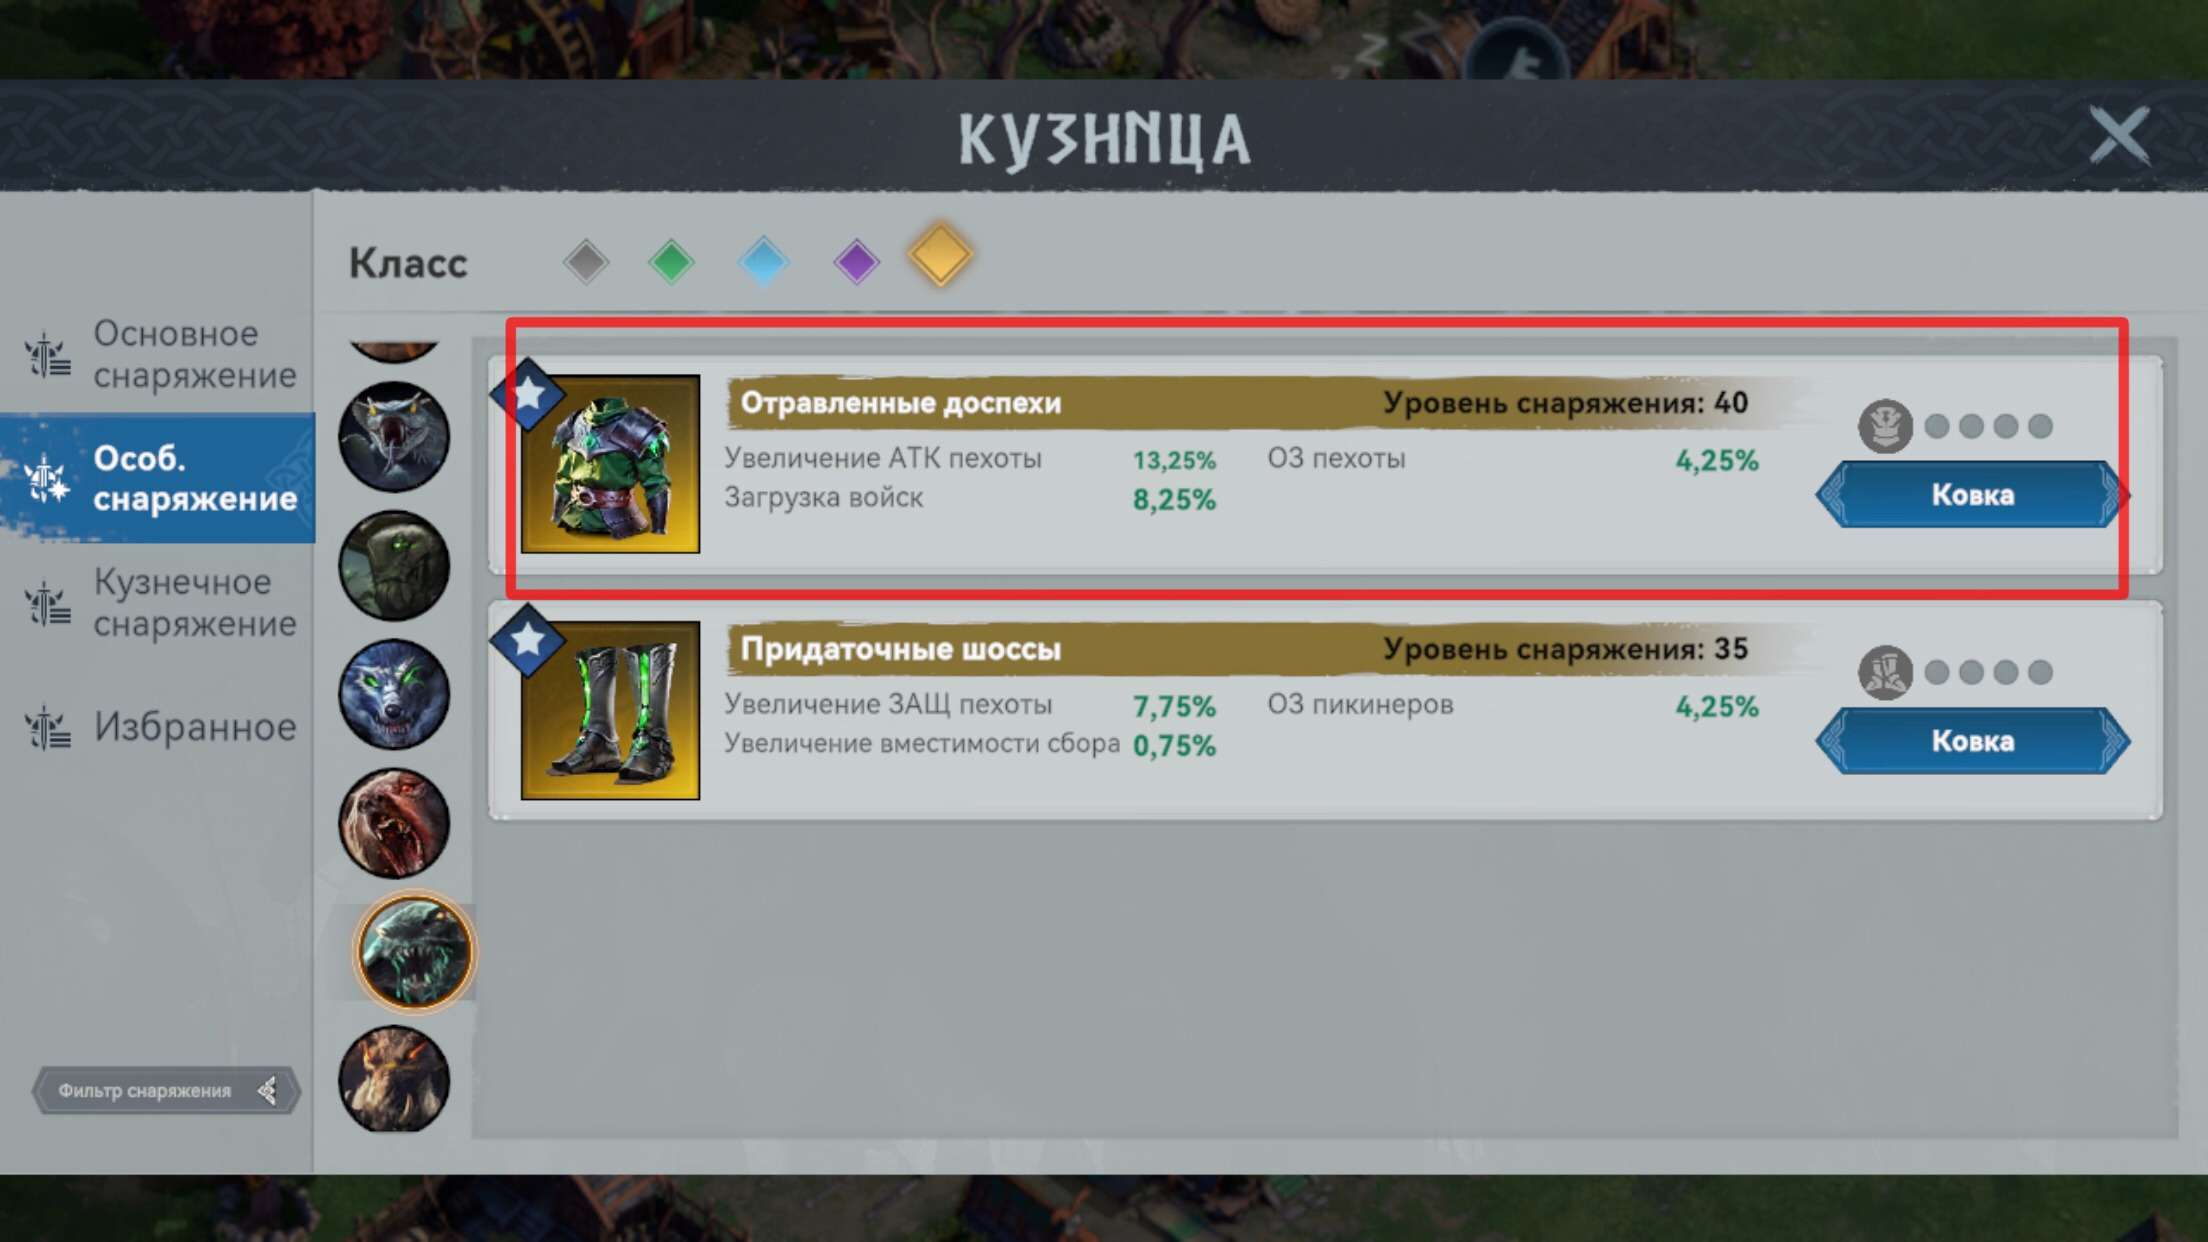
Introducing resource gathering gear.
They are universal. You can put this gear on all of your gatherers, which can increase your maximum load and more.
Do you think you need the crystals you get in the mines of the village? No!
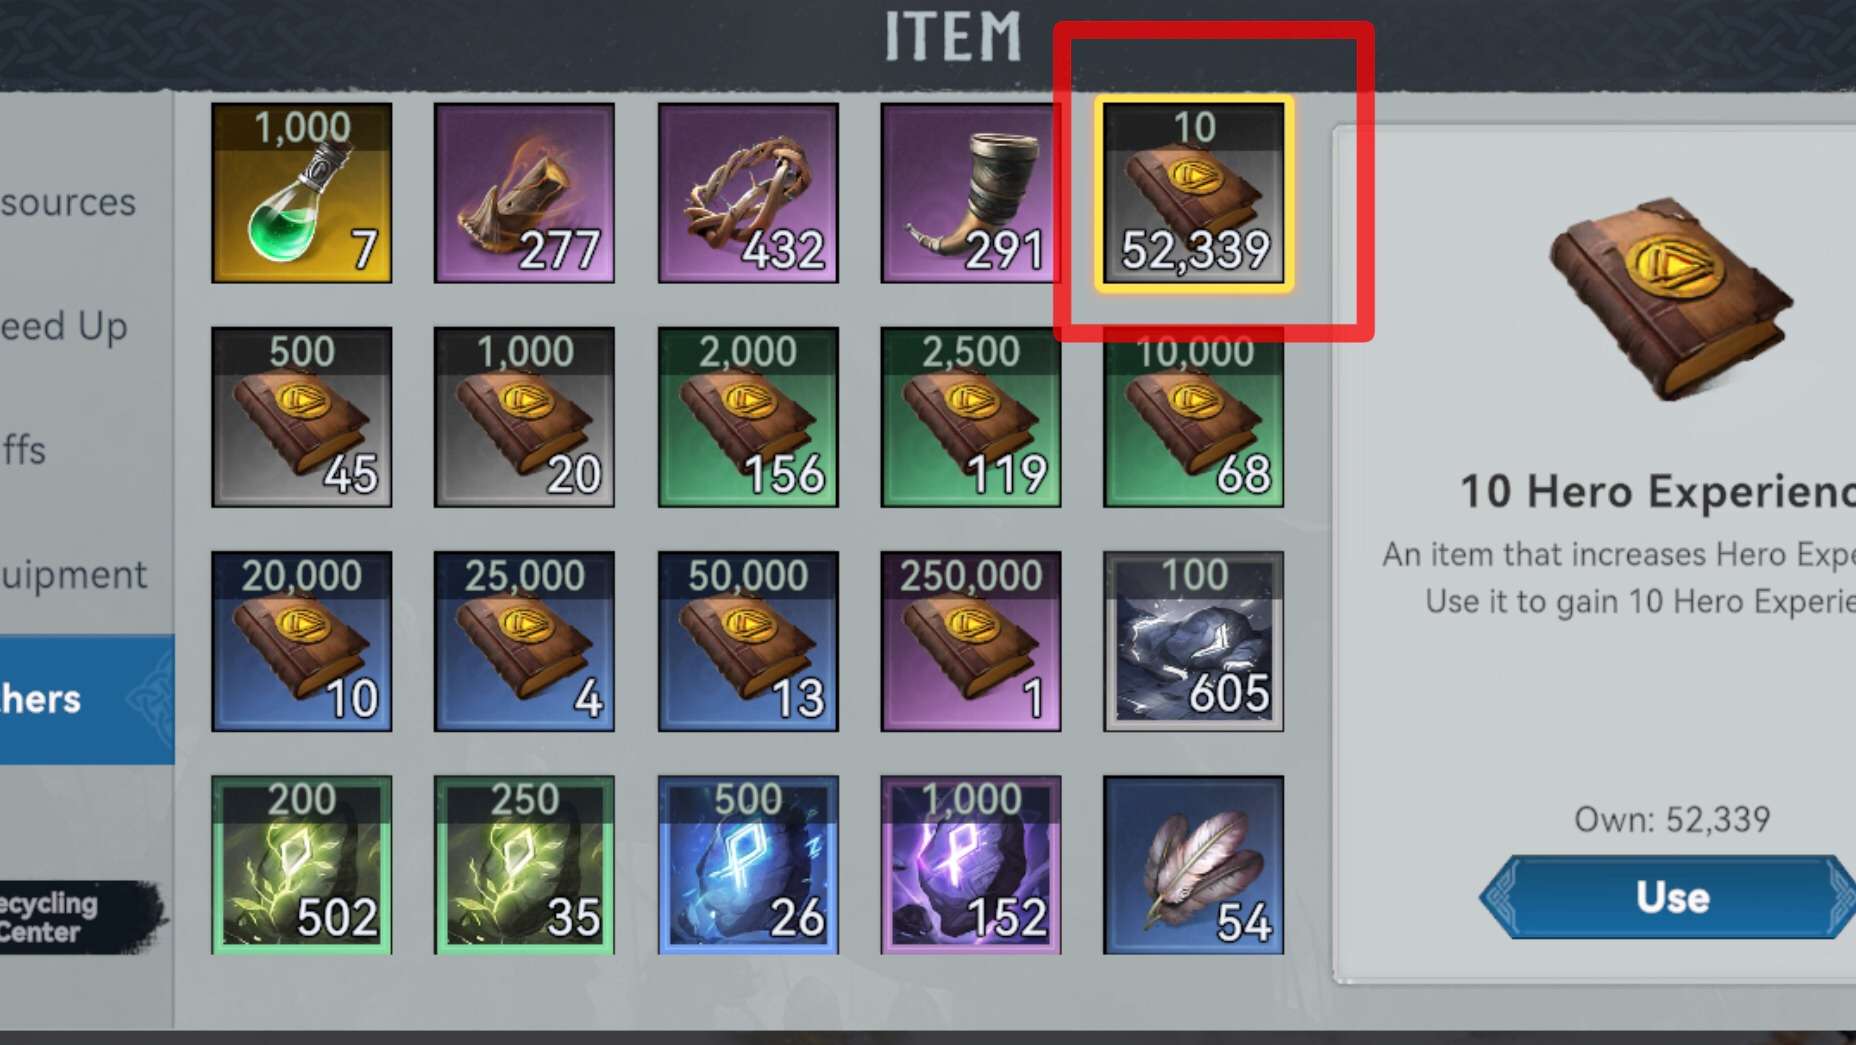
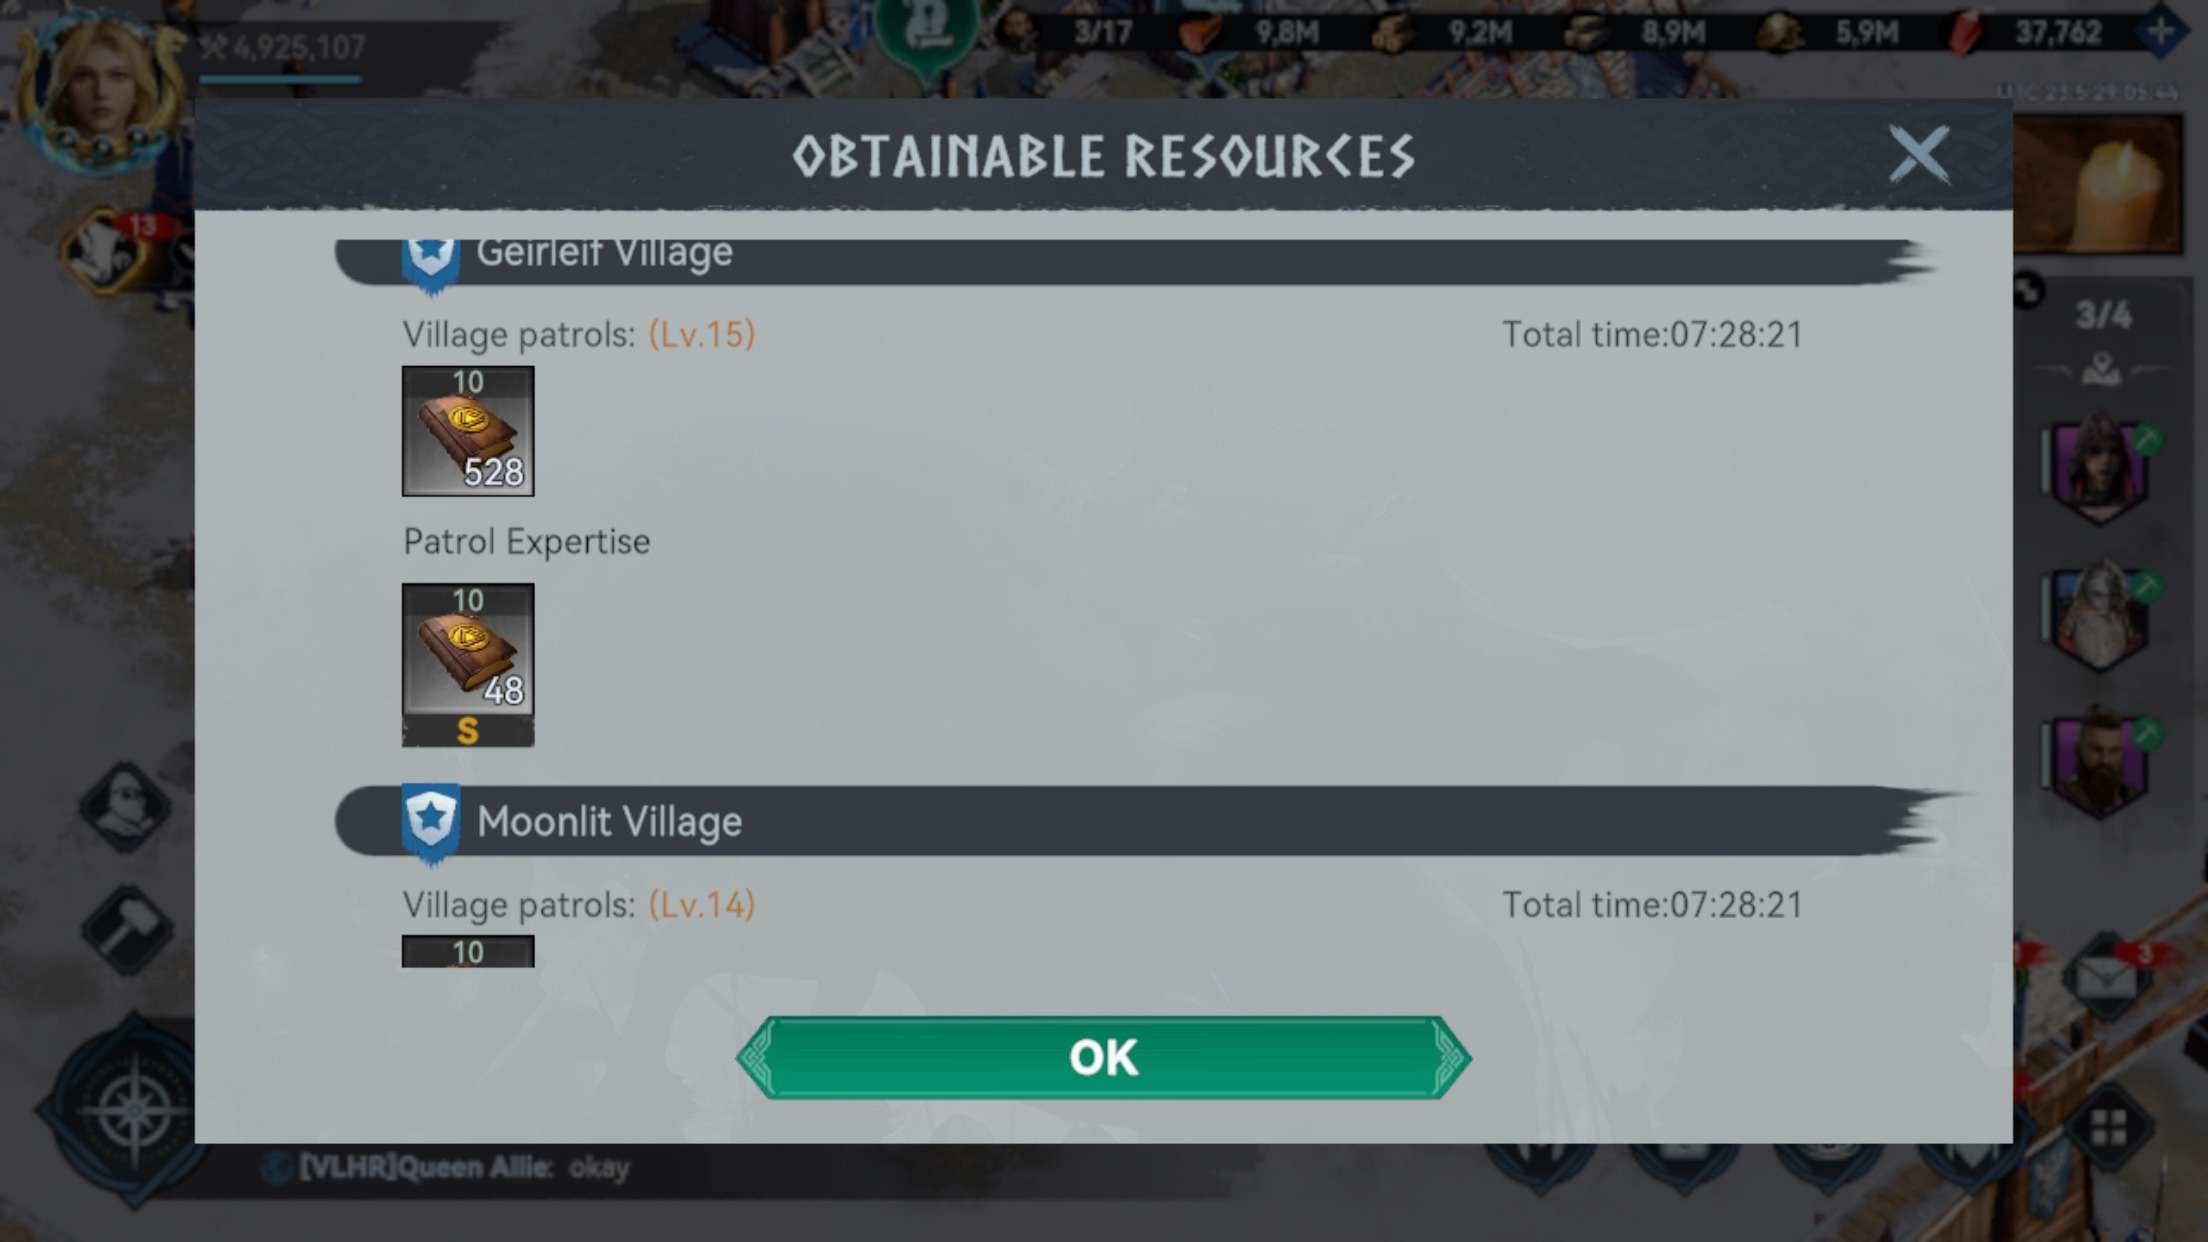
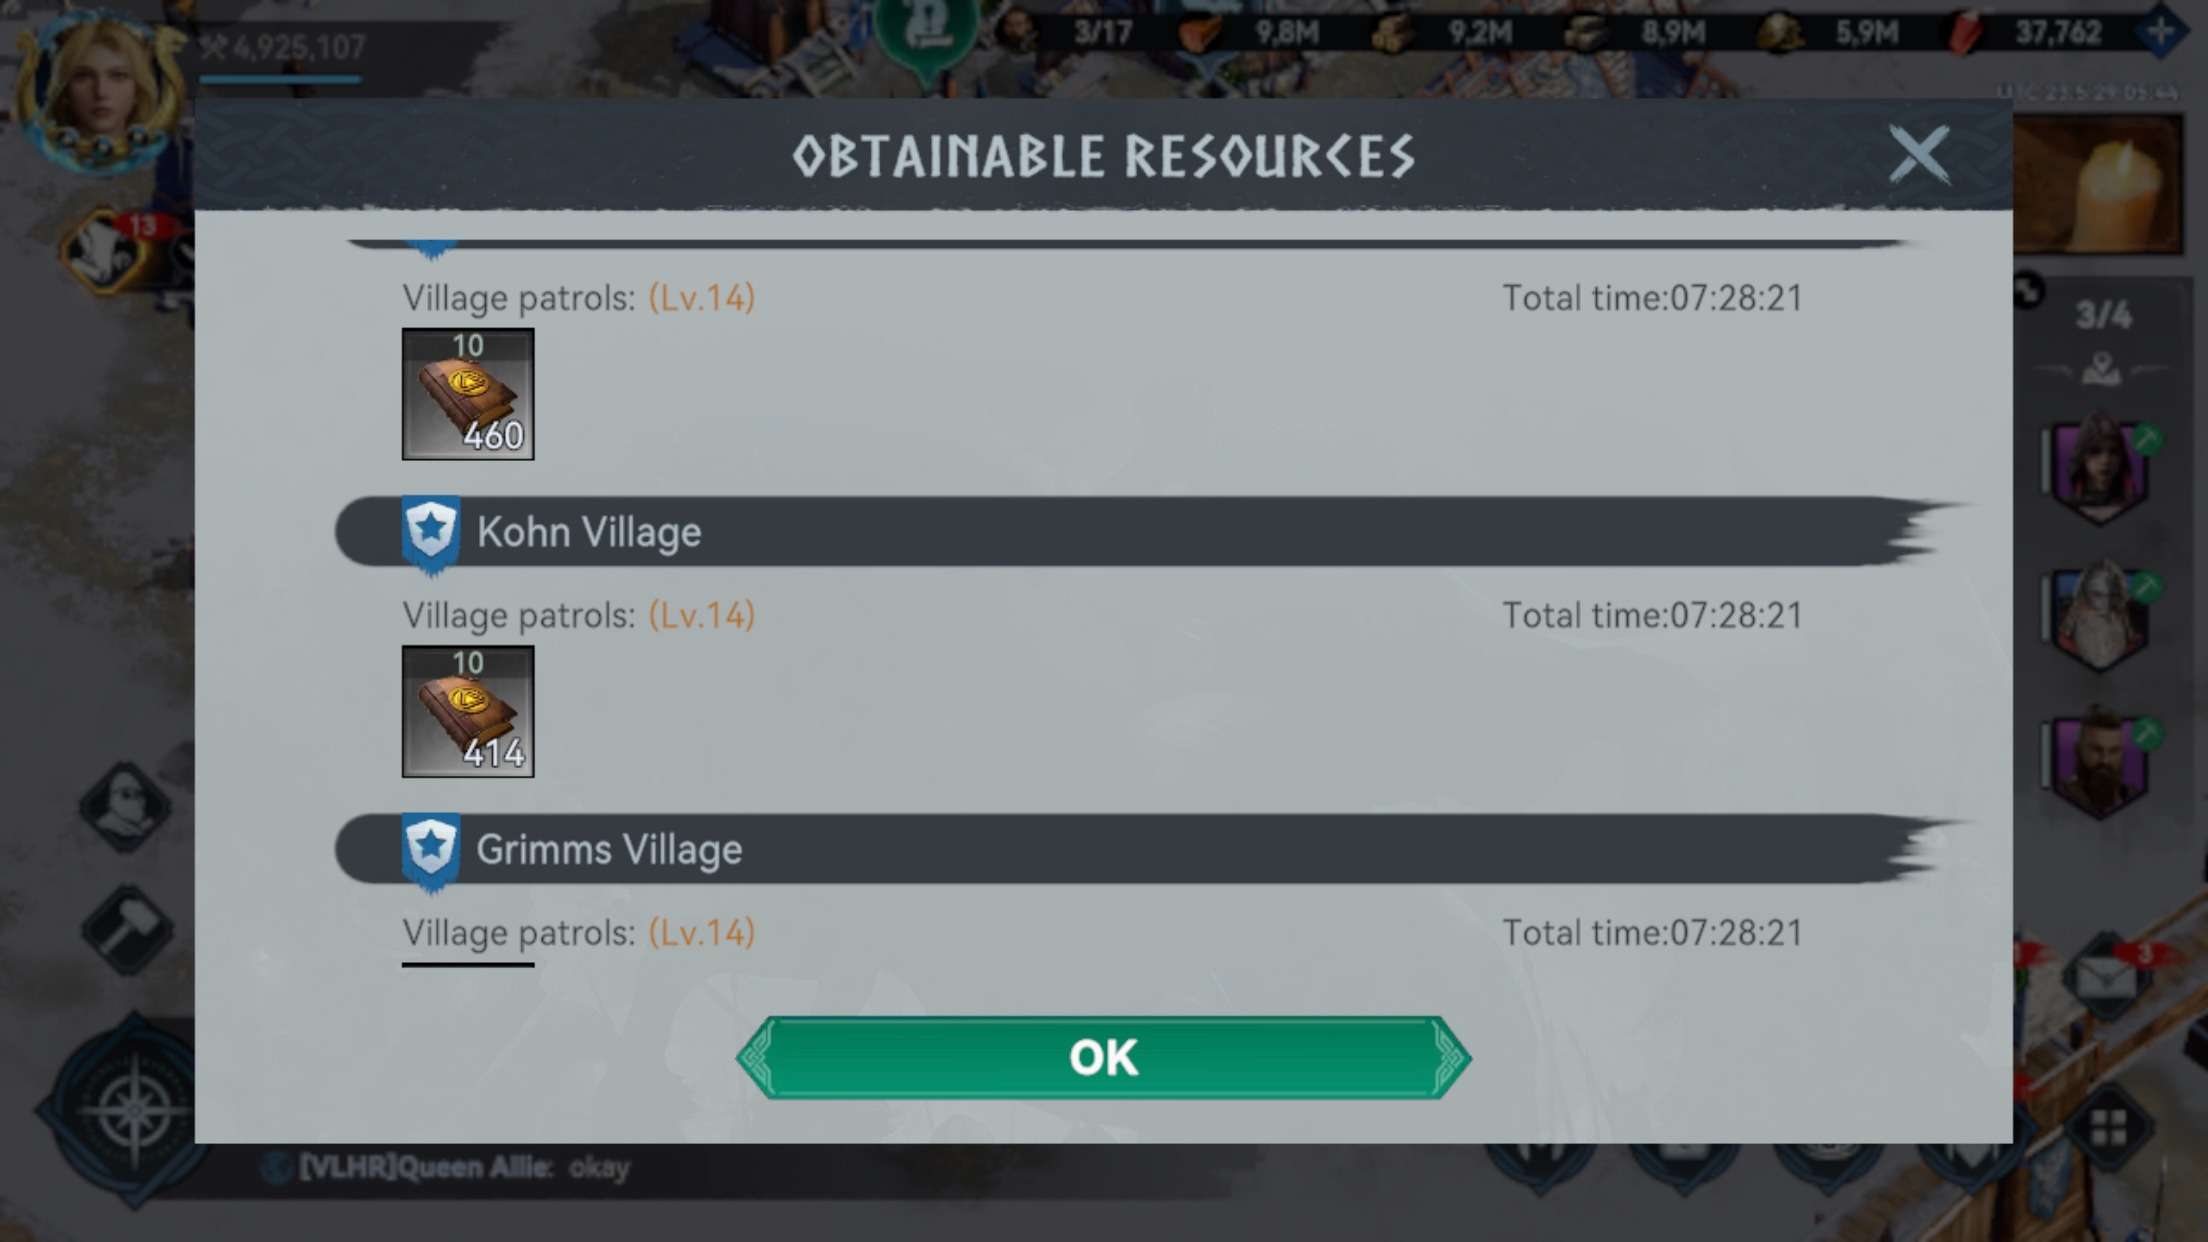
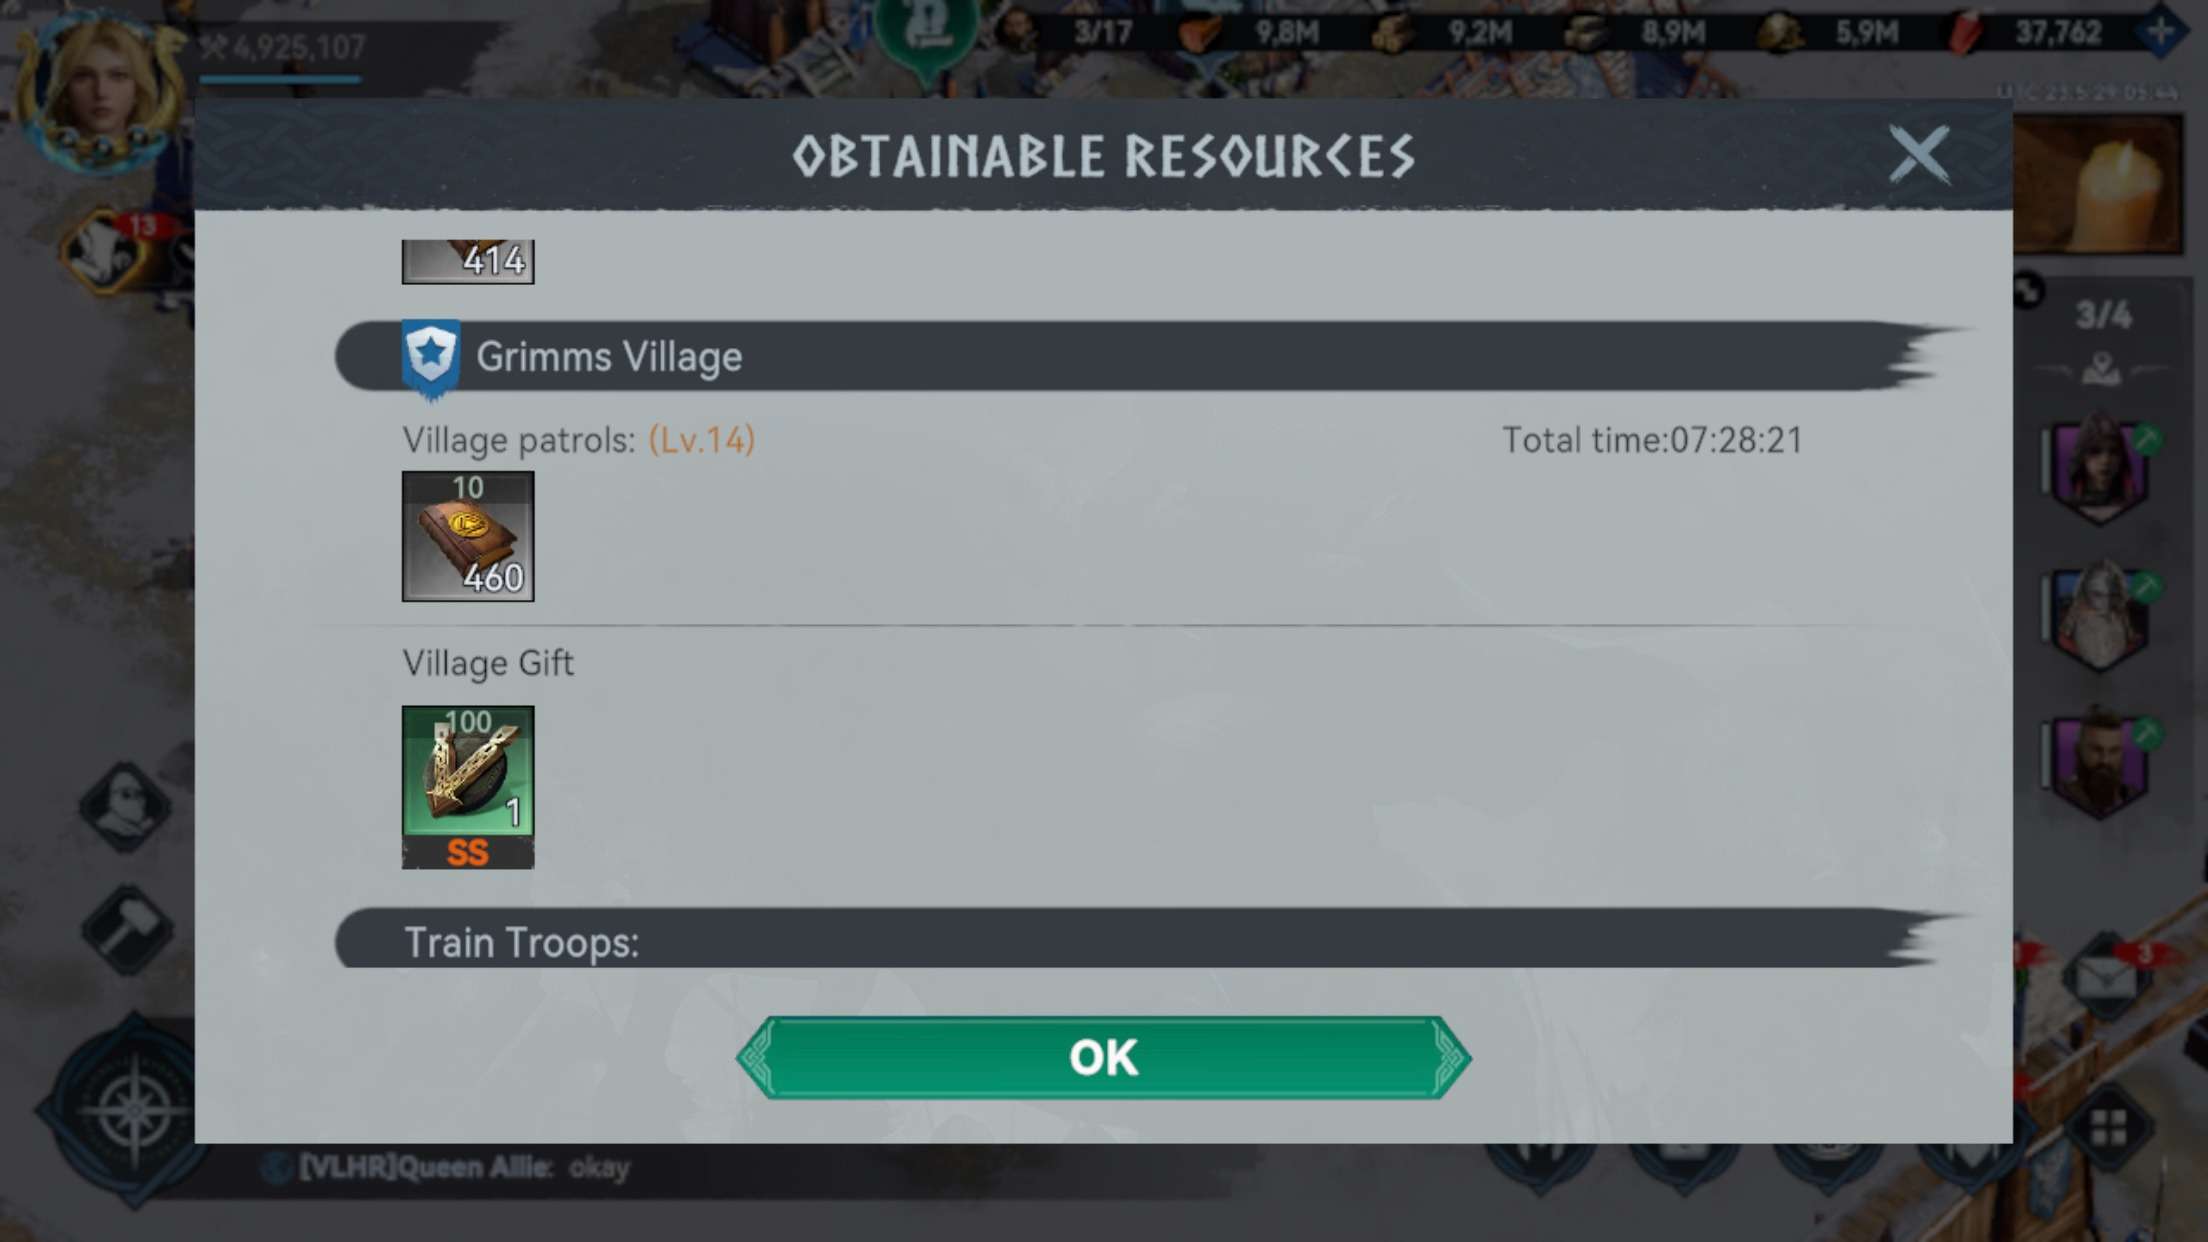
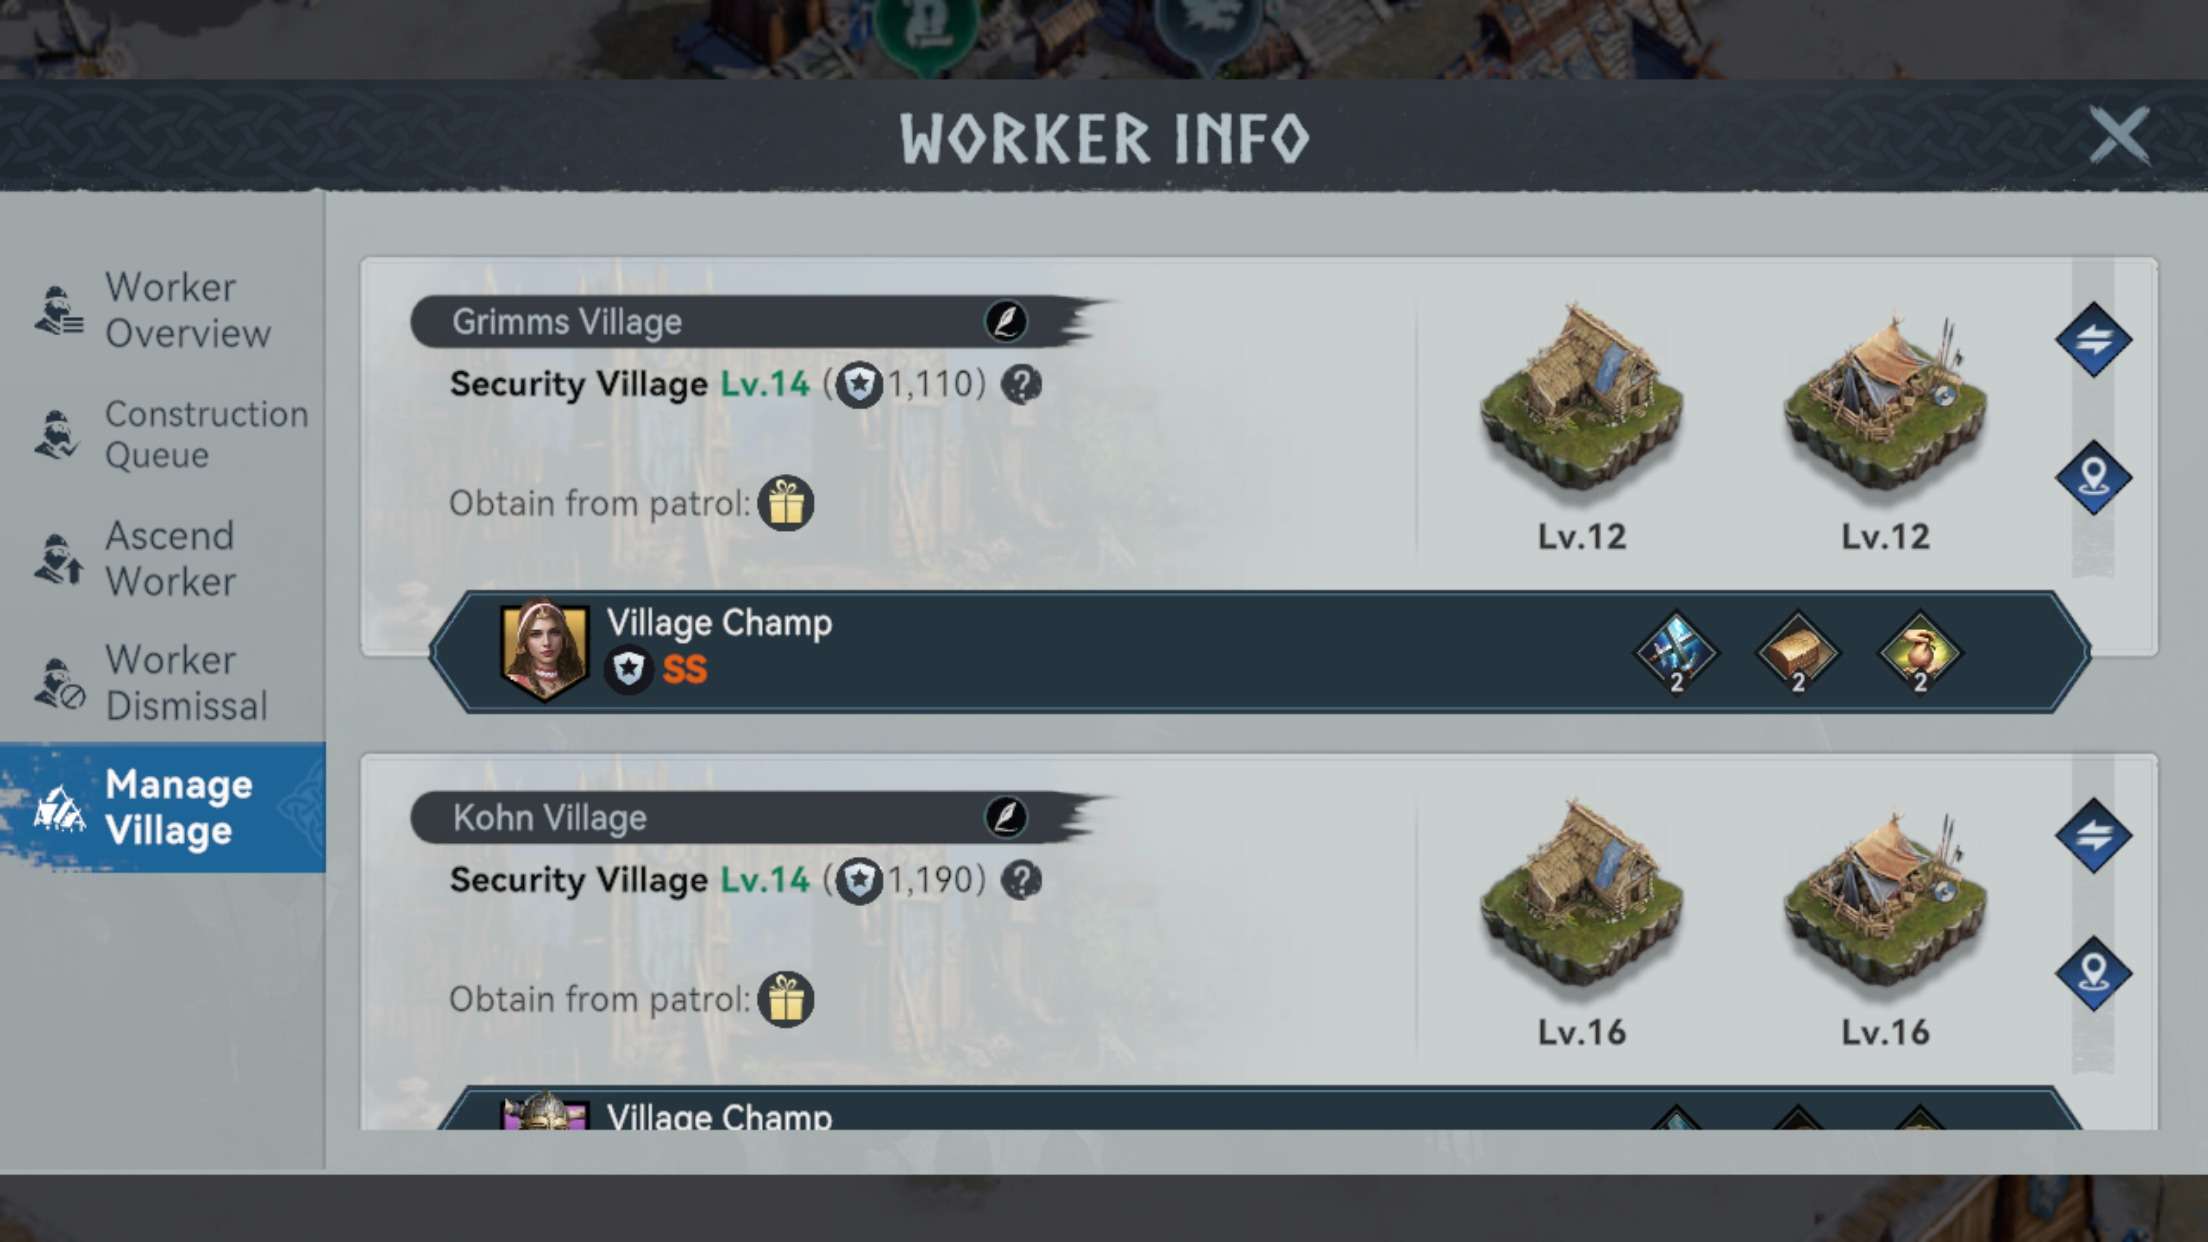
You need experience. Experience is obtained by putting your mines into “Security” mode. This will allow you to gain ~5000 experience books, giving you 10 experience. Which is a passive experience income for your heroes. Thus the parallel pumping of blue heroes will accelerate many times over!
Good luck!
Be the first to comment