
What Is This?
By Thunder#8398
In this hero compendium I’ll be giving my thoughts on every hero currently in Slice & Dice. While I mention the strength of each hero in these thoughts, this is just a simple evaluation of their potential that you can consider when picking, but there are other things to consider as well.
For this hero guide I will be assuming Standard Hard mode with the Start Damaged curse. I will also be assuming you are playing for Consistency, not just to try out every character. I highly encourage you to play the game how you want, especially before looking at this guide, but if you want to win more consistently you’re at the right place.
If you just want the basic idea of how to pick characters, no need to read past the 4th page. Past that is individual hero pages.
The game isn’t simple enough for me to say something like:
- Jester > Glacia > Evoker > Sparky > Caldera
The hero selection process is more complicated than that, and I don’t think picking heroes in such a manner is correct. You could probably still win doing so, but not as often. I’ll mention the “strength” of a hero and how it could vary as a way for you to decide for yourself if they could be helpful. For example, Knight is stronger if you have Anchor to grant +2 Block on the first turn.
As for the colors, I opted to use the Slice & Dice character box colors for the text and background. If this is bothersome to anyone please let me know and I’ll create a second document in black and white, and link it here.
When Choosing Heroes
When picking a hero, I find these and similar questions to be useful:
Is this hero helpful now?
Will they help me defeat a current boss or fight?
A good example is Jester’s early game power. Taking Jester allows you to do extremely efficient damage on low health enemies, but he isn’t as useful against larger ones.
Is this hero helpful later?
Do I need this hero to help me beat a boss in future areas?
Shaman is a good example for this question. Her spell, Ritual, is incredibly good at cleansing Dragon’s poison.
What heroes am I missing out on?
Is there another I’d rather upgrade into?
The main reason to upgrade into a hero you don’t want is because the other one locks you out of something very powerful; an item synergy or otherwise. If you have an item that would make Sorcerer win the game, try not to pick Warlock.
What synergy do I have?
What will I gain by upgrading?
Pretty self-explanatory. I want to upgrade to Sorcerer if I have Catnip.
What hero do I lose?
if I upgrade into this one? Am I missing out on a really good spell?
Upgrading Spellblade can be awkward because of this. Same with early Acolyte, and with incredible item synergy you currently have. Think (+ to the left side) on Whirl.
Hero Upgrade Priorities
While all heroes are worth considering, there are a few major things I try to meet when picking heroes. These are all easy to meet when considering Hero Choice Manipulation in the next section.
Tier 2 Heroes
Either Gray or Red needs a Cleanse. Cleanse is incredibly important for clearing debuffs in the mid to late-game, and is still very useful early-game. If you don’t have Cleanse, enemy debuffs can cause you to lose the game.
Either Orange needs a Ranged side, or they need to give your team enough offense to kill Back-Row threats, or meet some other sort of threshold. I usually pass on Gambler for this reason. Every other character meets this requirement, though Rogue only barely does so.
Tier 3 Heroes
Red needs Cleanse. If Gray has cleanse, then Mender’s Soothe is enough for the final boss. Forsaken should generally not be picked if playing for consistency.
Orange can be used as a flexible choice to guarantee other characters. Even if you don’t want Assassin for whatever reason, having Assassin is still way better than having a sub-optimal Red or Gray.
Blue and Yellow are also flexible for this purpose, but try to make sure you have some single-target damage to kill the floor 20 boss.
Hero Choice Manipulation
Slice & Dice does its best to avoid giving you the same character twice in one run. This has many implications for manipulating choices to ensure you get a desired hero.
For example: Consider your floor 2 Hero Upgrade is Monk or Caldera.
- If you pick Monk, you will never see Caldera again unless the game exhausts every tier 2 Blue.
- If you skip every Blue, you’re guaranteed the one in the example on Floor 2, A choice between your second-to-last tier 1 and a Blue on Floor 8, and 2 Blues on floor 10. 4 in total, more if you’re offered Blue characters in other choices.
- This means that if you want specifically Sparky, you can often, but not always, manipulate the game to offer him.
Doing something like this is most useful for Item synergies, but is also very useful for guaranteeing you see a Gray tier 2 with Cleanse, or that you see a Red tier 3 with Cleanse.
A larger pool makes this more difficult, meaning it’s hard to manipulate for a specific Tier 2 Yellow, for example, as there are 8 Tier 2 Yellow characters.. This means you might want to pick a good one for the situation you’re in when you see it.
Tier 1
Adept
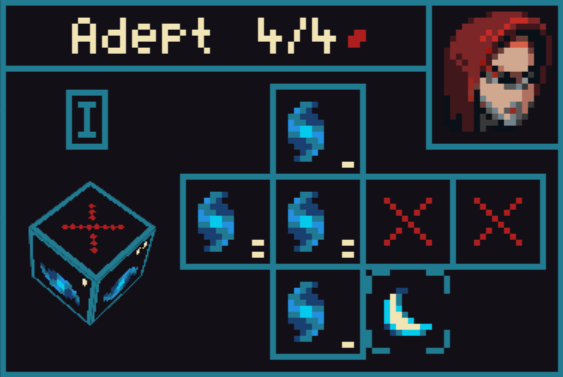
Slice: 3 mana, Deal 1 damage to all enemies.
Adept is the most flexible of the starting characters, and probably the strongest. He’s capable of dealing a decent amount of damage with Burst and with his spell, Slice. Something important to note about Adept is that his mana generation isn’t much worse than most of the Tier 2 Blues, so consider that when upgrading him.
For tier 1 heroes I can give some tier 1 and 2 item recommendations for them. Here are some I like to use on Adept:
- Castor Root
- Powdered Mana
- Short Sword
- Leather Vest
- Liqueur
Acolyte

Restore: 2 mana, Heal 1 to all allies.
Restore is definitely the main draw here; it allows you to heal all of your allies efficiently, especially with the Start Damaged curse. The 2 Max HP side also works well as equivalent block to Defender, but the Heal 3 sides can also be useful on your first few upgraded characters.
I like to use the following items on Acolyte:
- Rusty Plate
- Cursed Bolt
- Citrine Ring
- Leather Vest
- Anchor
- Pure Heart Pendant
Defender
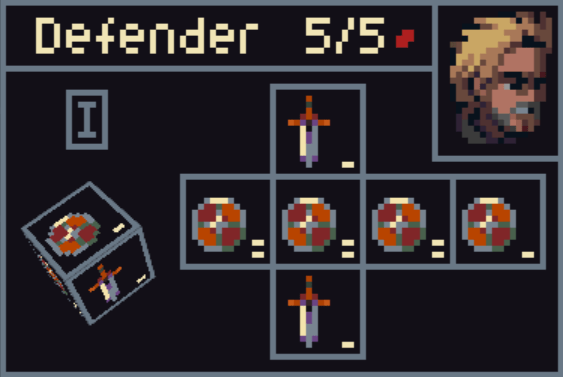
Defender is a pretty simple character, he mostly just says 2 Block. While you can roll for 1 damage occasionally, usually blocking for 2 is safer.
Using items on Defender is more interesting as it allows him to reach similar damage output to your other characters. I like to use:
- Seedling
- Rusty Plate (If I upgraded Acolyte already)
- Longbow
- Twin Daggers
- Sapphire
- Short Sword
- Worn Arms
Warrior
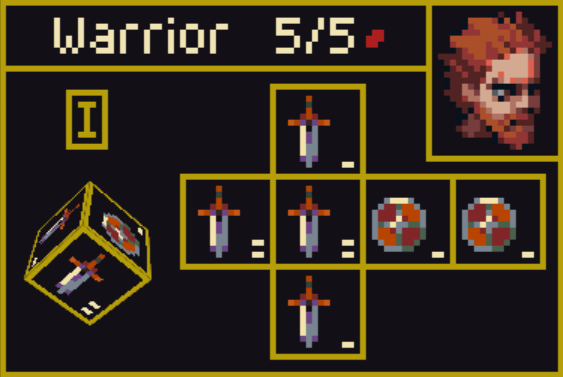
For the most part, Warrior simply does 2 damage. He can also block, but not very well.
I don’t usually have items on Warrior early, but I can still recommend a few:
- Sapphire (if no other uses)
- Longbow
- Max HP items if other characters are upgraded
- Wine?
Thief
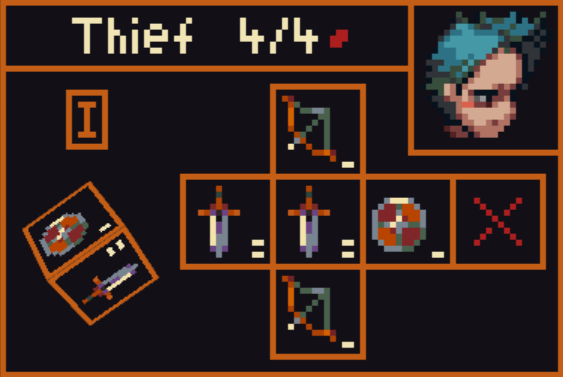
Despite their varying sides, Thief is probably the least interesting of the initial characters. They’re basically Warrior with 1 less Max HP, 1 less Block side, and Ranged 1 damage sides. For the most part, both simply do 2 damage.
I like to use the following items on Thief:
- Heal Wand
- Short Sword
- Leather Vest
- Anchor
- Worn Arms (if Defender was upgraded)
Tier 2
Tier 2 Blue Heroes
Caldera
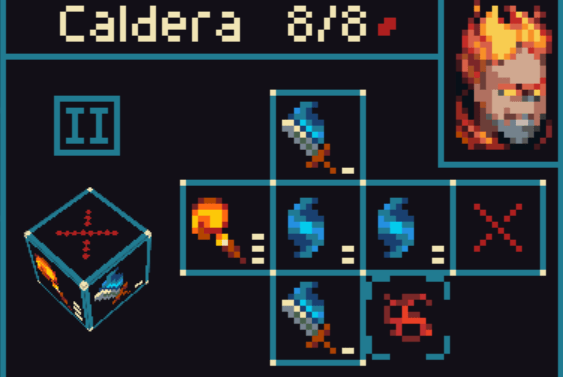
Scald: 3 mana, Deal 2 damage to all damaged enemies.
Caldera is definitely one of my last choices when upgrading Adept. His Single use Cruel side is pretty solid against tough enemies, but his spell simply doesn’t do enough. Combined with the fact that he needs more than one turn to even cast that spell alone, AND that the enemies have to already be damaged, he usually doesn’t turn out too great. He can work sometimes, though, especially if you have a character like Whirl to damage every enemy in the combat. He’s still a decent pick if the other option is bad.
Evoker
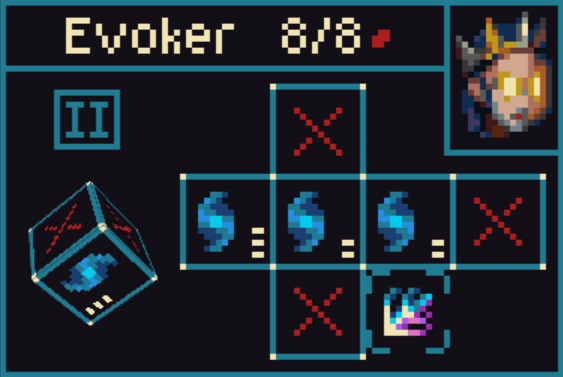
Beam: 3 mana, Deal 3 damage, Ranged.
Evoker is a pretty decent option whenever he’s offered. Most of Adept’s upgrades have an edge against certain parts of the game (Jester for weak enemies, Glacia for strong enemies, Sparky for those in between). Evoker’s spell, Beam, is excellent for taking out Snipers if you lack a strong source of Ranged.
He has very nice Item synergy due to the basic sides and blanks. Have a Worn Arms? Anything that improves basic mana sides? Evoker can get a lot of good use out of these items.
Jester
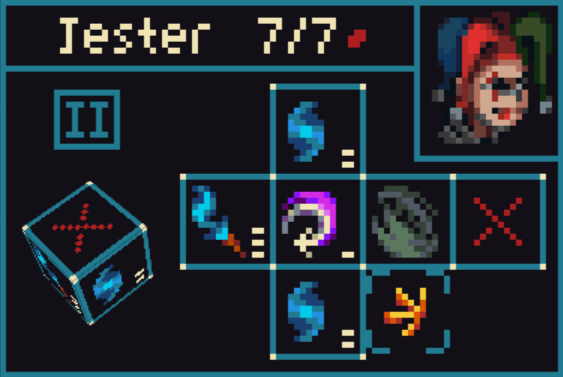
Flick: 1 mana, deal 2 damage to undamaged enemies.
Absolutely insane. The only unlockable hero in the game so far, and for good reason. Flick is one of the strongest spells in the game and only costs 1 mana. It crushes early enemies and still remains as extremely efficient damage later on.
On top of the solid mana generation (the single use only tends to be relevant for long combats), Jester also has a Reroll Cantrip side for supporting the rest of the team, and a Smoke Bomb side, both useful utility sides. If I haven’t sold you yet, consider that Flick kills Archers in one shot.
Glacia
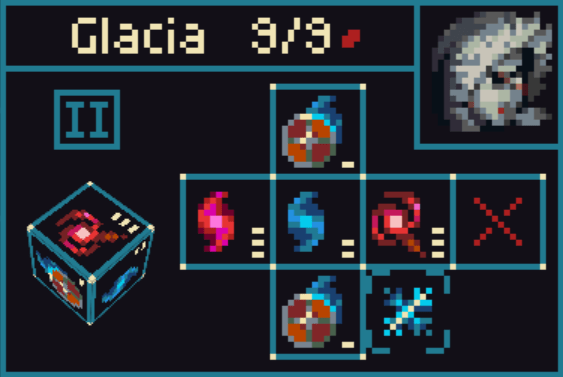
Chill: 3 mana, Deal 2 damage, Weaken. Single Cast.
The beta MVP! Glacia remains a strong choice despite being nerfed. Glacia has strong mana generation, a large pool of health, a flexible spell, and that really solid 3 damage self-healing side. Not only can Chill cancel enemy summons, but it also greatly reduces damage on attacks striking multiple allies and Poison attacks.
The mana block sides can be nice for getting that exact block on allies while still having offensive potential, but Glacia has enough mana sides that you can reroll if they’re not enough.
Sparky
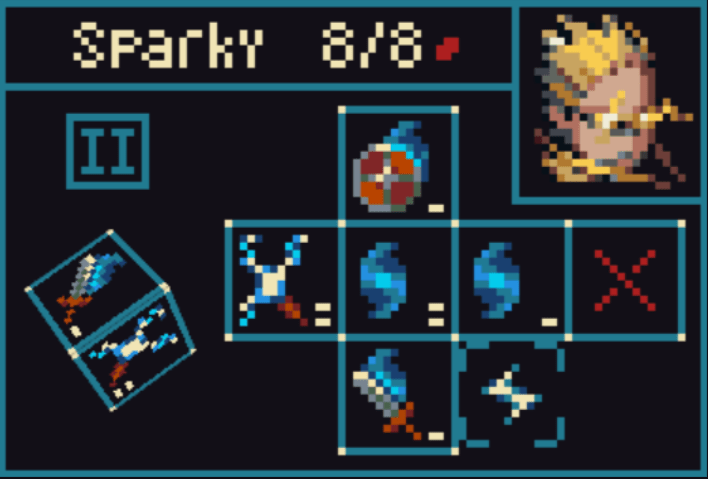
Zap: 3 mana, Kill an enemy with exactly 4 HP.
The last tier 2 blue hero is Sparky. Sparky has a lot of niche utility that’s easy to underrate, but he’s not at the same level as Jester, either. Zap is pretty efficient damage if you manage to cast it, and it works well against Slates, Wizzes, and even Ghosts.
The single use Charged side can be pretty useful if you need to do a lot of damage in one attack, such as against the Three Witches fight. Zap also works very well in that fight. Overall, Sparky is a pretty decent upgrade.
Tier 2 Red Heroes
Druid
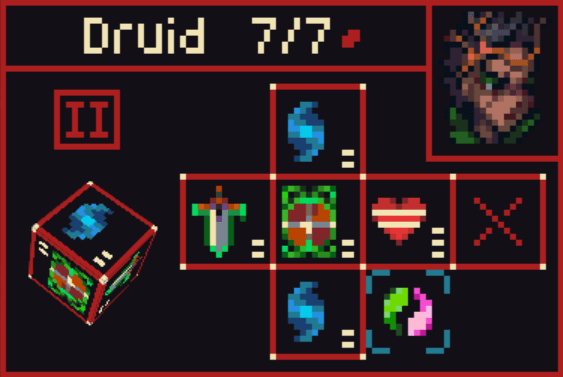
Balance: 3 mana, 1 damage to all enemies, heal 1 to all allies.
Druid! Despite having the strongest mana generation of the five, Druid’s spell is often lackluster. It’s awkward to pick her before replacing Adept, as it’s basically just Slice+. Giving up Restore and having it cost 3 mana is also pretty odd. However, she’s pretty good! That’s still a bunch of decent mana generation.
On top of that, Druid has a Cleanse side and two growth sides that can be solid damage or block if needed. It’s hard to get bad rolls when so many sides are just good value. Balance can be pretty good with Caldera, or later with Warlock or other Bloodlust sides. It’s also useful in fights where you might have wanted Slice but already upgraded Adept, such as if there are many Archers.
Herbalist
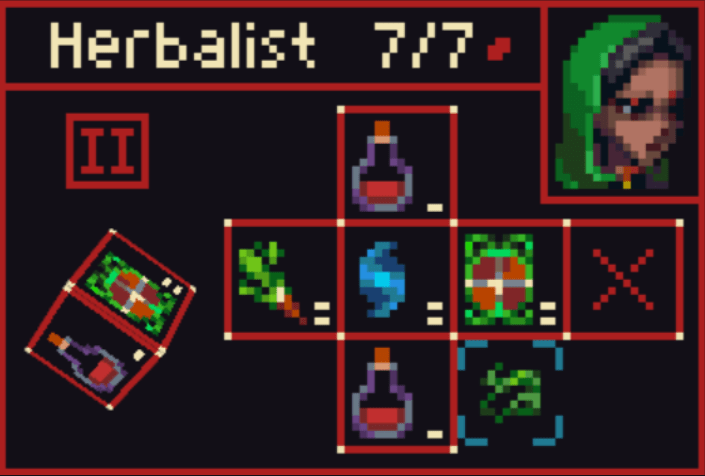
Vine: 1 mana, 1 damage to an enemy or Heal 1 to an ally.
Vine is so flexible. So flexible, in fact, that I consider this to be picking Vine rather than picking Herbalist. Herbalist is alright. The Poison as scaling damage is very valuable in boss combats, and the Regen sides are decent healing. However, the main draw here is definitely Vine. Are you just one damage/block off of being safe this turn? Vine. It’s a very strong, efficient spell. Herbalist lacks Cleanse, which is sad, but Regen acts as a sort of pseudo-cleanse as long as you’re just using it on poison.
Herbalist possesses the worst healing of the five Acolyte upgrades but the strongest offense. She can shut down Slate and other enemies pretty easily, and combined with Jester, you only need 2 mana to kill a 3 HP enemy. She can be a little awkward with item synergy, but just something like a Healing Wand can be nice to both fill that X and add a little more healing to her sides.
Medic
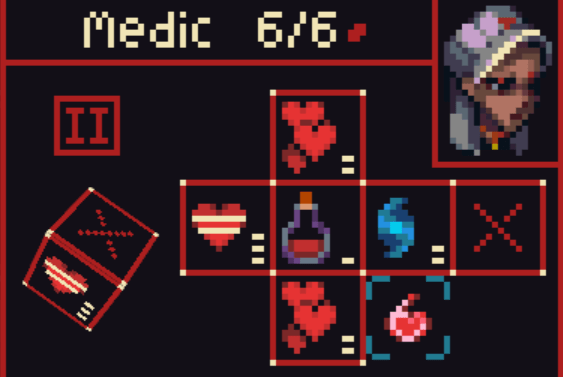
Renew: 2 mana, Set a hero to 6 HP.
Medic is an interesting character. I haven’t really focused on the healing of the last two Red upgrades, but Medic doesn’t have much else. That’s okay, though, because she’s really good at healing. Low Max HP is mitigated by heal cleaves, the Cleanse in case you need it, and Regen for fights you might want to stall, such as Slime Queen or Lich.
Renew is an interesting spell in that it sometimes blocks more efficiently than Burst, and can save an ally from Poison. Renew can actually give an ally Max HP if they have less than 6, too, so it works exceptionally well on Tier 1 Heroes or heroes you’re using an item like Faerie Pact on. She also does a good job of countering Rotten.
Medic doesn’t have much in the way of offense, but she is very good at keeping your team alive.
Priestess
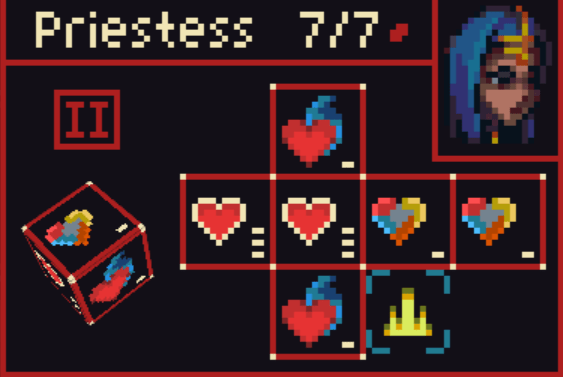
Flash: 2 mana, Heal 1 and Shield 1 to all dying heroes.
Priestess can only generate one Mana a turn, just like Acolyte! The Max HP sides are okay but the rest are not. You can’t even use Change of Heart to fix her because the mana and “all allies” effects don’t convert.
Flash seems like it could be good, and it is sometimes, but usually the only times a hero is truly in danger is if an enemy is using strong attacks against it, or if multiple enemies target one hero. In that scenario, it does almost exactly the same thing Burst does, but you don’t need to trouble yourself with picking Priestess for that. A strong contender for the worst upgrade in the entire game.
Vampire
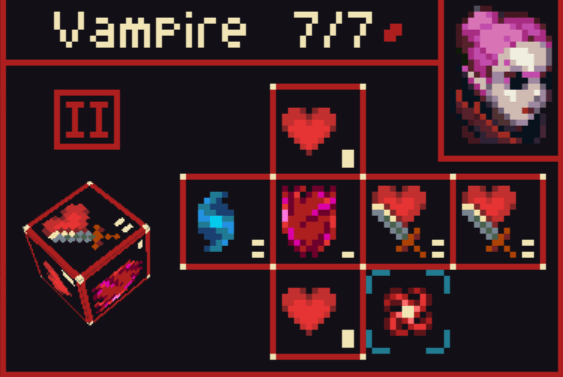
Infuse: 3 mana, heal 2 to all allies.
Vampire lacks cleanse, and is pretty similar to Acolyte. She has a more efficient yet more expensive version of Restore. Vampire is okay. She’s not terrible, and those Self-heal sides on the right can do decent damage when you need it, but her kit is a little lacking. If she had cleanse I think she’d be pretty good, or if the middle side even gave her one Max HP that would be nice, but it doesn’t.
She’s okay and there’s not really much you can do to change that, except take a synergistic item and build around it a little. Vampire is just average. There’s nothing wrong with that really, at least she isn’t Priestess.
Vampire has good item synergy with Charon’s Obol (Deathwish to the 2 right sides), Early Grave (cantrip Pain sides), and Ichor Chalice (1 damage to the top enemy for overheal).
Tier 2 Gray Heroes
Monk
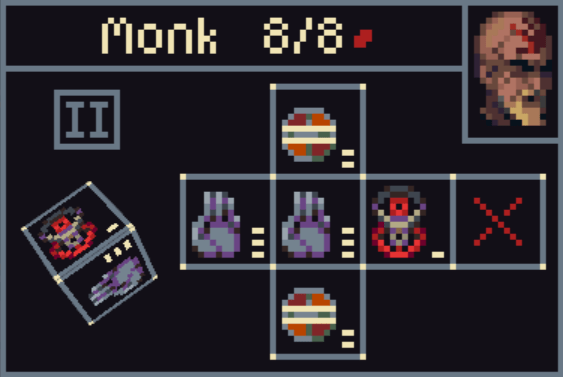
Monk is a pretty useful hero to have on any team. His redirect sides can take damage, debuffs, all incoming attacks from a hero and also self-shield for 3 to ensure his own survivability. Defending a larger attack with only one side is really good. He can be used to “group up” debuffs and cleanse them all at once, and he has really good synergy with a few items: Anti-Venom and Ambrosia to name some. Anything that makes him survive easier or shield more is also very useful.
Monk is really good at blocking, and he even has 2 Cleanse sides for reliable cleansing as well. The Revenge side is a little underwhelming but it can add up for exact kills sometimes, especially on Back-Row enemies.
Cleric
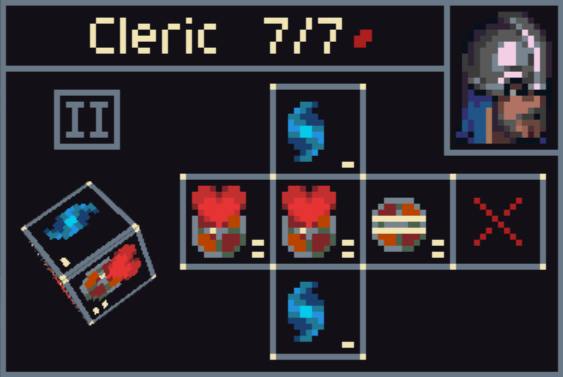
Similar to Monk, there is Cleric. Cleric lacks Monk’s redirects but makes up for it by offering superior utility in the form of Mana and larger effective block through the 2 block/heal sides. These can even save dying allies from poison! They’re very flexible and allow you to shield an ally from death without making Gray take the hit for them.
This isn’t to say that Cleric is better than Monk, though. They’re both pretty useful in their own ways, and I would pick whichever one you see basically. Monk has more consistent Cleanse and better item synergy, but Cleric is simply better at blocking. Both remain relevant until late-game.
Bard
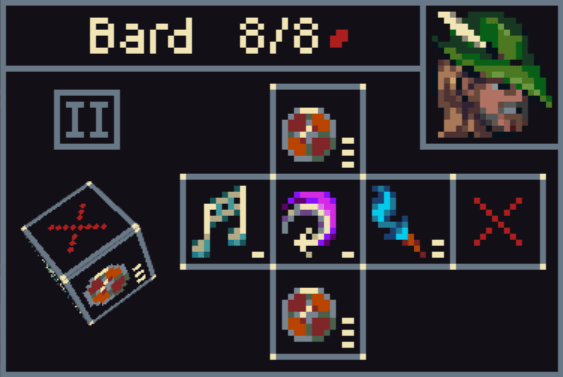
Bard is an interesting character. To cover for his lack of Cleanse, Bard has 2 good shielding sides, a shielding side for all allies, and the utility of Reroll cantrip and Mana. He’s not amazing, but he brings a lot to the table. The option between blocking everyone and blocking one hero for a lot is pretty versatile, and the utility sides are very good.
However, while Bard does have a lot of tools at his disposal, he isn’t the best at any of them really. He has nice item synergy with upgrades to the cantrip and mass-shield sides, but lacking Cleanse really hurts him. Keep in mind if using Bard that you want to have some source of cleanse, whether it be an item or a Red tier 2 hero.
Warden
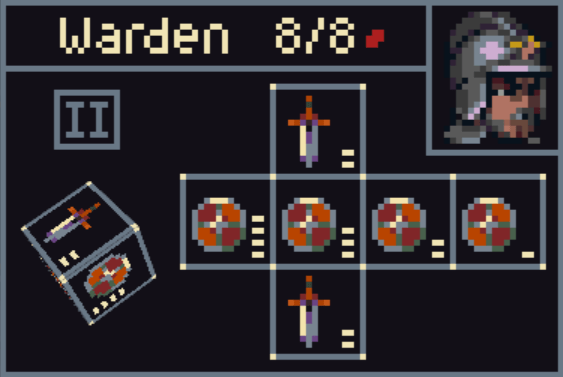
Warden is a pretty simple hero, but his blocking and damage are both solid. Basic sides have good item synergy but he lacks Cleanse. To compare him to Bard, another Cleanse-less character, Warden has superior Damage and single-target block while Bard has greater utility and the harp side.
To put it simply, I think Warden is very good at being a strict upgrade to Defender but he just doesn’t have Cleanse, forcing you to take a Red character with it instead.
Armorer
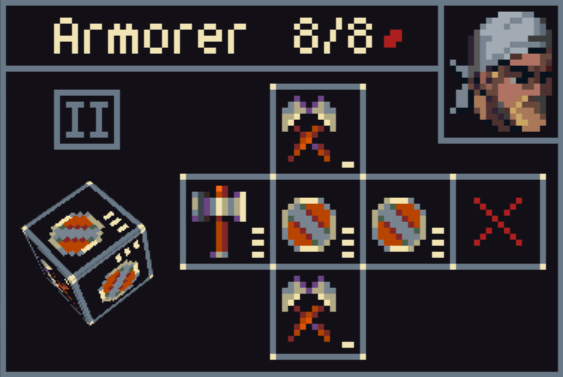
Armorer is mostly a trap in my experience. He has a 3 damage heavy side and I think that’s the highlight of his dice. On a gray character. The damage sides can be good synergy with a few characters, so he isn’t completely irrelevant, but rolling these sides combined with the side you want to boost is not incredibly likely, though it is still possible.
Armorer’s Steel sides effectively don’t have Steel on them. You might get real usage out of the Steel effect here once or twice, if you’re lucky. It’s hard to justify blocking Armorer with Burst and then blocking another character with that Steel side when you could simply kill the lesser enemy and block only one character. Also, Armorer doesn’t even have Cleanse. While he may be useful with high-value sides like Rampage or Engage, it’s still hard to justify picking him.
Guardian
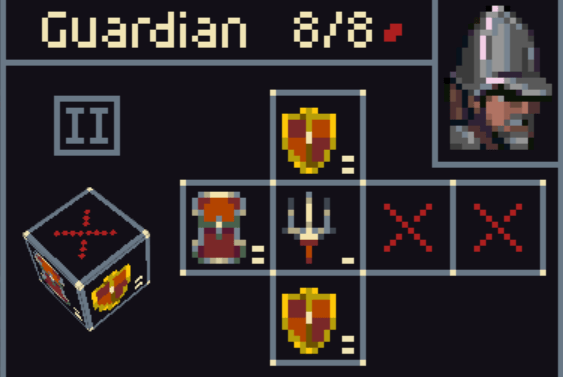
After his recent rework, Guardian is more usable than ever! But not by much. Engage shield sides are still pretty unreliable, especially in Hard mode and above. The Cleave damage side can be okay in some fights, and the Shield Cleave side is admittedly pretty high value, but Guardian has two blanks, no cleanse, and 2 sides that effectively say 2 Block.
He’s better with an item that replaces the two right sides, notably Heart of Light would be really nice on him. It would solve all of his problems; not having cleanse, too many blanks, and low single target “block”.
Unfortunately, not every Guardian comes with a Heart of Light, so it can be hard to justify picking him. He has a little more item synergy potential than Armorer, but less synergy with your other heroes’ sides.
Tier 2 Yellow Heroes
Berserker
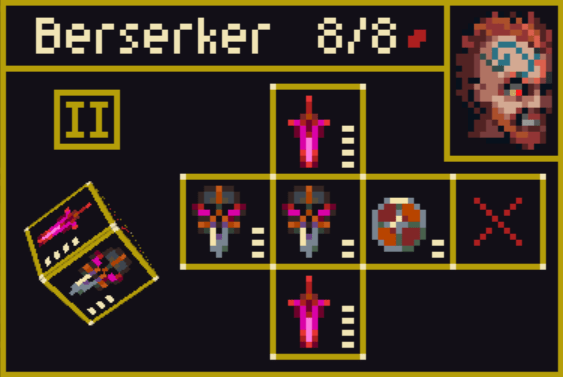
Berserker is deceptively useful. His pain sides may seem like an invitation to an early grave, but the raw damage output he is capable of is incredible. He already has 4 damage sides in hand for using against Zombies, and the 3 Witches. If you’re at low health from using a pain side or simply from taking damage, you can expect his Deathwish sides to deal a substantial amount as well.
He’s definitely the hardest-hitting yellow, but his health is, of course, more difficult to manage than any of the rest. However, if you do manage it properly, you will see great success using Berserker. Notable synergies include Spellblade for Imbuing a Deathwish side, basically any Max HP item, Thimble, and a strong healer.
Gladiator
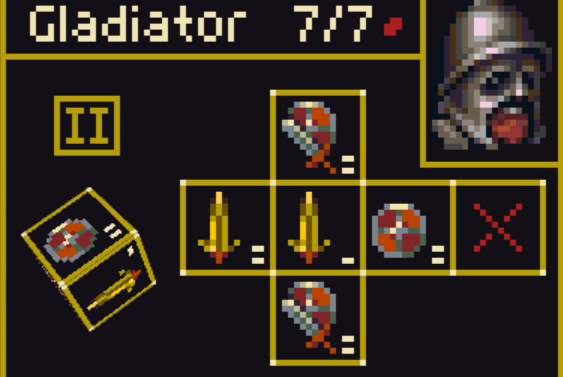
Gladiator is about as solid as you’d expect by looking at his sides. Similar to Berserker, but with more survivability and less damage. Gladiator is also capable of reaching the 4 damage necessary for Zombies, but he can’t use this to skip the 3 Witches’ invulnerability.
His sides are reliably pretty solid regardless of where in the fight you are. Early, the Engage sides are good for killing weaker enemies or weakening a tougher one. Later, the 2 damage self-shield sides are excellent for ensuring his survivability while still doing a decent amount of damage.
For item synergy, Gladiator’s Middle side is notably his weakest, so a middle side replacer item can see a lot of use on him.
Soldier
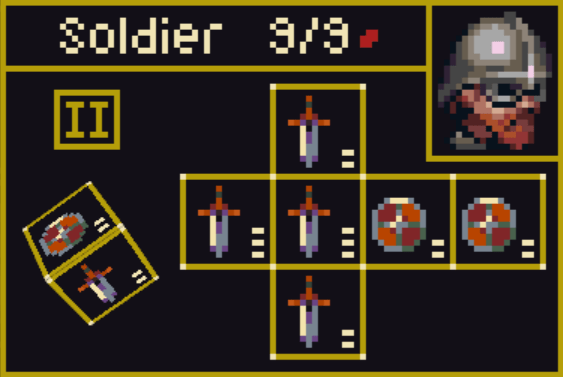
Soldier appears pretty boring, but is an effective ally. Simply adding 1 to all of Warrior’s sides and adding a massive 4 Max HP makes him one of the best upgrades in the game. While he isn’t capable of reaching the 4 damage threshold that the above two characters can, Soldier still deals consistent damage. Incredible synergy with basic side-oriented items.
Whirl
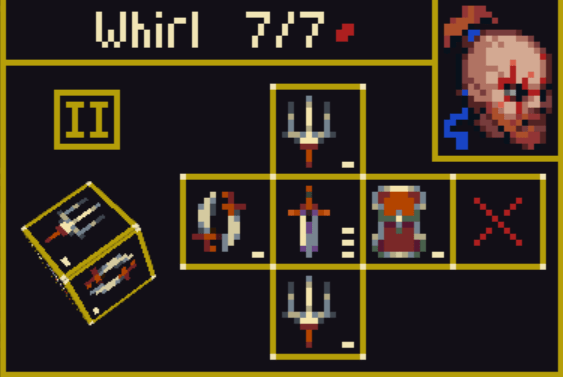
Whirl is a very item dependent character. On his own, he’s very good at damaging large groups of enemies, but you often need to kill them individually to remove incoming damage.
He can make up for this by dealing a lot more damage to all enemies through items: Items that boost the left side in particular are game-changing, but even something like Reflective Gauntlets (copy the middle side to the top and bottom), while removing his Cleave sides, make him much, much better against single enemies.
Collector
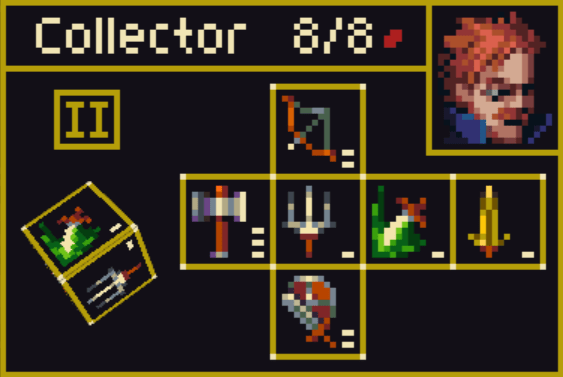
One of every gimmick, but not a powerful version of any. Much like Whirl, I find Collector to be item dependent, but he can still be useful without them. Improving the high-value Poison and Engage sides can be pretty good, so he has a lot of synergy with Spellblade and other side boosts. Collector is also the only Yellow tier 2 with a Ranged side, giving him a bit of an edge over the other choices if you’re lacking.
Brute
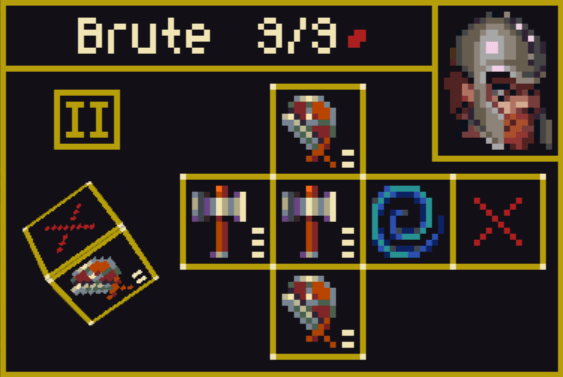
With a massive 9 Max HP and strong sides, Brute is definitely a strong upgrade. The 3 damage Heavy sides can mess with targeting a little, but they’re still efficient damage. The 2 damage self-shield sides are also of incredible value, and the Stun side can be really good against single strong opponents, or enemies with Poison or summons.
Brute doesn’t have much item synergy to speak of, but giving him a second Stun side can be pretty nice, letting you reliably cancel enemy turns with a tier 2 character.
Knight
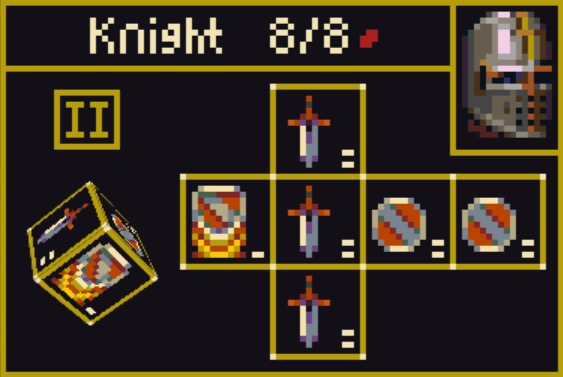
Knight really doesn’t have a lot going in his favor. Compared to Soldier there’s really nothing spectacular here; he has a 1 damage Steel side and a 2 Damage side replacing Soldier’s 3 damage sides. He is capable of reaching 4 damage for Zombies, but only if he has 3 Block or more.
Item synergy is necessary to make Knight do much more than Warrior. Something like Steel Spellbook can make the Steel side really strong, but still unreliable to roll.
Tier 2 Orange Heroes
Dabbler
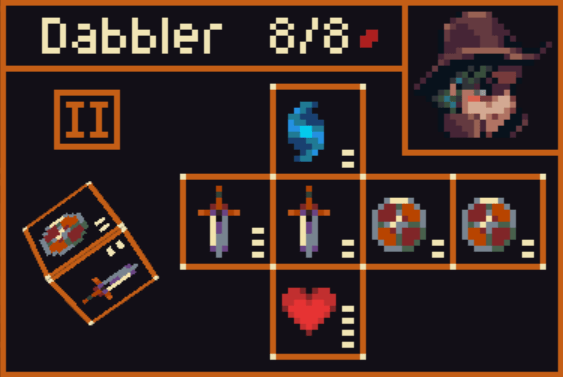
What Dabbler lacks in Ranged sides, they make up for in value. Dabbler can do anything Soldier can and more. The Healing side is only rarely useful, but having 2 mana as a flexible side is incredibly useful for casting powerful spells.
Dabbler is actually the only character in the game that gets value out of all four basic side enhancers. Simplicity is a good item for Dabbler because of this. Reliable offense, defense, and flexibility make Dabbler a strong contender.
Trapper
Trapper is the go-to hero if you’re in need of Ranged sides. Trapper comes with their own Longbow and has an incredible Kill side that can be used to great effect against most enemies in the game. Trapper trivializes Slates, the 3 Witches, Snipers, and many other tough enemies with one side.
The Growth damage side is overall pretty worthless but adds reliability to their rolls. Smoke Bomb can be useful against Tarantus or otherwise rarely, but it’s still better than a Blank. Trapper has low Max HP, so good item synergy for them would simply be a Leather Vest or something, or anything that boosts Ranged sides late-game.
Spellblade
Imbue: 1 mana, Target ally gains +1 to all damage sides this turn. Single Cast.
I’ve seen a lot of dislike for Spellblade, and while they certainly don’t bring the most to the table, they still do have a lot of upsides. The main attraction here is, of course, Imbue. This is currently the only spell available on an Orange, Yellow, or Gray character, and it’s pretty useful combined with keywords. Spellblade even has a Poison and Engage side for you to test it with.
You can use Imbue to reach damage thresholds for Zombies and the like, and at its very worst it’s 1 free damage on the Mana + Damage side. Having extra mana every turn can also be useful for your other spells, such as Flick. The Middle side is easily the weakest one, but if necessary it allows them to reach a damage threshold for Zombies using Imbue. Overall, Spellblade is a pretty solid character.
Ranger
Basically, Ranger just wishes they were Trapper. This means they’re still pretty good, but often the Cleave sides don’t do enough damage to have much of an impact. The only exciting side here is the 2 damage Ranged Engage side, but it doesn’t accomplish much that Trapper’s Kill side can’t do better, and it has less utility against certain enemies.
The engage side is also awkward if you use the Cleave side too, leaving Ranger in a pretty awkward spot overall. Good item synergy would be right side replacers to fill the two blanks Ranger has.
Gambler
Does this look familiar? Gambler is essentially the damage-oriented, feline cousin of Evoker. Gambler’s 5 damage side is a lot of value, of course, but they don’t have much of anything else for you to work with. Therefore, I find picking Gambler to be highly item-dependent.
If you can replace the top and bottom sides with Longbow or something then they become a very solid character. Otherwise, a very inconsistent one. Pocket Mirror can be useful to copy the 5 damage to the right side as well, although that is a high tier item. Gambler meets almost every damage threshold in the game, but only in about 1 out of 6 rerolls.
Rogue
Rogue, while possessing 6 sides, doesn’t manage to do much except Poison in any of them. The 2 damage Ranged side is solid, but other than that there are mediocre 1 damage Poison sides, which are good for bosses, and Cantrip damage sides, which have limited value and can often get you killed or ruin combos with full health enemies.
Rogue’s main item synergy is Longbow, honestly, since it replaces the Cantrip daggers and gives them a second and third Ranged side. A pretty bad character overall, but not one that loses you the game if you pick them. Picking Rogue over a bad upgrade such as Guardian or Priestess is often a good idea.
Tier 3
Tier 3 Blue Heroes
Warlock
Blaze: 6 mana, deal 13 damage.
Warlock offers efficient damage, but at a steep cost. 6 mana is difficult to reach with Warlock alone, so often you’ll need to use your Red character’s mana as well to fund his spell. He only effectively has 4 sides, so an item like Faerie Dust would be very nice to have.
Even if you don’t cast Blaze, Warlock has a lot of mana generation, especially in fights with a lot of enemies, so you can use him to generate Mana for Burst or healing spells, or use the 3 damage sides to kill a weak enemy. The 13 damage is a really useful spell for bosses, nearly killing even the Dragon in 3 casts, not counting the rest of your team’s damage.
Weaver
Crush: 3 mana, Deal 3 damage. Flanking.
Weaver has interesting utility both in being able to Block while consistently generating mana and in being able to kill 2 flanking Snipers in a single Crush. Their mana doubling side can see increased value from mana on other characters, including Dabbler or any character with a mana side item. With enough mana, Weaver can kill weaker enemies until you reach the boss, at which point their spell is good against Dragon’s Archers and Caw and Hexia’s Imps and Spawn.
One thing to note is that Crush still deals 3 damage against a single target, and that it’s equally as efficient as Burst against one target.
Chronos
Slow: 4 mana, Deal 1 damage. Cleave.
Chronos has the weakest mana generation of the five Blue Tier 3s, and yet still one of the weakest spells. In longer fights, Chronos can see some value through Growth, but rolling the higher side can be difficult. Smoke Bomb and Reroll Cantrip both bring excellent utility value to the table, but they’re all Chronos really has. The Repeat side can be used on a more offensive character to end a fight, but it’s usually best used on mana anyway, making it counterintuitive on a Blue character.
Chronos has synergy with Growth items, or anything that can boost his mana output really. A rare example of this would be Liqueur (swap top and bottom to the 2 right sides) and Timestone (cantrip to the 2 right sides), allowing Chronos to generate mana during the rolling phase. Synergies with this or with growth can be difficult to pick without first having Growth sides, however.
Artificer
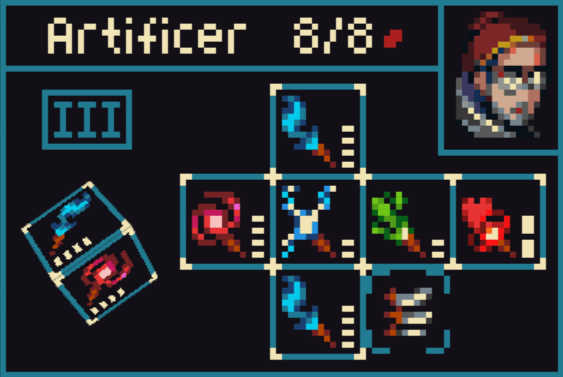
Blades: 4 mana, deal 2 damage to all enemies.
The king of single-use sides, Artificer has a lot of item synergy and strong mana generation. Even in boss fights, his Poison side and mana generation make him strong despite his rapidly depleting toolbox.
Single-use item synergy is extremely good when using him or aiming for him: Picking up Wand Extensions is basically +2 to all sides. Memorize makes him simply keep his sides after using them. Using them together works, too. Dumbbell also has a lot of value here, as it boosts Artificer’s mana sides to 8. None of these are necessary, however, as fights will generally be won before Artificer’s sides are gone.
Sorcerer
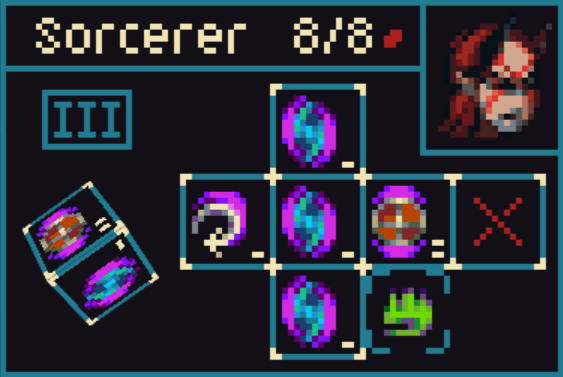
Miasma: 3 mana, Deal 1 damage. Cleave. Poison.
Sorcerer has everything. Consistent mana generation, a strong spell in both weak combats and strong ones, and the strongest item synergies in the entire game. Since there are only 5 blue tier 3 characters, you can usually manipulate the game into offering him to you, too.
At base, Sorcerer is strong. He usually generates enough mana to cast Miasma on his own, and the value only snowballs from there. Any items that increase his non-shield sides essentially win the game. Generating 2 mana instead of 1 every time you land on a side is very high value, and Sorcerer has the potential to go infinite with a Growth reroll. If you’ve never picked him before, try him out. You’ll see what I mean.
Tier 3 Red Heroes
Alchemist
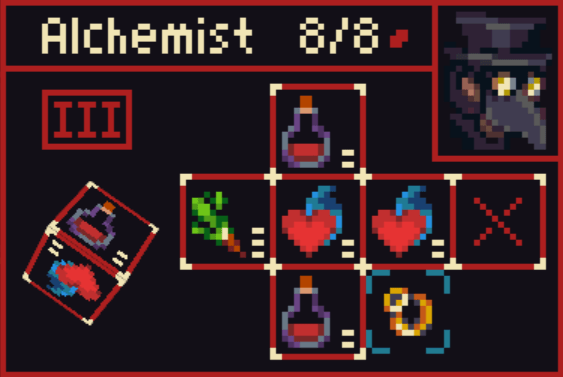
Liquor: 4 mana, Heal 20. Cleanse.
To make up for her awkward spell, Alchemist has very good side value nearly unmatched in Red’s tier 3s. All of her sides are very useful regardless of which combat you’re in, and her mana generation is really good as well.
The main other things to say about her are that she can’t cleanse as efficiently as Shaman, Liquor is insanely good with Ichor Chalice, and she’s the only Red Tier 3 that offers Poison against the final boss. In a pinch, especially with items like Twisted Flax or Boarhide Bracers to boost the regeneration and Angel Feather to apply rescue to them, excessive amounts of regenerate can substitute cleanse for poison.
Mender
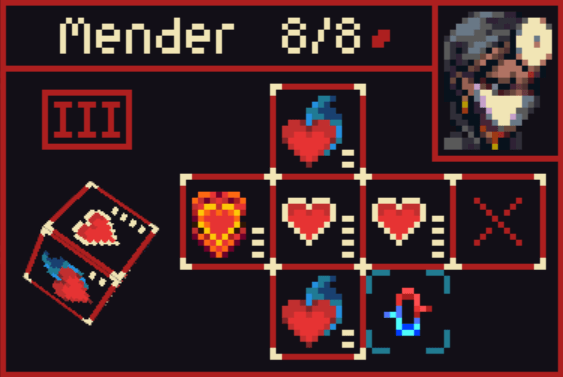
Soothe: Heal 1 to all allies. Regen.
Mender has really good mana generation and one of the best spells in the game. Soothe can stall any combat in the game except Dragon and Mender’s sides can help you to survive early turns in the combat.
The only negative Mender has is that she lacks Cleanse, and honestly for her power level I think that’s a fair trade. If you pick her, run cleanse on a tier 3 Gray, or at least Venom.
Shaman
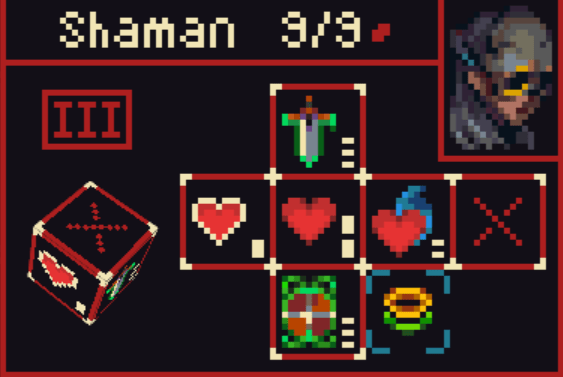
Ritual: 4 mana, Heal 1. Cleave. Cleanse.
Shaman is the best cleanser in the entire game. Because Dragon is such a tough combat, this makes her one of the most useful characters to have on your team. Her sides are pretty nice, though slightly worse than your other choices. The main draw here is Ritual. Ritual is capable of single-handedly turning Dragon from a big problem into a non-issue. Even against Hexia, Shaman still has very good value in cleansing Petrify, Imp Poison, and in healing allies attacking Hexia.
Shaman is one of the most important picks if you’re trying to ensure consistency in your victories, as half of all runs end up fighting the Dragon.
Forsaken
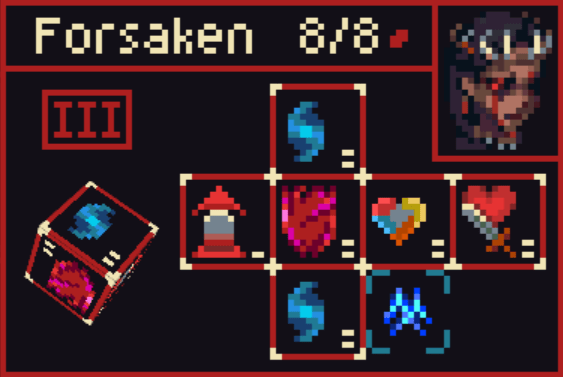
Bind: 3 mana, Target ally becomes immune to damage this turn and loses 4 Max HP.
Forsaken is the worst tier 3 in the entire game. It’s hard to really spin her in a way that makes her seem useful. Revive side is awkward, Pain side is good but doesn’t give herself Max HP, mana generation is fine but lacks a heal like other Red Tier 3s.
The problem with Forsaken is that she lacks both cleanse AND healing. The only thing you can really do with her is use her spell as a pocket Undying, but even then you’re likely to just die of Poison or lack of Max HP. Forsaken is in need of a buff. The only scenario I’d consider picking her in is against Hexia on floor 20, if she’s offered alongside Shaman. I might still pick Shaman though.
Witch
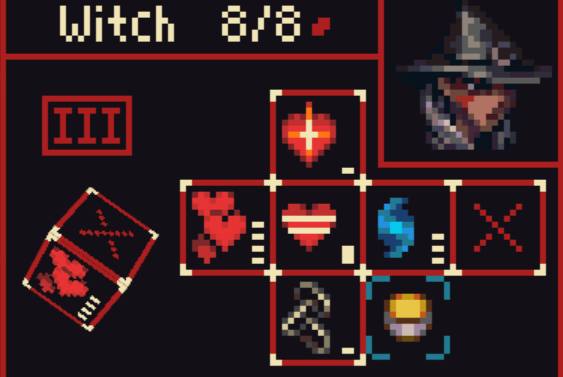
Salve: 1 mana, Heal 2.
Witch has strong sides, an efficient spell, and a source of cleanse. She’s the best use for Ambrosia (-1 and Rescue to the left 2 sides), and can even cleanse better than Shaman if you have it. She brings a lot of healing and utility to the table, and can Weaken annoying attacks or Boost your valuable ones. The only problem with Witch really is that there are 3 other really strong Red upgrades.
Tier 3 Gray Heroes
Paladin
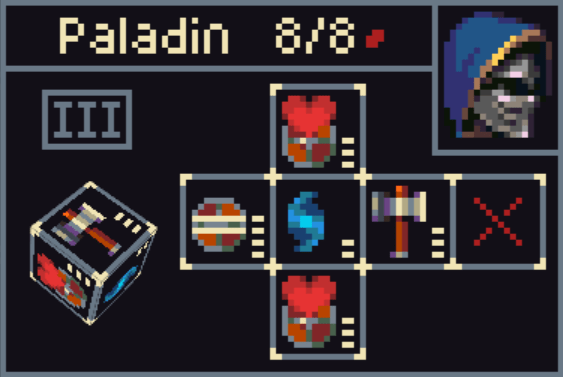
Gray tier 3s can be split into 3 distinct groups, similarly to Gray tier 2s, so I’ll start with Paladin. Paladin has very efficient shielding, decent mana if you need it, and a Cleanse side. His hammer is more or less just there for flavor and might as well be ignored. However, his block is very high value.
Late-game items that work well with Paladin include Glyph of Purity (cleanse to top and bottom), Angel Feather (rescue to top and bottom), and Ordinary Triangle (+1 to sides that are 3 originally). However, he’s still very usable without items like this.
Stalwart
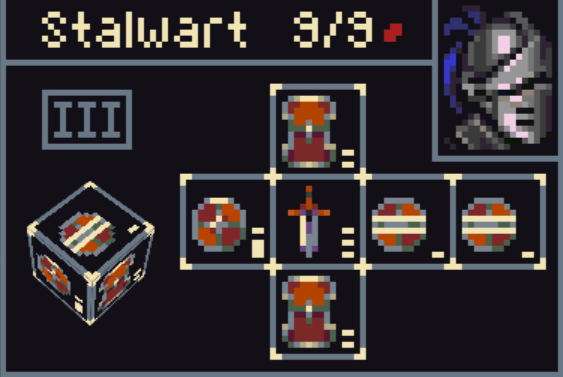
Like Paladin, Stalwart also features cleanse. This makes him a very useful way to cheaply and efficiently remove debuffs. His block is also very efficient, although the 6 Block side can be inconsistent at times and the others aren’t the best value for one target.
Notable items include Glyph of Purity and Angel Feather, as these are even better on Stalwart than Paladin, and Shard (cleave to basic shield and healing sides).
Bouncer
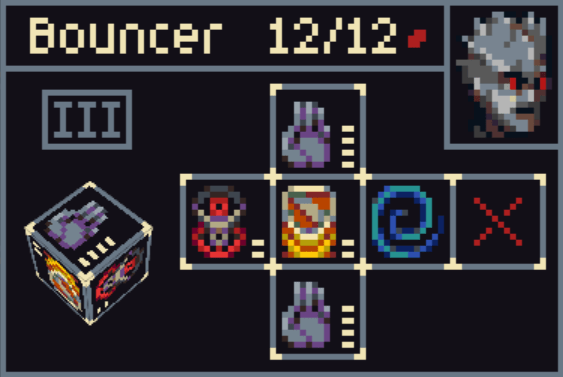
Bouncer, while lacking Cleanse, is still a competent blocker. His redirect sides are less block than Stalwart and Paladin, but allow him to use his own health as effective block for the target. His middle Steel side is essentially worthless, but the Revenge side is decent damage against Back-Row enemies, and the Stun side can lead to some interesting combos.
Despite all this, Bouncer does still lack Cleanse, so I value him lower than even Monk usually. Still, he’s not an awful pick if you’re offered something else you don’t want, and he sports one of the only Stun sides in the game. He lands in the second group of Tier 3 Grays; though he lacks Cleanse he is still a competent blocker.
Keeper
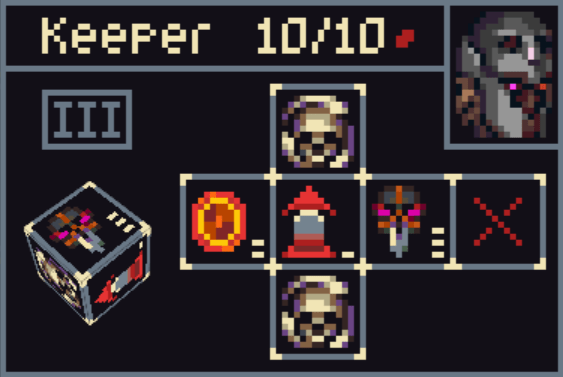
Keeper is an interesting character. Though he lacks both Block and Cleanse, he makes up for it through a versatile Rescue side and 2 Undying sides. He also has a revive side which is awkward in use but can still be useful, and a Deathwish side for damage. Despite having very low block on his sides, Keeper is still an effective blocker due to the keywords he has: Rescue and Undying. This places him in the same category as Bouncer. Sadly, because he lacks Cleanse, it can be difficult to pick him.
Notably, Angel Feather (rescue to the top and bottom sides) is very strong on Keeper.
Valkyrie
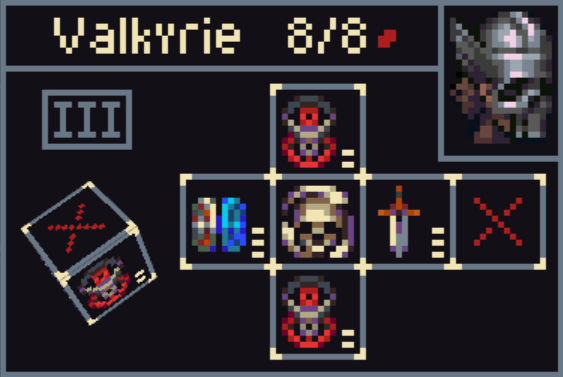
Valkyrie is a contender for the worst tier 3 upgrade in the game. To get effective use out of him, you need specific items that combo well with his sides. Aside from that, Valkyrie is the only one in a third group of tier 3 Gray characters: Those without block and without cleanse. The Undying side is useful, but the only way his other sides will see use is through items.
The items Valkyrie uses well are:
- Boosts to his Revenge sides, as that allows him to kill Snipers with one shield.
- Ambrosia (adds rescue and -1 to 2 left sides), sacrificing the duplicate for a rescue undying
- Heart of Light?? (heal 3 cleanse to the 2 right sides)
Tier 3 Yellow Heroes
Veteran
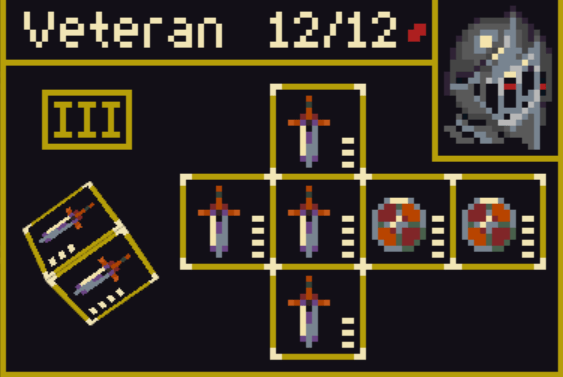
Veteran, similar to Soldier, is one of the simplest and most effective characters in the game. His 6 basic sides allow a great deal of item synergy, notably Shard (cleave to basic heal/shield sides) and boosts to basic damage sides. With items like this, Veteran can block or deal enough damage to handle a wide range of threats. The downside to Veteran is that you may have to pass on a strong character by picking him.
Veteran also has a massive 12 Max HP. This makes him the tankiest yellow character in the game.
Brawler
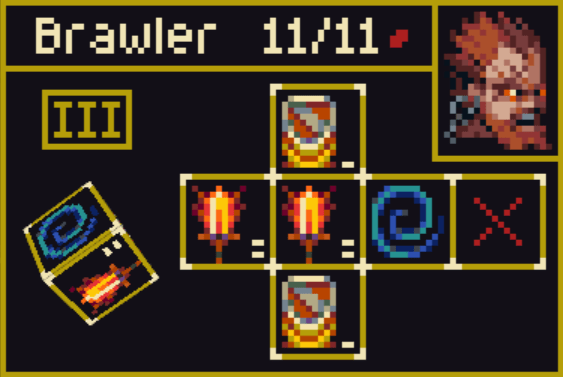
Brawler is a strong choice for eliminating weak opponents but doesn’t have much in the way of single-target damage. The Rampage sides can kill weak enemies with ease if boosted, but his only single-target sides are the Steel damage and the Stun. This puts Brawler in the awkward position of being great against normal enemies and not very good against bosses, similar to Whirl.
Barbarian
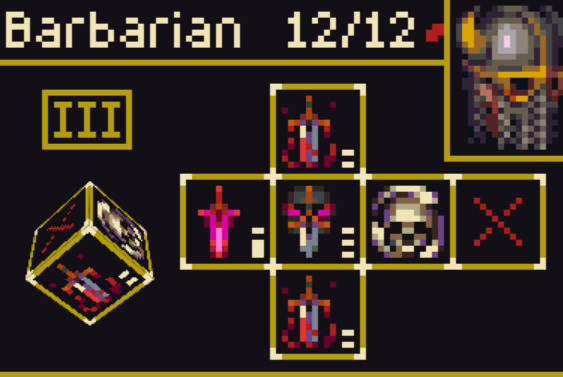
Barbarian possesses good single target damage, but mainly in environments with lots of weak enemies. His bloodlust sides are awkward because they usually amount to 3 damage against bosses, but can be as high as 7 in normal fights. Because of this, Barbarian is really good at killing Caws. Aside from that, he has general blocking utility from the Undying side, and he is very tanky at 12 Max HP.
Overall, I think he’s worth picking when trying to secure a specific hero of a different color, like skipping Alchemist to get Shaman later.
Leader
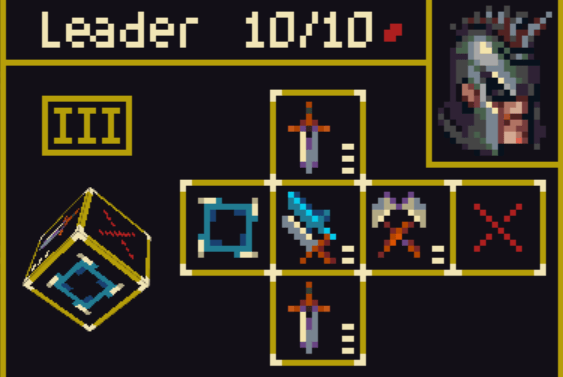
Leader is a strong choice for a yellow upgrade, but it isn’t because of his damage. Rather, Leader has great utility in his Repeat Dice side and the +2 to shield and damage side. The former can be really helpful for generating mana, therefore pretending you have two blue characters, and the latter can be helpful for boosting high value keywords like Poison.
Leader’s other sides do decent damage but nothing impressive or worth considering really. He can boost other damage sides and he can repeat another dice’s action. That’s basically all there is to Leader.
Curator
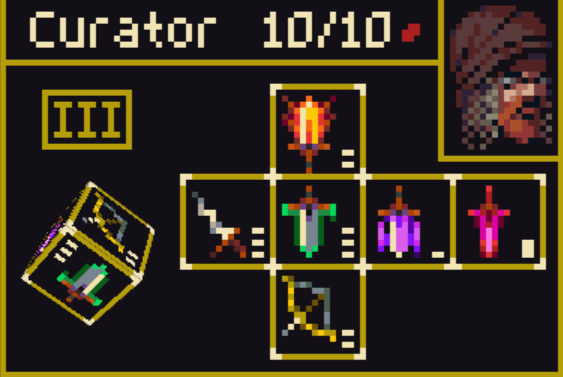
If Collector had a little more money, he might look something like this. Curator’s sides are all unique, so there’s some value to be had in that. He possesses a Ranged engage side, which makes him useful against Snipers, a Rampage side for small enemies, a Cruel and Growth side for bosses, a strong Pain side for burst damage, and a Cantrip side which might as well do nothing.
Curator’s main weakness is that it can be difficult to roll a specific one of these sides when you need it, so his damage output ends up being less than spectacular. Also, unlike the other upgrades, Curator has no defensive sides or utility sides, meaning he’s an entirely damage-centered character.
Tier 3 Orange Heroes
Ludus
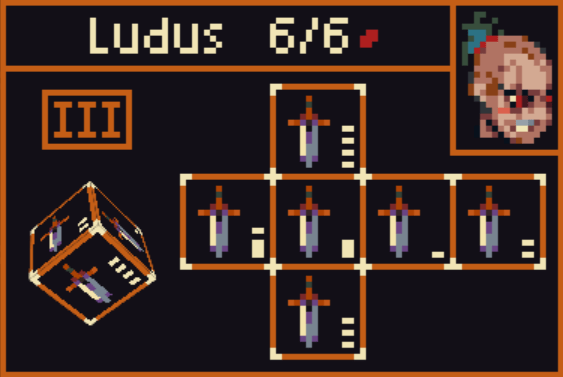
Ludus is everything Gambler wishes they were. Ludus can consistently roll 4 or more damage for thresholds. They have great item synergy with 6 basic attack sides, but do not need them to be strong offensively. Ludus’ weakness is their low Max HP at 6.
Overall, Ludus is a strong pick, but so are most of the tier 3 Oranges, so usually I just pick based on what the other choice is. Shining Bow or basic Damage side boosters greatly boosts the viability of this character as it allows for killing Caws or other enemies with around 10 HP or less very easily.
Fencer
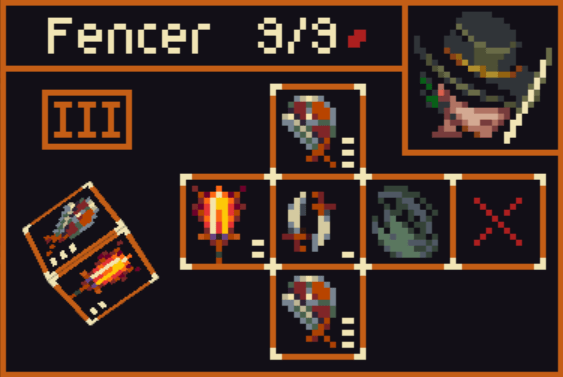
Fencer is in a similar camp to Ludus but is much stronger defensively. Despite being capable of lower single-target damage numbers, Fencer has a Rampage side without compromising too much single-target utility. They can block and attack at the same time, and have a Smoke Bomb side for rare dodges.
Fencer is stronger than most other tier 3 Oranges against multi-enemy combats, and is still pretty good against single enemies. However, I would still pick based on the other choice when upgrading into Fencer, as there’s only one Orange Tier 3 that isn’t all-around useful, and instead forcing a different character such as Shaman may be more beneficial.
Venom
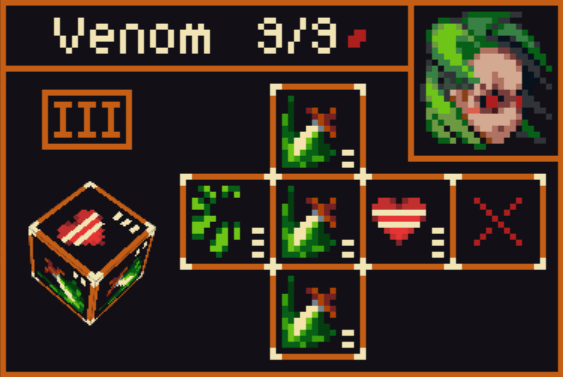
Venom has incredible single-target damage thanks to their 3 poison sides and poison multiplier side. An additional Cleanse side makes Venom a very desirable pick, as most bosses are dead in just a few turns if you get the right rolls.
However, if the other choice is incredibly desirable, it’s not necessary to pick Venom to win the game. Often the Orange choice can be used to manipulate the other heroes you run into, so doing so with Venom themselves can also be a good idea.
Assassin
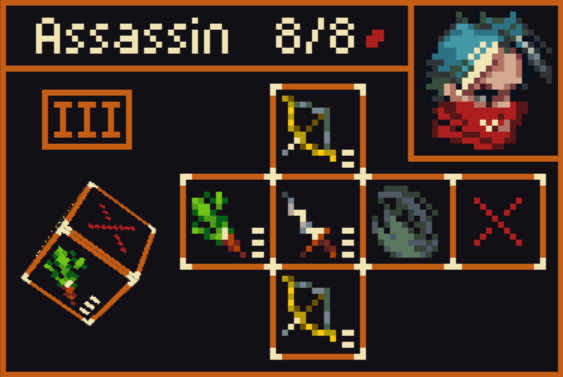
Assassin is quite similar to Venom in that they possess incredible single-target damage. Additionally, Assassin also has Ranged Engage sides for dealing with snipers and a Smoke Bomb side for utility. As with the other Orange Tier 3s, consider Assassin weighed against the other choice, and whether you want the other choice or not. Orange Tier 3s are all around the same value.
Good items with Assassin include Ranged synergy and Pocket Mirror (copy left side to the right side).
Sharpshot
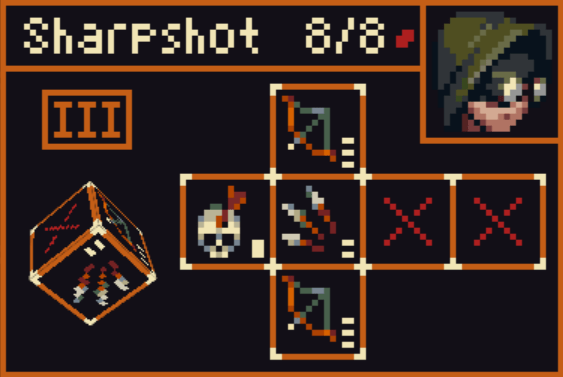
Sharpshot is the most Ranged-focused Tier 3 Orange, which makes them the most useful for multi-enemy combats. They scale very well with ranged side synergy, including Second Arrow (+1 to ranged sides) and Splitting Arrows (Cleave to ranged sides). They also benefit a lot from replacing the empty right sides.
Unlike the others, I recommend upgrading into Sharpshot as one of your first Tier 3s if you lack Ranged in your current Orange Tier 2, as Snipers can be difficult to deal with otherwise. The consideration of the other upgrade is still there, but you can skip out on something strong if necessary.
Dancer
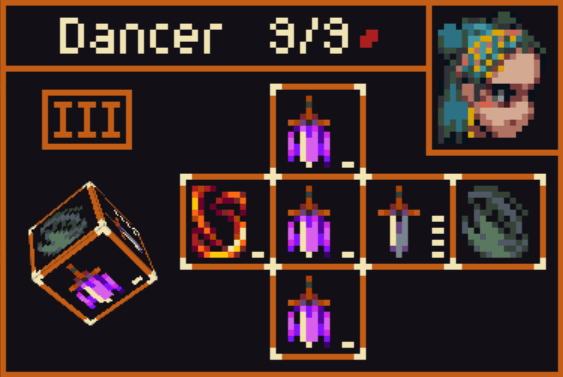
Dancer lacks the single-target utility that the other 5 Orange Tier 3s possess. Their only single-target sides are the right two, Smoke Bomb and 4 damage. They’re hardly impressive. While the left side (1 damage to all enemies, Pain, Rampage) can be very helpful against Snipers, it often kills weaker combats and leaves stronger enemies. Because of this, Dancer is almost worthless against the final boss.
In addition, Dancer takes a lot of damage from Spiky enemies and Hexia, potentially leading to an unnecessary hero death.
Interesting Twin Cat fact: If you have the necessary level up numbers, you can level up Twin and Tw1n separately to tier 4. If you don’t have anything for Twins, it’s garbage. Sushi + cantrip heroes, for example, are good enough items to make Twin very strong. In essence, if you don’t have a great combo, you don’t pick them.
Backliners such as archers and snipers can be targeted by Cleave on attacks. It really depends on the fight, so I’m not sure if it is greater or less than the x3 value. Actually, it doesn’t really pose a threat to the final bosses.
Confirmation bias is at play here. Beyond color, your hero has no bearing on what is offered to you.
there is a double level ups after a fight bug where game can offer you to change hero colour.. And with Cat, even jump a tier! It might happen if you have 2 or more level ups as reward in a particular floor.
Backliners such as archers and snipers can be targeted by Cleave on attacks. It really depends on the fight, so I’m not sure if it is greater or less than the x3 value. Actually, it doesn’t really pose a threat to the final bosses.
It is undoubtedly impossible to determine that a cleave is worth three times as many pip values. Concentrating damage and eliminating threats to prevent them from harming you is far more important than spreading damage among several creatures without causing casualties (assuming there are several creatures). In a similar vein, it is preferable to be able to prevent the death of a significant hero rather than dispersing a meager supply of shields among players and failing to save a carry who is on the verge of death (and that’s even presuming that the enemy attacks are grouped together so that three nearby heroes are taking damage).
Although Scrapper is only rated a C or B, he has two steel damage sides and can be a hard carry. With the correct setup, Scrapper can outcompete certain Tier 3 characters. Certain items can permanently apply shields to you or grant shields every turn. I frequently see Scrapper deal about eight damage per turn in any run where I take him.
Despite being among the best Tier 1s, Hoarder receives a rating of F, while Collector receives a rating of A despite being among the worst Tier 2s. I won’t bore you with every criticism, but I believe that the value placed on bonus effects is distorted. Situational effects like cleave are overrated when they depend on an item, while subpar positive abilities like growth are overvalued and game-carrying abilities like steel are undervalued. Negative abilities like guilt are also overrated when they aren’t as dangerous as they should be.
Yes, scrapper is simply too strong. He can eliminate the most dangerous opponent in one turn if you play smart defense, making it the best and most durable defense available.
He is somewhat weak with pilgim, though. Scrapper or pilgrim is great in general, but scrapper plus pilgrim is not.
The in-game graph feature thinks it’s worth +2 pips which lol no it’s way stronger I think it’s a problem of the game not scaling its value with higher tiers when it should, as +2 is actually correct for t1 but not for t3
Barbarians with deathwish and defy, I’ve discovered, can be amazing. I just had him deal more than 40 damage to the run’s last boss.
Undoubtedly, Defy is an excellent keyword; in fact, Wanderer’s power stems from the fact that it is their default keyword.
The steel shield’s advantage is that it still has some size, so it doesn’t really need to use the keyword in order to be effective.
Since Knight makes good shields with his shield sides and parries, which is what a good defense guy does, he isn’t really any better with scrapper than he is normally. He is good, which is why he is good with scrapper.
Sadly, I am unable to describe Knight as anything more than mediocre. Three shields, slightly less than what I had anticipated (four is good for T2, according to the criteria; guardian and cleric can handle six, bard five, monk on average four due to redirect, Pilgrim is invaluable). Thus, using Parry consistently with three shields is merely ok.
Frankly, I believe the criteria are incorrect. Warden typically makes four on a highroll, but he’s still quite good. And for a T3, a six-single target shield is extremely difficult. Damage is worth more than shields, but not twice as much.
With the exception of the knight, the guardian’s six is conditional, the cleric’s six is half healing, and the bard’s five is an aoe that is poor at saving lone heroes.
Furthermore, regarding the in-game graph feature: it’s not perfect by any means, but it’s a good place to start.
Spellblade is ready to commit fully if you find her the right stuff. However, it’s not the best decision *every* time you receive a spellblade.
I would like to add a few things: Knight can shield for at least three damage points when he doesn’t use X, and steel can provide even more shielding. Parrying costs two damage points. I suppose steel shields work well with other steel sides.
Deplete is a rating for some spells that wasn’t specified. A priestess can cast a spell once for one mana, twice for one plus two mana, or three times for one plus two plus three mana per battle. This is significant. I believe the order is as follows: pray, operate, bind, and draw.
In relation to Bind, dodge can provide protection against a variety of Death effects, but Bind cannot. Additionally, Bind allows you to receive poison (which only ticks when not Binded) and other debuffs, but Dodge ignores them.
Statue and Twin are the chosen items. You first look for good combo items, and only then do you choose one of them.
The voices are tainted, and it can generally end a lot of Classic Hard runs on its own. One reason not to random t3 greens (unless it’s banned from the pool for some reason) is that it’s too expensive.
You severely underestimate weak points. They have extraordinary strength. Because of her two very strong sides, both of which hold their relevance until the end of a run, Scoundrel is not a total trash fire. In a similar vein, Trapper is not a gambler in any sense since, although having a strong kill side, she also has equally strong and significant vulnerable sides.
Spellblade is far more skilled than you realize. In many teams, having a 1-damage buff available for just 1 mana is an incredible value. Consider the effects that has on Whirl, Ninja, Ranger, and Fey. A lot of reds and blues will be able to access their spells much more consistently thanks to the increased mana production. The poison is also very helpful against large targets when combined with the previously mentioned buff spell. And there are a ton of things that are helpful to her. One of the T2 heroes I’m most likely to stick with through the end of a run is Spellblade.
I want to start by saying that I appreciate you making this guide. Doing something like this takes a lot of work, but the community gains from it.
Still, I take issue with a lot of your ratings. I’m ranked 9th on classic normal speedrun, 5th on shortcut normal speedrun, 10th on shortcut hard streak, and 3rd on loot hard streak to give you an idea of where I’m coming from. Even though I haven’t mastered the game, I have played it for hundreds of hours—since before version 2.0. I therefore have a great deal of experience to speak from.
Meddler is a great hero who belongs on higher levels. Best midgame value of any t1 blue and an abundance of mana
The bones are not nearly as bad as they appear, and he is not that suicidal. He swaps out the current threats for more distant ones.