
Your Role as a Support
Bard is one of two support classes in Lost Ark, and one of the most wanted classes in any raid. The harder the content, the more Bards are preferred. Like a setter in volleyball, you need to understand the abilities of your teammates and coordinate with them to bring out their best. It’s easy to play a bard at a basic level, but the difference between a highly skilled bard and a newbie is night and day.
As a support, you’ll be able to keep the raid alive by providing protective shields, reducing incoming damage taken, heals, and more. You can significantly boost the damage output of your allies by giving them attack power buffs and increasing the damage a boss takes from your entire raid.
If you want to excel as a support, a high level understanding of the game will go a long way – more importantly, you’ll need to be flexible in adapting to constantly changing raid conditions. A fast reaction speed and a good set of eyes and hands won’t hurt either.
Generally, as a Bard you’ll use your skills to provide various buffs and effects to your party while building your Serenade gauge, a set of three bars in the center of your action bar. When these bars fill up, you can spend them to play one of two songs, Serenade of Courage and Serenade of Salvation, to either provide a large attack buff or heal to your party members.
Main Stats
If you’re completely new to Lost Ark, each accessory you equip (earrings, rings) comes with one of three stats: Critical, Specialization, Swiftness, Domination, Endurance, and Expertise, with the exception of your necklace which has two stats. The higher the quality of an accessory, the more stats it gives.
What’s that? That’s six stats?
Lost Ark Rule #1 – Domination, Endurance, Expertise gear = Disassemble right away.
Unfortunately, among the six stats only three of them are ever used in the game’s current state: critical, Specialization and Swiftness. They’re usually referred to as crit, spec, and swiftness respectively.
Of these three, as a Bard you’ll only be concerned with Spec and Swiftness. I’ll cover Spec first.
Specialization
Specialization as a stat gives various bonuses depending on the class. It’s just that – a class’ Specialization. As a Bard, Specialization increases the amount recovered by your healing identity skill (Serenade of Salvation – X key), the % attack buff of your identity skill (Serenade of Courage – Z key), and increases the amount of Serenade gauge gained from landing your skills.
In addition to that, it also increases the damage of your awakening skill and slightly improves the effectiveness of your potions (self-heal), but these are negligible and don’t really matter.
To sum it up, Specialization improves the rate at which you gain Serenade gauge, letting you use your Identity Skills more often, and also boosts their effectiveness.
Swiftness
Swiftness is the same for every class, making it a lot more straightforward. It improves your attack speed, movement speed, and reduces the cooldowns of your skills letting you use them more often.
A few things to note:
In Lost Ark, attack speed also means cast speed, which means a high Swiftness will speed the cast times and animations of your abilities even as a Bard.
More importantly, cooldown reduction is extremely powerful on a Bard because it lets you cast your support abilities that much more often, getting you near 100% uptime on some of your buffs and shields if you have the right build.
Lastly, movement speed goes a long way in helping with your positioning and survivability in tough raids, as Bards don’t have a separate movement skill aside from their spacebar dodge ability.
To sum it up, Swiftness makes your animations faster, helps you move around quicker, and lets you use your abilities more often.
Stat Builds
Unlike some MMOs, Lost Ark isn’t a game where you allocate stat points (except in some situations like PvP, which is equalized). Instead, your stats are completely determined by what accessories you are using.
Your necklace provides two main stats, while each other slot (earrings/rings) provides one. For example, a ring might provide you with 200 Swiftness (the exact number depends on the quality). Another ring might provide you with 200 Spec. However, the same ring can’t have 100 Swiftness + 100 Spec, since a ring only provides one kind of stat.
Thus, when someone talks about a stat build, they are talking about what stats you have on your accessories.
Since we only care about two stats, Spec and Swiftness, there are three main Bard builds: High Spec, High Swiftness, and Half-Half.
High Specialization
This build has high Serenade gauge gain by stacking the Specialization stat. In addition, the amount recovered by your Serenade of Salvation heal is increased. The most important thing is that your Serenade of Courage (attack buff) is more powerful than Bards with low Specialization. As a downside, since you are stacking Spec, your Swiftness will undoubtedly be lower, making your character slower and less forgiving to play. High Specialization Bards usually cover for this with the Spirit Absorption engraving, which we’ll cover later in the Engravings section.
This build is ideal for Bards who have a keen sense for positioning, and for those players who want to provide a more powerful attack buff during short DPS windows.
Your stat distribution would be something like this:
- Necklace – Spec + Swiftness
- Earring 1 – Spec
- Earring 2 – Spec
- Ring 1 – Spec
- Ring 2 – Spec
High Swiftness
This build is generally more common amongst Bards. It allows for high mobility on an otherwise slower class by providing max, or near max movespeed at all times. High Swiftness drastically lowers the cooldowns of your skills, making your rotation much more active and letting you achieve high uptime on many of your support abilities. In addition, your faster animations help you get your spells off quickly, reducing the chance you get hit by a boss’ attack or pattern.
This build is ideal for Bards who want a more active and busy playstyle, focusing on sustained support over burst. Full Swiftness builds are more forgiving to play and generally more recommended for beginners. You also have a high Serenade gain because although your abilities provide less gauge, you use them more often, making it similar to high Spec builds.
A downside to this build is that since you are spamming your abilities, you have large mana problems. Bards usually cover for this weakness by eating mana food (extra costs to raiding) or with mana boosting engravings.
Your stat distribution would be something like this:
- Necklace – Spec + Swiftness
- Earring 1 – Swiftness
- Earring 2 – Swiftness
- Ring 1 – Swiftness
- Ring 2 – Swiftness
Half-Half or 1:1
This build is pretty straightforward, as a hybrid between full Swiftness or full Spec. You get the best of both worlds, but don’t excel at either. It’s pretty self-explanatory so I won’t waste any more words here. While the name is half-half, you can have any mix of Swiftness to Spec as you desire – this third build basically encompasses all other possible stat build options.
This build is ideal for Bards who aren’t quite ready to commit to the other two ‘extreme’ builds. You may find yourself using this build just because the price of Swiftness accessories is too expensive, forcing you to mix in Specialization pieces.
Your stat distribution might be something like this:
- Necklace – Spec + Swiftness
- Earring 1 – Swiftness
- Earring 2 – Spec
- Ring 1 – Swiftness
- Ring 2 – Spec
… but you can mix and match them depending on what’s available.
My Recommendation
I’ve already outlined the pros and cons of each build above, so ideally you can decide what might fit your playstyle best based on that. Personally I’m using the full Swiftness build, and that’s what I’d recommend if you’re on the fence or are a beginner.
Full Swiftness is less punishing if you miss an ability or find yourself out of position, letting you get your cooldown back quickly and/or reposition yourself fast. Having high uptime on your abilities (due to low CDs) is very powerful, and it’s quite fun to play as you press your buttons more often.
If the price of Swiftness accessories becomes too expensive (as they are on the KR server), you can mix in some Spec pieces here and there making you a sort of hybrid build.
Skills
Let’s talk about Skills. These are the core element of combat in Lost Ark, and are arguably the most important part of your character. If you only take one thing away from this guide, read this: your skill build should be dictated by your needs.
Unlike DPS who might have one set skill build, you should think of the Bard skills as individual tools. Each of them has a use and can be swapped out according to your needs, so don’t feel constrained to any one ‘build’ (although I will recommend a few starter ones later).
If you really want to excel, learn why we use each skill and when, so you can adjust accordingly. Even if fights are the same, the people you play with and their level of skill can also affect what skills you need, so keep that in mind.
Bards have four different kinds of skills: Sigil (Debuff), Protection, Attack Buff, and Stagger/Serenade. Let’s go through them in order.
Sound Shock

If you’ve followed my leveling guide, chances are you’ve been using this skill since level 1. In raids though, your Sound Shock transforms into a different skill. It’s one of two abilities that provide the Sigil debuff, which increases damage taken by 10%. With this debuff active on the boss, your entire raid is doing 10% more damage. It’s extremely important, and you want to keep this debuff up at all times.
This skill is good since it’s on a low cooldown and can be used from a long range. The projectile is fast, making Sound Shock great for applying Sigil from a distance and quickly. Bosses in endgame raids are mobile, or have patterns requiring you to reposition quickly. You’ll find yourself needing Sound Shock to apply Sigil in these cases.
Sound Shock also has surprisingly high Stagger/Impair, so you want to use it during moments where you need to Stagger the boss (after your Whirlwind Grenade/Soundholic).
Tripods:
For that reason, our first tripod pick is Constant Explosion. It turns our Sound Shock into a multi-hit ability that deals constant damage over 2 seconds. This is important, because each time it hits the boss it will apply Sigil. This tripod makes our debuff last 2 more seconds.
The second tripod is the most important. Holy Shock lets our Sound Shock apply the Sigil debuff for 2 seconds, and is absolutely necessary. This debuff is the entire reason we use this skill.
If you have extra skill points, you can get the Autofire tripod at level 10. This makes Sound Shock hit twice, which we care about because it extends the duration of the debuff. For those of us on NA/EU launch who don’t have enough skill points, this is one of the tripods we’ll drop to save points.
- Why we use it: Provides 10% damage taken debuff.
- When to use it: When you need to apply Sigil quickly or from a long range.
- If you have no skill points: Drop level 10 Tripod. This skill must be level 7 to apply the debuff, so it should never be lower than level 7.
- Runes: Bleed (more DPS), Overwhelm (if you need more Stagger), Judgment (to help with Mana problems).
Harp of Rhythm

Harp of Rhythm summons a small, stationary harp that will attack monsters in range until it runs out of time. This is our second skill for applying Sigil, and also charges our Serenade meter. All you have to do is cast it in range of the boss and it will do its thing. We use this skill as often as possible.
This skill provides you with an extremely high uptime on your Sigil debuff, especially if you use it in conjunction with Sound Shock. When the harp is active, it constantly attacks the boss, reapplying the debuff. When it disappears and goes on cooldown, you can use Sound Shock to fill in the gaps until you can re-cast harp. Even if you need to dodge an attack or do mechanics, the harp will continue to attack and reapply the debuff, making it superior to Sound Shock during fights where you need to move a lot.
However, this skill has its downsides. The harp itself is stationary, which means if the boss moves out of range, this skill does very little. If you cast it in a bad place and it can’t reach the boss, that means no debuff applied. In addition, the harp has a smaller range and also takes some time to get going (summon delay + attack animation), whereas Sound Shock can apply Sigil from long range pretty much instantly.
You should know what each Sigil skill is good for, and pick the right one to use for each situation.
Tripods:
Our first tripod, Summoned Will, increases the duration of the summon by 2 seconds. It constantly applies the debuff and charges our gauge, so making the harp last longer is extremely good.
The second tripod, Melody Increase, automatically charges our Serenade Gauge every second the harp is active. It doesn’t need to be hitting the boss or anything, it just charges our meter automatically. That’s one of the reasons we want to use this ability every time it’s available, unless the boss is invulnerable or can’t be attacked.
The last tripod is Stigma Notes, which makes each of the harp’s attacks apply the Sigil debuff. This basically gives our debuff 100% uptime if the harp is in range of the boss. Unfortunately this is a level 10 tripod, which means we’ll have to cut it if we don’t have enough points. When harp is on cooldown, OR if you don’t have the level 10 tripod, use Sound Shock to keep the debuff active.
Keep in mind, the sigil debuffs DON’T stack. If you have harp going, you can cast Sound Shock for some extra DPS, but the debuffs won’t combine to give the raid 20% more damage. The debuff duration also doesn’t get added together, only refreshed. Each application of the debuff overwrites the last one.
- Why we use it: Provides 10% damage taken debuff.
- When to use it: When you want to keep Sigil debuff applied while moving; when you want a higher uptime on Sigil debuff.
- If you have no skill points: Don’t use this skill. It needs level 10 before it can apply the debuff, which is a considerable investment early on. You can get by with Sound Shock and/or Stigma.
- Runes: Bleed (more DPS), Judgement (to help with Mana problems).
Stigma

Ah yes, Stigma. Like Sound Shock, you’ll have grown to love this skill while leveling; in raids, it is also a (third) source of Sigil, but it’s only used as a stopgap until you get more skill points.
It has a cast time, making it slower than both Sound Shock and Harp in terms of how long it takes to get going; in addition, the uptime on it is lower than harp, making it a weird hybrid of the other two. At the end of the day, it just isn’t as good as our other Sigil skills, but we’ll be forced to use it early on when we have little skill points.
Tripods:
Our first tripod is Enhanced Duration, boosting the duration of Stigma by 2 seconds. This is a no-brainer since it extends the uptime of Sigil.
The second tripod, Brilliant Stigma, allows this skill to provide Sigil. Without this tripod there’s no reason to use this skill at all. Pick this.
Our third tripod is.. Melody Increase, if we had to choose, but if you have enough points for level 10 Stigma why aren’t you using Harp of Rhythm instead? Keep Stigma at level 7 and move on with your life.
- Why we use it: Provides 10% damage taken debuff and we don’t have enough skill points.
- When to use it: You need a second source of Sigil and you are a baby Bard.
- If you have no skill points: Use this skill! Keep it at level 7.
- Runes: Bleed (more DPS), Judgement (to help with Mana problems).
Conclusion of Sigil Skills:
You’ll want to bring some combination of Sigil skills in your set of eight, usually 1-2. Three is too many. When you don’t have enough skill points, I would bring Sound Shock + Stigma or just Sound Shock (and have lower debuff uptime).
I often find myself just bringing Sound Shock these days, especially in higher tier Legion Raids. The bosses move around, and a long-range, quick source of Sigil is often what I need. With high Swiftness and level 10 Sound Shock, I can often get near 100% uptime on Sigil as the CD of the skill is so low. Harp is good if I need to move around and keep the debuff up… but in actuality if I need to move (dodge) chances are the DPS do too – which means nobody can actually take advantage of the debuff.
This is why I say that although the skills do a certain thing on paper, once you start raiding you’ll realize that some skills might be better in practice depending on your circumstances.
Let’s talk about attack buff skills next, excluding Serenade of Courage, which I’ll cover in the Identity Skills section.
Heavenly Tune

Let’s start with Heavenly Tune or HP for short. You play a song that applies a buff to members within 24m. The range of this skill is massive, and it’s actually bigger than the circle indicator on the screen. You can basically think that if you can see a party member, they are close enough to get the buff.
This is one of our signature skills, and one of our best abilities. I know I said your skillset is a set of tools, and you can swap them out depending on your needs…
But a set of tools without this skill needs to be thrown in the garbage.
This is one of our biggest buffs. By default, it gives 8% attack speed and 40% mana regeneration. But it really shines when you have all the tripods for it:
It increases attack power (AP) by 6%, plus gives 15% of the Bard’s attack power as a flat bonus to all party members. In a raid with 2 or more parties (8-man raid), only your own party of 4 will receive the buff. It even boosts attack speed (16%) and mana regeneration (40%) on top of all that. If you’re just starting out, just cast this on cooldown whenever your party is in position to attack. For advanced play, you’ll want to watch your raid members and use this skill during damage windows. If you’re playing in difficult, cutting-edge content like hell raids, you should call out your Heavenly Tune timings through voice chat or DC so your party members can coordinate their cooldowns, synergy buffs, debuffs, and hard-hitting abilities.
You might come across some builds that take the enemy damage reduction tripod for the second slot instead of 8% attack speed, but I don’t recommend it. This skill isn’t on a short enough cooldown for the debuff to be up a lot. Most importantly, you want to use this skill during damage windows – for the most part, a damage window means the boss isn’t doing anything dangerous, which makes the damage reduction debuff kind of useless on this skill in practice.
Also you really don’t want to get hit while casting this skill, as it will stop the buff from going out and put it on cooldown (if you get knocked down).
Tripods:
Basically every build will use the same tripods for this skill, whether it be for leveling, Chaos Dungeon, or raiding.
Take Quickly Prepare to lower the CD of this skill. Less CD = More Heavenly Tune = Kill the boss faster.
Second tripod is Strong Performance, which gives an additional 8% Attack Speed buff effect (for a total of 16%).
Last tripod is Intense Performance. This is the best and most important tripod, since it provides all the Attack Power bonuses mentioned above.
- Why we use it: Gives your party a considerable buff to their damage, as well as mana regeneration.
- When to use it: Always bring this skill. No matter what. Use it as often as possible (when it makes sense to).
- If you have no skill points: Take skill points from other skills. You need this at level 10.
- Runes: Focus (to help with Mana problems), Galewind (faster Cast Speed).
Sonic Vibration

This is our second attack power buff for the raid. The first thing you should know is that the attack buff from this skill does NOT stack with Heavenly Tune. That means that if Heavenly Tune is active, you never want to cast Sonic Vibration. The second thing to keep in mind is that party members have to stand on top of the Sonic Vibration AoE to receive the buff. If they move out of it, they no longer have the buff.
You always want to position the AoE in a place where your DPS can stand on it. You’ll need to adjust based on where the boss is standing, whether your party has head attackers, back attackers, or ranged classes. If you’re not sure, just stick it on the boss where you see people standing. For advanced play, you’ll want to also consider the boss’ patterns and safe areas, along with lining up the buff with your party’s cooldowns.
Also it doesn’t come up all the time, but this skill also has Destruction on it so you can use it to break parts on bosses when needed. In addition to that, this is one of our skills that has Super Armor, which means that while casting this skill you have resistance/immunity to knockdown effects. You can occasionally use this to your advantage to prevent getting knocked down by attacks you can’t evade (if your dodge is on cooldown).
Tripods:
For tripods, we take Tenacity for the knockdown resistance. Our level 7 Tripod is Brilliant Sound Wave. We NEED this tripod, it’s the one that turns this skill into an attack buff.
Level 10 makes the AoE bigger which helps you with positioning it, but it’ll be one of the first things we drop to save points in the beginning. You’re just going to have to get good with placing the smaller AoE.
- Why we use it: A second source of Attack Buff. Occasionally used as a Super Armor.
- When to use it: Just as we always bring Heavenly Tune, you’d rarely (never) drop this skill from your eight.
- If you have no skill points: Drop Wide Attack (AoE increase) and keep this skill at level 7.
- Runes: Follow-Up(reduce CD), Galewind (faster Cast Speed), Conviction (helps with Mana problems), Focus (reduce mana costs).
Conclusion of Attack Buff Skills:
We have two skills that provide attack buffs to our parties, and we want both of them. You’ll want to cast them so that they don’t overlap, extending the uptime of the attack buff they provide. In general, applying Sigil provides more damage, so you should prioritize applying the debuff before the attack buffs.
Wind of Music

Wind of Music is our first protection skill. You cast two bursts of energy in a circular AoE around you. Any allies hit by this skill receive a shield for 4 seconds. This skill also charges our Serenade Meter by a fair amount, but only if you hit the boss with it.
You can pretty much cast this on cooldown to start.
Occasionally, advanced players may want to watch the boss’ patterns and time the shields for dangerous moments, or before telegraphed attacks. Here’s where our positioning becomes very important. Unlike other skills, Wind of Music always pulses around you. If you are too far away, you won’t be able to do anything. You need to be near your allies to give them the shield, and you need to hit the boss with the pulses to charge your Serenade gauge. Watch carefully, move in and try to hit both allies and boss with the AoE. This is where having high Swiftness and movespeed helps.
Tripods:
For tripods, we take Quickly Prepare and Melody Increase to lower the CD and boost the Serenade gauge gain.
Our last tripod is Wind of Protection to provide shields. There ARE some cases where you can take High Speed Cast here, since it greatly increases the rate at which you charge your gauge. You should only use this tripod if you know what you’re doing, since you are losing a lot of defense from the shield tripod. High Speed Cast is mainly for spamming 3-bar Serenade of Courage, for content that you want to clear faster or for extremely skilled parties.
For beginners, stick to Wind of Protection, since we’ll be running that most of the time.
- Why we use it: Provides high defense via shielding, and is a major source of Serenade meter.
- When to use it: This skill is extremely good, on the level of Heavenly Tune. I’d be trolling if I told you not to use it. Always bring this skill.
- If you have no skill points: Find them and remove them from other skills. Level 10 Wind of Music is a must.
- Runes: Wealth (more Serenade gain), Follow-Up(reduce CD).
Guardian Tune

I have a lot to say about this skill. It’s very powerful and versatile, so you should try and understand when and how to use it. Guardian Tune is our second protection skill, and it has the same range as Heavenly Tune – 24 meter screen-wide. It applies a buff that reduces damage taken by 30% for 8s to all party members. With the right tripod, when this buff expires it also gives a shield equal to 15% of max HP, and is on a 30s cooldown.
This skill is extremely good, reducing damage taken and then giving a shield afterwards. It has a variety of uses depending on the tripods you select. The first style is to be casting this as often as possible to reduce incoming damage. By casting it on cooldown, you give your party 8s of damage reduction, then 8s of shield. There are only 14 seconds of downtime (not including CD reduction from Swiftness) before you can cast it again, saving your party from lots of incoming small damage.
The second style is to save this ability for predetermined patterns or damage timings that you can plan around. If you’re not sure what those are, just cast this on cooldown. We have other skills we can use on demand to save players, so you don’t need to save this one and never use it.
The style you use depends heavily on your preference and also the individual encounters, in addition to your character build. I’ll cover this more in detail in the Tripods section below.
Tripods:
For tripods, we take Enhanced Mind to save mana. This is the least difficult choice of the three tripods, and although you can take Tenacity if you have no mana problems, chances are you will be short on mana – especially if you’re casting this on cooldown.
Our second tripod is between Endless Protection and Powerful Protection. The first one provides a shield after the damage reduction buff expires, extending the defensive uptime of this skill. Powerful Protection boosts the damage reduction effect by 20%, making this skill give a massive 50% damage reduction during its effect. If you plan to spam this skill for sustained raid protection, mitigating incoming damage over time, you should go with Endless Protection. For those who want to save this spell for difficult patterns, you can pick Powerful Protection and use it like a party-wide Shield Wall.
Our third choice is between Sharp Guard and Wind of Protection. Sharp Guard halves the cooldown of this skill, but also halves the duration of its effects. This means it combos well with Endless Protection; if you have sufficient Swiftness, you can achieve nearly 100% uptime on some kind of defensive buff, whether it be damage reduction or shield. Unfortunately, since you’re casting this so often, you are going to have massive mana problems.
Wind of Protection protects against 1 attack that has a CC property, like stun, freeze, shock, etc. You can tell which attacks also have CC effects by their blue-colored area (instead of the usual red). This means it completely negates the next attack you would take while the buff is active: no damage, no CC. This can be an extremely powerful effect during some encounters, and totally useless in others. If you take Wind of Protection, I prefer using it with Powerful Protection – you end up wanting to save the ability to block a CC attack, so it kind of contradicts the playstyle of Endless Protection where you spam it off CD. It feels pretty bad when that CC attack you’re waiting for finally comes out, but your skill is on cooldown.
My head hurts, so what tripods do I take?
If you’re just starting out, I recommend just taking Endless Protection + Wind of Protection and spamming it whenever the skill is off cooldown. It’s not as efficient as what I described earlier, but you get the best of both worlds and you have the option of both ‘modes’ of this skill. Eventually, when you start getting used to boss patterns, you’ll know when you want to save your ability to counter some CC moves or painful attacks.
- Why we use it: Provides high raid survivability via damage reduction buffs, a shield, and one-time CC immunity.
- When to use it: This skill is very versatile, and although it can be used in a variety of conditions and ways, you should always bring it.
- If you have no skill points: Keep this skill at level 7. Use Endless Protection.
- Runes: Focus(reduce mana costs), Galewind(reduce cast animation).
Rhapsody of Light

This is the ability you’ve been waiting for. When you cast it, a circle of light appears at your mouse cursor, giving allies inside a huge damage reduction buff and a shield. Positioning is important for this skill, since it has a small range.
Unlike Guardian Tune, you don’t want to cast this on cooldown. This is the one you want to save for dangerous moments, when you see someone about to get hit by a big attack, or when you yourself can’t dodge in time. Knowing how to position yourself and use this skill well will separate you from the newbies and turn you into a true raid savior.
Rhapsody of Light is your big clutch-save ability, the one that will earn you millions of internet cool points and the respect of your entire raid if you use it properly. This skill also has Super Armor like Sonic Vibration, and along with its massive damage reduction + shielding properties, lets you straight up ignore most damage mechanics.
Some things to note: you don’t need to be in the circle (as the Bard) to receive the damage reduction buff. In addition, you don’t get the shield provided by this ability even if you are in the circle.
Tripods:
For tripods, we take Quickly Prepare to lower the cooldown, Steady Light to give us super armor, and most importantly, Light of Protection. It gives allies in the circle a 75% damage reduction and a shield for 10% of their Max HP. As the caster, you also get 50% damage reduction yourself while channeling the skill.
This skill really makes you tanky, and lets you play really aggressively for a character that has no movement skill. Just having Rhapsody in your back pocket and available means you can play confidently, knowing you can cast it at any time for 50% damage reduction, a shield, and Super Armor for yourself. This means you can often use your spacebar dodge to reposition yourself instead of saving it to dodge an attack, since you can just soak even the most powerful attacks by casting Rhapsody.
Of course, it won’t save you from one-shot mechanics or other gimmicks like Vykus’ temptation gauge or Kouku’s madness, but you’ll get the gist of it quickly.
- Why we use it: Provides an extremely powerful defensive cooldown for both you and your allies.
- When to use it: Bring this skill during fights with difficult to avoid attack patterns, or for bosses with high damage but telegraphed moves. The higher your familiarity with a boss, the better this skill becomes. Keep it off cooldown for the right moment.
- If you have no skill points: Don’t use this skill. It really is only good at level 10, so if you can’t use a level 10 Rhapsody then pick a different build instead.
- Runes: Guardian – this rune gives you a shield (up to 12% max HP) when you cast the ability, whereas you wouldn’t get one without it.
Conclusion of Protection Skills:
Like with your Sigil abilities, you’ll want to bring at least one Protection ability. Most of the time, I would recommend two. Wind of Music should be on your hotbar at all times, plus one or two more depending on the content you’re doing. I usually have Guardian Tune with me (>95% of the time), and swap out Rhapsody of Light for easier stuff like Guardian Raids.
For Legion Raids and endgame stuff, I like to bring all three protection spells.
Soundholic

Now we’re onto our Stagger and Serenade Skills.
Soundholic is unchanged from my leveling and solo guide. It’s a massive laser of sound that is basically our sole source of Stagger and burst DPS, while also giving us some Serenade gauge.
For record’s sake, this is technically a back attack so you’ll get more damage and crit when casting it from behind the boss. However, it’s not really all that important in practice so you should focus on just hitting the boss and leave it at that.
Tripods:
We take Focus Sound, Enhanced Duration, and Concentrated Fire to boost DPS. This is basically a set in stone tripod build for all content and builds. If you find you’re always a little short on Serenade meter, you could take Melody Increase as the level 10 tripod instead of Concentrated Fire, but I don’t recommend it.
The biggest reason to use Concentrated Fire is that it shortens the overall duration of the skill (and Concentrates it, obviously). This means you aren’t standing around like a sitting duck channeling this thing, AND it unloads all of your damage and Stagger faster.
- Why we use it: Our main source of burst Stagger and DPS.
- When to use it: Bring Soundholic if your party is a little lacking in Stagger. There are quite a few “stagger fast or party dies” mechanics in Legion Raids, so you’ll want Soundholic in those encounters. This skill can be swapped in or out depending on if you need more Stagger/Serenade or Protection, or even a counter skill.
- If you have no skill points: I’d stay away from using Soundholic if it’s not level 10, for the reason listed above.
- Runes: Overwhelm (More Stagger).
Overture of Storm

Overture of Storm is an extremely simple skill. Cast it whenever it’s available, hit the boss, build Serenade meter. You’ll want to be relatively close to the boss in order to hit it, but if you’re in range already for Wind of Music you’ll be fine.
Tripods:
We take Quickly Prepare to lower the cooldown, and Melody Increase to boost the Serenade gain. At level 10, we take Powerful Overture to boost the Serenade charging even more, but we’ll be dropping this tripod early-game to save points.
- Why we use it: Solely as a way to build Serenade gauge.
- When to use it: This skill is a meter building machine, but it’s one of the first things I drop if I want to bring in more Protection skills or a counter (Rhythm Buckshot).
- If you have no skill points: This skill is much, much better at level 10, but if you’re really hard-pressed for skill points you can use this at level 7.
- Runes: Wealth(More Serenade Gain).
Rhythm Buckshot

Rhyhm Buckshot is our one and only skill that has counter-attack properties. What is counter?
There are certain attacks and patterns where the boss will flash blue and require you to hit it with a counter, or suffer some (usually painful) attack. This is similar to abilities that need to be interrupted or kicked in other MMOs.
There isn’t much to say about this one. Stand in front of the boss, and when you need to counter, hit the skill. Most of the time, it won’t be your job to counter, but for raids like Valtan everyone should bring a counter skill, Bards included.
As this is a counter skill, you want to save it. The last thing we want to do is have this skill on cooldown when we need to counter something. If you know exactly when you’ll need to counter something and you have time before, you can just use this skill to build Serenade meter. Additionally, after a boss is countered, there is an internal cooldown of 30 seconds before it can be countered again. If somebody else counters the boss, you know you are safe to use this ability to build gauge for the next 30 seconds.
Lastly, this skill does have some weak Destruction/Weak Point properties, so you can use it for mechanics that require that.
Tripods:
We take Enhanced Mind for our first tripod, but it doesn’t matter too much. For the level 7 tripod, you definitely want Tenacity, giving you super armor while casting this skill – it helps a lot when going for counters, preventing you from being knocked down.
For advanced players, you can use this skill to super armor through attacks you can’t dodge. Our level 10 tripod is quick cast, which basically just helps us hit the counter timing more easily.
- Why we use it: As a counter.
- When to use it: When you need a counter.
- If you have no skill points: You can leave this skill at level 7, or even at level 1 if need be, if you are good at timing the attack.
- Runes: Galewind (Faster start-up animation).
Conclusion of Stagger/Serenade Skills:
These skills (along with our counter), can be considered our toolbox skills. Since they aren’t providing some key support effect to the raid, we can swap these skills more freely depending on what we need.
Soundholic for more stagger, Overture of Storm for more Serenade, and Rhythm Buckshot when we need a counter.
As for the other skills that I didn’t mention, they’re not really used in raids so I left them out of this guide.
Symphonia

Symphonia is one of our two Awakening skills. The other skill, Oratorio, isn’t used much outside of certain Hell modes where you need to squeeze out every bit of damage as possible. These are kind of like “ultimate” abilities, which have limited uses per fight (resets if you wipe) and are on long cooldowns.
Symphonia provides a massive shield (100% of Max HP) to all party members in range, and also gives you one bar of Serenade meter. It’s definitely deserving of being an awakening skill. You’ll want to cast this skill often, only saving it when you have a good reason. You should also try to hit the boss with this when possible, because it applies a debuff that gives 30% attack down to bosses.
Since it gives one Serenade bar immediately, you can use it to do things like:
- Playing a 3-bar Serenade of Courage, casting Symphonia, then casting a 1-bar heal immediately.
- With 2 bars, filling the last bar to play a 3-bar Serenade of Courage.
- Etc.
Identity Skills
- Serenade of Courage (Z) & Serenade of Salvation (X)
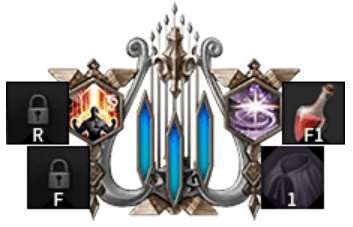
These skills are why we work so hard to fill up our Serenade Meter. When we use either of our Serenades, it consumes all of our Serenade meter and gives us a stronger effect depending on how many bars were used.
Important note: if a bar is partially filled, it will be consumed but there will be no extra effect. That means that if you have 1.5 bars and you cast an identity skill, you’ll get the 1 bar effect and lose all your meter. When possible, you always want to wait until you have 1,2, or 3 full bars before casting a Serenade, unless it’s an absolute emergency (like someone is about to die, they have no potions, and you have a heal available).
This system has been patched in KR and no longer exists, you keep all remaining partials. I will update this when it is confirmed changed in NA/EU.
In short, our Z skill Serenade of Courage gives an attack buff to all party members, and our X skill Serenade of Salvation places an AoE healing field on the ground. You generally want to cast Serenade of Courage with 3 bars, and Serenade of Salvation with 1 bar. This is mainly because Courage gives more attack the more bars you have, and while Salvation heals for more, a lot of it ends up overhealing and wasted.
Some notes about Serenade of Salvation: you can think of this skill as a bucket. When you cast it, there are a certain amount of heal ticks (depending on how many bars you had), like water in a bucket. Whenever someone (including yourself) gets healed by the ability, one of those ticks is consumed. When there are no more ticks left, the ability ends. That means that if you are at 99% HP and you get healed to 100%, you still used up and ‘wasted’ one of the heal ticks. When using this ability, try to target it so that you hit only the most hurt allies, avoiding healthy people. If you yourself are healthy (>80% HP), you should avoid your heal to let more hurt party members eat more ticks.
You should be flexible and judge which Serenade to cast depending on the situation. However, you should note that unlike other MMOs, you are not a healer. You have a healing skill, but it isn’t necessarily your responsibility to only spam heals on everyone.
Lost Ark is about dodging mechanics and staying alive, and potions should always be the first thing used to recover HP.
Mainly we don’t prefer to cast our heal unless necessary because unlike Paladins, casting our heal means we have to sacrifice our attack buff. That being said, don’t be one of those Bards that only plays Courage even though everyone is dying. You should use your discretion when choosing which song to play.
For an advanced tip, you want to save a 3 bar Serenade of Courage if you know there’s a big burst window. This is because the skill gives a 2 minute buff to yourself that boosts attack by 15%, BUT it also gives 5/10/15% attack to you and your party members for 8-16 seconds after casting it. The length of the short buff and the attack it gives depends on how many bars you have when casting it.
What does this mean? The attack buff is strongest (30% for yourself, up to 15% for party members) right after casting Serenade of Courage, so you ideally want to time it for a good DPS window when everyone has cooldowns and can hit the boss. In addition, your party members ONLY get the attack buff for 8-16 seconds, so you really want to make sure they’re in a position to actually take advantage of it.
Also, here’s the math on why 1 bar heal is the most efficient. Serenade of Salvation heals for different amounts based on how many bars you spend when you cast it. It heals anyone inside the AoE who is damaged, until the total amount of ‘heal ticks’ of the skill are depleted, sort of like a healing well that damaged players can drink from. The more bars you cast it with, the more max HP% it heals for, AND the more ticks Serenade of Salvation has.
The math is as follows (assuming 1 person only being healed): 1-bar heal has 8 ticks of 4%, for a total of 32%. Level 3 Desperate Salvation heals for 24% on top of that, making the total healing 56% of your max HP. 3-bar heal has 16 ticks of 8%, for a total of 128%. Add 24% for our class engraving heal and we get 152%. In terms of total healing for ONE person, level 3 heal does more overall, but what about efficiency? We are using 3 bars, so we divide 152 by 3 and get 51 (rounded up). You can see that PER BAR, a level 1 heal gives 56% total healing while a level 3 heal gives 51% total.
The math is even more ridiculous if we are healing 4 people: 1 bar heal has the same amount of ticks, spread among 4 people, so 32% max HP. However EACH person gets the Desperate salvation heal, so that is 24 x 4 (96%) extra healing, for a total of 128% max HP. Compare a 3 bar heal which heals for 128 + 96, or 224% total. If we calculate the healing PER BAR again, a 1 bar heal gives 128% max HP healing while a 3 bar heal only gives a measly 75%. Not to mention the opportunity cost of losing a 3 bar Serenade of Valor attack buff.
Tripods
Tripods are an integral part of the game, and they can even be leveled up to be more powerful. Bard is unique in terms of tripods because some of our most powerful tripods (like the attack buff on Heavenly Tune), are capped at level one. They cannot be leveled up further due to balance issues.
Each piece of gear starting from legendary grade in T3 can hold up to 3 tripods ‘upgrades’. These can range anywhere from +1 to +4, which along with the base level 1 tripod, means you can achieve a max tripod level of 5. The difference between them is massive, so let’s take a look at which Bard tripods you should prioritize leveling.
We want to prioritize identity gauge generation to play more songs, and cooldown reduction for the same reason – we can generate more gauge and also increase the uptime of our support effects, like shields.
Priority 1 (This Group Should be Prioritized First)
- Heavenly Tune – Quick Preparation: We want to lower the CD of our main attack buff as much as possible.
- Wind of Music – Quick Preparation: Same idea. Lowering the CD of our shield means more uptime on it, and also generates more identity gauge.
- Wind of Music – Melody Increase: This tripod greatly increases the amount of gauge we gain from this ability, a difference of a whopping 75% increase from level 1 to level 5.
Priority 2 (Second Tier)
- Prelude of Storm – Quick Preparation: Exact same logic as Wind of Music, except we sometimes swap this skill out for counter/rhapsody/soundholic, so this is lower in priority.
- Prelude of Storm – Melody Increase: Again, same logic as above!
- Rhapsody of Light – Quick Preparation: In endgame legion raids, Rhapsody of Light is a near broken ability that you want to have during emergencies. Lowering the cooldown allows you to abuse this powerful damage reduction ability while lowering the risk of having it on CD when you really need it.
Priority 3 (Support Tripods)
These tripods are not as important, although useful, and can be slotted in any order after your main six tripods above. I would recommend getting level 4 of the 6 tripods above, and aiming for level 3 tripods of everything in Priority 3 and below.
- Wind of Music – Wind of Protection: Increases shield potency.
- Guardian Tune – Endless Protection: Increases shield potency.
- Harp of Rhythm – Summoning Will: Increases duration of Harp. This one is iffy because in later builds, you will often swap out Harp of Rhythm for another skill.
Priority 4 (Everything Else)
As far as supporting tripods, there isn’t much else. You can fill in the remaining slots with Soundholic Tripods (see build section), Stigma, or Dissonance tripods to help with Chaos Dungeon or other solo content.
Gems
For Gems, we want to mainly use cooldown reducing jewels on our main abilities.
Priority:
- CD Heavenly Tune + Sonic Vibration: Casting our attack buff frequently is what we want to do.
- CD Sound Shock: We want our main debuff skill to have as short of a CD as possible, especially if we aren’t bringing Harp of Rhythm or Stigma.
- CD Wind of Music + Guardian Tune + Rhapsody of Light: Less CD on our protection abilities means more safety for the raid.
- CD Prelude of Storm: The more often we can cast this skill, the more Identity Gauge we can generate, meaning more songs played.
- CD Soundholic: Our main damage and impair skill. Lowering the CD of this skill will help but not top priority.
That leaves 3 empty gem sockets. We can slot in 3 DPS gems if needed, but they are not required as our personal DPS does not matter too much in raids.
- DMG Sound Shock
- DMG Soundholic
- CD Harp of Rhythm: if you are still using this ability, you can use a cooldown reducing gem for it.
Skill Builds
I just want to say this again: there is no one Bard build. Even I don’t really follow the exact builds listed below, as I change my build depending on the fight and my personal gear/build.
I already went through when and why we bring each skill above, so you should try and go off that when possible.
But, that being said, it is hard to decide that stuff when you’re just starting out, so I’ll recommend a few ‘preset’ builds you can start with, depending on how many skill points you have.
Standard
- 252 Points + Rhythm Buckshot Lv. 1
Use this for: When you’re a fresh level-50 with no skill points, use this tree for party play. This build has weaker Stagger, so in fights with high Stagger requirements (Rohendel Abyss), use another build.
Features:
This build has all the major attack buffs maxed out, with Sonic Vibration AoE making it easier to hit more allies. This build also has two sources of Stigma debuff, Sound Shock and Stigma (skill). It also has level 10 Prelude of Storm which will generate a large amount of identity gauge for you.
Upgrades:
1) When you get more skill points (Power Pass, Island Hearts, etc.), level up your Rhythm Buckshot.
2) Replace Stigma 7 with Harp 10, de-level Rhythm Buckshot.
- 280 Points + Rhythm Buckshot Lv. 1
Stagger
Use this for: Content where you need high Stagger (Rohendel Abyssal Dungeon)
- 252 Points + Rhythm Buckshot Lv. 1
Upgrades:
1) When you get more skill points (Power Pass, Island Hearts, etc.), level up your Rhythm Buckshot to LV. 7 (Melody Increase + Tenacity).
Skill Rotation and Play
Alright, now that we have all the skills down, let’s go over the rotation and how to use them. Of course, this will vary differently for each encounter, so I’ll just go over a general use case for the Standard skill build.
When we’re approaching the boss, we want to go ahead and cast Guardian Tune. This will let our party get into position with some protection. Unless you know you need to save it, here’s where we’ll also cast Symphonia. The massive shield will let everyone initiate the fight safely, and also give us 1 Serenade bar right away. We’ll use it to cast Serenade of Courage, then a Sigil skill, followed by Heavenly Tune for the maximum attack boost.
Now your party is shielded and has all the attack buffs you can give. Now you’re free to cast the rest of your Serenade building abilities like Soundholic.
By the time you’re finished channeling, you’ll notice skills coming off cooldown. Now you’ll have to use your brain a little since they might come off cooldown at the same time. In general, you should prioritize the Sigil debuff. It’s an easy 10% more damage for your entire party, and requires the most care to maintain. At early-game, we won’t have level 10 Harp, so we’ll need to spam Sound Shock as much as we can. You’ll notice we have other skills like Overture of Storm and Wind of Music available, but you should go ahead and cast Sound Shock first. Maintaining the Sigil debuff is more important than building our Serenade meter.
Once Sound Shock is on cooldown, we can go and throw out all our other skills. When you see that the attack buff from Heavenly Tune is finished (or has about 1 second remaining), go ahead and use Sonic Vibration. By that time, the Sigil debuff will have fallen off, so we want to Sound Shock again.
You’ll see that after our first cycle of skills, we follow more of a priority rather than a set rotation. Cast Sigil and Attack Buffs first, making sure not to overlap the two – remember, sigil debuffs don’t stack with each other and attack buffs work the same way. When those are going, we’ll want to cast our protection skills off cooldown, unless we know there’s a big attack coming up. Squeeze in your Serenade skills when you can.
As I mentioned before, if you’re using Rhythm Buckshot and Rhapsody, we don’t use them off cooldown but save them for when we need them.
With our awakening skills, namely Symphonia, you can go ahead and cast it whenever it’s available or you need 1 extra bar of Serenade. You can also save it as I mentioned in the skill description, since a 100% HP shield is generally enough to negate anything but instant-kill mechanics.
While this is a general ‘rotation’ you can use, this is more of a starter cycle for those who might have zero idea what they’re doing. In reality, you won’t have perfect uptime on your skills and that’s okay. Just focus on prioritizing what you need at the moment and doing the gimmicks/mechanics required. No one will care that your Sigil dropped off for 1.5 seconds if you just put a massive AoE in the middle of the raid.
Stagger / Impair Rotation
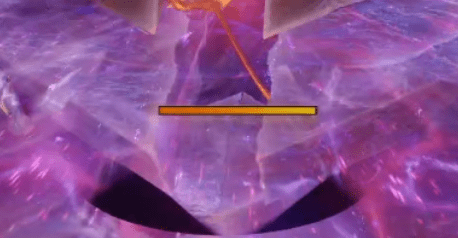
Starting from Legion Raids, there will be lots of times when the entire raid has to burst Stagger a boss to prevent some big attack or even a raid wipe. A yellow bar will appear below the boss, and it must be depleted through Stagger quickly.
At this time, you should use the following rotation:
- Whirlwind/Earth Grenade
- Sound Shock
- Soundholic (if you have it)
- Sonic Vibration
- Sound Shock (2nd time, after it comes off CD).
Engravings
Engravings are a massive part of building your character and can get quite tricky, so I won’t go into how the system works in depth. You can look up any number of guides on YouTube…
Bards have a few engravings that I would consider ‘core’, so I’ll go through them.
Awakening
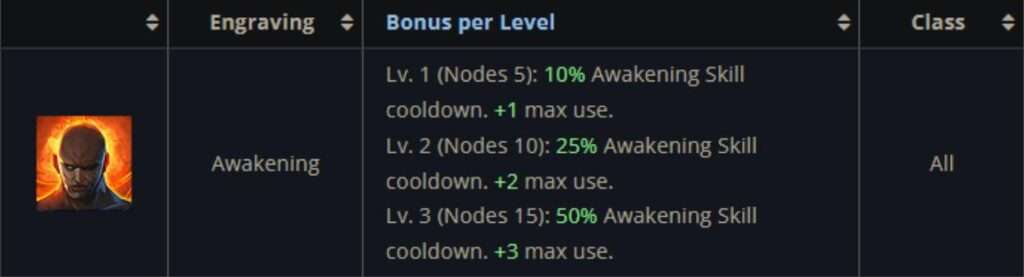
This should be your first priority to get to level 3. It halves the cooldown of Symphonia and lets you use it 3 MORE times every pull, for a total of six. That’s three more massive shields and 3 bars of Serenade over the course of a fight, making this priority number one.
In general you’ll be able to get this via your ability stone (6 points) plus 9 more points on your other accessories.
Desperate Salvation (Bard)
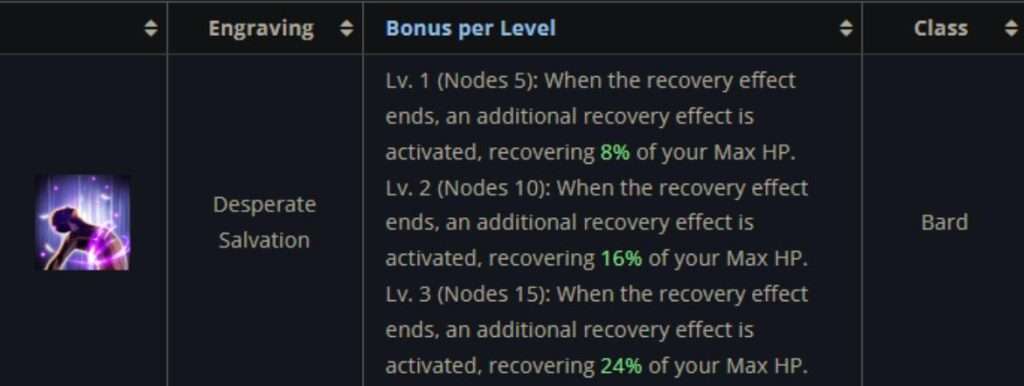
This should be your next priority after Awakening. This is our class engraving, which means it is unique to Bards. This engraving provides your Serenade of Salvation with an extra burst of healing after it ends, whether that be by timer or because all the healing ticks were used up. At level 3, it gives a massive burst of 24% Max HP healing.
It’s important to know that you get this effect no matter what level of Salvation you cast (1-bar, 2-bar or 3-bar). That means that you can spam 1-bar heals and get this 24% Max HP heal every time. This engraving is also the reason why we prefer to cast Serenade of Courage with 2+ bars and Salvation with 1-bar only.
Since class engravings can’t appear on ability stones and are generally really expensive on good accessories, you’ll generally get level 3 of this by applying two purple engravings to your rings (for a total of +18). If you don’t know what I’m talking about, go find that engraving guide like I mentioned!
Heavy Armor
Bards are the squishiest class in the game. We have the lowest HP/Armor coefficient and have no movement ability. Our only dodge is on a 10 second cooldown. In reality though, Bards are considered one of the most survivable classes, especially with high Swiftness.
This engraving is one of the main reasons why. At level 3, it gives +150% to all Defense, turning us into an unkillable machine when combined with our high movement speed and all of our defensive abilities. You should focus on getting Level 3 Heavy Armor after Awakening and Desperate Salvation, especially if you’re new and take a lot of hits.
Technically, if you played perfectly and never got hit, you could drop this in favor of something that boosts your support capability. Technically. But if you’re tempted by this notion, I’d recommend you look up the builds of any top Bards on the KR server – there’s a reason why we all run Heavy Armor 3, and when you get to endgame raids you’ll find out why.
Spirit Absorption
You’ll see this engraving a lot as a Bard’s 4th choice, after getting level 3 in the above 3 (shortened as 333). It provides a large 15% increase in both cast speed and move speed, making the class feel a lot smoother to play. If you are full Swiftness, you don’t need this engraving as you’ll hit the speed cap without it. However, this engraving is basically mandatory for full Spec builds, and personal preference for 1:1 builds.
Increased Max MP

This engraving is common as a fifth pick (33333 or 3×5). It’s almost mandatory if you’re a full Swiftness spec or have any amount of high Swiftness, since you’ll be constantly out of mana without it. Max MP is doubly good because it not only increases your mana pool, but also the speed it recovers, since recovery is based on how much total MP you have.
Engraving Setups for NA/EU:
Don’t worry too much about engravings if you are a beginner.
- If you can, read 20 Green Awakening Engraving Books, then read 20 Blue Books (you can get a lot of these from side quests and islands).
- Apply both Awakening Engravings to your Engraving Slots (Character window P, bottom left, click the + button).
- This should give you +12 Awakening, which is level 2.)
- (Optional) Get an ability stone with Awakening on it, and try to get at least +3 on it via the Ability Stone Cutter. This will give you +15 Awakening nodes total, which is level 3.
- Do Vern Abyssal Dungeon (Elveria) or Rohendel (Dreams). Buy the extra loot box at the end for more accessories.
- Pick any 5 accessories with +1 or +2 to Desperate Salvation (Note you can’t equip pieces with the same name) and equip them. Ideally they have either Swiftness or Specialization. This will give you at least +5, +10 if you’re lucky, meaning you will have level 1 or level 2 Desperate Salvation.
If you followed all steps above, you should have “31” or “32”, which means Level 3 in one engraving (Awakening) and Level 1 or Level 2 in the second (Desperate Salvation). This engraving setup is fine all the way until Tier THREE**!!! So now just focus on your alts and gearing up.
Note that you will eventually replace your Abyssal Dungeon accessories in Tier 2 when you do the higher tier Abyss Dungeons, so you will need to repeat step 5 and 6 once you get there.
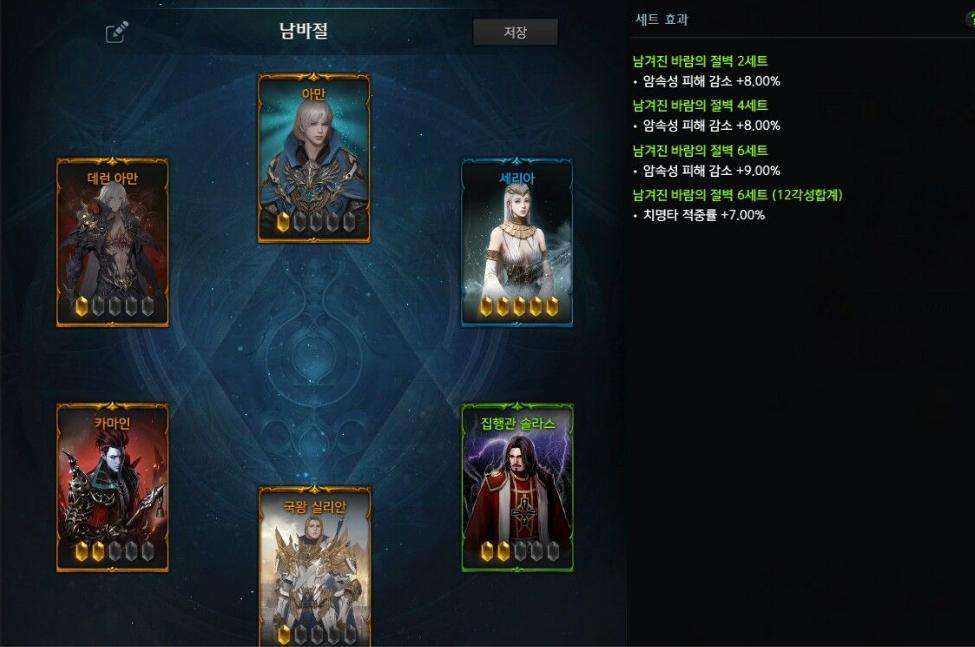
Card Sets
Terminology:
X-Set: Number of cards equipped in your 6 card slots needed to activate an effect, where X is the number you need.
Awakening: A system where you feed cards EXP (acquired through various content) to level them up. When a card is at Max HP, you can feed it duplicates to Awaken them, filling up one of 5 max crystals. Some card set effects only unlock through Awakening.
E.g. Awakening 12 means that for that card set, you need to have a total of 12 Awakening levels spread throughout the cards. If there are 3 cards in that set, each of those cards can be Awakening 4, for example, so 4+4+4=12. If there are 6 cards in a set, if each of them are Awakening 2, you would have Awakening 12. You can mix/match levels as long as the total number is greater than the amount required.
Field Boss II
Effects:
- 2-Set | Max HP +4%
- 4-Set | Max HP +4%
- 6-Set | Max HP +4%
- 6-Set, Awakening 18 | Crit Rate +2%
The Field Boss II set is an excellent set for supports. With all 6 cards equipped, you get 12% total Max HP, which is important because our shields and heals scale off our Max HP. It makes you more tanky and is one of the few card sets which actually improves your support capability as well.
I’d 100% recommend going for full Field Boss at the start of the game, since it is one of the easiest card sets to obtain and strong without any awakening levels.
Armory

Effects:
- 2-Set | Max HP +4%
- 4-Set | Max HP +4%
- 6-Set | Max HP +4%
- 6-Set, 30 Awakening | % chance to gain 24% crit rate for 10s when attacking.
Nothing much to say here. You can use this as a substitute or mix/match if you don’t have the full Field Boss set. They’re interchangeable. 30 Awakening is difficult and not needed as a support.
Forest of Giants

Effects:
- 3-Set | 15% more health recovery from healing items.
- 3-Set, 9 Awakening | +10% Physical and Magical Defense.
- 3-Set, 15 Awakening | +20% Physical and Magical Defense.
Forest of Giants is a 3-card set that greatly increases your survivability. It makes all of your potions more powerful and when fully Awakened, also gives you 30% extra physical and magical defense. It’s commonly paired with another set, We’ll Meet Again, to make a full 6 card deck.
Unfortunately this set can be a bit hard to obtain for beginners, and takes some work. Although it’s easy to obtain the 3-set effect, the set really shines after Awakening which can take some time. Of the three, the purple card Mokamoka can be obtained from a traveling merchant in Tortoyk. Given enough time, it’s relatively easy to collect all copies of the card. Unfortunately there is no easy way to obtain the other 2. They are technically farmable through bosses in Tortoyk, but the drop rate is in the area of 0.5%, so it’s not recommended unless you’re absolutely mad.
We’ll Meet Again
Effects:
- 3-Set | When your HP is below 50%, take 12% less damage.
- 3-Set, 9 Awakening | When your HP is below 50%, take 16% less damage.
- 3-Set, 15 Awakening | When you take damage that reduces you below 20% HP, quickly recover a moderate amount of HP over 5 seconds (10 minute CD).
We’ll meet again is another set that boosts your own survivability. It makes you take greatly reduced damage when you’re below 50%, and if you ever drop really low it has an emergency heal.
Just like Forest of Giants, this card set gets significantly better with Awakening, making it a long-term project. The purple card, Jean Mednick, and the blue card Xian/Sian can also be acquired from traveling merchants in Shushire. The last card is difficult to obtain, so you need to rely on card packs.
Romanticist

Effects:
- 2-Set | 10% reduced cooldown on your spacebar dodge.
- 4-Set | 10% chance to reset the cooldown of your spacebar dodge on use.
- 4-Set, 12 Awakening | 4% increased movespeed.
- 4-Set, 20 Awakening | 8% increased movespeed.
Romanticist is a set that aims to help your mobility. It’s relatively easy to obtain, but like all card sets, difficult to Awakening. It can be especially powerful for high Spec bards who are slower, improving the CD of your spacebar and also giving you movement speed. This set is commonly mixed with Field Boss II, and can be a good 2-set or 4-set filler if you don’t have other options.
Lostwind Cliff
Effects (the ones that matter):
- 2-Set | 8% Dark Resist.
- 4-Set | 8% Dark Resist.
- 6-Set | 9% Dark Resist.
- 6-Set, 12 Awakening | +7% Crit Rate.
- 6-Set, 30 Awakening | When landing an attack, grants you and your party members 3.5% increased Holy Damage.
What gives? You might know that Lostwind Cliff is one of the most common and used card sets for DPS, as it gives 7% crit. However, this set can also be considered as an extremely end-game support option, that I wouldn’t recommend except for the most cutting-edge of players.
Here’s why.
At 30 Awakening (a very difficult task), you can give your entire party 3.5% more Holy damage. Why is that good? For DPS dealers, the ultimate end-game DPS card set is Light of the Ark, which converts all damage down to Holy element. This means that with a fully Awakened Lostwind Cliff set, your attacks are giving your entire party a flat 3.5% damage buff, which is quite significant. However, it’s something that you won’t be able to take advantage of for a long time.
First of all it’s extremely difficult to get 30 Awakening on this set, even if you plan to spend lots of money. Secondly, it requires you to be paired with DPS players using Light of the Ark, which is also a difficult to acquire set.
However, I wanted to cover all options and let you know that this does exist, even though it won’t be a reasonable option for a long long time. Even in Korean servers there are few people with this set fully Awakened (big flex if you have it though!)
Recommended Sets
- Beginner: Field Boss II 6-set.
- Intermediate (I want to give my party all the help I can): Field Boss II 6-set.
- Intermediate (I want to live): Forest of Giants 3-set + We’ll Meet Again 3-set. This gives you the most personal survivability, but it does nothing for the team. You can opt to use this card set and DROP the Heavy Armor engraving, but you will still be squishier than if you had Heavy Armor. Only do this if you want to maximize utility and are confident in staying alive.
- Intermediate (High Spec Bards who want more mspd): Field Boss II 2-set + Romanticist 4-set (as much Awakening as you can get). You can adjust between Field Boss/Romanticist numbers as preferred for more/less HP.
- Degenerate/Extreme Min-Maxer: Lostwind Cliff 6-Set, 30 Awakening. I just want to add again here, this is really really not easy to get. Really.
Field Boss set interchangeable with the Armory card set. I still recommend 12% Max HP as your card deck for most supports, all the way from early game to end game.
Gear Sets (Tier 1)
As a bard, you want to go for a 2/2/2 mixed set. This is because we are not interested in damage bonuses from the 4 or 6 set bonus, so this 2/2/2 approach gives us the most increase in cast and move speed – the equivalent of having level 3 Spirit Absorption.
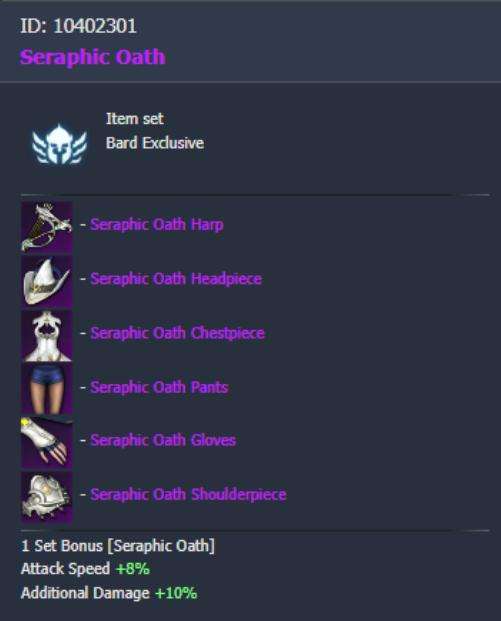
You want to have 2 pieces of Seraphic Oath (Purple): this set gives you 8% attack speed and 10% damage. Note that the picture says 1-set bonus, but it’s an error. You need 2 pieces of these sets for the bonus.

You also want 2 pieces of Boisterous Elemental (Legendary): this will give you up to 8% attack and move speed when attacking bosses, along with 12% damage against bosses.
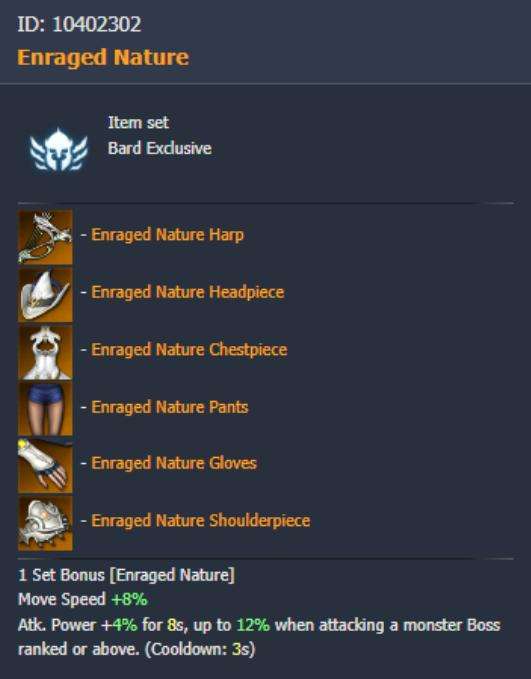
Lastly we want 2 pieces of Enraged Nature (Legendary): this will give 8% move speed, plus 12% attack power against bosses.
As mentioned, we don’t care about the damage, but combining the 2-set bonuses of all three sets will give us 16% attack and move speed against bosses, which is more powerful than a level 3 Spirit Absorption Engraving.
Gear Sets (Tier 2)
We also go for a 2/2/2 mixed set in Tier 2. The bonus isn’t nearly as good as the T1 bonuses but we don’t really have a choice. Going for a mixed Tier 2 set gives some Attack and Move Speed, 30% more mana regen, and additional Attack and Move Speed after we use spacebar (very minimal).
Chaos Dungeon / Post-50 Solo Build
+LV 1 Rhythm Buckshot.
If you don’t have enough Skill Points just keep de-leveling Sonic Vibration.
- Stigma and Dissonance are very low cooldown AoE abilities that you can cast to clean up most packs of mobs.
- Prelude of Storm and Sonic Vibration work great at low levels, as they both CC mobs with stun.
- You can use Soundholic to take care of the tankier elite mobs in Phase 2, as well as the boss.
- Sound Shock works great as a filler, or to break the red crystals in Phase 3.
- Heavenly Tune is a powerful attack buff you should cast whenever available.
- You’ll want to save your Serenade of Valor (Z) for the boss in phase 2.
- You want to use your second Awakening, Oratorio, since it does way more damage. Until you unlock it, you can use Symphonia (see Gameplay section).
Gameplay
- Walk around in a circle to group up mobs.
- Cast Heavenly Tune.
- Cast Dissonance, then Stigma in front of you. The monsters will walk into the AoE, becoming slowed and staggered.
- If needed, cast Prelude of Storm or Sonic Vibration to keep them stunned in the AoE.
- For tankier mobs, you will need to use Prelude to Death. This spell applies a stacking debuff on any monsters hit. After 2 seconds, if any monster with the debuff dies, it will unleash a powerful explosion dealing insane damage to 1 nearby enemy. You can use this as a chain explosion of sorts, finishing off elites and even bosses.
- Ex: For bosses – Cast Heavenly Tune. Cast Serenade of Valor. Gather small monsters near the boss and cast Prelude to Death. Then, cast your Awakening (Symphonia/Oratorio). The monsters should stack on top of the boss during your cast animation. When each of them die, they’ll proliferate their explosion onto the boss dealing it massive damage.

Loved it!!!.. so much good info. Not a great gamer, just enjoy the ride, and this will make it much less painful for groupmates!
This was amazing, thank you! I learned so much from this even though I’ve played Bard for a month now. One question about the Chaos/Solo build section. You mention a few times to use Heavenly Tune, but you didn’t include it in the build that the link directs to. Is this a mistake or am I missing something here?
I’m so glad I came across this! Thanks for such an amazing run down. Can’t wait to use more of the guides here.
Best guide! What do you think about the “Expert” Engraving though? Shouldn’t a buff to shielding and healing be mandatory for a bard?
Extremely detailed; perfect for new NA/EU players. Exactly what I was looking for, thank you!
I concur thankyou VERY much! bookmarked to keep coming back to it. gg!
This guide is amazing. Thank you very much.