
Indepth explaination for AOW4 Combat and how it functions.
Introduction
Welcome to the Age of Wonders 4 Comprehensive Combat guide. Age of wonder is a 4x game that shares many similarities with games like civ, might and magic, and master of magic. The combat mechanics and stats can be overwhelming. So today, we will explain the details of the combat mechanics in this game.
Defense
First, lets talk about the defensive stats.
Def and resistance:
- 2 = 19% =>123%
- 3 = 27% => 136%
- 5 = 41% => 169%
- 6 = 47% => 188%
- 7= 52% => 208%
- 11 = 69% => 322%
- 16 = 81% => 526%
Defense and resistance are modeled to have diminishing returns. While you get 8% damage reduction from 2 -3 armor , you only get about 5% per armor around 6-7 armor.
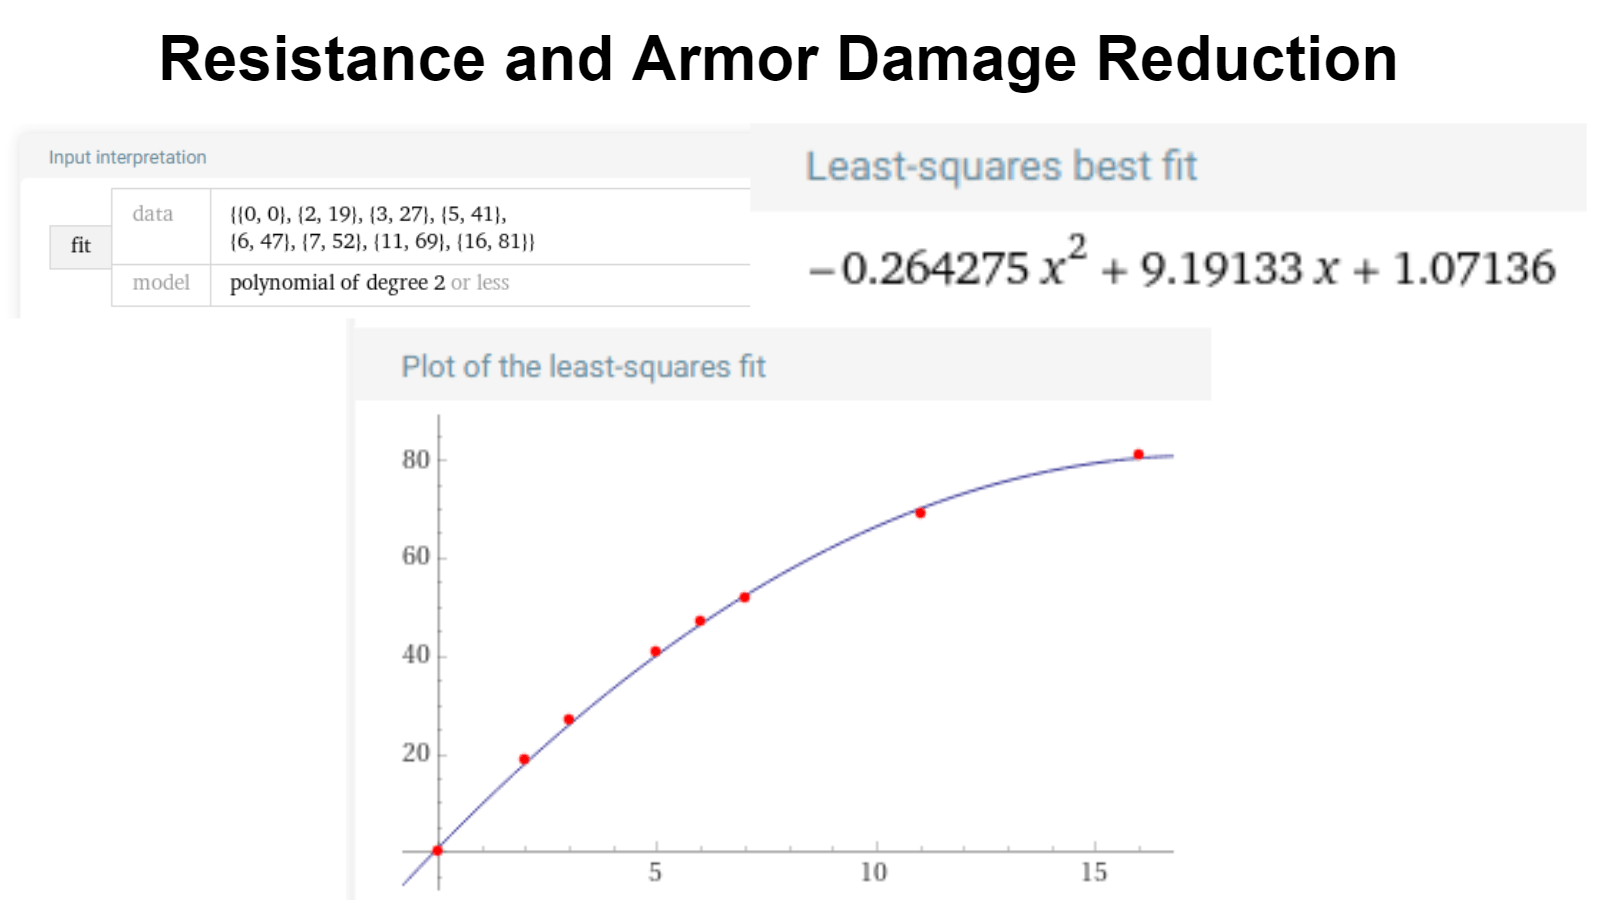
But with a damage reduction effect, diminishing returns are not uncommon.. What we should really be looking at is the effective HP based on these reduction values, which we can see is actually growing quadratically.
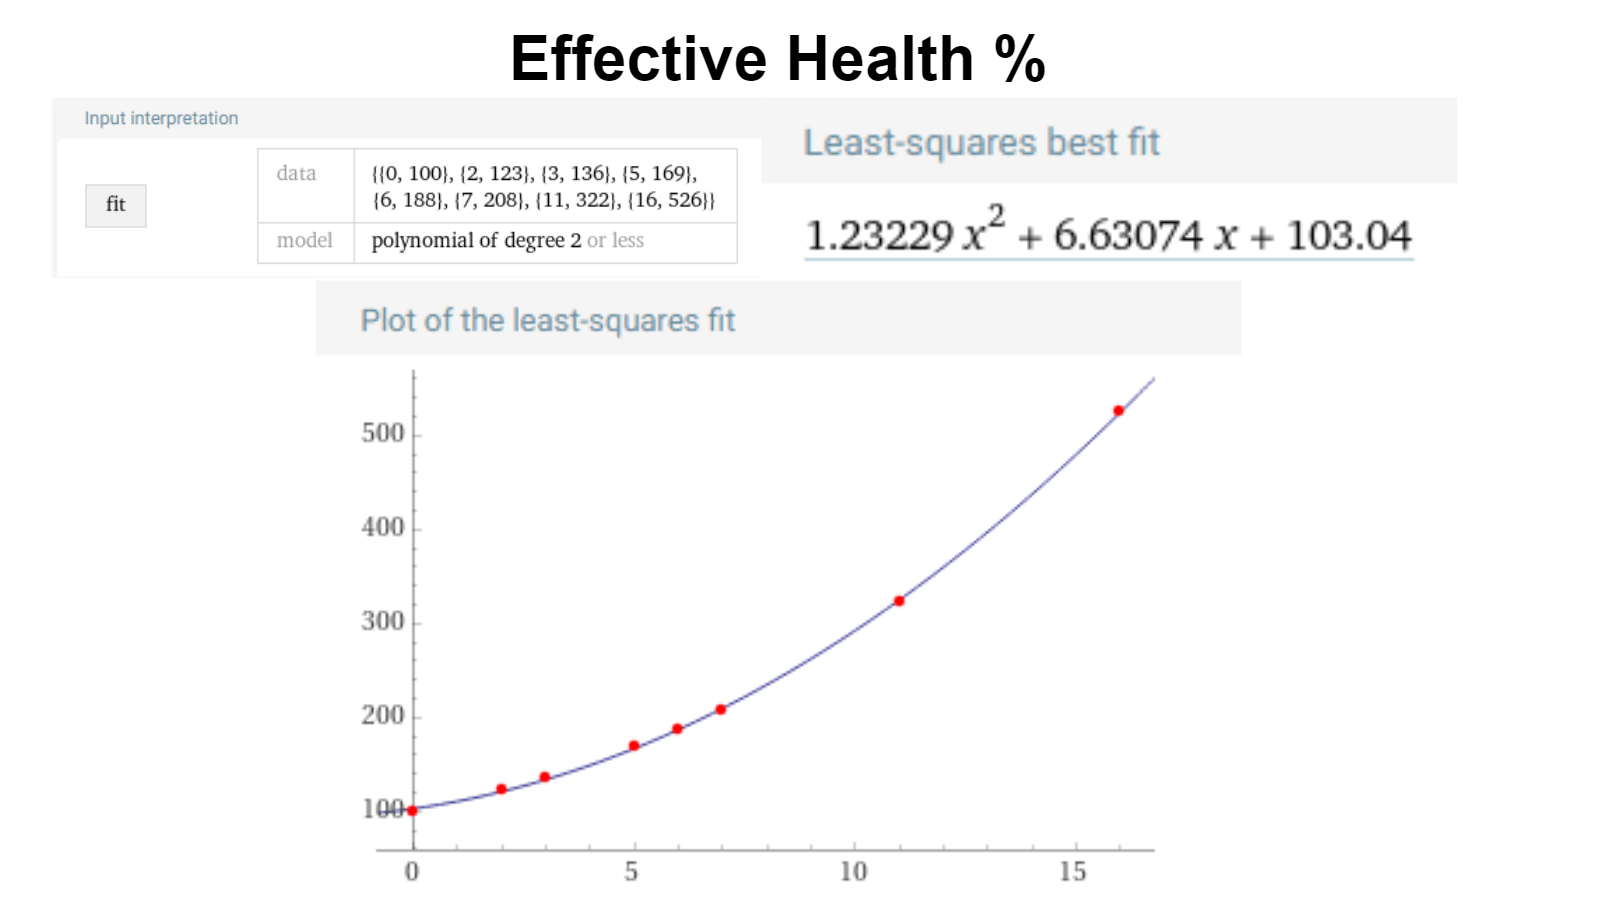
In summary, the more armor, the more effective health each armor point gives.
Health and Unit # (Figures)
Next up, let’s talk about health and casualty penalty.
Unlike other 4x games, health percentage has a huge impact on the damage output due to casualty penalty.
In AOE4, the casualty penalty operates similarly to the classic game Master of Magic. It functions by a figure system. Each unit has a certain # of figures depending on the unit type.
The current number of figures in the unit depends on the unit’s current health percentage. The percentage of unit figures left in a unit correlates with how much damage your unit outputs.
For Example:
If your unit is a 4 figure unit (such as a support like Steelshapers), each unit figure represents a quarter of your unit’s total damage. For each 1/4th health you lose, you lose 1 figure and lose a quarter of your damage.
A 4 figure unit with 60% hp will output 3/4th of its original damage, while a 2 figure unit with the same amount of health percentage will not suffer any damage loss due to both figures still being alive.
As a result, units with more figures are more prone to casualty damage penalty as their damage output drops every time they take damage
While units with 2 figures only suffer a casualty damage penalty at 50% health, and 1 figure units are completely immune to casualty damage penalty.
Note that temporary health healings restore the number of figures, restoring damage output in the process.
It is preferable for units that have many figures to launch single strong first attacks on the enemy first before taking damage. Damaging the enemy first cripples their ability to retaliate and fight back (with Polearms as exceptions).
In summary, bigger, fewer figures in a group makes you more resistant to the penalty.
Good time to talk about attack orders and retaliation as that impacts who takes damage first
Retaliation, Attack Order, and Action Points
Each attack triggers a retaliation strike if the defender has any retaliation charges left.
Normal melee units only have one charge, while shield units have 2.
Units that are attacking on their turn strike first before retaliations trigger. This is important to shock unit types as they can output a large amount of damage to cause massive casualty penalty, crippling their damage while canceling their retaliation..
This is also why Polearms counters Calvaries, or units oriented around attacking first, as they can retaliate first with first strikes to make attacker suffer casualty penalty, and have charge cancellation to take less damage themselves, winning the trade.
A good transformation to synergize with first attack build will be Chaos Spawnkin
Spawnkin allows the unit to hit harder at the cost of increasing the unit’s figure #, making them more vulnerable to casualties. This makes it more preferable to hit first and hit hard, reducing the enemy’s damage as enemies suffer casualty penalty first.
On the other hand, Nature Supergrowth does the exact opposite.
Next up, we have action points.
You will notice that sometimes your units attack more than once. This is dependent on the attack type and their action points:
Abilities with the 3 crescent icons implies it will attack as many times as you have action points left.
Shield Units generally have them.
This also means they hit less hard each time and triggers retaliation during the process, making striking first less useful for shield units, and benefits more from staying stationary or not using all of its movement (as using all movement consumes 2 action points)
Those without the crescent icons will consume all action points while only firing a single attack, regardless of how many white circles there are.
The circles represents the minimum required amount of action points to use the ability.
In summary, single heavy attack units should move and strike first in their turn against non-pole arms to trigger casualty penalty loss, while multi strike units may not want to use all movements or wait for engagement to save action points for attacking multiple times against melee.
Movement
Speaking of action points, let’s talk about movement
As mentioned, full movement will use up 2 of your action points, while using only half of your movement will only use up 1. Units that are guarding also exerts a zone of control.
Moving away from an enemy when they are facing you will also trigger an attack of opportunity for every melee unit that is facing you. Most ranged units are also unable to use normal attacks when someone exerts a zone of control. Units can only move one tile at a time when moving through ZoC.
It is to note that atk of opportunity from multi-hit units generally deal less damage per hit compared to single-hit units.
Morale
One of the last few more confusing things would be morale.
Morale is a value varying from -60 to 40. At high morale, a unit’s crit chance will increase. At low morale, a unit’s attack will have a chance to do less damage or even flee should the morale reach -60.
Accuracy, Crit, and Status Effect
Lastly, let’s talk about accuracy, critical chance, and status effects.
While accuracy and crit are mostly self explanatory, there are few things worthy of mention.
For ranged units, you will sometimes notice an accuracy %. In addition to implying that they will miss, it also means that it will hit the units next to the targets. Be Careful with firing with low accuracy at a target surrounded by allies.
Self explanatory, Crit increases your damage by 50%, generally results of perks, gears, or high morale
Most status effects are self explanatory. But it is worth noting that you can find your unit’s current status effects by hovering your mouse over the unit’s name during battles.
Grouped Synergy and Flank Synergy
Before We finish the video, lets talk about pros and cons of the common Group strategy and Flank strategies.
Due to zone of control and attack of opportunity effects, groups with ranged generally prefer a tight formation over flanking. Flanking will cause tanks or ranged to go out of position, which leaves the ranged to become vulnerable to engagement.
Engaged ranged are faced with two choices:
- Wait for rescue as they cannot attack or..
- Take attacks of opportunity to disengage and fire, only for the gap to be closed next turn once again.
Ranged are generally squishy and have no retaliation attacks.
In summary, These scenarios make tanks and tight formation nearly a must for ranged oriented compositions.
For those who look to play a ranged-tank composition, Overwhelm/Defensive Tactic, Wolf mount, and perks from feudal are good choices. Spider mount can also be a good option to help CC the enemy, stopping them from reaching your ranged units.
It is worth to note that many mages and support are less penalized by this due to their ability to cast certain spells while engaged. Mage and support are also less affected by casualty penalty since they can cast many support spells to its full effect regardless of figures.
Because of the disadvantages of ranged in an engaged scenario, It is recommended that melee heavy compositions be used for a flanking strategy. Flanking centers around getting behind the enemy, putting yourself out of position in the process. Since flanking involves a lot of repositioning, it is recommended to use single-hit melee units, potentially along side with a few support units. Flanking also greatly benefits from mobile units. All of these factors makes mobile shock units an ideal choice.
Perks that will benefit flank strategies are sneaky and unicorn mounts, for the bonus damage or mobility and ease of disengage.

Be the first to comment