
An in-depth, step-by-step, introductory guide to the basic mechanics of 5D Chess via explanations of all 34 currently available puzzles and their solutions.
Guide Contents
- 01 – Rook Tactics I – Mate-in-one
- 02 – Rook Tactics II – Mate-in-one
- 03 – Rook Tactics III – Mate-in-two
- 04 – Rook Tactics IV – Mate-in-two
- 05 – Knight Tactics I – Mate-in-one
- 06 – Knight Tactics II – Mate-in-one
- 07 – Knight Tactics III – Mate-in-one
- 08 – Knight Tactics IV – Mate-in-one
- 09 – Knight Tactics V – Mate-in-one
- 10 – Knight Tactics VI – Mate-in-three
- 11 – Knight Tactics VII – Mate-in-one
- 12 – Bishop Tactics I – Mate-in-one
- 13 – Bishop Tactics II – Mate-in-one
- 14 – Bishop Tactics III – Mate-in-one
- 15 – Combination Attacks I – Mate-in-two
- 16 – Combination Attacks II – Mate-in-one
- 17 – Combination Attacks III – Mate-in-one
- 18 – Combination Attacks IV – Mate-in-two
- 19 – Backrank Basics I – Mate-in-one
- 20 – Backrank Basics II – Mate-in-two
- 21 – Backrank Basics III – Mate-in-two
- 22 – Backrank Basics IV – Mate-in-three
- 23 – Queen Tactics I – Mate-in-one
- 24 – Queen Tactics II – Mate-in-two
- 25 – Queen Tactics III – Mate-in-three
- 26 – Queen Tactics IV – Mate-in-two
- 27 – King Tactics I – Mate-in-one
- 28 – King Tactics II – Mate-in-one
- 29 – Opening Traps I – Mate-in-one
- 30 – Opening Traps II – Mate-in-one
- 31 – Opening Traps III – Mate-in-two
- 32 – Tricky Checkmates I – Mate-in-one
- 33 – Tricky Checkmates II – Mate-in-one
- 34 – Advanced Branching I – Mate-in-one
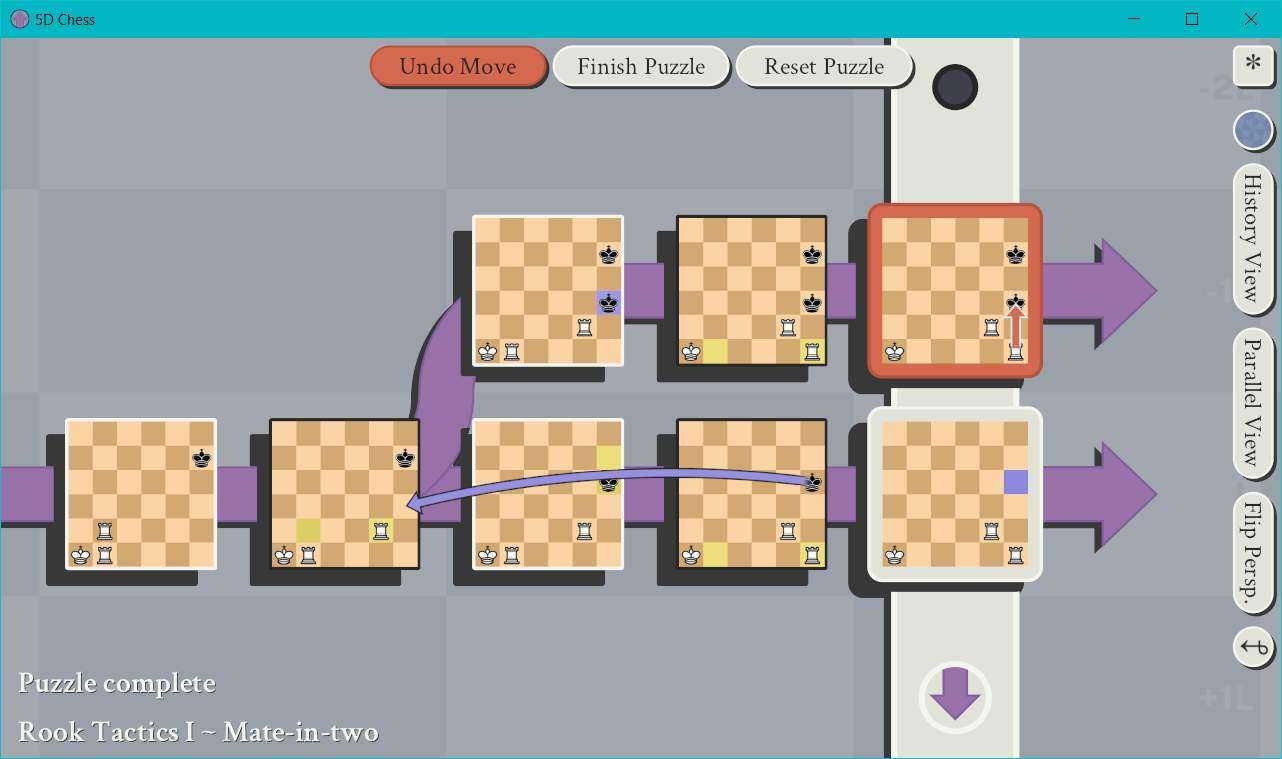
01 – Rook Tactics I – Mate-in-one
Note: Credit goes to Jamelia Earhart
- Player Color: White
- Opponent Color: Black
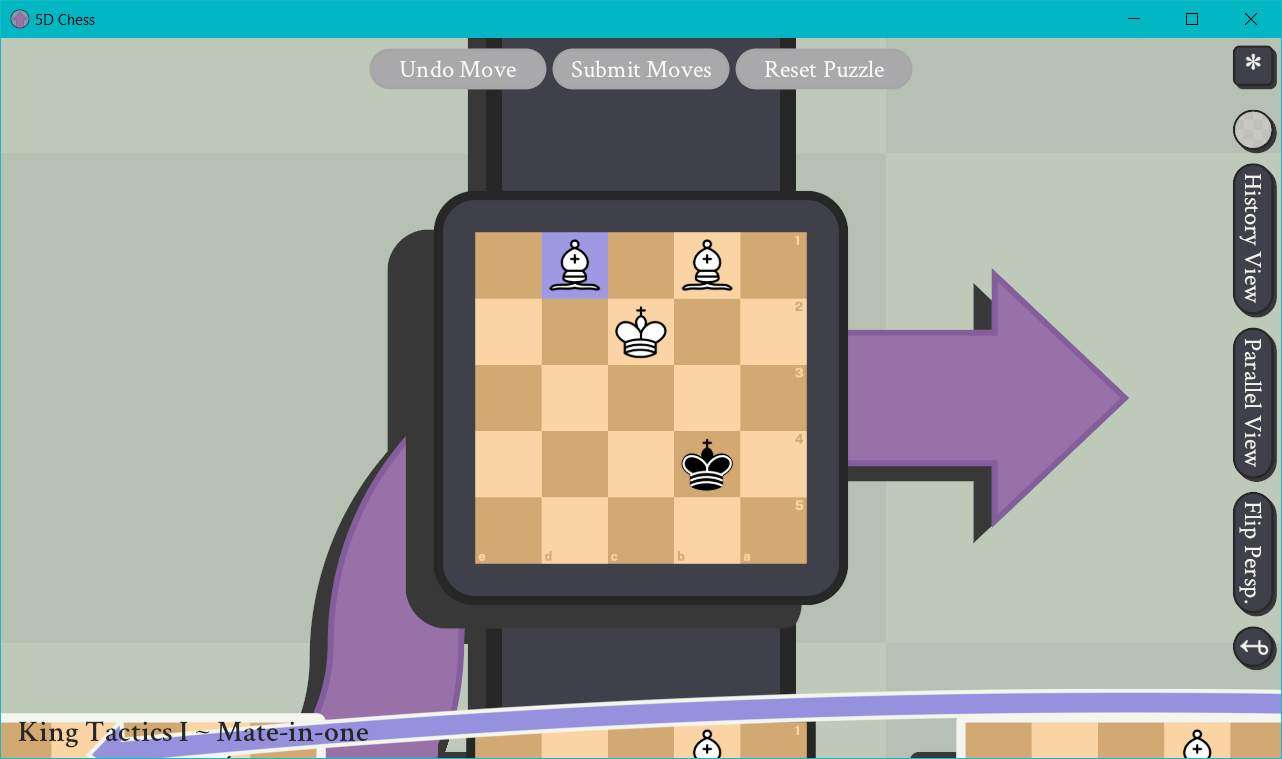
Here’s our first puzzle:

As we are playing White, we had the first move in this game, but the puzzle actually begins a few moves into the match. The solution this time is incredibly simple. It doesn’t even require us to think of this too differently than a standard chess game for the most part. For this puzzle we do not need to actually travel in time or create parallel world lines yet, but our opponent will do so.
Step 1: Start from the only available “present” board state. That is to say, start with the only board state attached to the vertical bar which says “The Present”. Note that the text is cut off in my screenshots, but it’s the vertical white bar. It’ll turn black when it becomes Black’s turn to move.
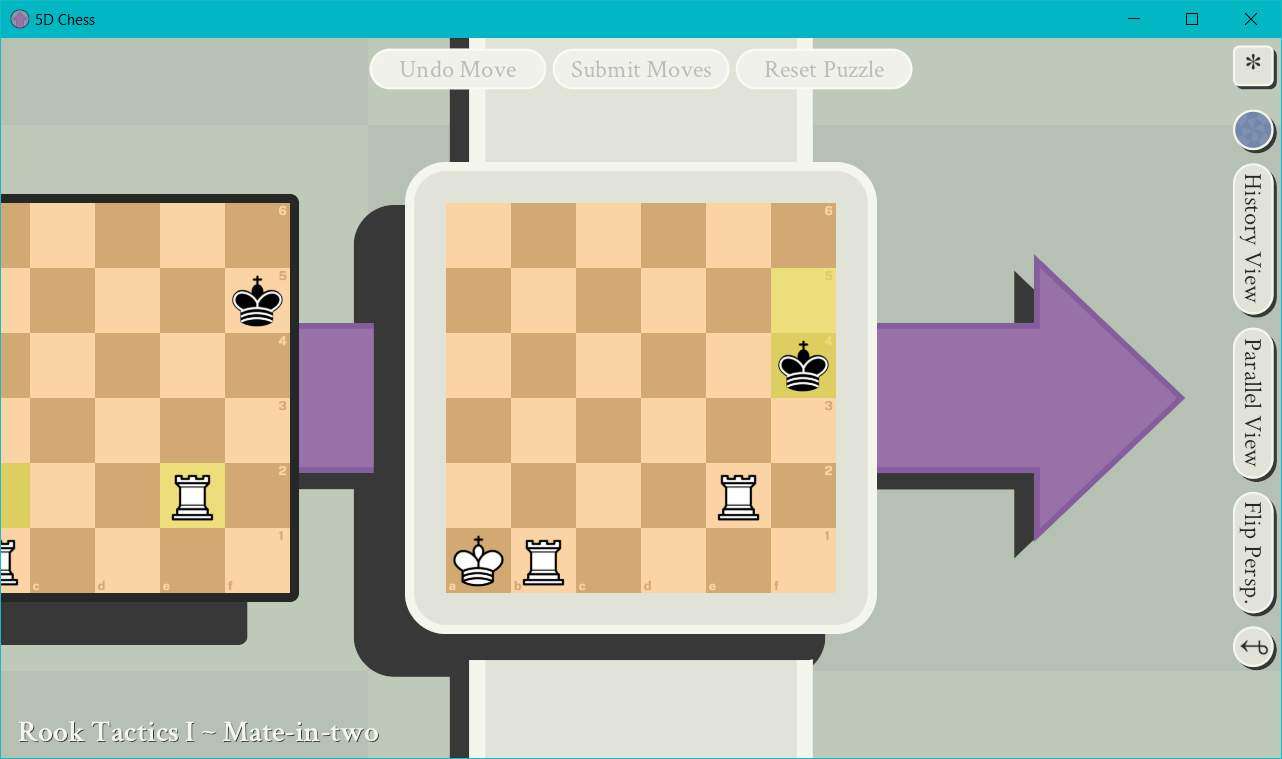
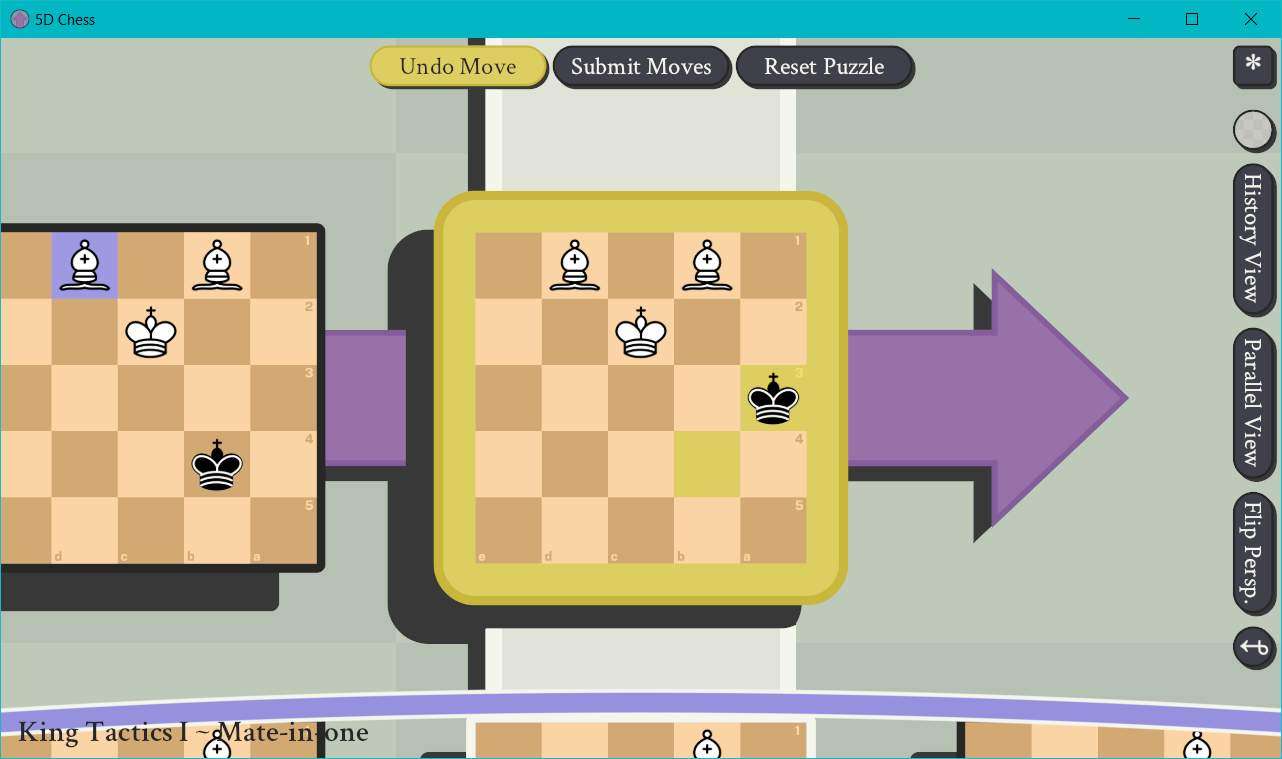
Step 2: We’re going to move one of our Rooks from B1 to F1.
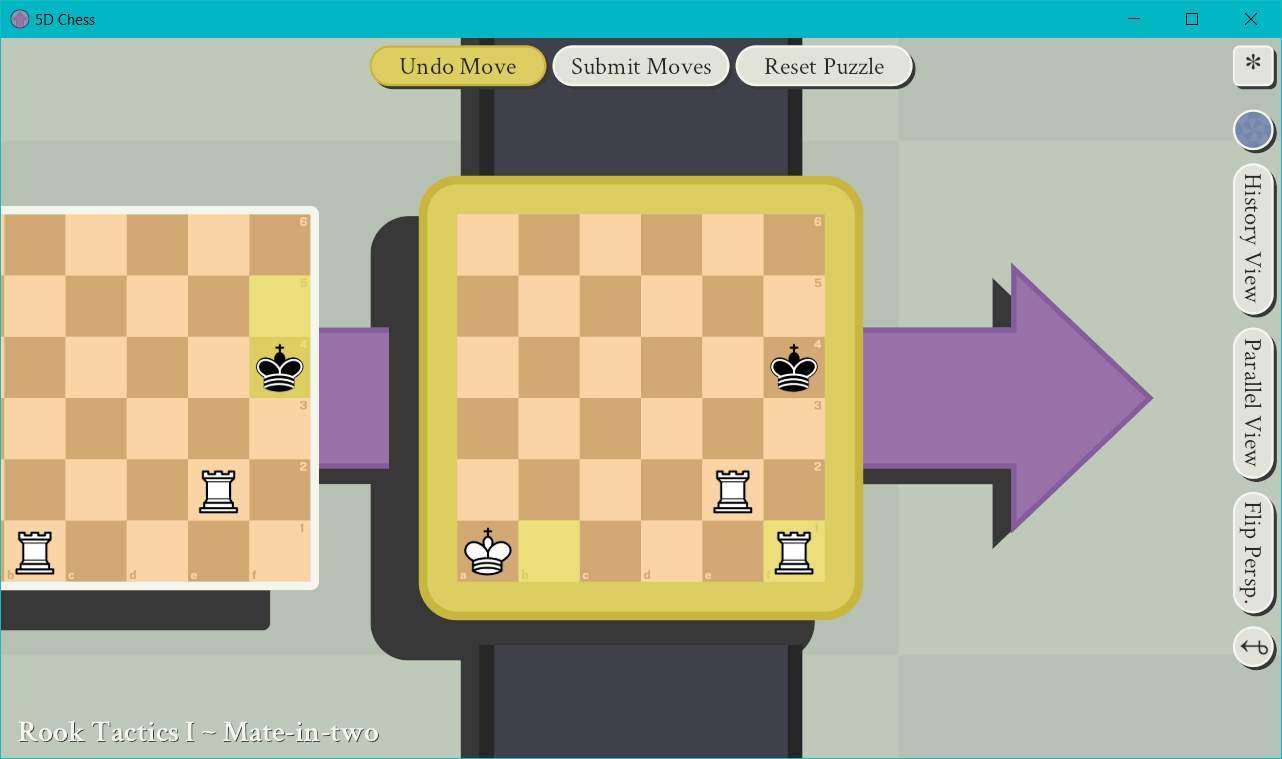
This would put our opponent in checkmate in standard chess, but this move will actually leave Black with only one option: moving their King back in time to create a new timeline where they are not in check. Our Rook placements have blocked off all other options here. Black could move their King from F4 in the present to either F3 or F4 in the past. Thankfully, we can actually make the same moves to solve both variations. I’ll show both this time since this is the first puzzle and I don’t want there to be any confusion about why our solutions work in each variation even though the board configurations look different.
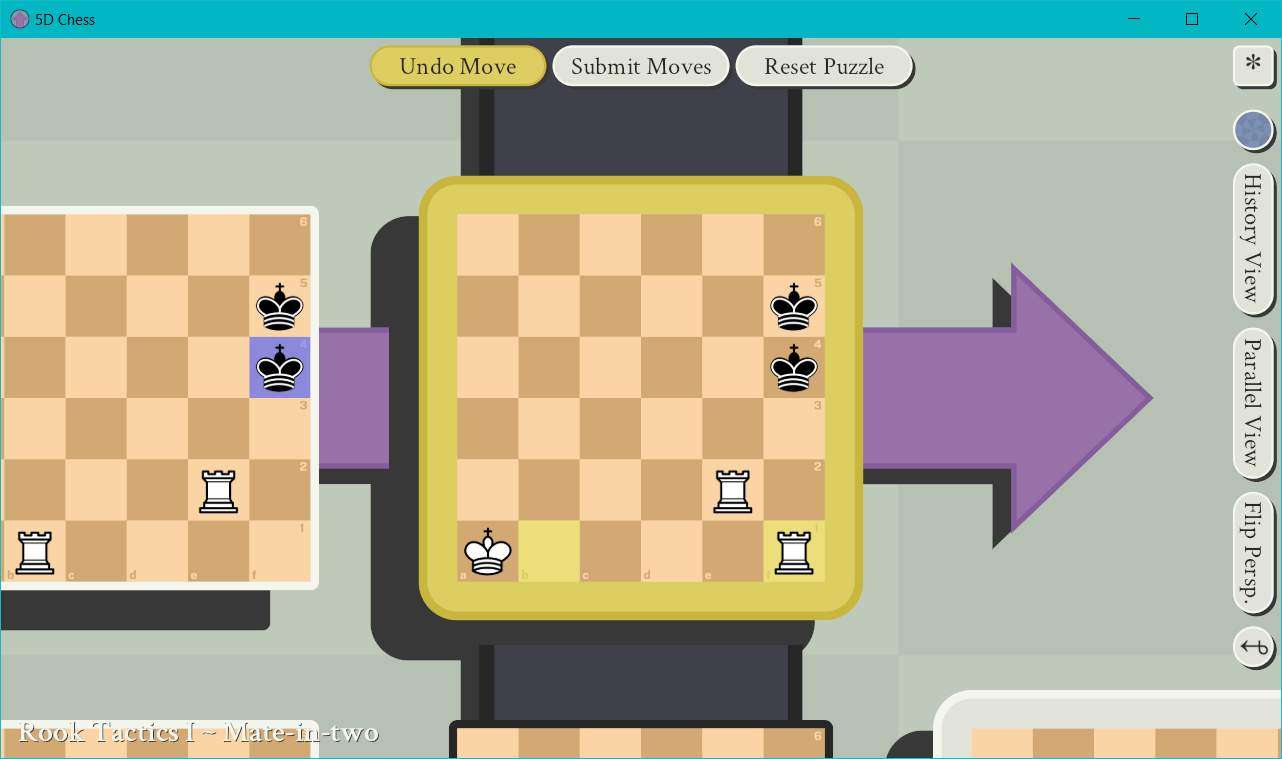
VARIATION F4:
So, Black is going to send their KIng from F4 in the present to F4 one full turn into the past.

This may seem weird to you if you’re new to 5D Chess: Black now has 2 Kings in one timeline and 0 Kings in another one. How does that work? Why don’t we win in the timeline where they don’t have a King? How do we win in a timeline where they have two Kings to put in check?
The answer to all of this is actually very simple: you only ever have to put one of your opponent’s Kings in checkmate. More specifically, you need to put at least one of their Kings in check with no way for them to get out of it. This may sound simple, but this can get a bit complicated of course once we really start messing with timeline hopping in full force, shifting the present around, creating multiple branching timelines, and have access to a wider variety of pieces, but for right now, we just need to exhaust Black’s options for at least one King.
Step 3: Now then, suddenly, we have options for where to play. We need to make a move on the present board state to end our turn, but we could additionally move on the other lower timeline. We won’t do so, however. We don’t really need to. Let’s take a look at what’s happening up top.

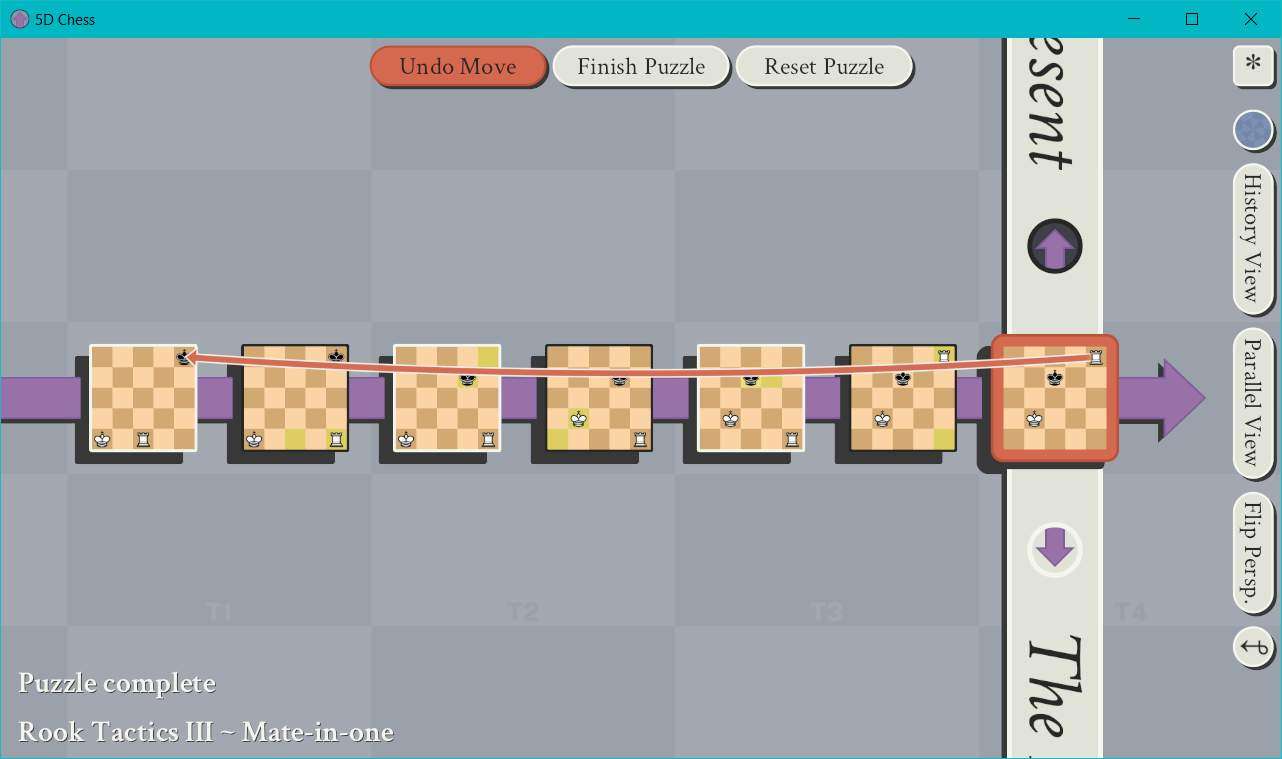
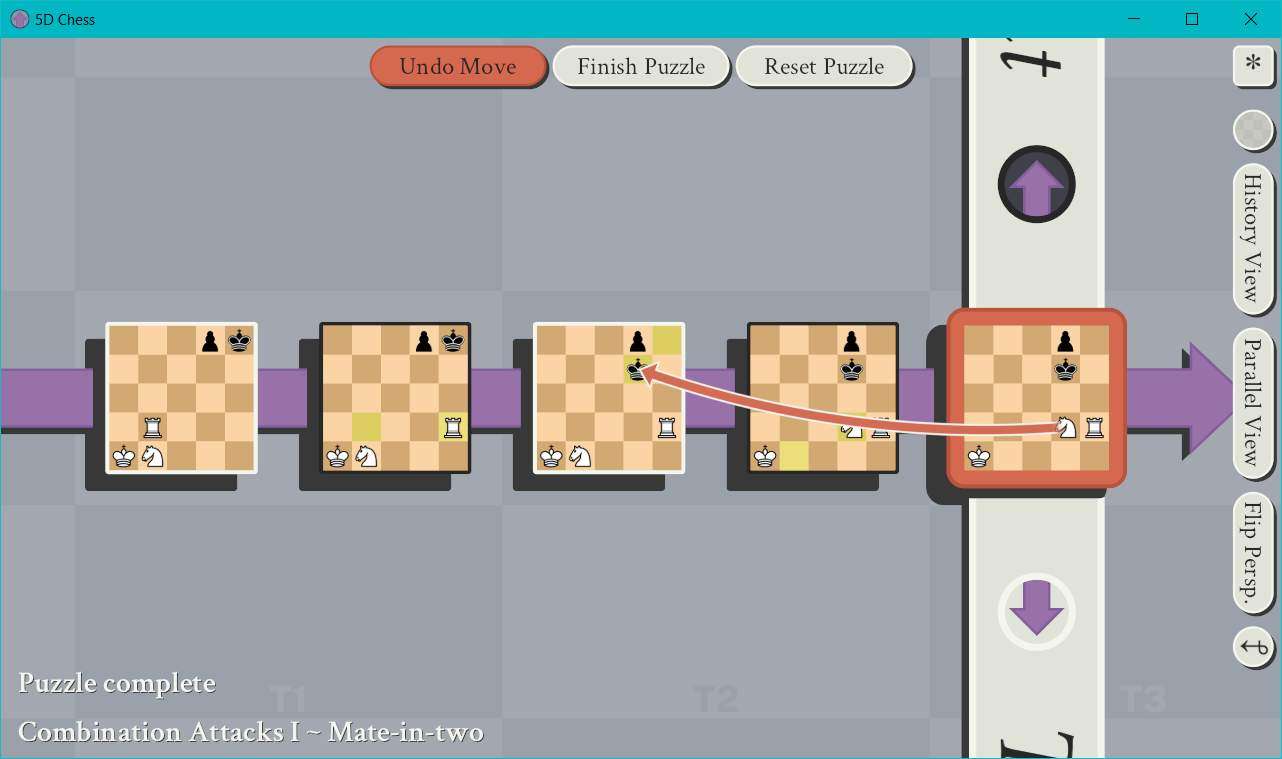
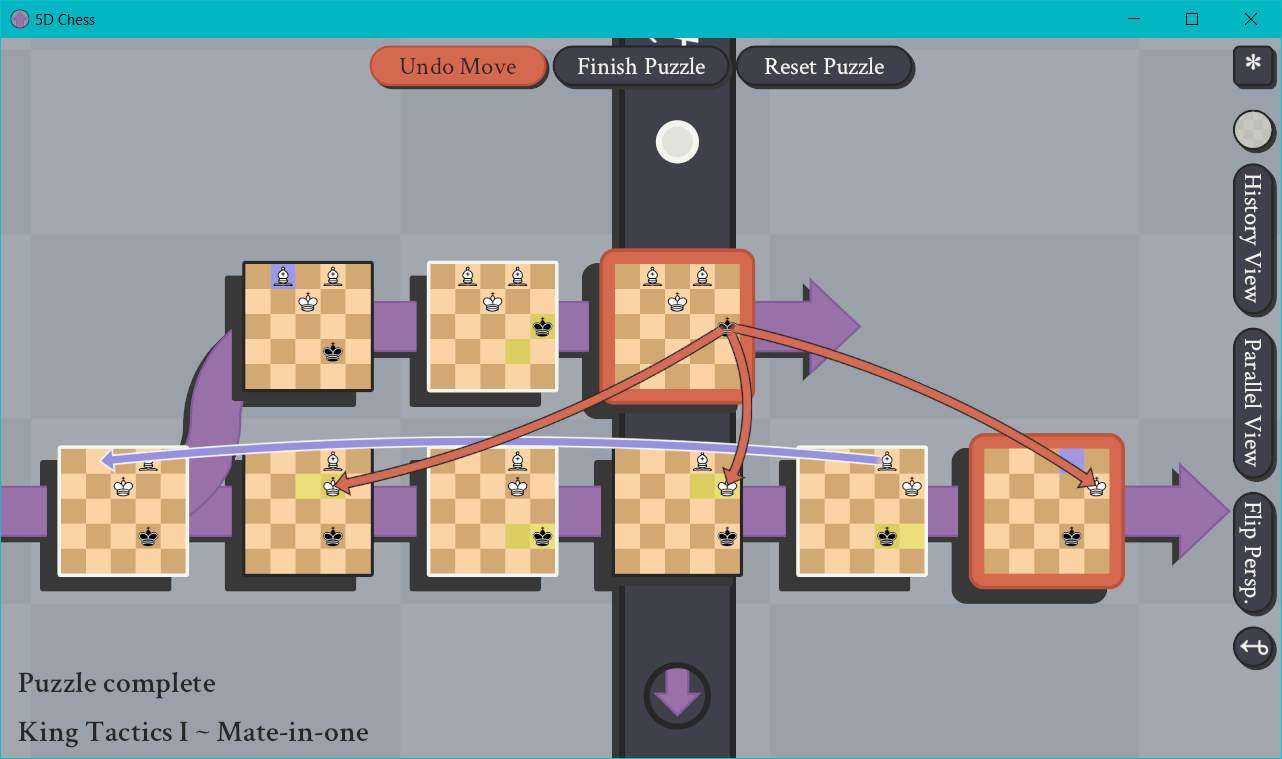
Step 4: We’re going to just do the same thing we did in the other timeline here, but this time, we win: we’ll move one of our Rooks from B1 to F1. This will put one of Black’s Kings in check, but even should it try to evade this trap, their other King will be revealed and put in check to our Rook in the process. This would be illegal for Black to do, therefore we have checkmated them.
Step 5: Profit.
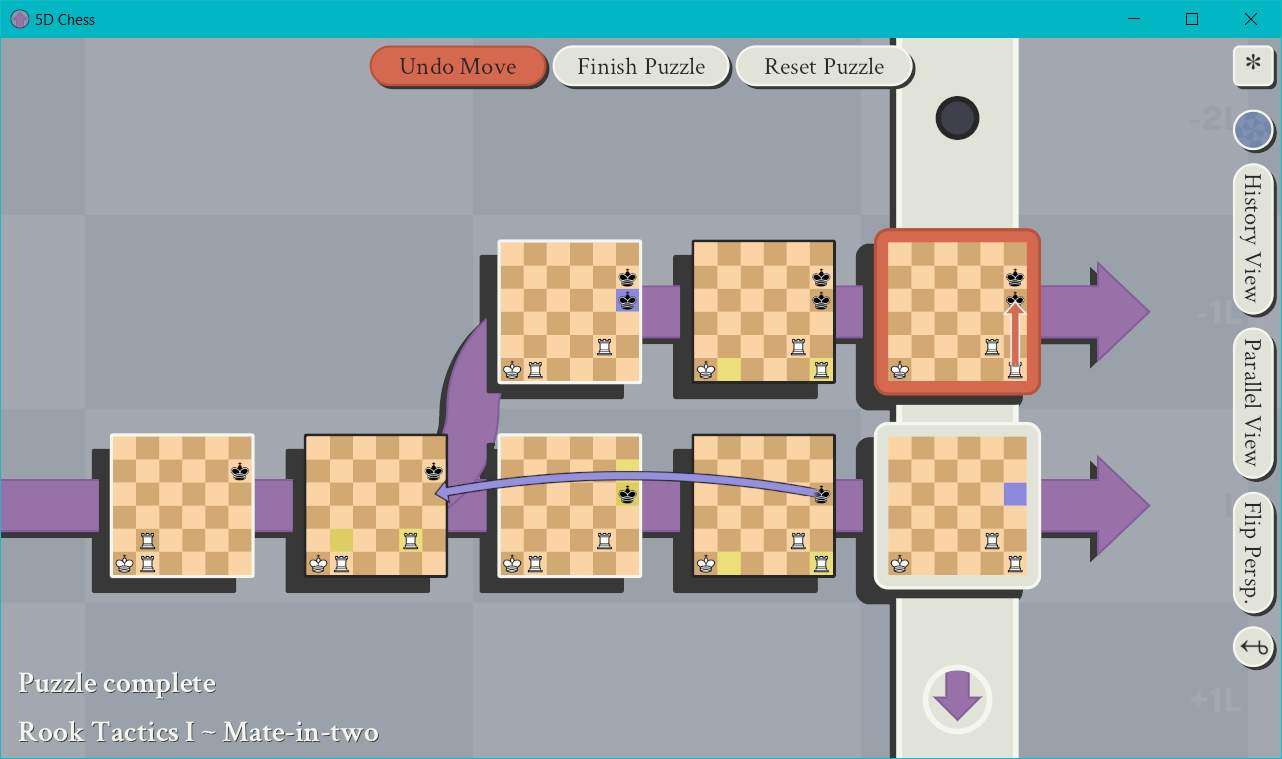
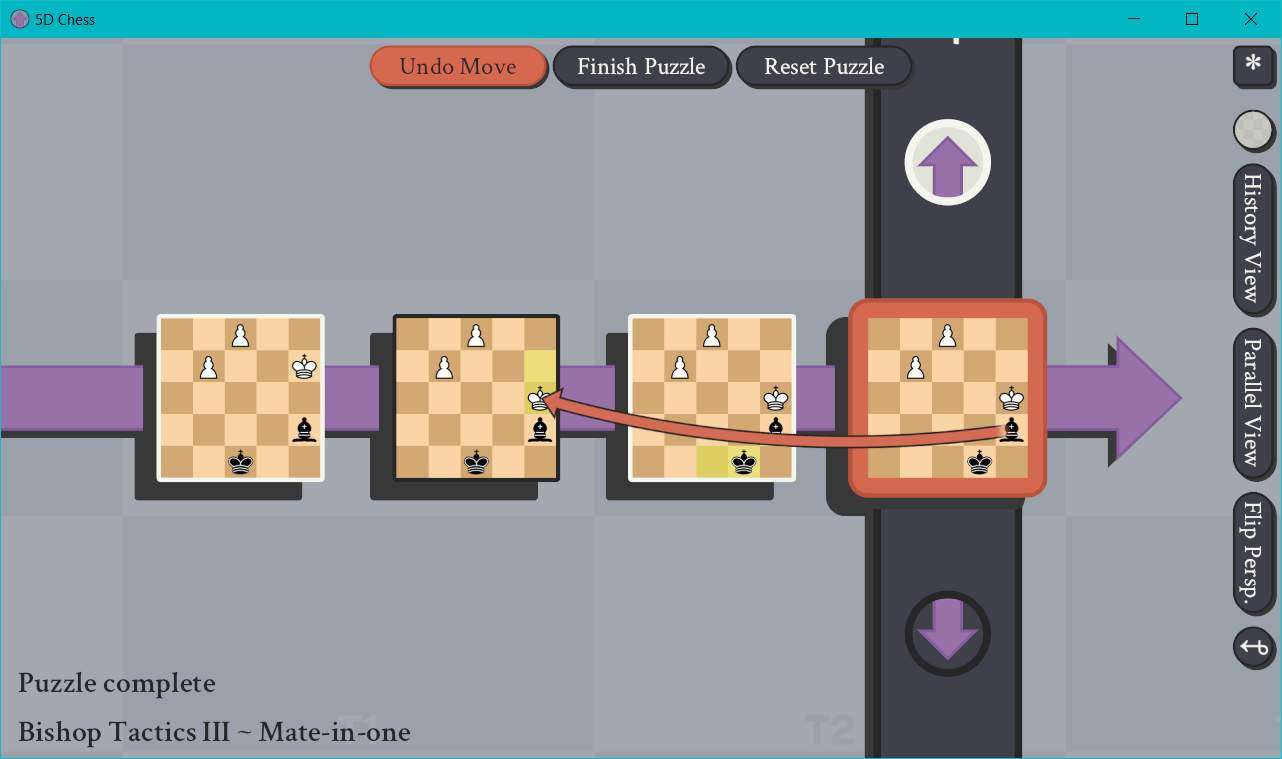
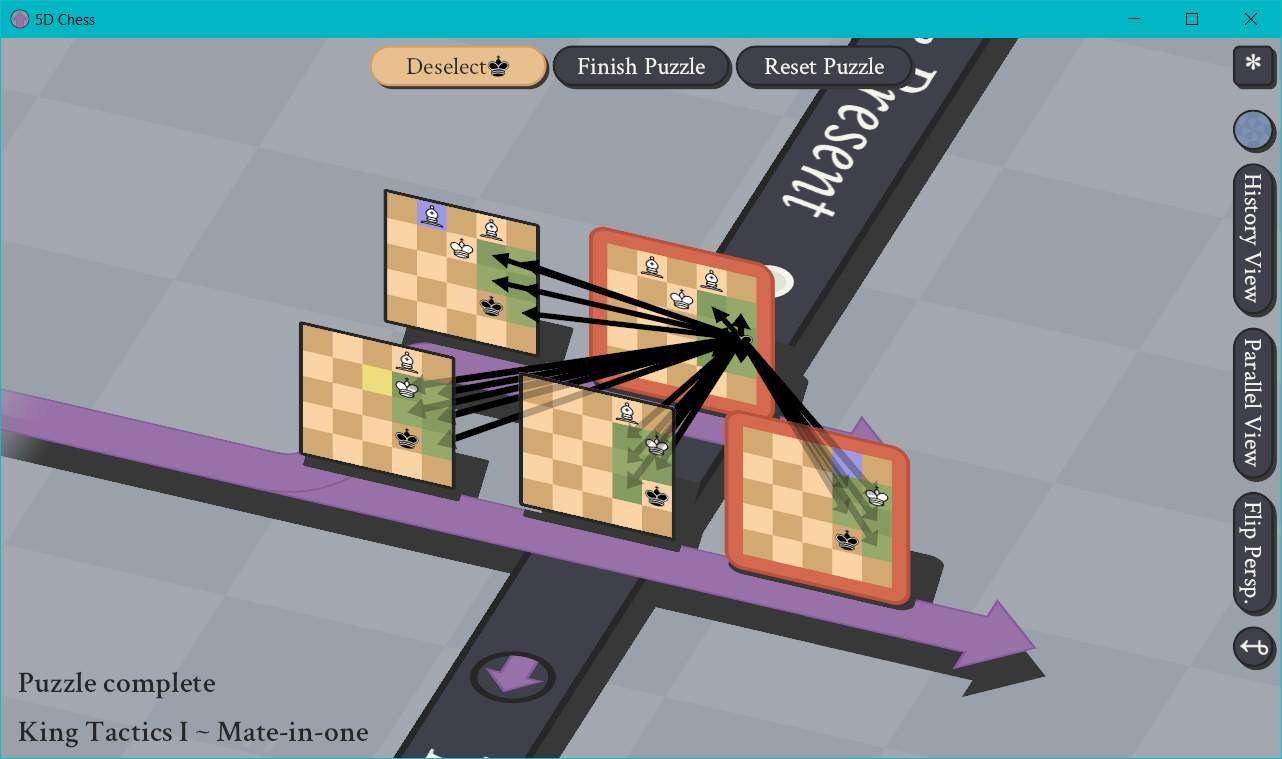
Note that the red line which arcs from our Rook to Black’s King denotes where we have put them in either check or checkmate, in this case it’s the latter of the two.
VARIATION F3:
So, Black is going to send their KIng from F4 in the present to F3 one full turn into the past.

Step 3: As before, we’re going to shift our focus to the upper timeline.

Step 4: And now, once again, we’re going to move one of our Rooks from B1 to F1, and secure our checkmate. You might be thinking that Black’s King on F3 could take our Rook on E2. However, this is not the case. Should Black attempt to do so, they would be putting their other King in check, which would be illegal. They have no counter to our threat, so we win.

Step 5: Profit.
02 – Rook Tactics II – Mate-in-one
- Player Color: White
- Opponent Color: Black
Here’s our second puzzle:
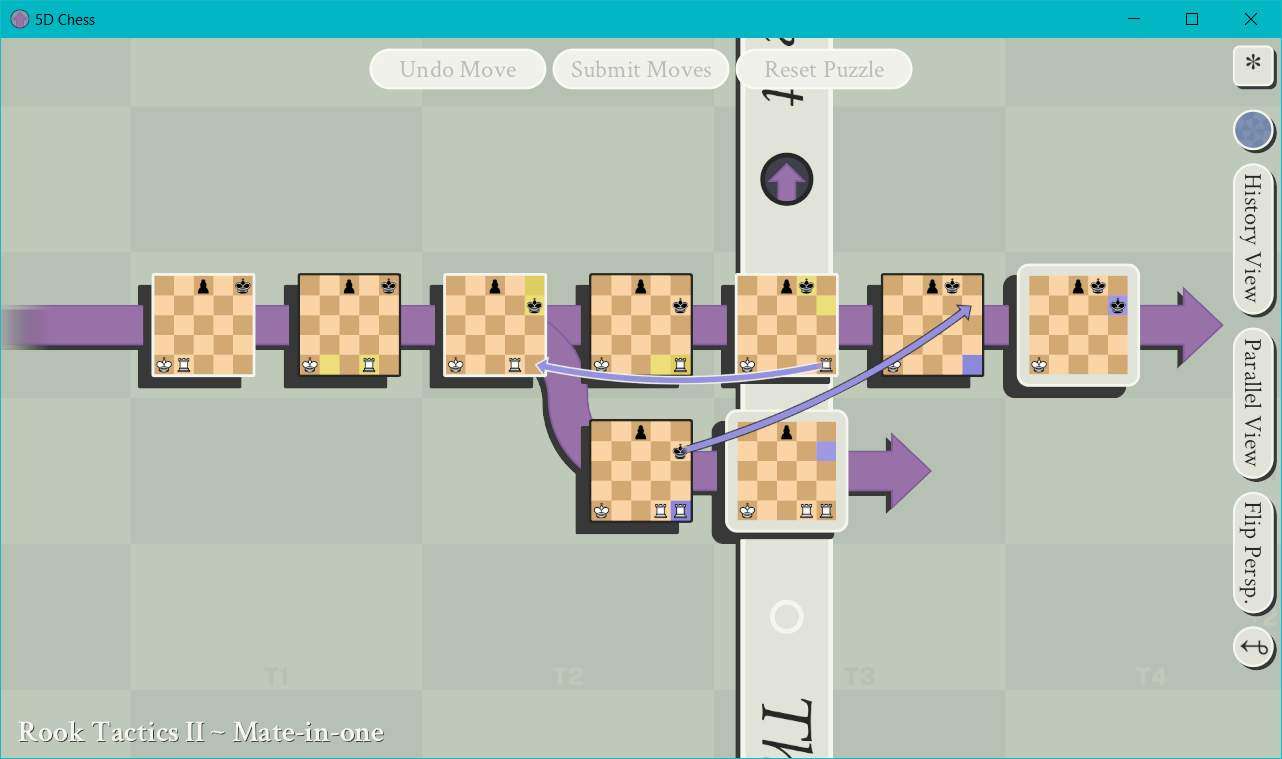
If you’re confused at what you’re seeing with the separate timelines and arrows pointing all over, basically we started from the left-most board state, and after playing a few moves we sent our Rook back in time. However, the past cannot be changed. When we sent our Rook back in time, we had actually created a branching timeline, just as we saw Black’s King do in the previous puzzle. This has also shifted “The Present” bar back in time. It will always move to the left-most “active” timeline. There’s more to discuss on the topic of active and inactive timelines, but we’ll leave that for later. And by “later”, I actually specifically mean “Puzzle #34”. It’s not crucial to understanding this puzzle, or even most of the other puzzles until Advanced Branching I.
Anyway, after we created this new timeline, which looked very unfavorable for our opponent, Black then responded by sending their King from this lower timeline to the future timeline up above. And that is where the puzzle has us start from.
If you’re confused about how the Rook moved through time and ended up on that particular position, then let’s go over how Rooks work with the extra dimensions in this game. Rooks can move any number of squares in any one direction along any one axis until their path becomes blocked by another piece. And if that piece belongs to our opponent, it can take that piece, and end at that position. This is how it operated on the standard 2D chess board, and that’s how it will operate here, even with the time and parallel world mechanics.
In 5D Chess, time and parallel world lines are axes, just the same as X and Y are normally. The time axis moves across the screen horizontally by default, and the parallel timeline axis moves across the screen vertically by default. Note that you can only move to board states wherein it was originally your turn to play. By moving a piece to one such board state, you can create a new timeline wherein that piece materializing on that board was effectively your move for that turn, and it will become your opponent’s turn to play. Board states with borders that match your color were ones wherein it was your turn to play. I know this is a lot, but bear with me, we’ll see some examples of how this all looks and works later in this puzzle, and in future puzzles.
The main takeaway here is that we moved our Rook along the time axis, so it could not move on any other axis simultaneously. And we specifically moved it back by one full turn, so we moved it back through time by 1 square.
Step 1: We want to start with the lower board here. Remember: you always have to address the “present” board state (or board states, because yes there can be multiple board states considered part of the “present”) before you can end your turn. You can play on as few or as many of the other board states as you wish, but you cannot end your turn without addressing all of the “present” ones.
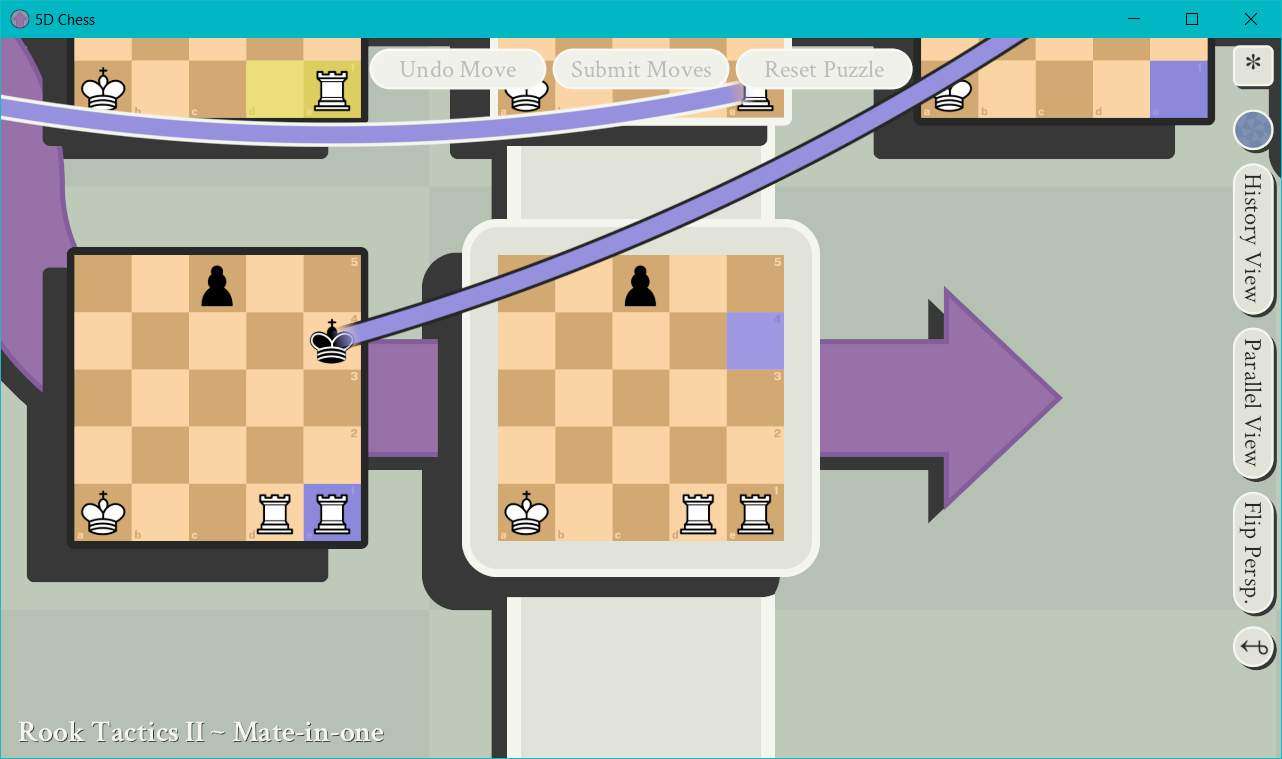
Step 2: The solution here will introduce another new concept for us: we can threaten our opponent’s pieces in other points in time or in other parallel timelines just the same way we can threaten them in the present or in standard chess. We’re going to send our Rook from E1 (the bottom-right corner) to E4. The future board state up top has a white border around it, which means that it is still our turn to move on that timeline branch. Black cannot play there, so all of their pieces on that board are stuck until we make a move on that timeline. When we submit our Rook to E4 move in the lower timeline, they will still only be able to move on the lower timeline because we never opted to move on the upper timeline, but our Rook on E4 on this timeline will be threatening to move to E4 on the other parallel timeline, which is exactly where Black’s King is positioned. They have no way to respond to this on the upper timeline, and they have no way block this on the lower timeline, which gives us checkmate.
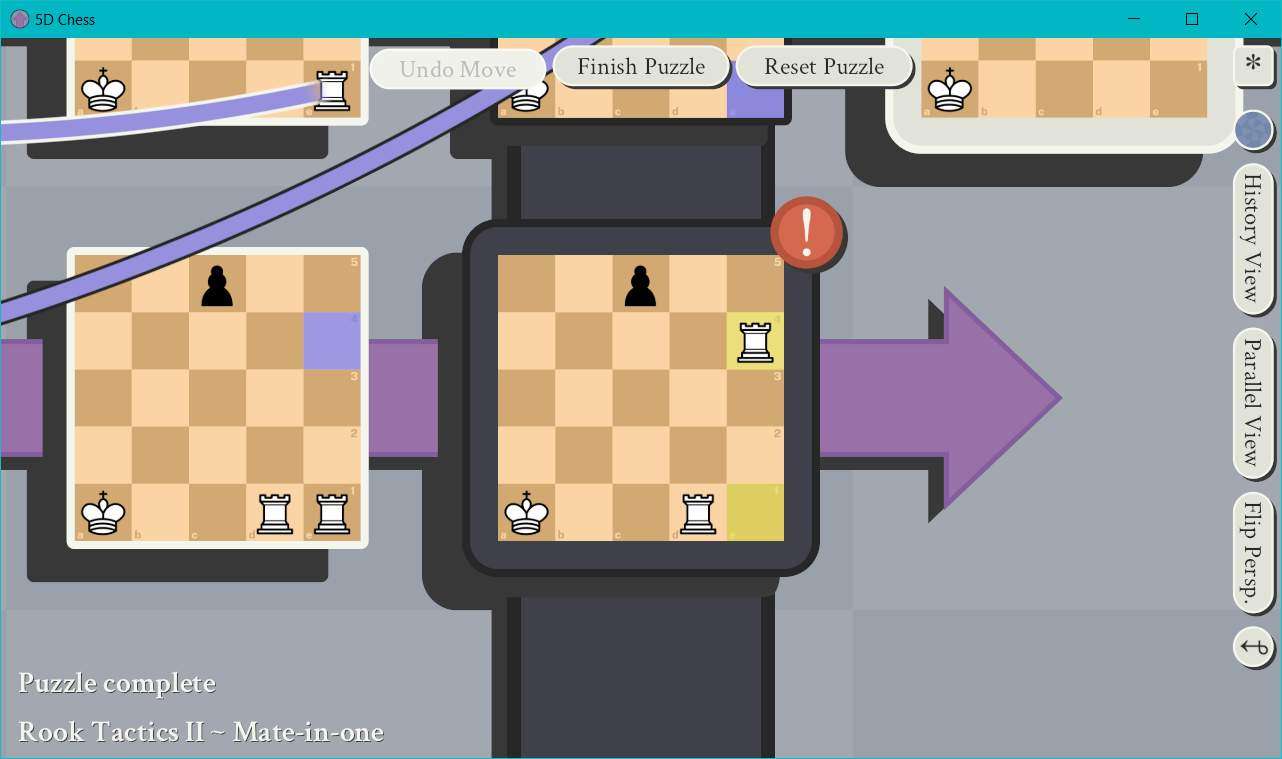
Step 3: Profit.

If you’re confused, just remember that our Rook can move any number of squares across parallel timelines until it becomes blocked by another piece, but it can’t also move on any other axis while it does this. This is how we can threaten Black’s King on E4 in one timeline while our Rook is on E4 in another timeline. If this still isn’t really clicking with you, just wait, hopefully the upcoming puzzles will help clarify this.
03 – Rook Tactics III – Mate-in-two
- Player Color: White
- Opponent Color: Black
Fun fact: After I was almost ready to publish this guide, the developers rolled out an update which changed this puzzle, as well as Rook Tactics I. Then they changed Rook Tactics I a second time. The funny thing is that only after I had already deleted all of the text I had written did I realize that the first “change” was just that they had swapped Rook Tactics I and III around. This puzzle is actually the original Rook Tactics I, and the current Rook Tactics I is some abomination that I resent because it always makes my guide out of date.
Here’s our puzzle:

Step 1: We only have one board state marked as part of the present, so that’s where we need to play.

Step 2: We’re going to move our Rook from F1 to F6. As discussed previously, it is possible for us to threaten an opposing piece at different points in time or across different timelines. We’ve seen an example of the latter, but this will be our first encounter with the former. Or at least I think so. Honestly, my memory is getting really mixed up because they keep changing these couple of early puzzles. Anyway, this move to F6 will threaten Black’s King in the past, and it cannot be countered, blocked, or escaped, which makes it a checkmate.

Step 3: Profit.
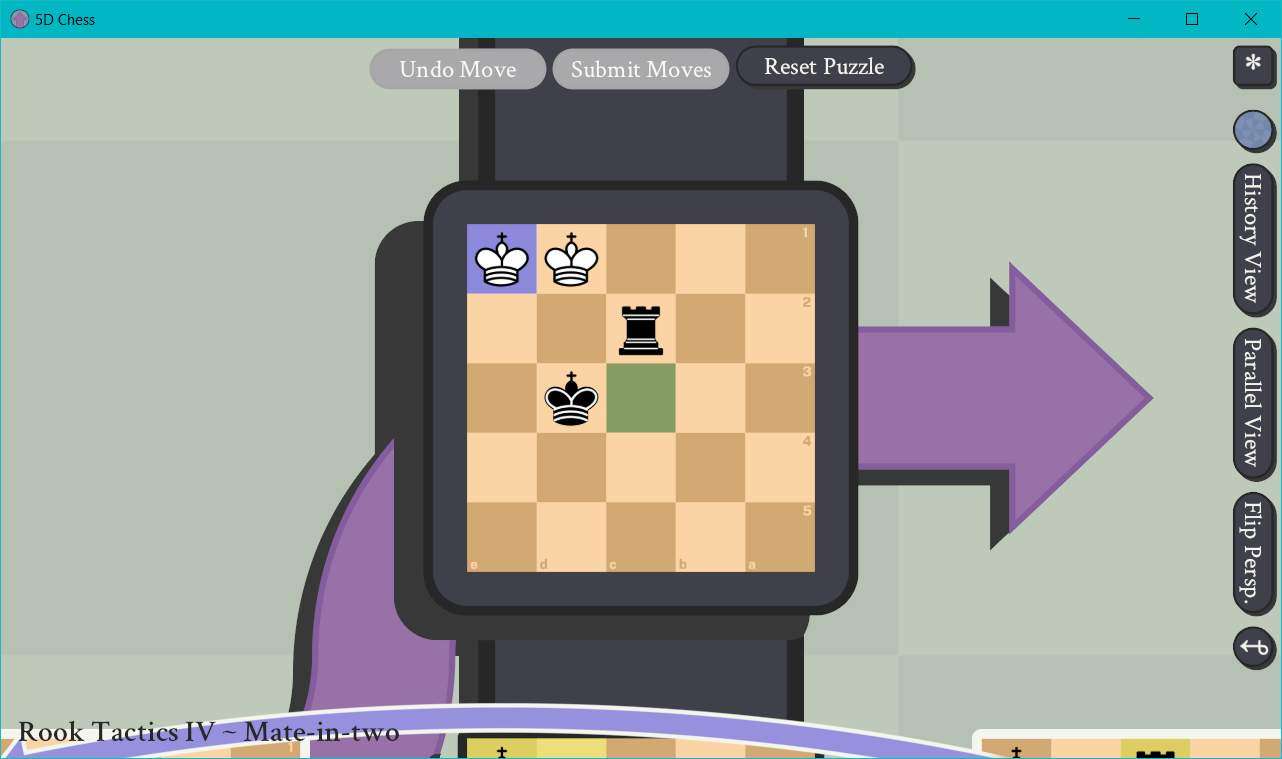
04 – Rook Tactics IV – Mate-in-two
- Player Color: Black
- Opponent Color: White
Here’s our puzzle:
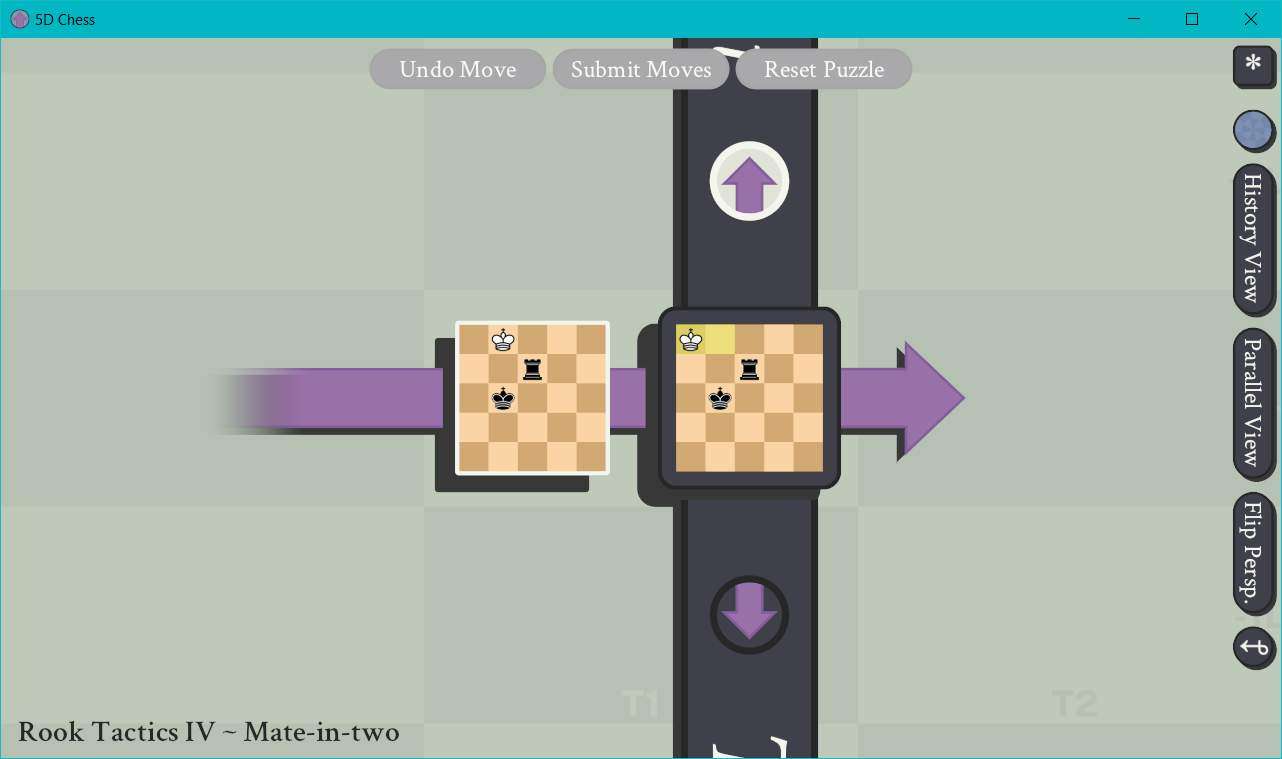
Step 1: Once again, we’re going to start from the only active board state.
Step 2: We’re going to move our Rook up one square from C2 to C1. This will leave our opponent’s King with no legal moves besides escaping to another timeline. If it tried to move down or diagonally downward, it would be putting itself in check to our King, but if it moves to the right it will still be in check to our Rook as it is right now.

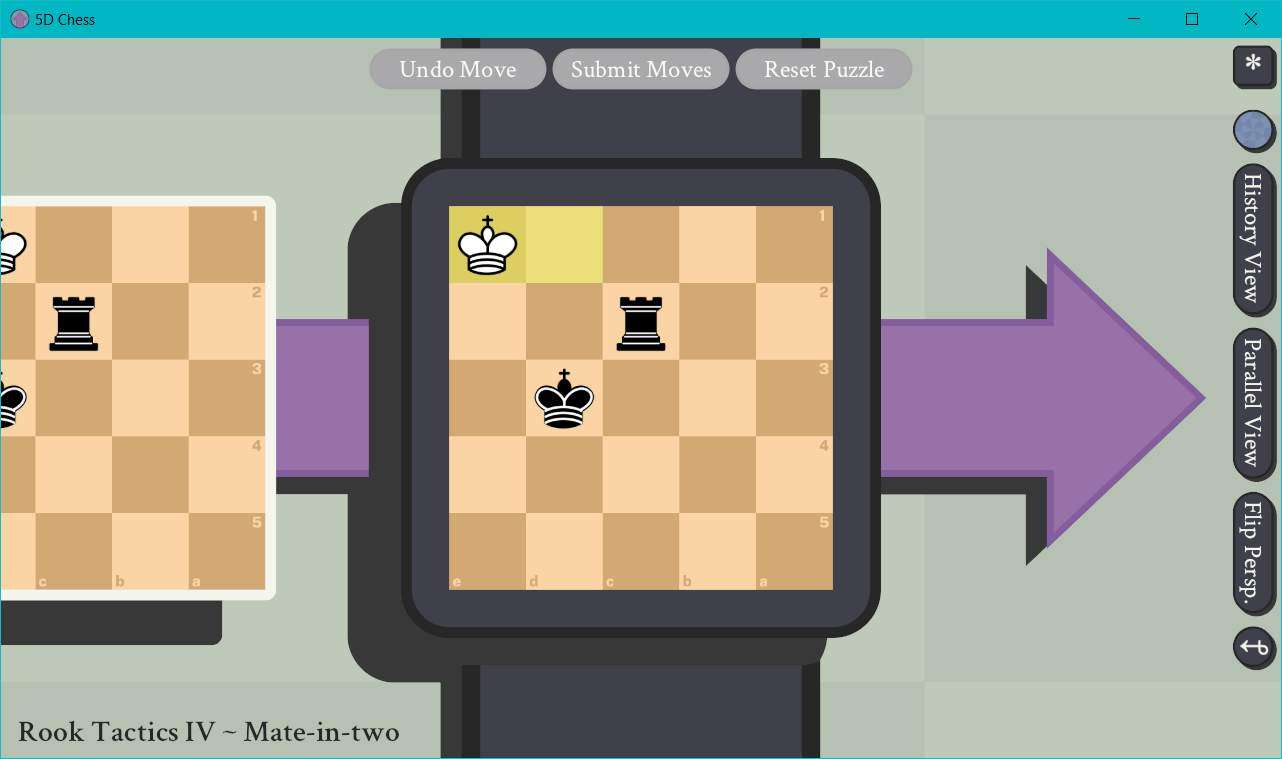
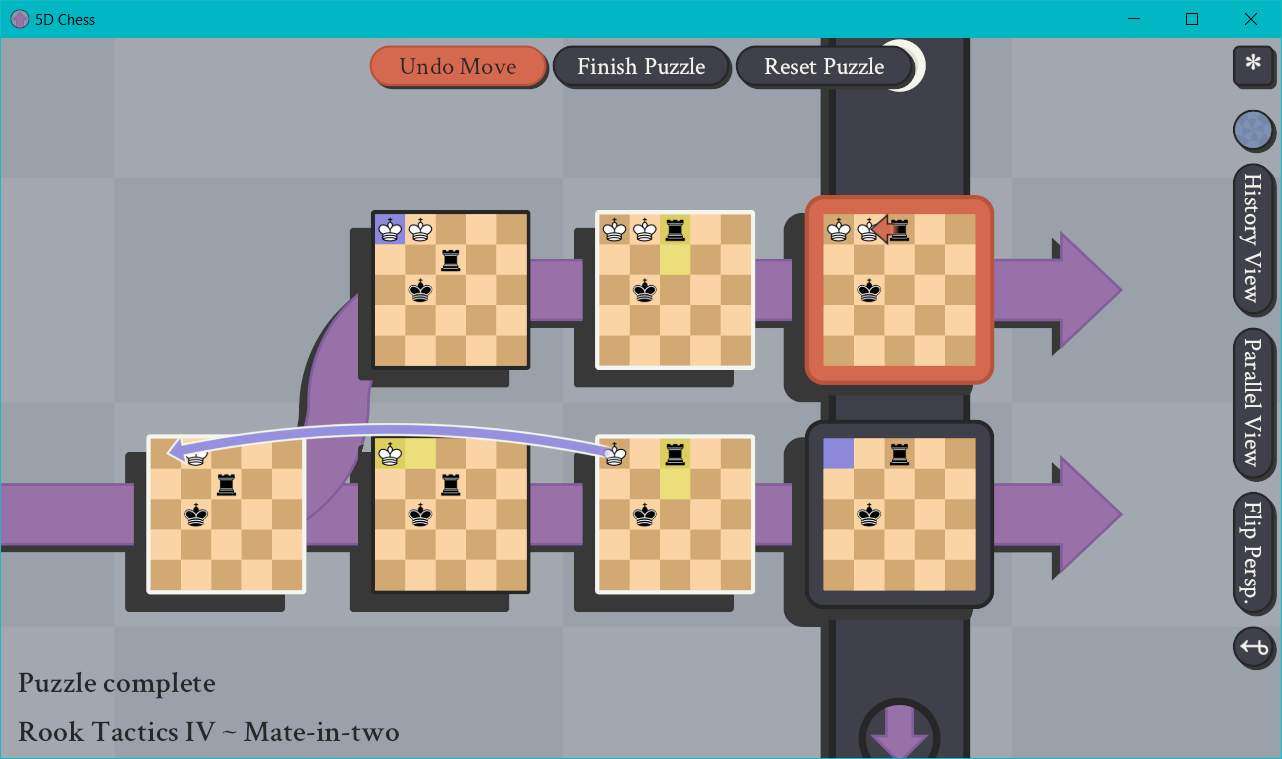
Step 3: The Black King has escaped to the past, and created a new diverging timeline which has become “the present”. The puzzle now looks like this:
We will resume play on the new upper timeline.
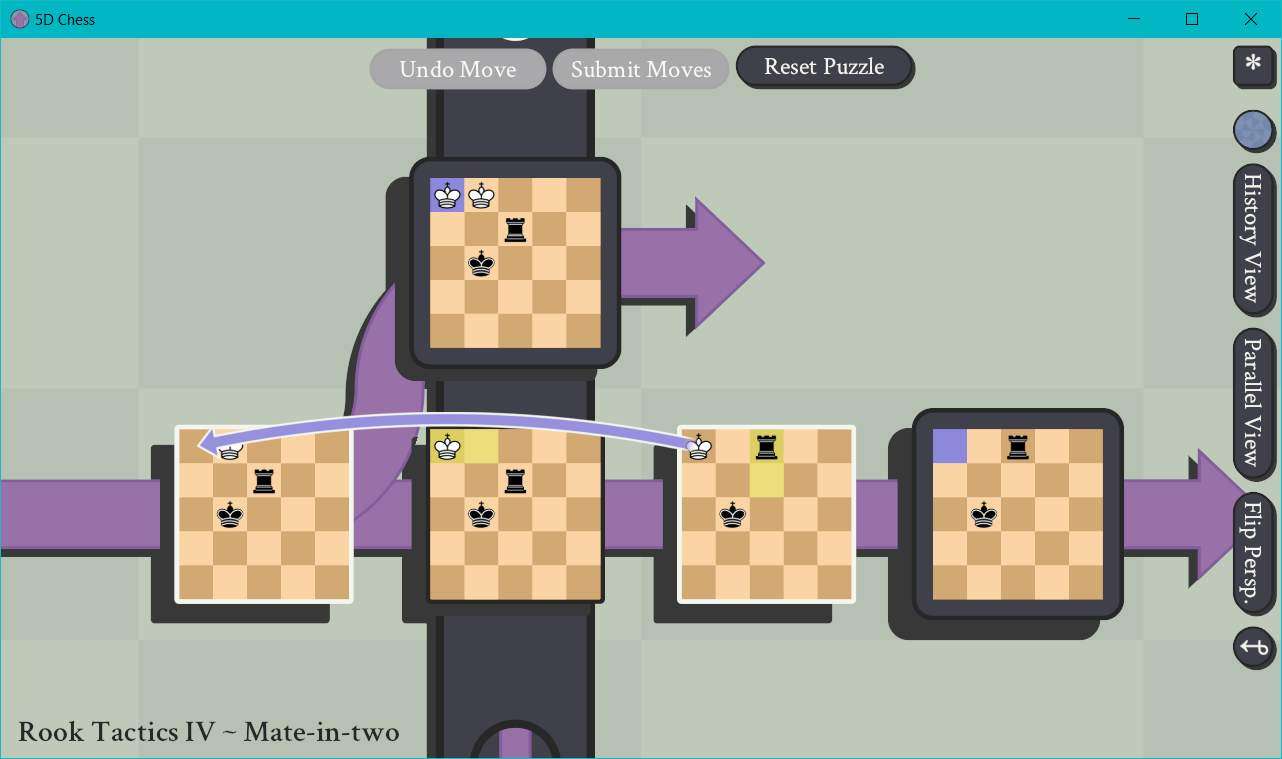
Step 4: Just as in Step 2, we’re going to move our Rook up one square from C2 to C1. Most of the board analysis from before also holds true here, except that it seems that our opponent could potentially move their second King from B1 to C1 to capture our Rook. However, this is not actually true. Should our opponent attempt to do this, they will put themselves in check from our Rook on C1 on the lower timeline, which would then be able to change timelines and claim their King. And even if they could send one of their Kings to another timeline, the remaining King would still be in check, which gives us checkmate.

Step 5: Profit.
With this, we’ve completed all 4 of the Rook Tactics puzzles, but we still have 30 other puzzles remaining, and other concepts to explore.
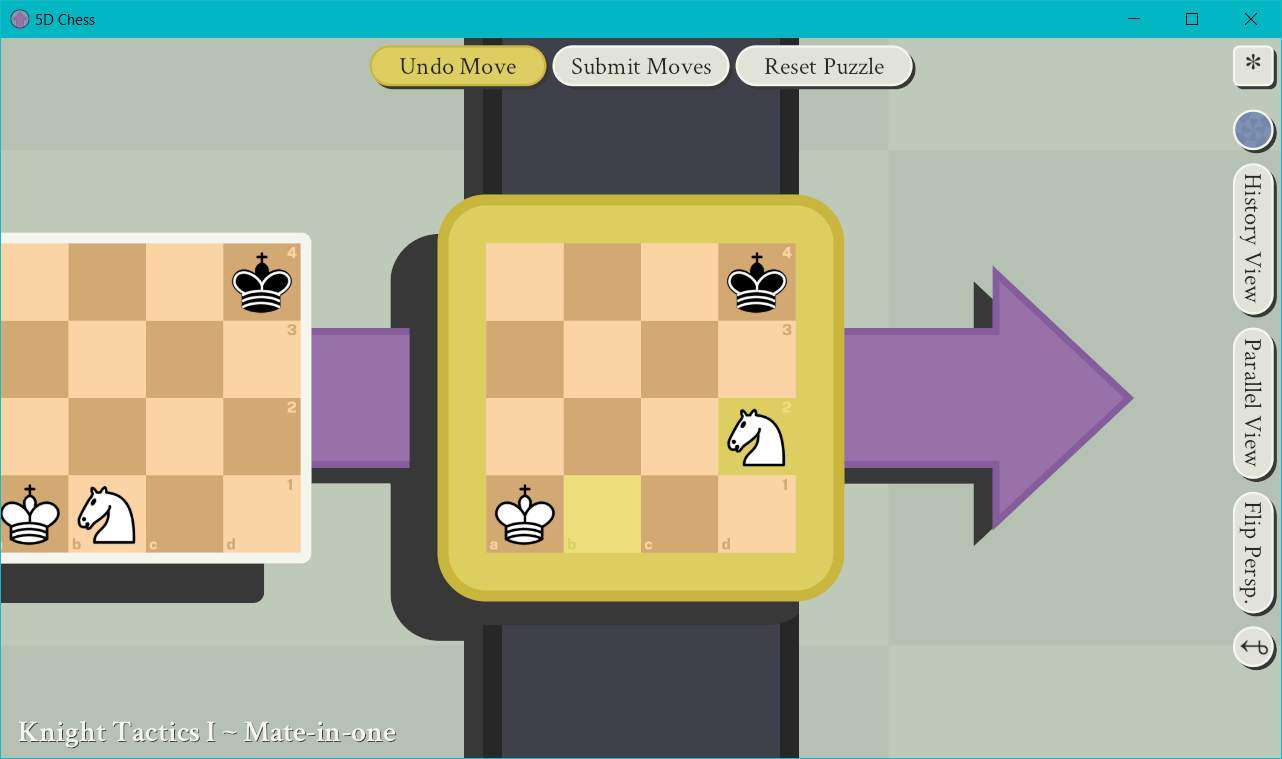
05 – Knight Tactics I – Mate-in-one
- Player Color: White
- Opponent Color: Black
Now we’re getting introduced to the Knight, which operates very differently from our Rook, not only in how it moves on the present board state, but also in how it moves through time to other board states.
Here’s our puzzle:

Step 1: Once again, we’ll start on the only active board state. I promise, we’ll have other options for where to start in some of the other puzzles.

Step 2: We’re going to move our Knight from B1 to D2. This will threaten the Black King in the past. You see, just as the Rook retains its movement patterns from standard chess and simply applies them to the new time and parallel world axes, the Knight does so as well. The Knight operates on the idea that it will move 2 squares along one axis and 1 square along another. This means, for instance, that a Knight could move 2 squares backward along the time axis, 1 square upward along the parallel world axis, and retain its previous X and Y coordinates, but on this new board state. Similarly, a Knight can move 1 square backward along the time axis, 2 squares upward along the parallel world axis, and still retain its previous X and Y coordinates. The same sort of combinations hold true for how it could move on the time axis and the X axis, but retain its position on the parallel world axis and the Y axis. And it also holds true for all other combinations of axes.
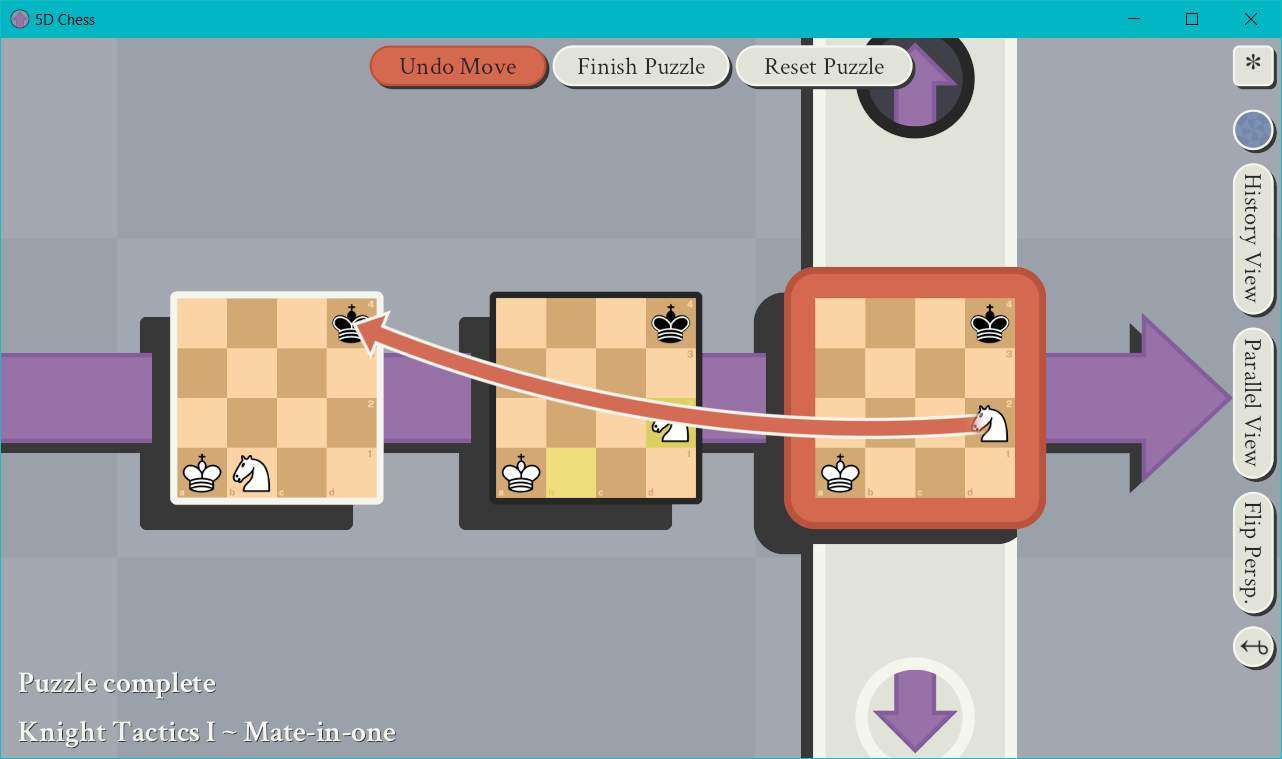
So, in this puzzle our Knight on D2 can threaten to move back in time one square to our first turn’s board, and would move to a position 2 squares away from D2 along the X or Y axis. Our options would be B2 or D4. And D4 is where our opponent’s King had been positioned on our first turn, meaning it is already threatening to move to the Black King’s position in the past. And since our opponent has no counter for this, we have checkmate. If the Knight’s movement through seems confusing, check out the next puzzle which I think does a better job of walking us through this idea.
Step 3: Profit.
06 – Knight Tactics II – Mate-in-one
- Player Color: White
- Opponent Color: Black
Here we’re going to be making use of how the Knight’s movement options on the X or Y axis changes based on how many board states we move back.
Here’s the puzzle:
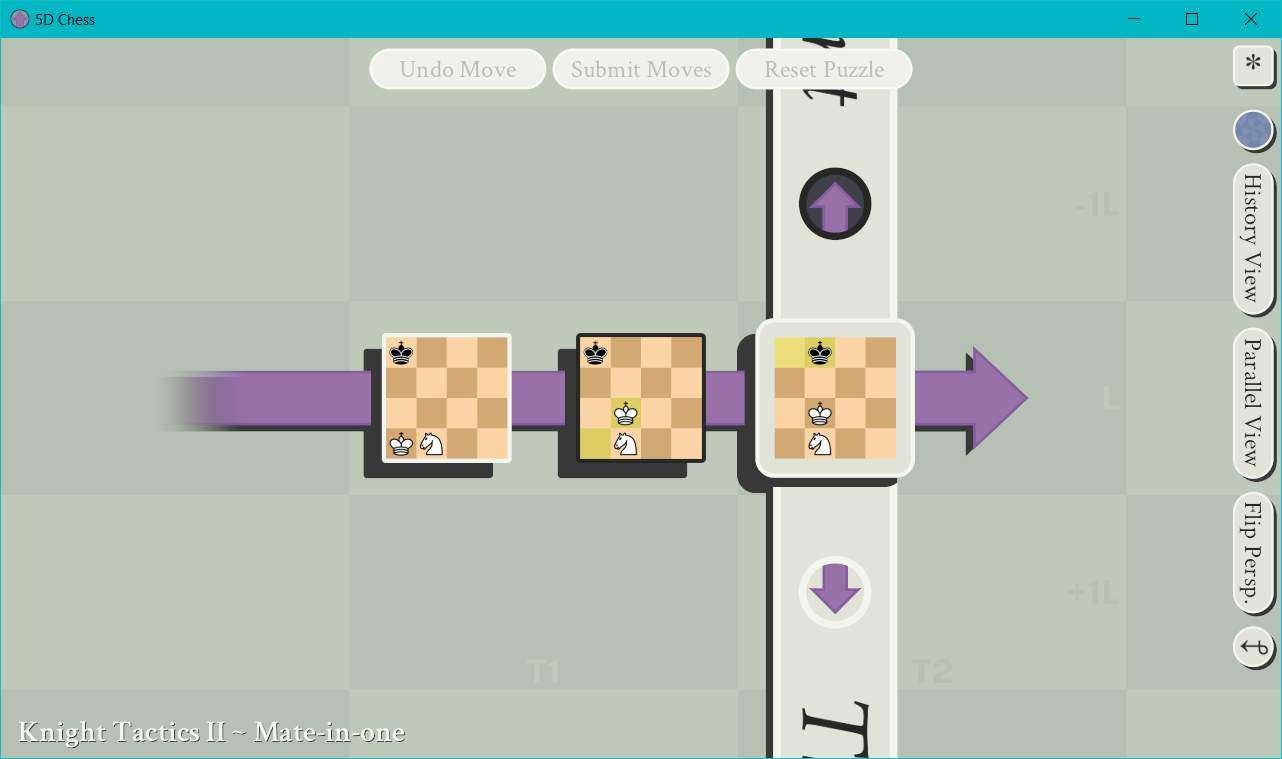
Step 1: Blah blah blah, one active board, start there.

Step 2: We’re going to move our Knight from B1 to A3. While this does not put the King in the present in check, or even the King one board state prior, it does put Black’s King from the very first turn in check, and without a response. This is because our Knight is threatening to move 2 squares back in time and 1 square up along the Y axis to the King’s position A4 on the first board, and at the same time Black’s King in the present can’t take the Knight because it would be moving into check from our King in the present.

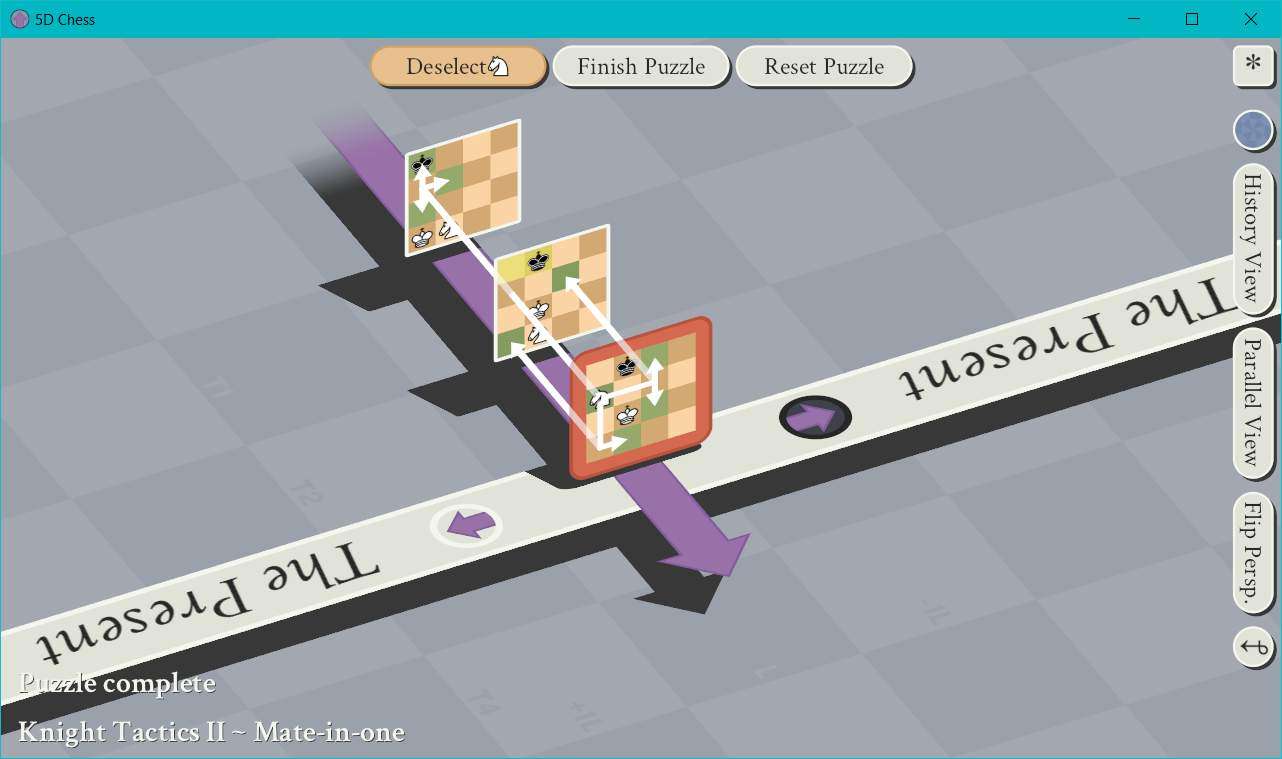
Step 3: Profit.

To better illustrate how our Knight has checkmated the Black King, here’s a view of all of its options in the present AND in the past:
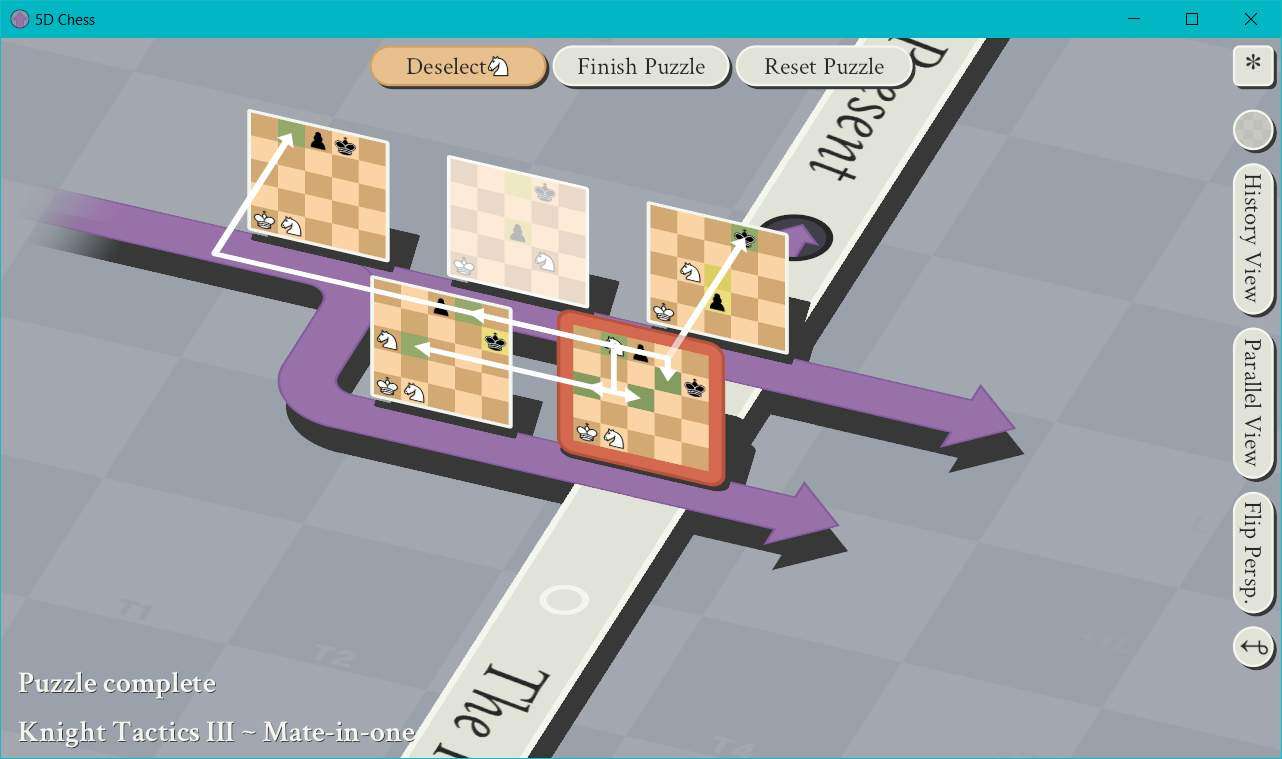
07 – Knight Tactics III – Mate-in-one
- Player Color: White
- Opponent Color: Black
For the first time in a while, we have a puzzle which is starting us off in a branched timeline.
Here’s the puzzle:
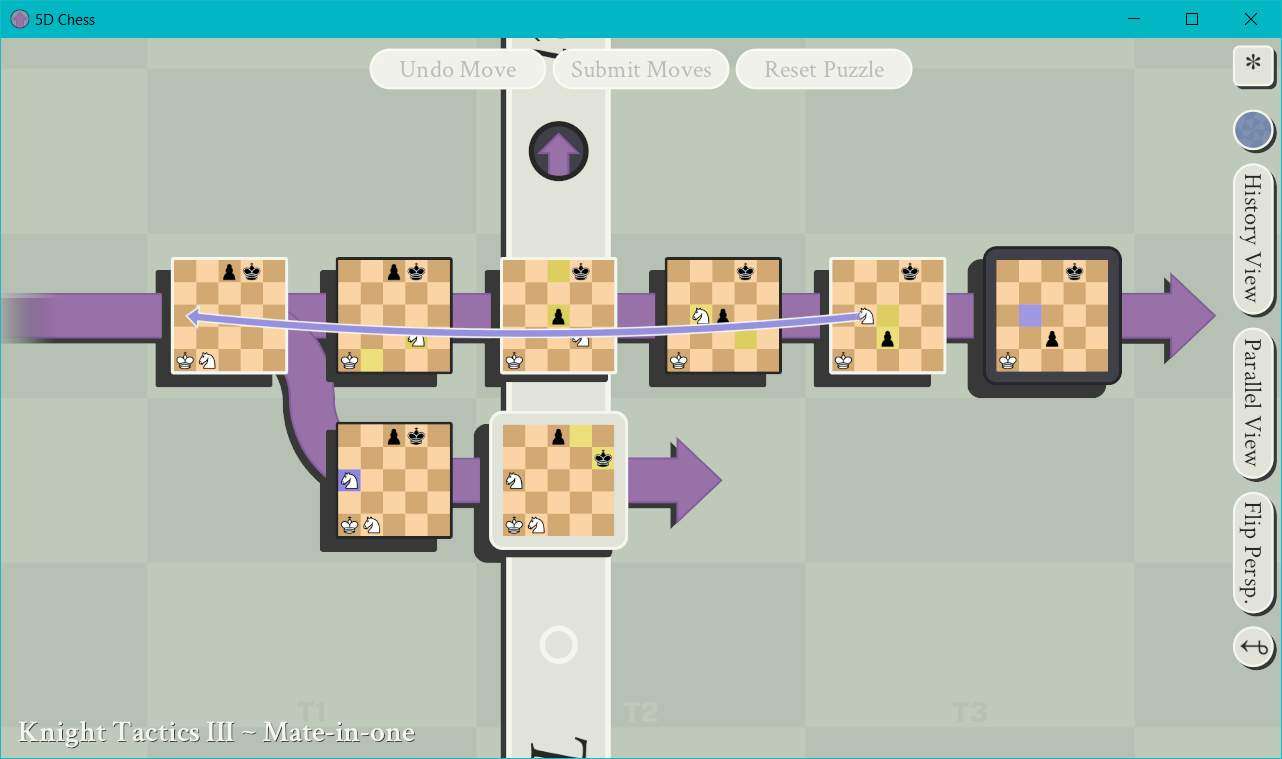
If you’re confused about what’s happening here, basically after a few moves, we sent our Knight 2 squares backward in time and 1 square to the left, which then created a branching timeline which appears on the bottom and has become the new “present” which we must play on to be able to end our turn. Since our opponent did not play on the upper timeline in the future, but instead opted to only play on the lower timeline, we cannot make any moves on the upper timeline even if we had wanted to, and we cannot send any of our pieces over to that board state either.
Step 1: Finally, when it seemed like we had a choice about where to play, we actually don’t. We have one active board state to play on, so let’s do that.
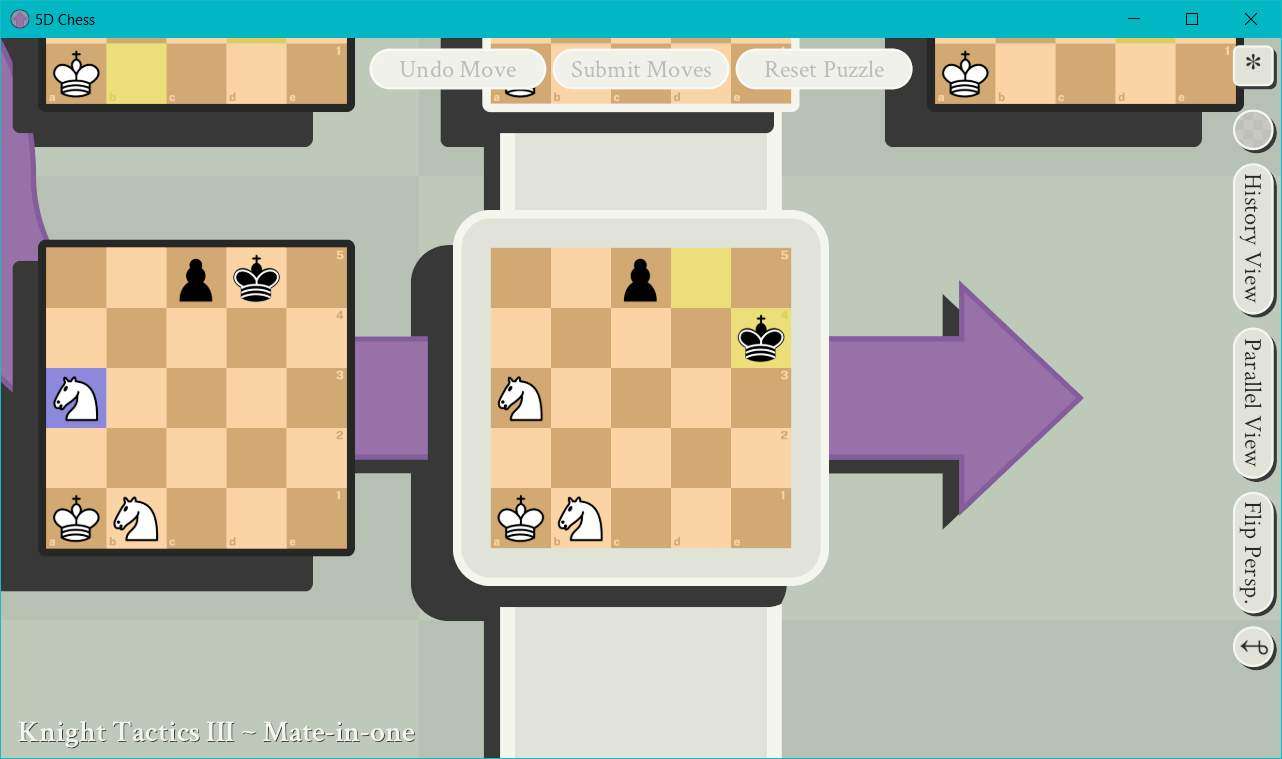
Step 2: We’re going to move our Knight from A3 to B5. This will threaten Black’s King on the directly parallel board state because our Knight would be able to move 1 square upward across parallel timelines and 2 squares to the right along the X axis, which would put it on D5 where Black’s King is positioned. Black has no counter for this, which makes it a checkmate.

Step 3: Profit.

If this seems weird or confusing, here’s another view of all of our Knight’s potential movement options:
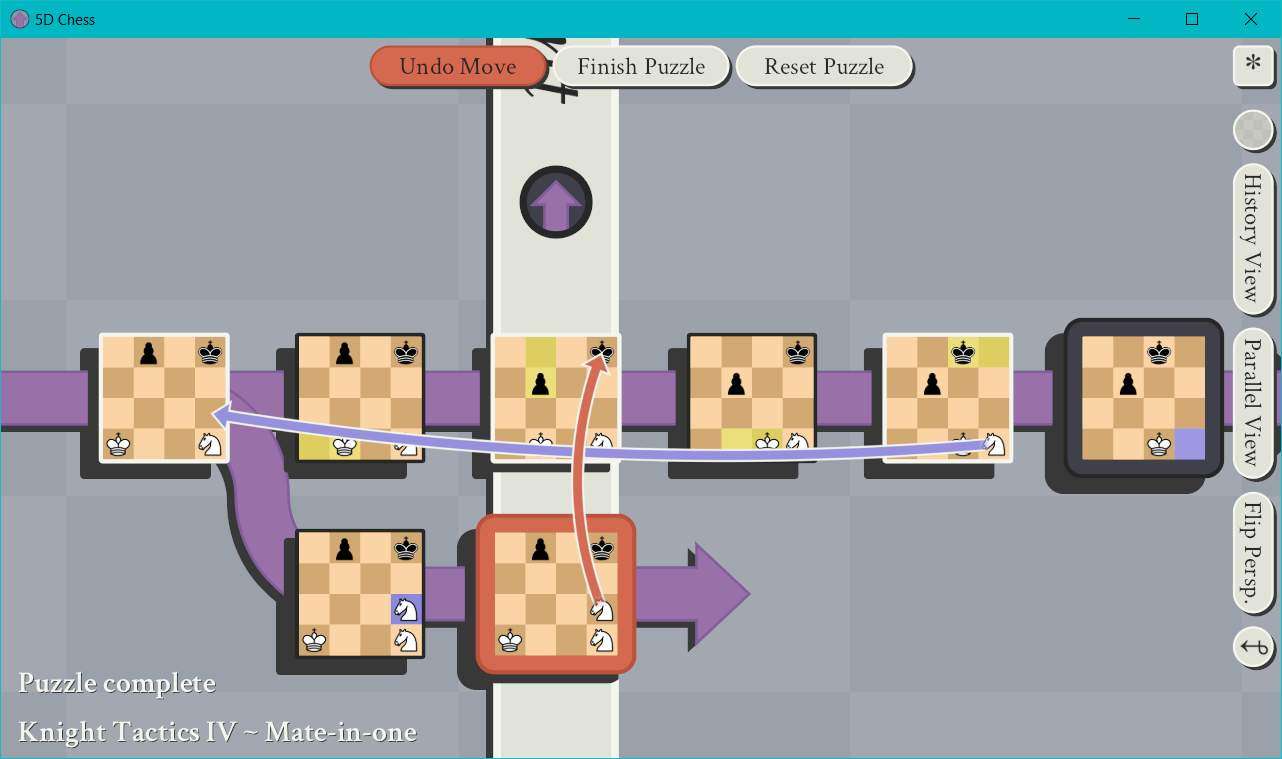
08 – Knight Tactics IV – Mate-in-one
- Player Color: White
- Opponent Color: Black
This puzzle will require us to make use of both the ability to send pieces back in time to create branching timelines, but also to send pieces across parallel timelines.
Here’s the puzzle:
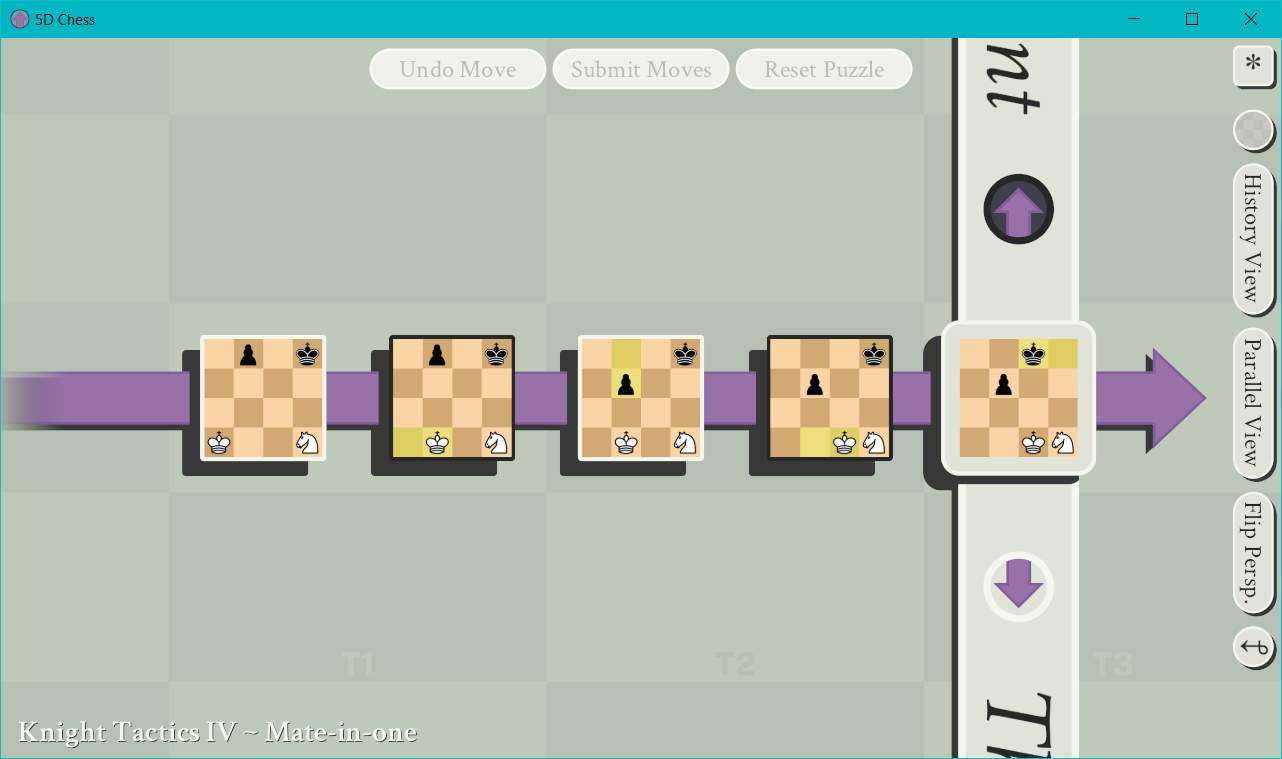
Step 1: One active board state, just start there…
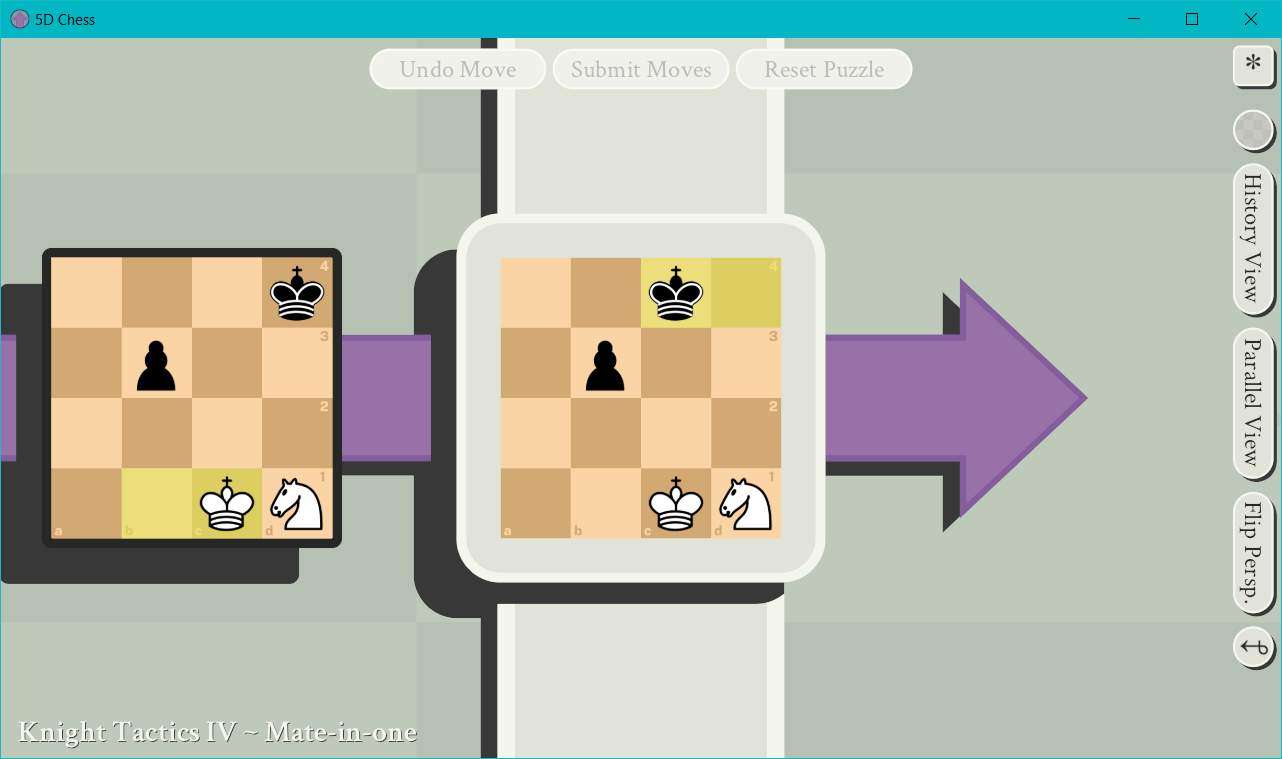
Step 2: I personally think this is a really cool maneuver that we’re going to pull off. We’re going to start by sending our Knight 2 squares backward in time and 1 square along the Y axis upward. So from D1 in the present to D2 in the very first board state.

Which will result in the puzzle looking like this:
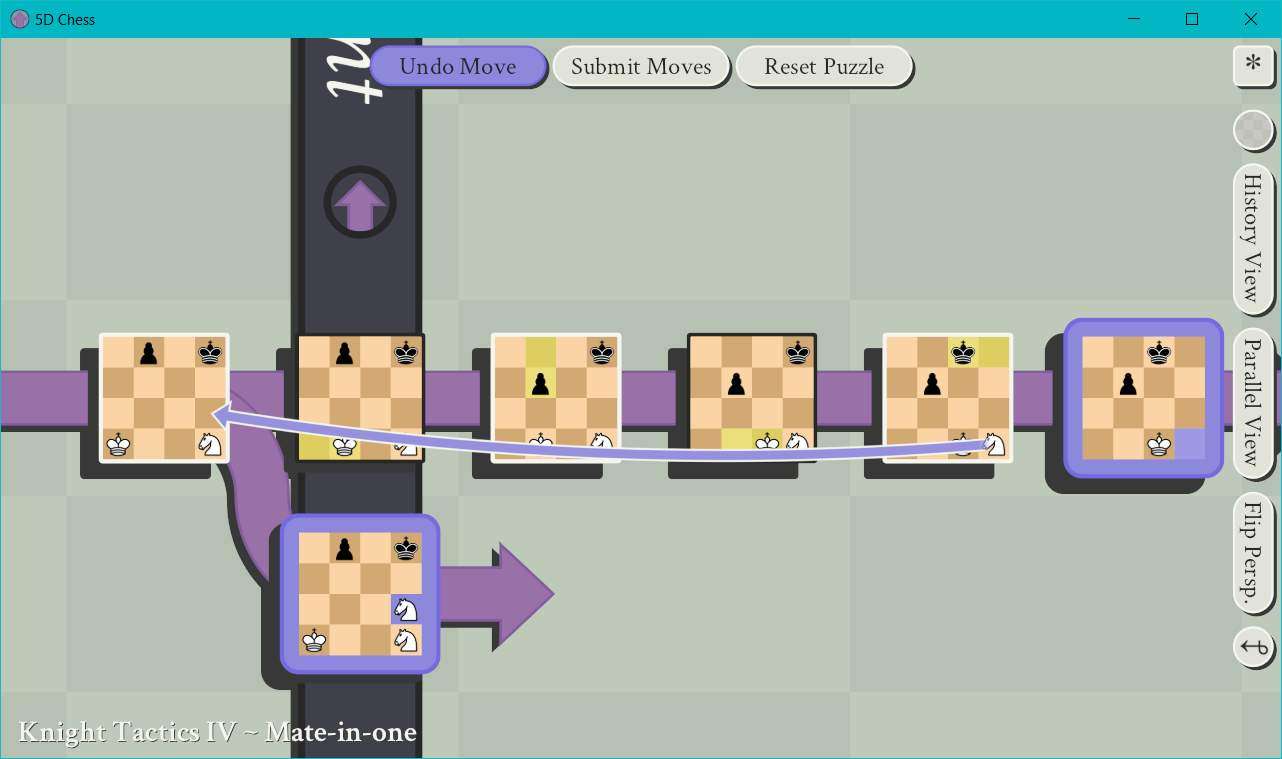
This will create a timeline wherein our Knight is threatening Black’s King, but not in it’s own timeline or board state, but in a parallel board state. Our Knight can threaten to move 1 square across parallel board states, and 2 squares up along the Y axis to claim our opponent’s King on D4. Since our opponent has no counter for this, we have them in checkmate.
Step 3: Profit.
09 – Knight Tactics V – Mate-in-one
- Player Color: White
- Opponent Color: Black
This puzzle is very similar to the previous puzzle, but there’s a slight trick to it.
Here’s the puzzle:
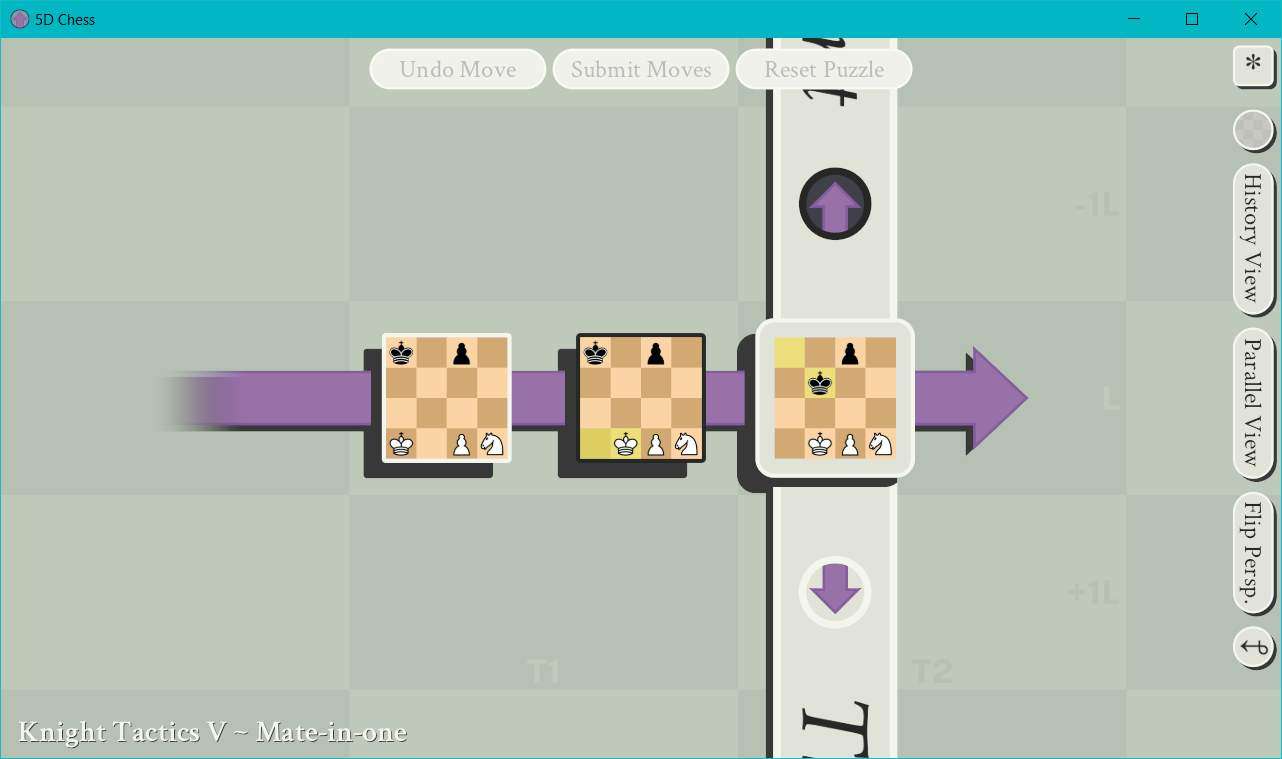
Step 1: Same as usual, start on the only active board state.

Step 2: We’re going to move our Knight backward through time, specifically by 1 square back on the time axis and 2 squares left on the Y axis, so from D1 in the present to B1 in the first board state. It may be hard to tell how this benefits us at first, but we have to look at what our opponent’s options are and where that will leave us next turn.
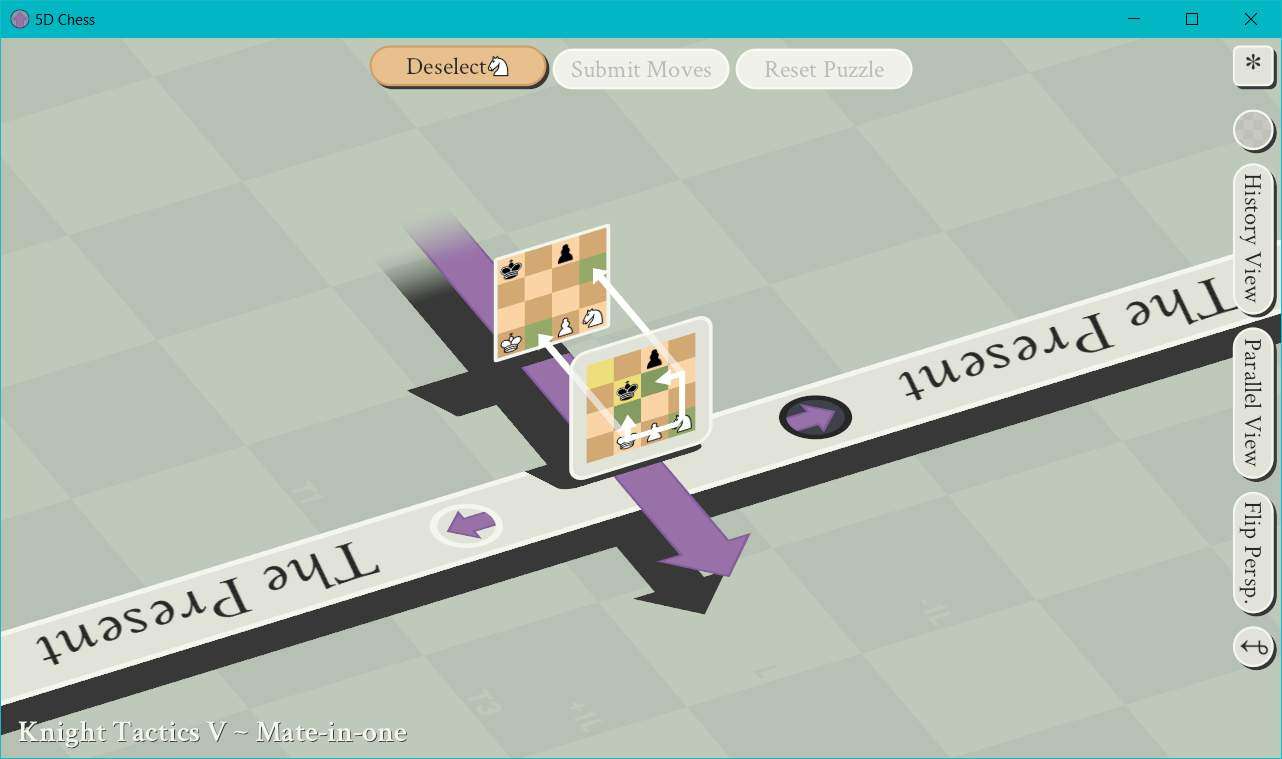
Here is what the puzzle will look like:
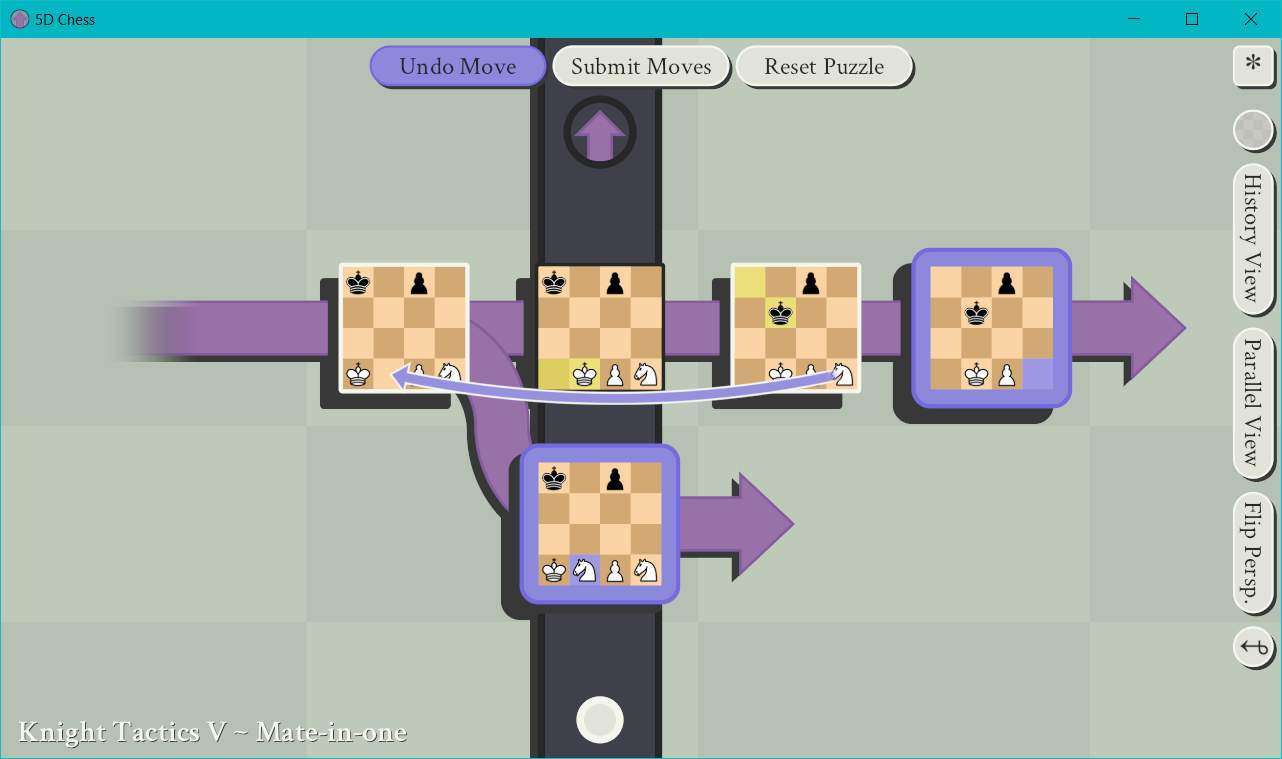
No matter what our opponent tries to do with their pieces after we submit this move, our Knight will be positioned to take their King on the parallel branch on our next turn, meaning any move Black makes will put them in check, thus we’ll have checkmate by threatening to move our Knight 1 square across parallel worlds and 2 squares up along the Y axis from B1 to B3.
Step 3: Profit.

In this case, we weren’t actually looking to immediately check our opponent, but instead set up a situation where it would be inevitable that their upcoming actions on another timeline would put them in check.
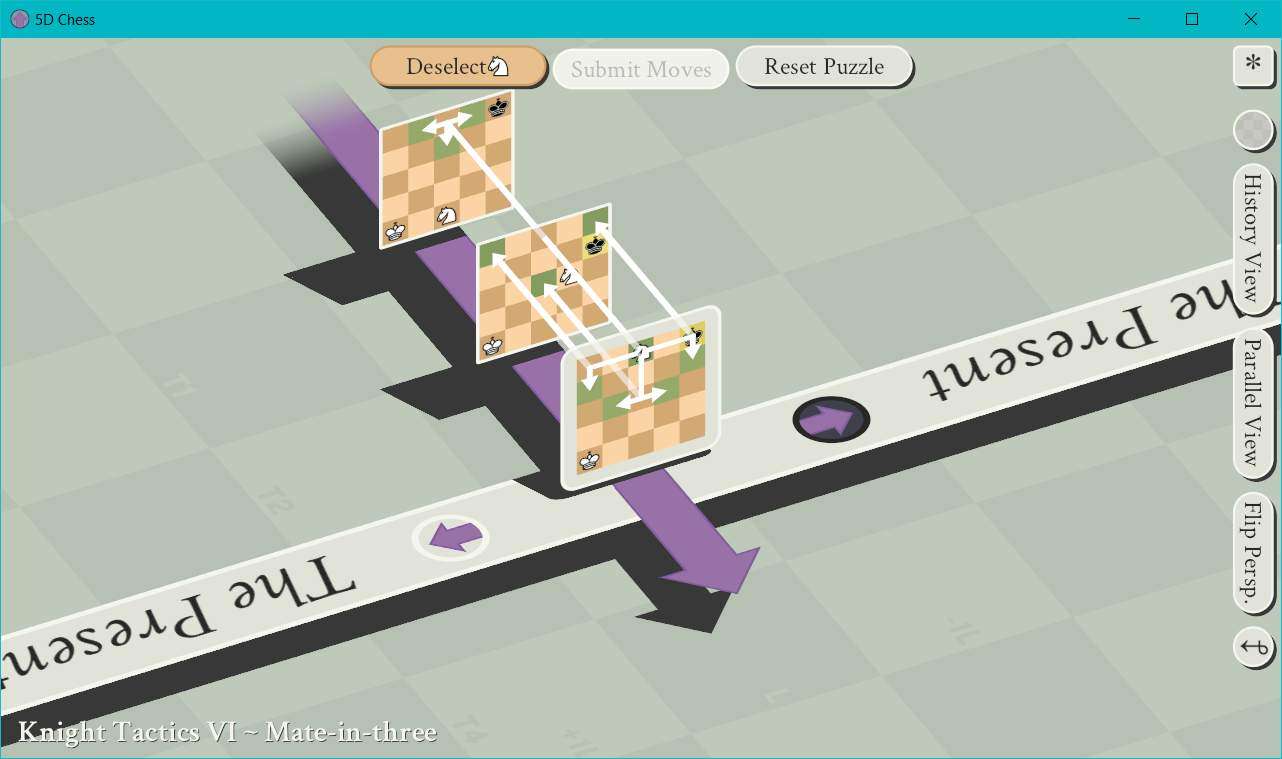
10 – Knight Tactics VI – Mate-in-three
- Player Color: White
- Opponent Color: Black
This is one of the rare puzzles which requires a mate in more than one or two moves. This will also be the first time we see a move in which our Knight moves across both the time axis and the parallel world axis simultaneously. Yes, it’s time to prove that I wasn’t all bluster when I said we could move a Knight across time and parallel worlds, while retaining X and Y coordinates. We’re dipping our toes into some real 5D Chess here (though really people are right, it feels more like 4D Chess since there aren’t any stacking boards).
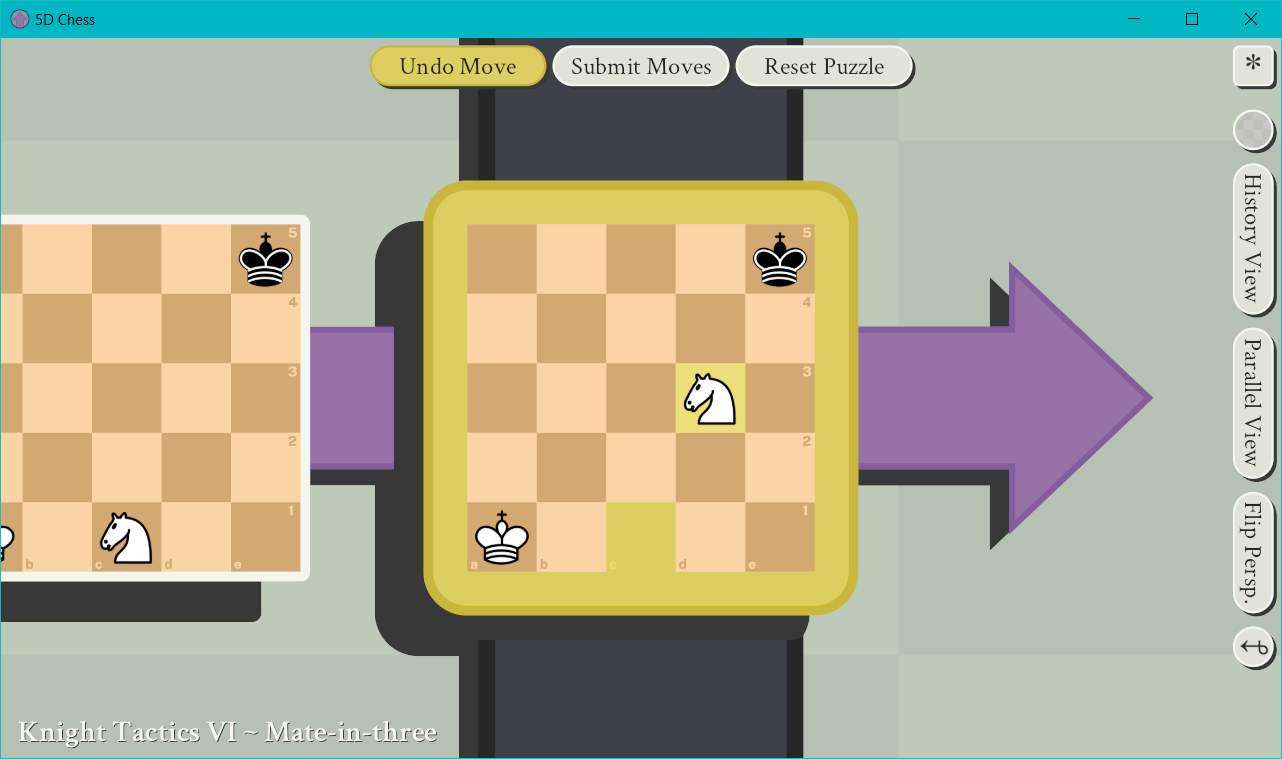
Here’s the puzzle:

Step 1: Only one choice for where to start.

Step 2: We’re going to move our Knight from C1 to D3. We’re setting up for our big 5D play right now. This move will put our opponent in check, so they need to move in some way.
And they’ve chosen to move their King down 1 square from E5 to E4, which results in this:
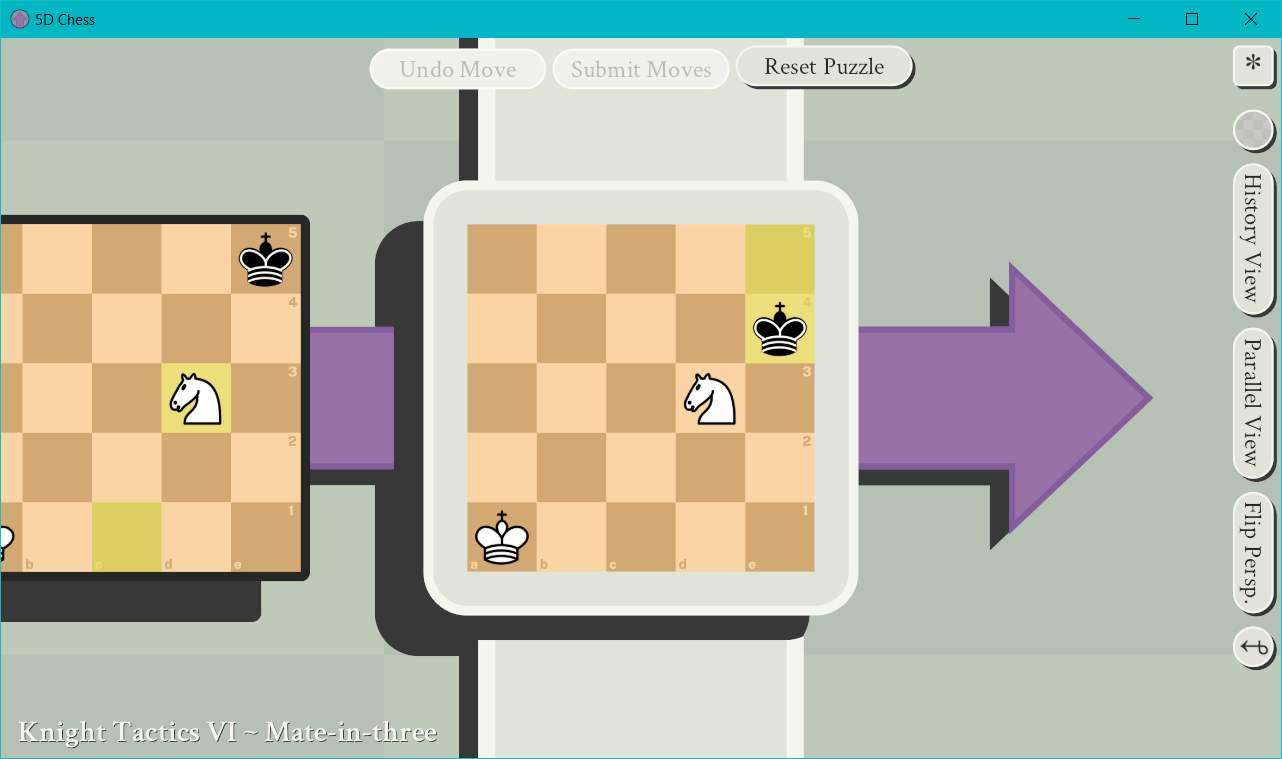
Step 3: Black was probably aiming to threaten our Knight, but it’s fine, we’ll put them in check again by moving our Knight from D3 to C5.
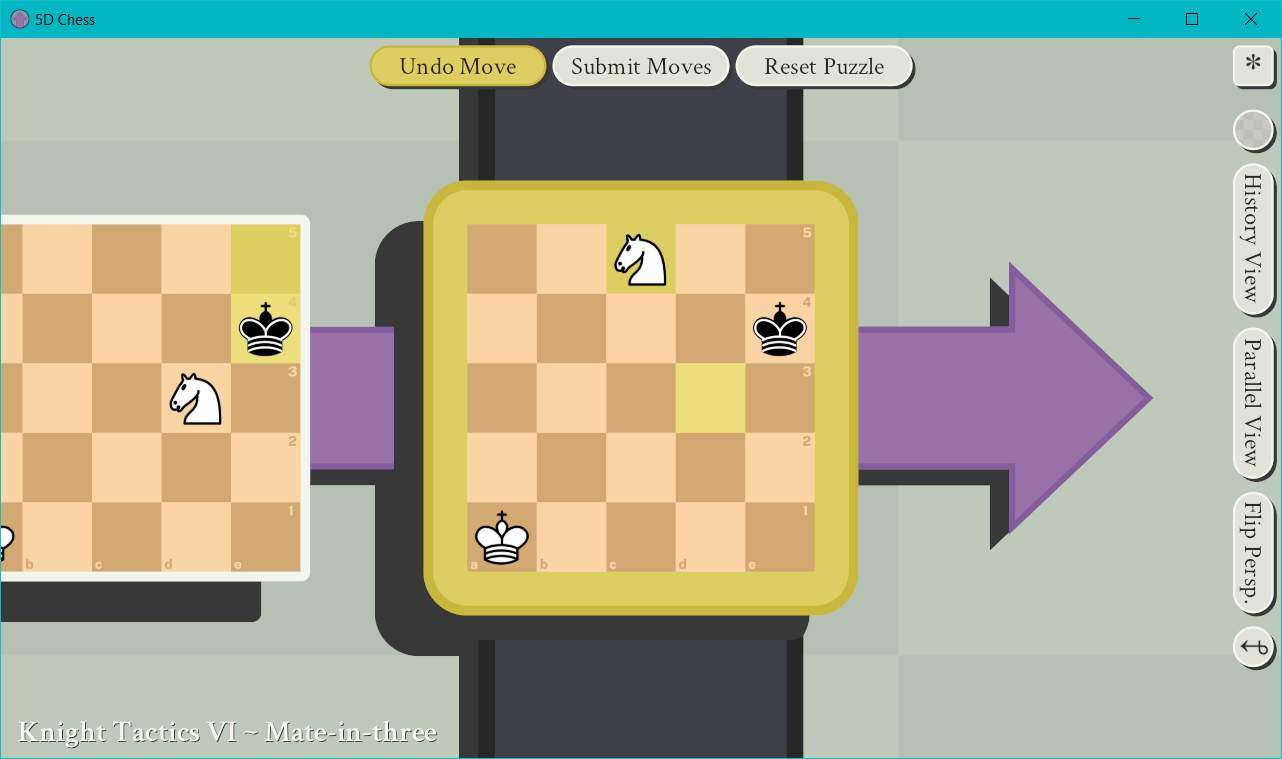
Black backs off back from E4 to E5:
Note that Black actually has other moves here, like you may see Black retreat another space down from E4 to E3, but none of these other moves will affect what we’re about to do to win.
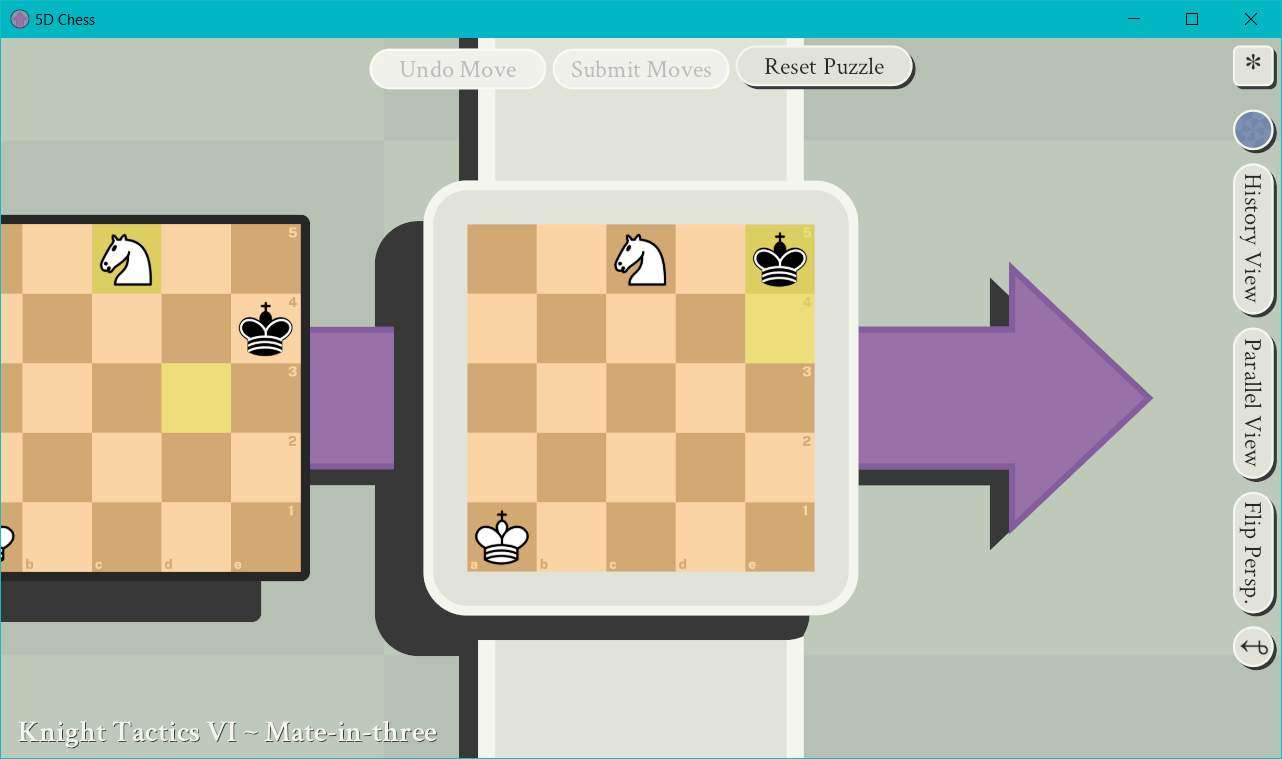
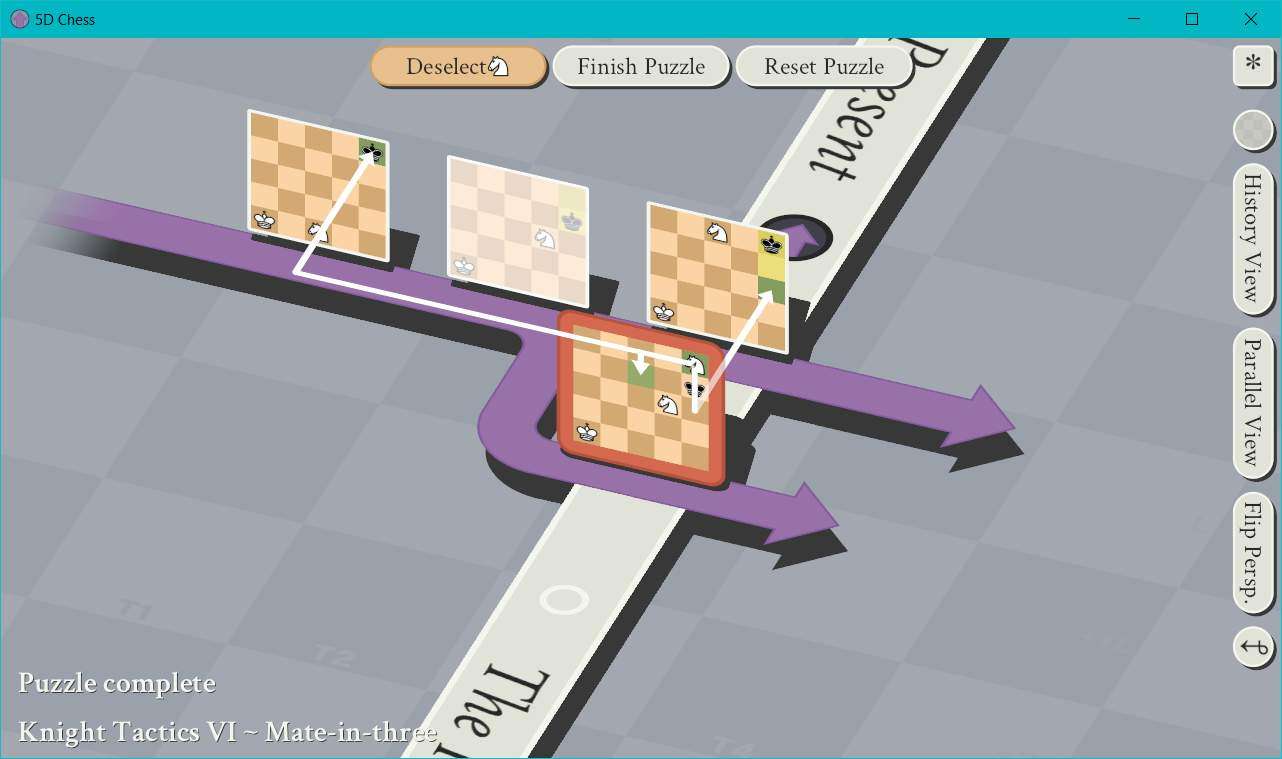
Step 4: We’re sick of this timeline. Why sit around in a musty old timeline where you only have one Knight when you could be hanging out in a sick nasty timeline where you have TWO Knights, amirite or amirite? So, we’re going to send our Knight 1 square back in time and 2 squares to the right, so from C5 in the present to E5 one board state back.
And so the puzzle now looks like this:

And we’ve won. How? By using our Knight on E5 in the lower timeline to threaten Black’s King on E5 on the first turn. If it moves 2 squares backward along the time axis and one square upward along the parallel world axis, it will need to retain its position on the X and Y axis, sending it back in time and across dimensions to E5 to claim Black’s King.
Step 5: Profit.

If this seems confusing, here’s another perspective on how our Knight can move:
Cool, right?
11 – Knight Tactics VII – Mate-in-one
- Player Color: Black
- Opponent Color: White
So, minor hiccup with this puzzle. In one of the moves prior to where the puzzle has us start, we see an example of a Bishop moving back in time. We haven’t covered the Bishop yet in these puzzle examples, and the next set of puzzles will have us finally working with using them. How they move through time isn’t particularly vital to being able to solve this puzzle, but I could see it confusing a new player trying this puzzle on their own without having done any of the Bishop puzzles. I’ll explain how Bishops work in the next section, so just bear with me and try not to think about it too much for now. We just wanna see the horsey do sick nasty L moves for now.
Here’s the puzzle:
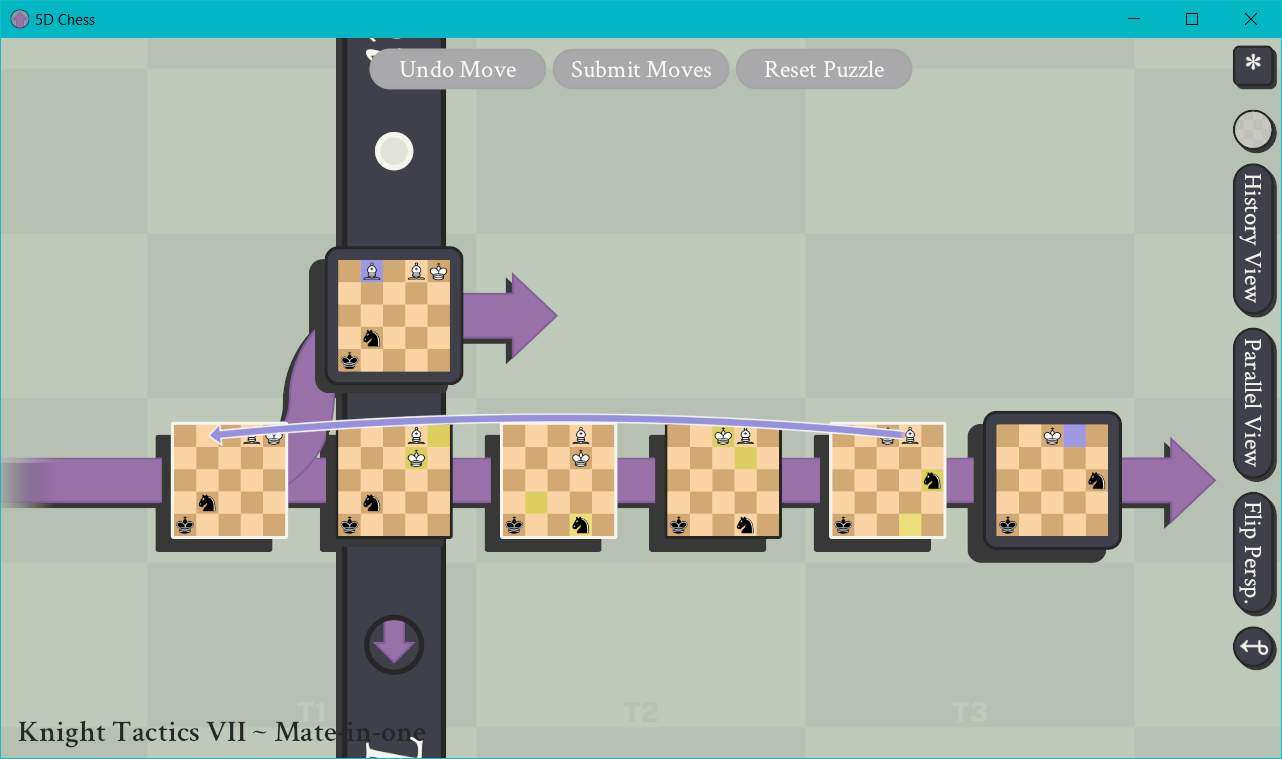
Step 1: Finally, it looks like we have an actual choice of where to start this time…and we DO. We’re required to make a move in the upper “present” timeline, but we can additionally make a move in the lower future timeline. And we will. I’m so excited to actually have something to do in Step 1 that we’ll just go ahead and start in the “optional” future timeline for the sake of it.

Step 2: Last time we won by threatening to move our Knight through time and parallel worlds, but this time we’ll make good on that threat. Let’s move our Knight from A3 in the future timeline, backward 2 squares in the time axis and upward 1 square in the parallel world axis, to A3 in the upper active board state.

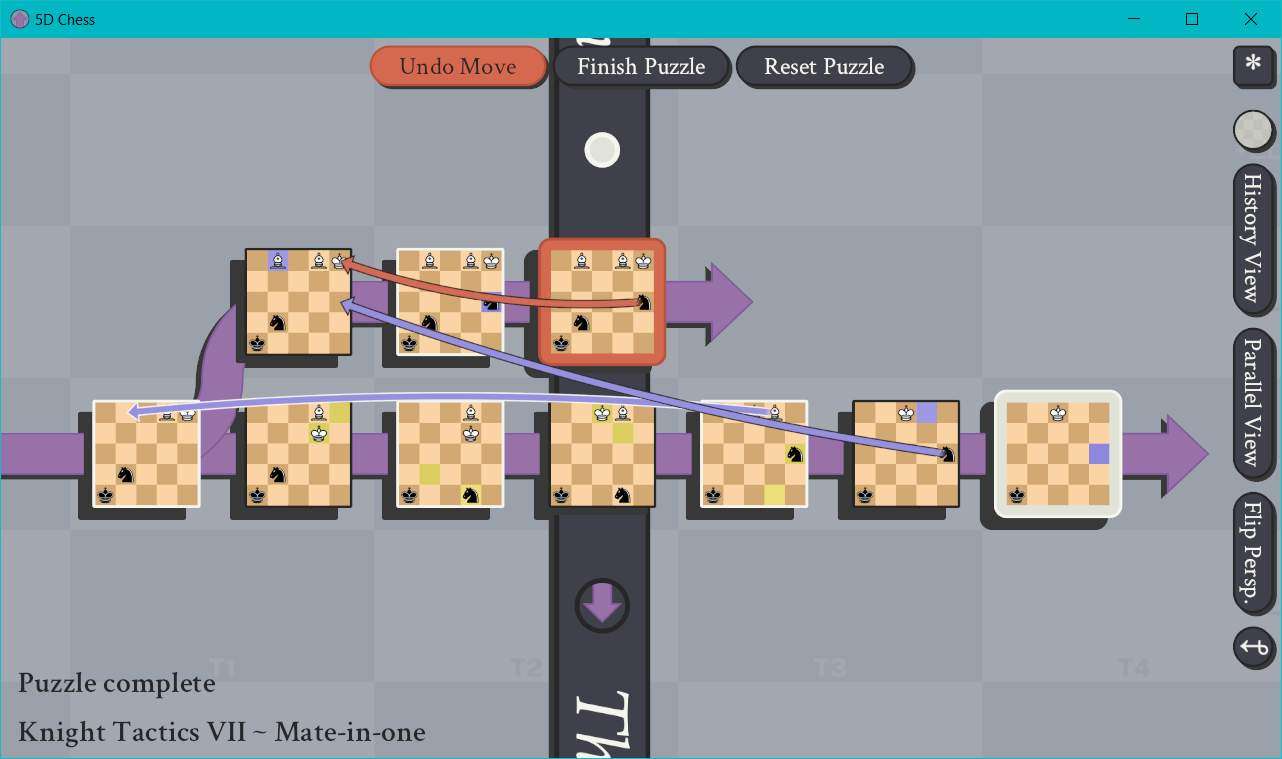
Now the puzzle should look like this:

Next turn, we’ll be able to move our Knight backward 1 square in time, and upward 2 squares on the Y axis from A3 in the present to A1 one board state previous, which is where the White King resides. And since our opponent has no counter for our time traveling horsey threat, we have checkmate.
Step 3: Profit.
12 – Bishop Tactics I – Mate-in-one
- Player Color: White
- Opponent Color: Black
Here’s the puzzle:

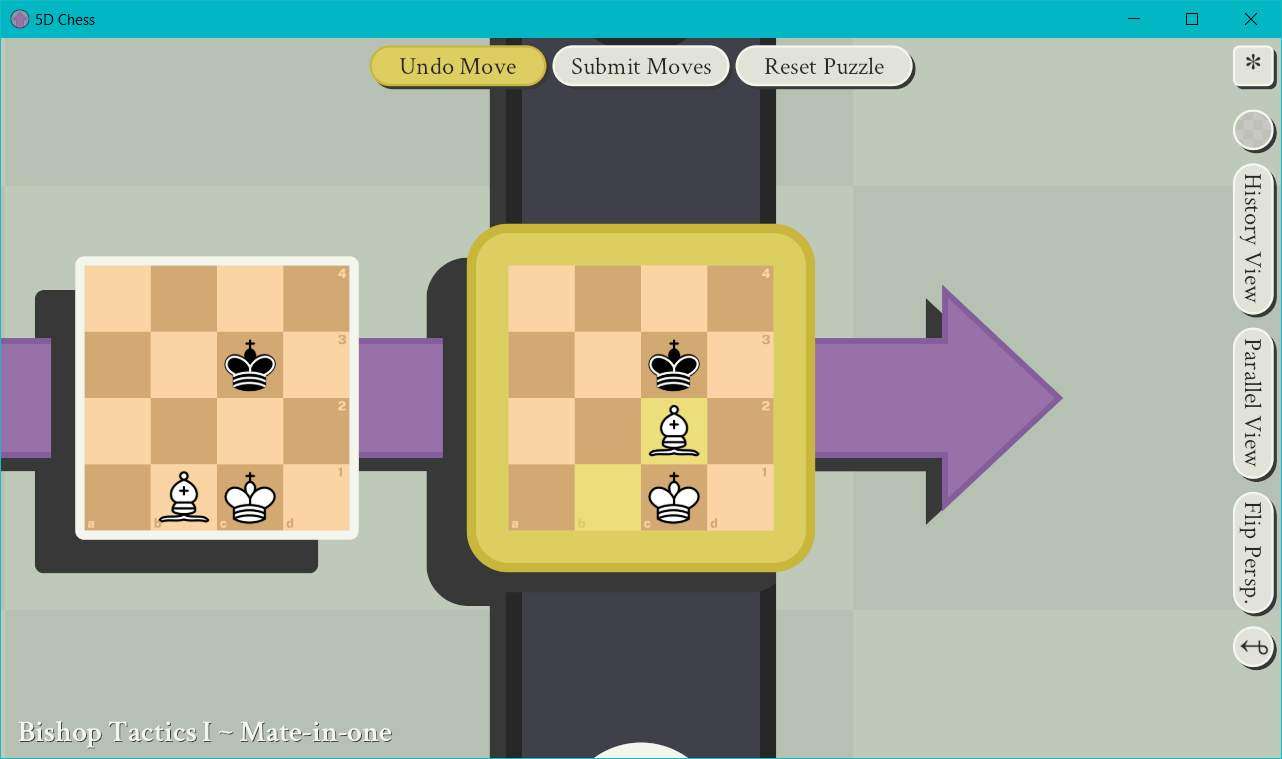
Step 1: Good news: we got Bishops. Bad news: only active timeline to mess with here.
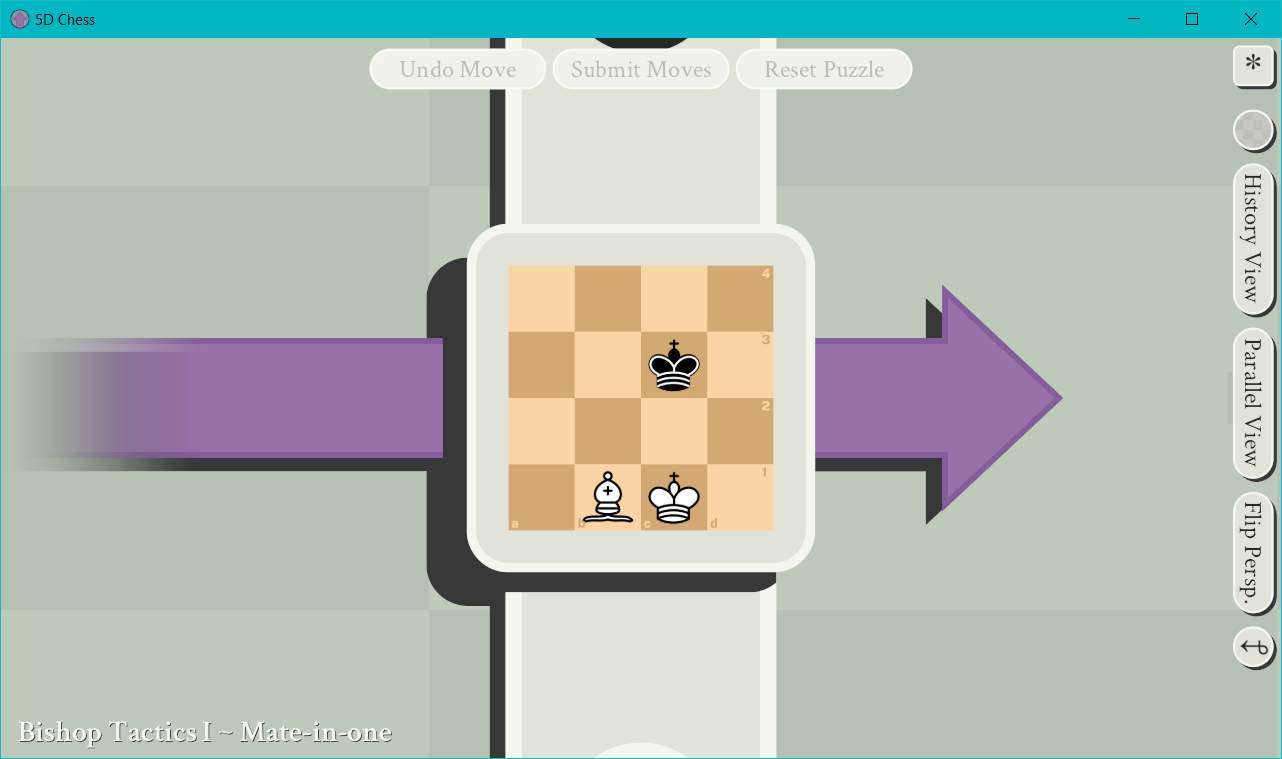
Step 2: We’re going to move our Bishop from B1 to C2, and threaten the Black King in the past. This is because Bishops always move on perfect diagonals between 2 axes. Ordinarily this would mean diagonally between the X and Y axis, but this is 5D Chess, so we have some options. If we move a Bishop 1 square back along the time axis, then we can move it 1 square along any other axis, whether it is the X, Y, or parallel world axis. If we moved it 2 squares back in time, then we could move it 2 squares along any axis. In this case, we don’t have enough previous board states to move 2 squares, but we don’t need to. By moving our Bishop to C2 in the present, we can threaten to move 1 square backward in time and 1 square upward along the Y axis to threaten the Black King on C3. Our opponent, however, has no way to respond to this move because even if they tried to take our Bishop with their King, they would still be moving themselves into check from our King, which would be illegal.
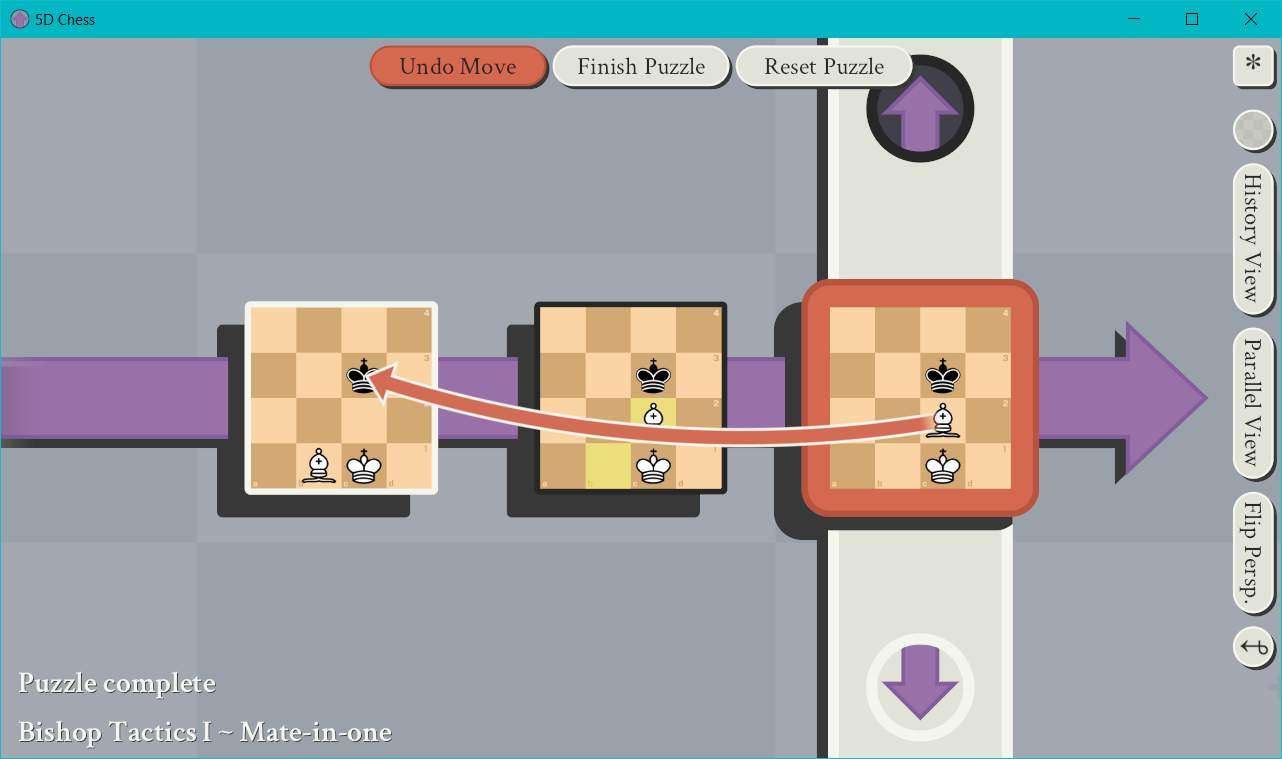
Step 3: Profit.
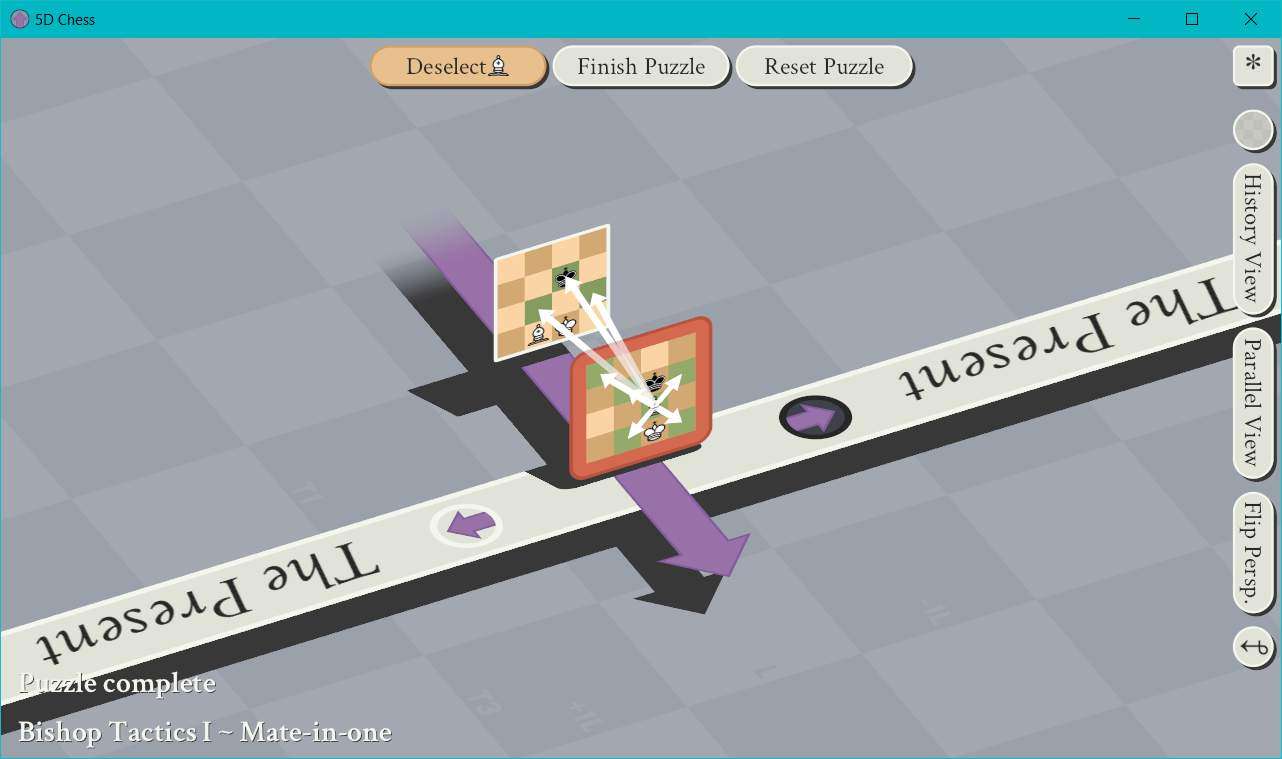
If you’re confused about the Bishop movement, here’s another perspective:
13 – Bishop Tactics II – Mate-in-one
- Player Color: White
- Opponent Color: Black
Here’s the puzzle:
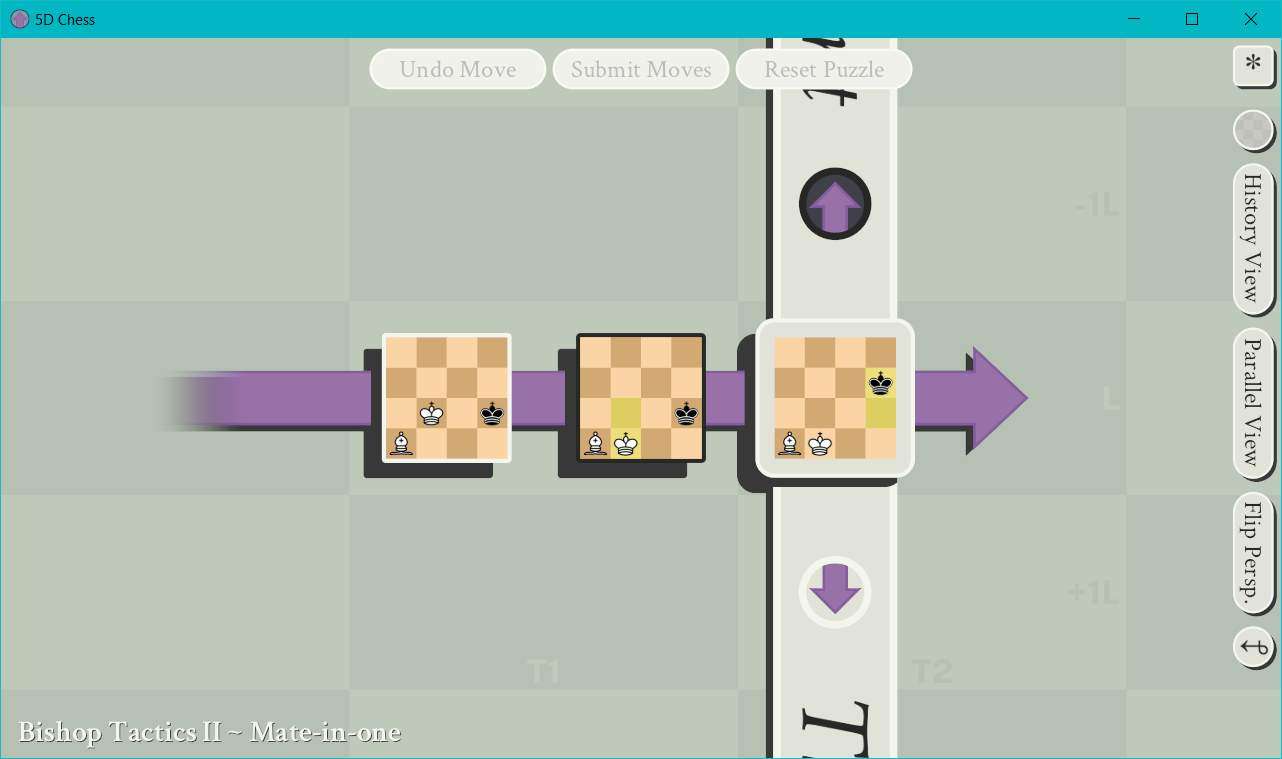
Step 1: Start at the only active board state.
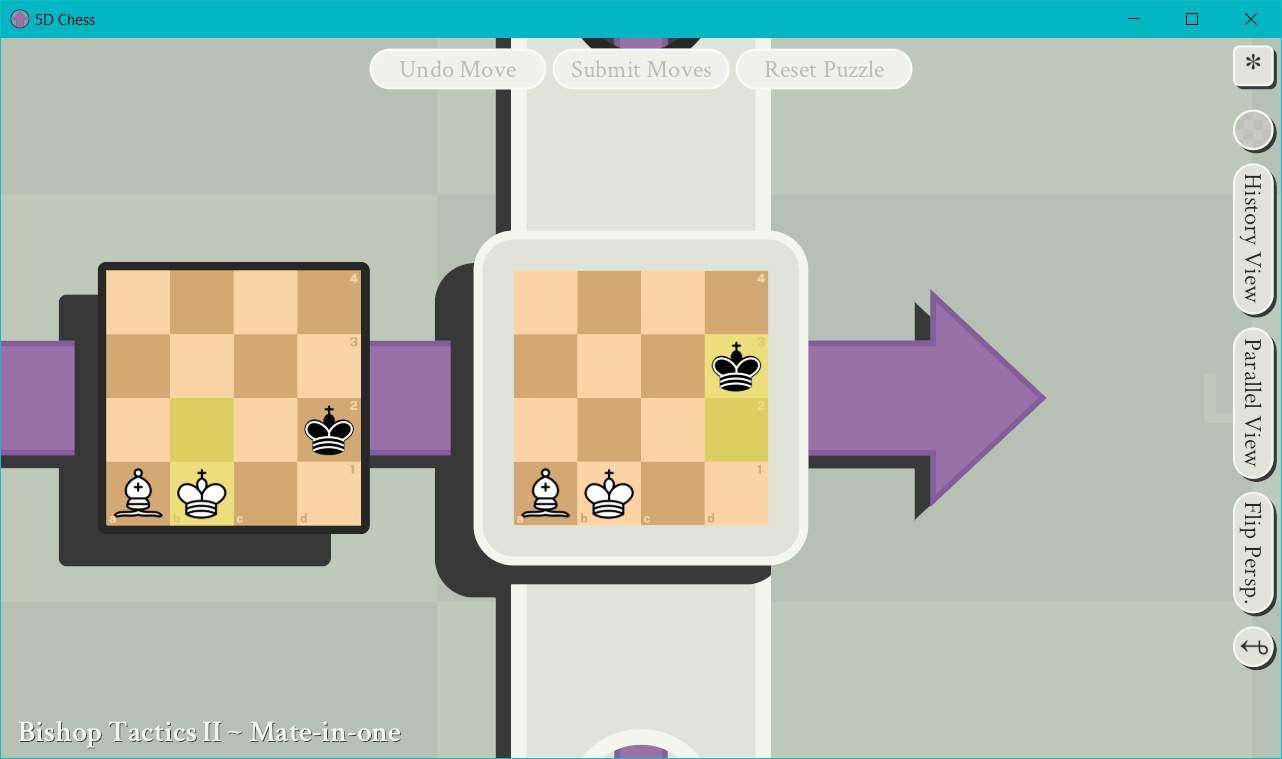
Step 2: We’re going to move our Bishop from A1 to B2 to threaten Black’s King in the past on the first board state. This is because we can move our Bishop 2 squares backward along the time axis and 2 squares right along the X axis, so from B2 in the present to D2 in the past. Since Black has no counter to get out of check, we have checkmate.

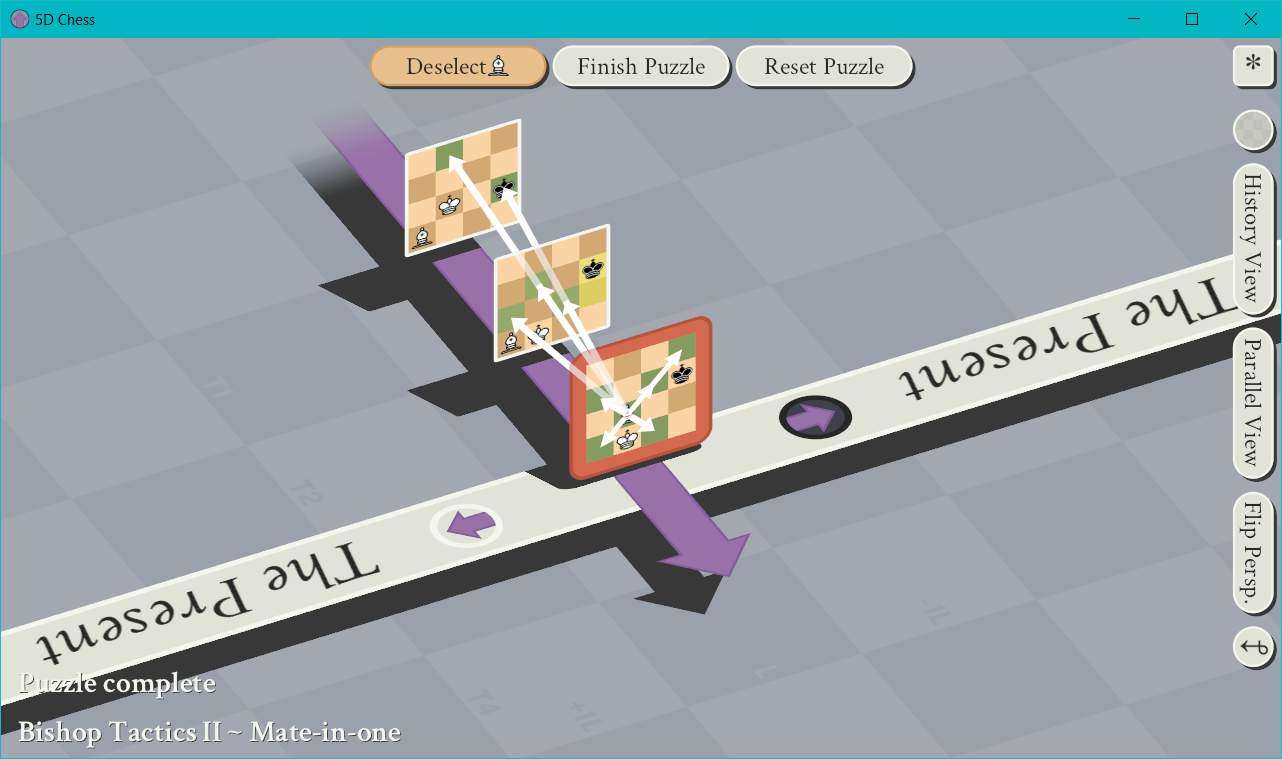
Step 3: Profit.

And once again, here’s another perspective to show how the Bishop moves along the time axis, as well as either the X or Y axis:
14 – Bishop Tactics III – Mate-in-one
- Player Color: Black
- Opponent Color: White
The title of this puzzle is a little bit misleading. We will in fact win using our Bishop, but we won’t actually play any Bishop moves for this one.
Here’s the puzzle:
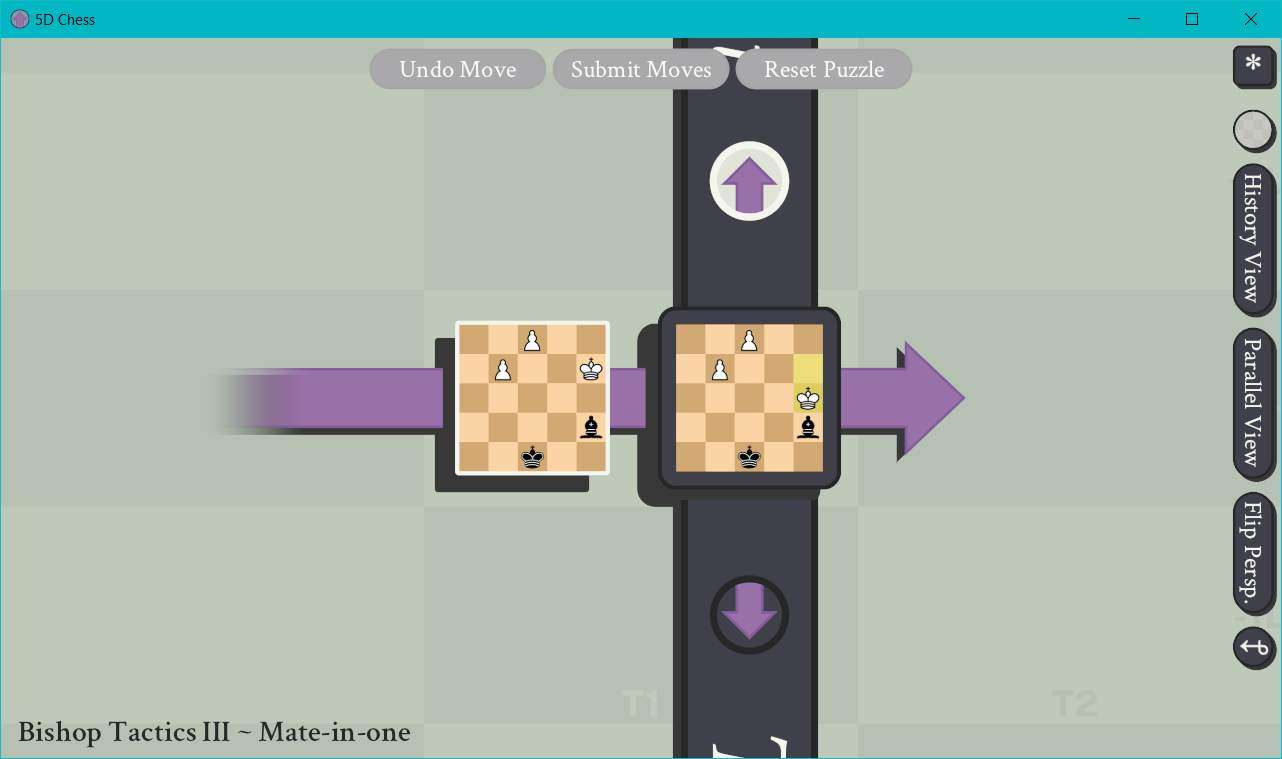
Step 1: Yadda yadda, start with the active board state.

Step 2: We’re going to move our King from C5 to B5. Our Bishop is already perfectly positioned so that next turn it’ll be threatening Black’s King in the past by moving 1 square along the time axis into the past and 1 square upward along the Y axis from A4 to A3. Essentially, we’re looking to progress time by one board state, and then threaten to come back to this one with a second Bishop. We just need to protect our Bishop from being taken by the Black King in the present, hence why we’ve moved our King next to our Bishop. If the Black King tries to take our Bishop, then they’ll move into check from our King. And so, they have no counter to our threat which gives us the checkmate.

Step 3: Profit.
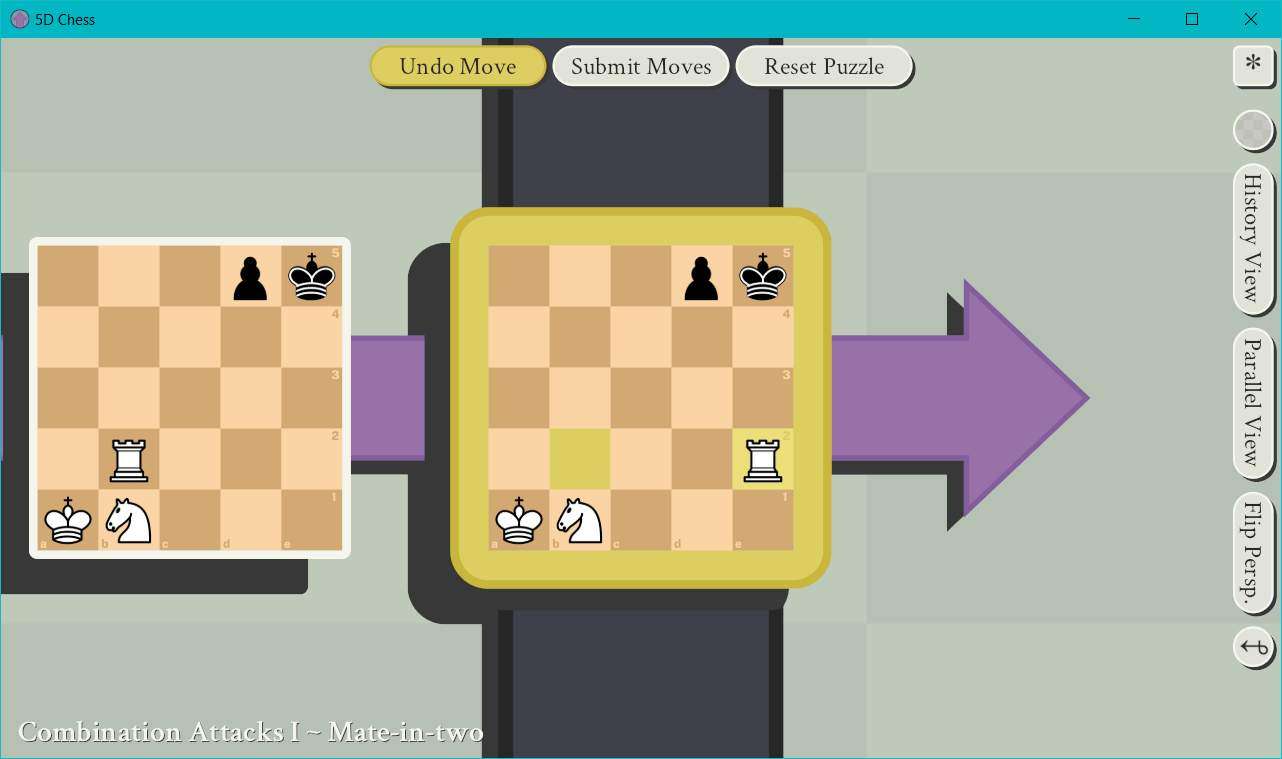
15 – Combination Attacks I – Mate-in-two
- Player Color: White
- Opponent Color: Black
Time to start putting into practice all of these mad skillz we’ve been acquiring. These next few puzzles will require us to use multiple different types of pieces to secure the win.
Here’s the puzzle:

Step 1: Start from the active state and just do the thing.

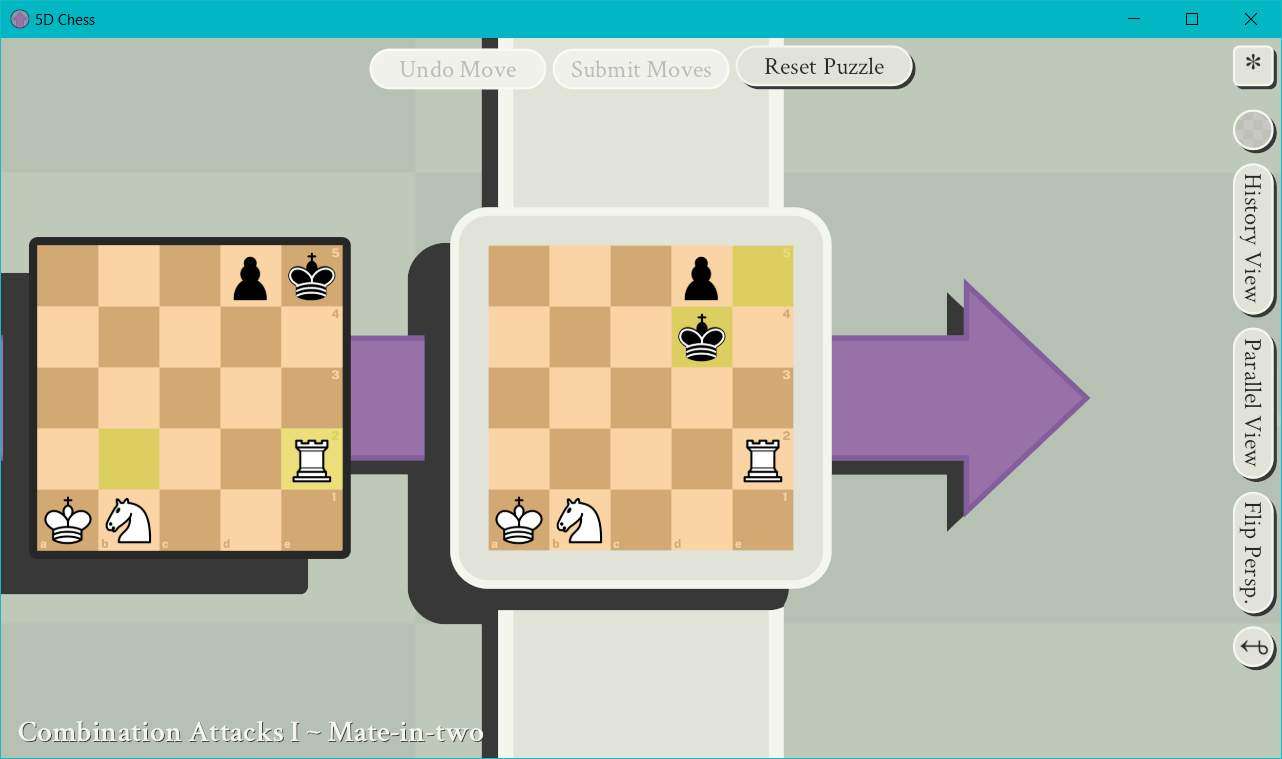
Step 2: We’re going to move our Rook from B2 to E2 to threaten Black’s King and force them out of their little hidey hole at E5.
They have no choice here, they have to move their King to D4.
Step 3: Now we’re going to move our Knight from B1 to D2 to threaten Black’s King one square in the past and two squares upward along the Y axis. Black has no counter, so check and mate, we win.
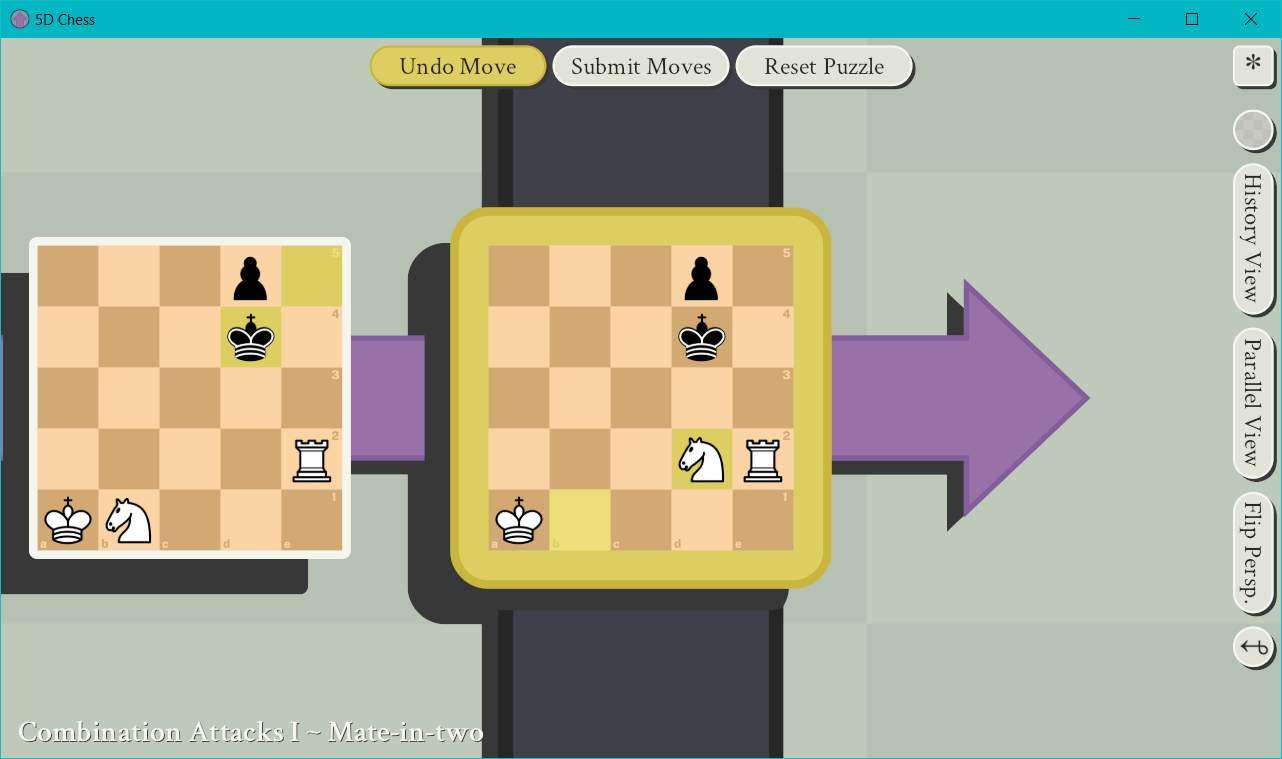
Step 4: Profit.
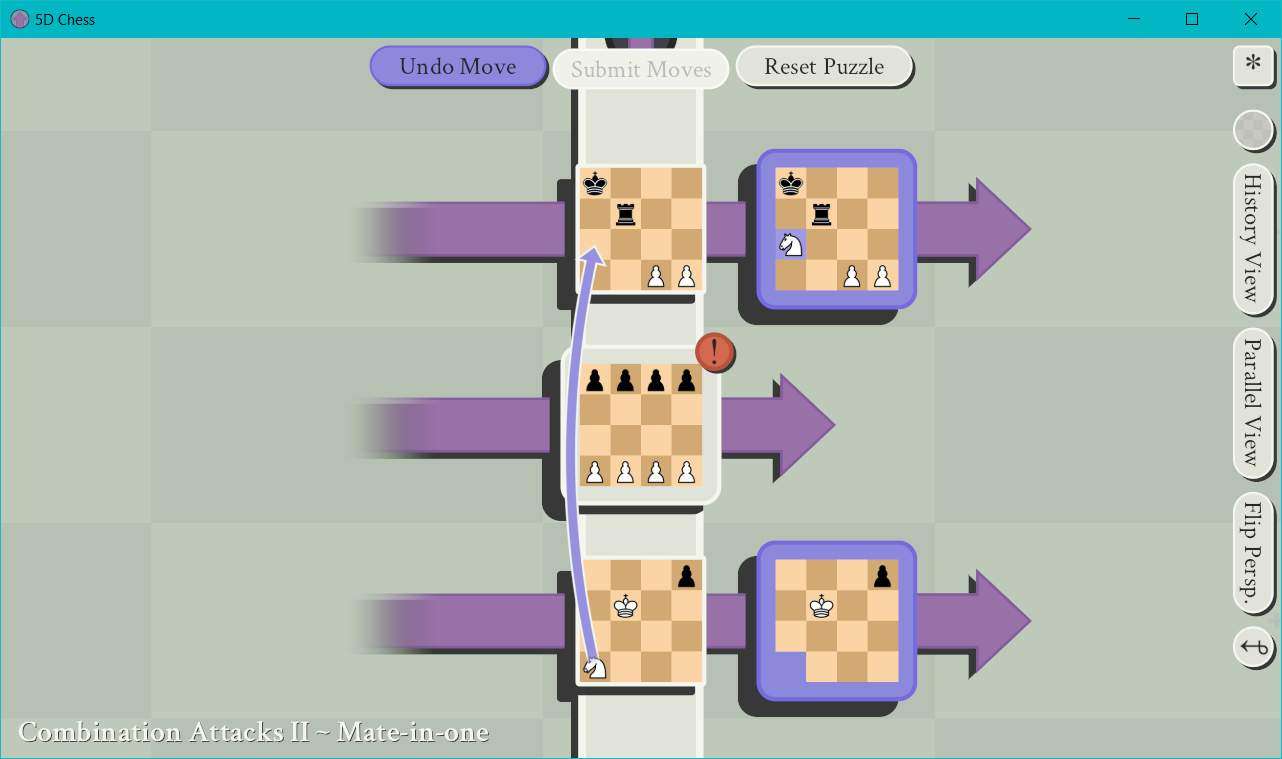
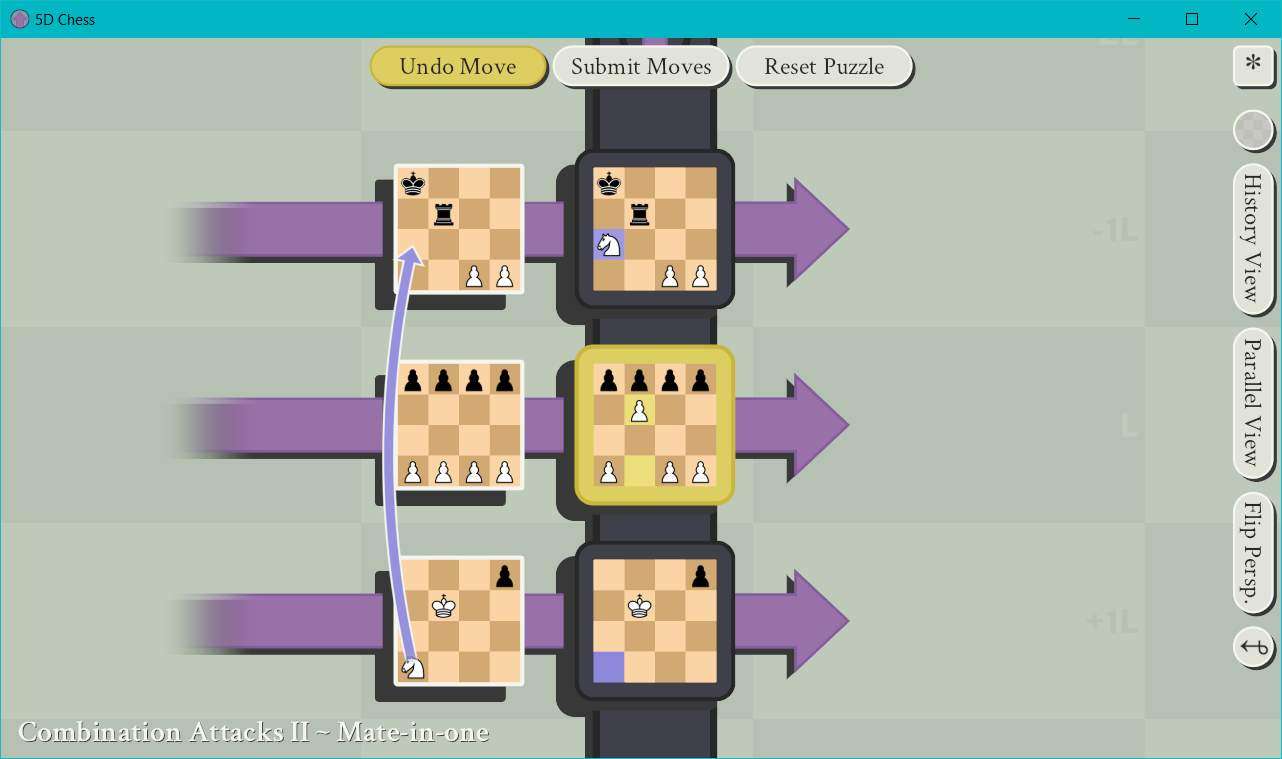
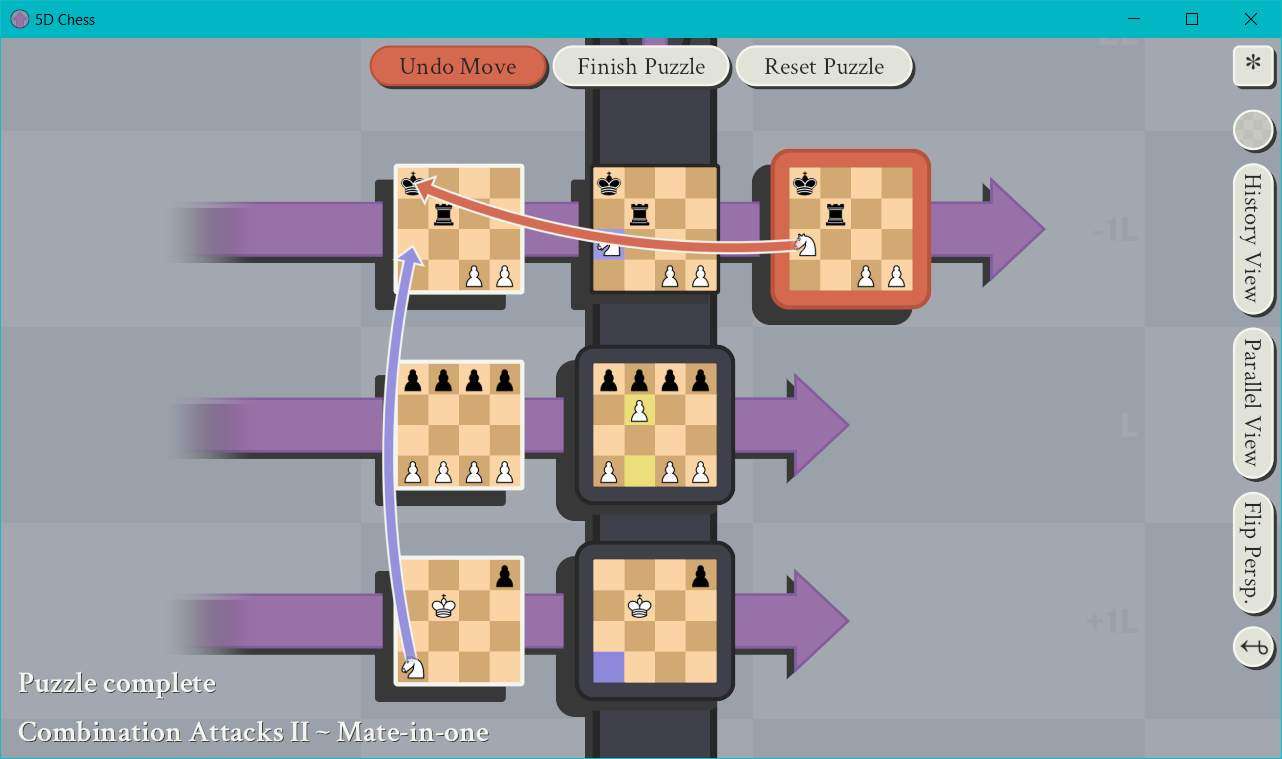
16 – Combination Attacks II – Mate-in-one
This, in my opinion, is one of the trickiest puzzles in the entire set. There are a few puzzles which I think a lot of people will struggle with even if they understand the core mechanics of the game, and this is one of them.
Here’s the puzzle:
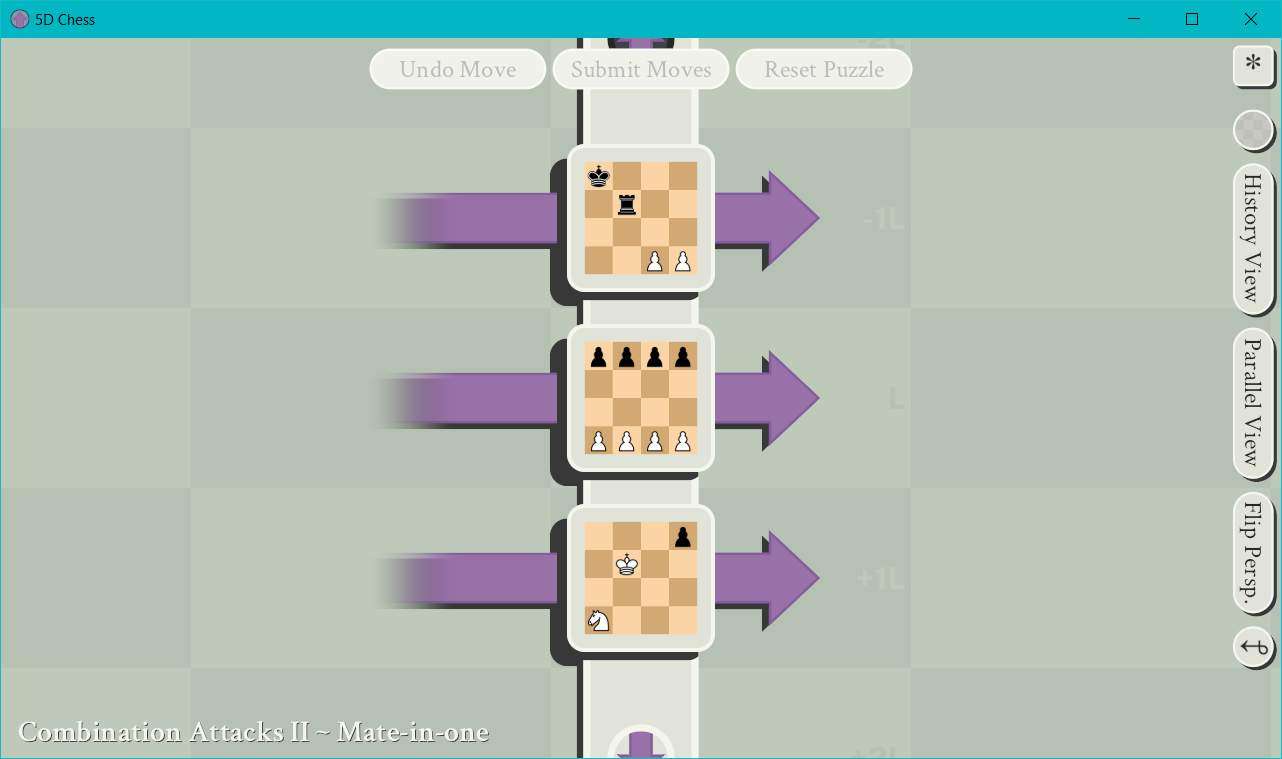
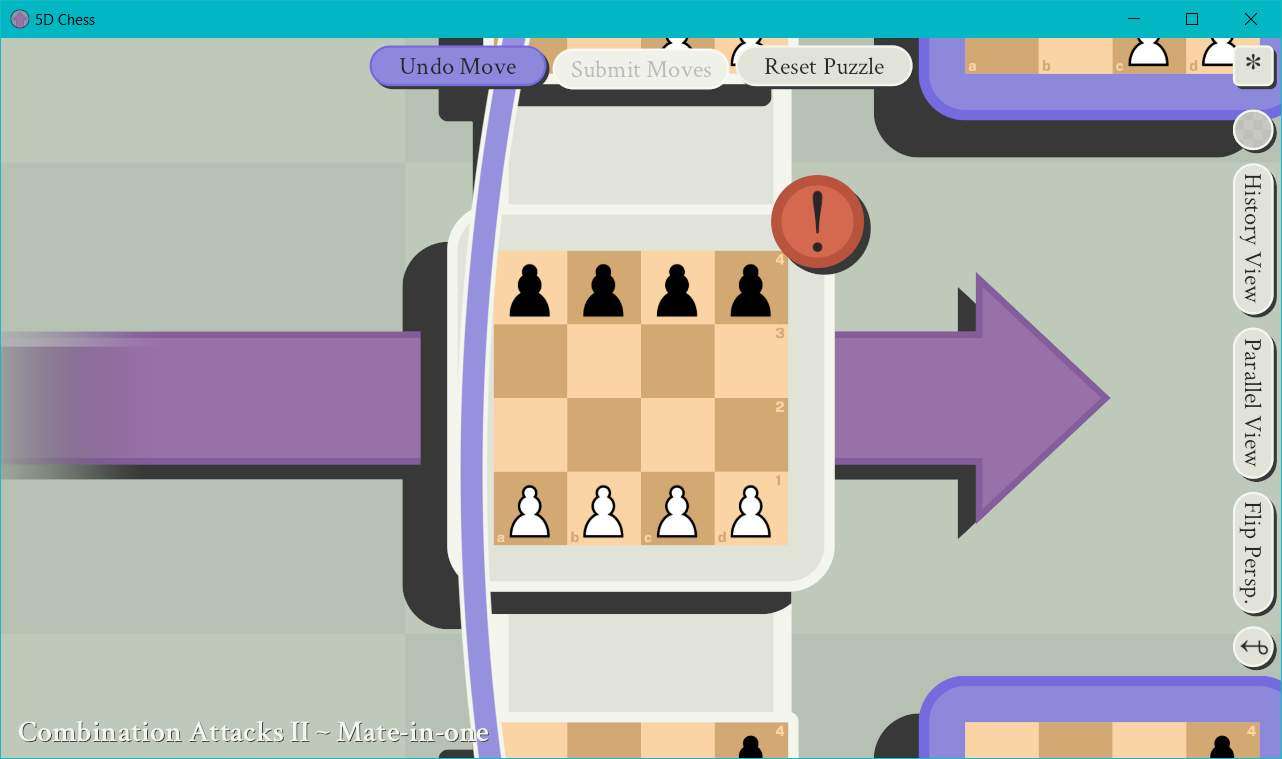
Step 1: So this puzzle has three parallel worlds which all exist in the present, so we need to satisfy all three of these before we can end our turn, but the order in which we interact with them is left up to us. We’re going to start with the bottom board state.
Step 2: We’re going to get aggressive here and send our Knight 2 squares upward on the parallel world axis and 1 square upward on the Y axis, so from A1 on the bottom timeline to A2 on the top timeline. We’re aiming to pull an old familiar gambit here we’ve done a few other times where we’ll score a win by threatening the Black King in what will become the past.
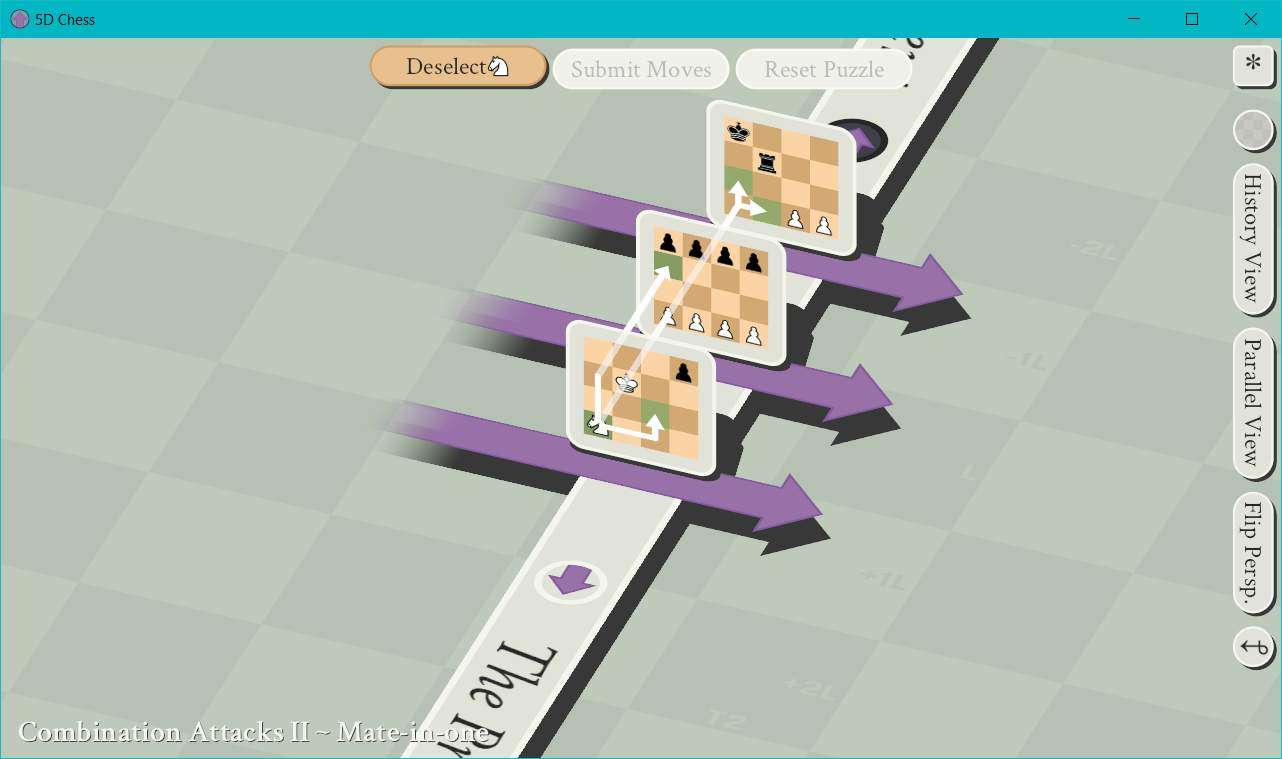
There’s a small hiccup with this plan, however. We’ve put ourselves in check with this plan. The Black Rook can move across any number of parallel worlds as long as it remains in the same position on the X, Y, and time axes, and as long as it is not blocked along that path. And it just so happens to be posed to claim our King.
Here you can see where Black has the potential to put us in check:
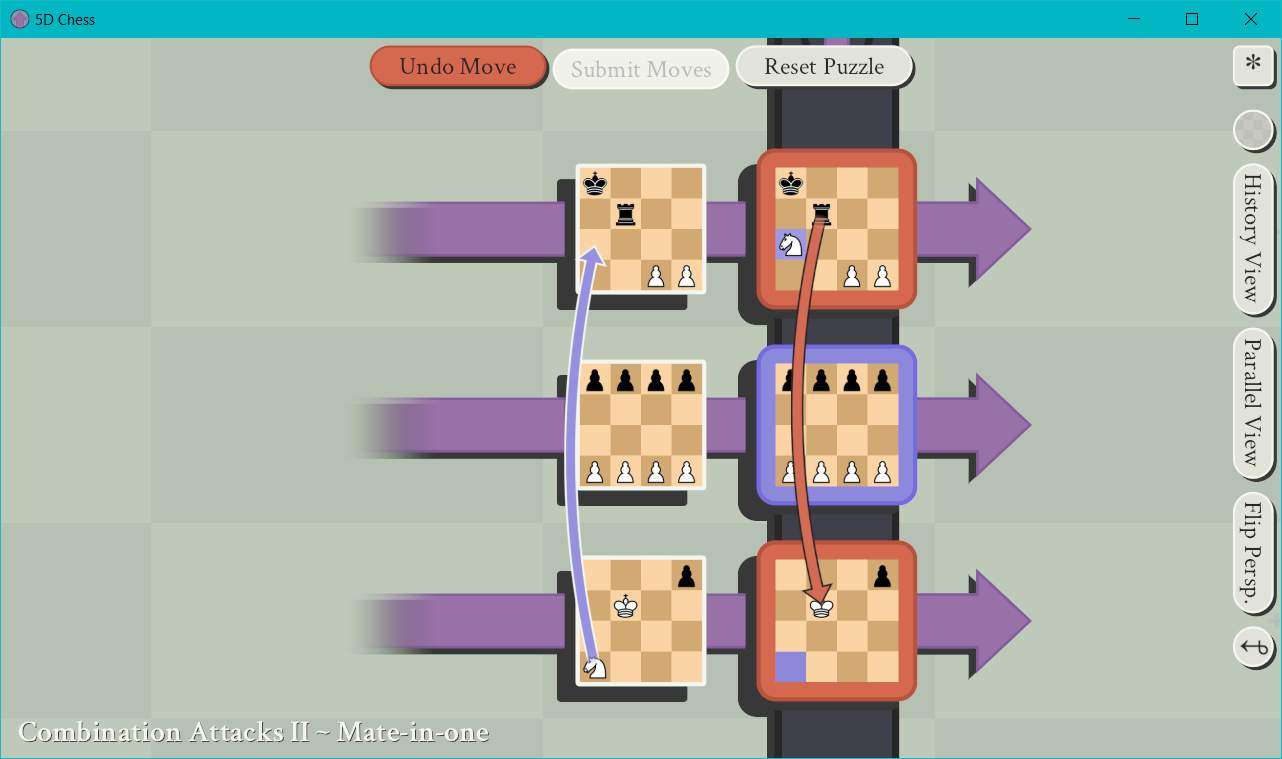
Step 3: Rooks have a weakness, as I’ve already hinted at. Just as Rooks can be blocked from moving along X or Y axes by simply moving any piece into their path, they can also be blocked from moving along the time or parallel world axes by just putting a piece in their path. We have our win condition set up and Black has no method of countering it, we just need to block the Rook, and that’s what our middle timeline is all about.
Step 4: We’re going to move our Pawn from B1 to B3, which will put it between Black’s Rook and our King on the parallel world axis. And with that, their check has been countered, and they can’t respond to the threat we’ve imposed upon them, so we have checkmate.
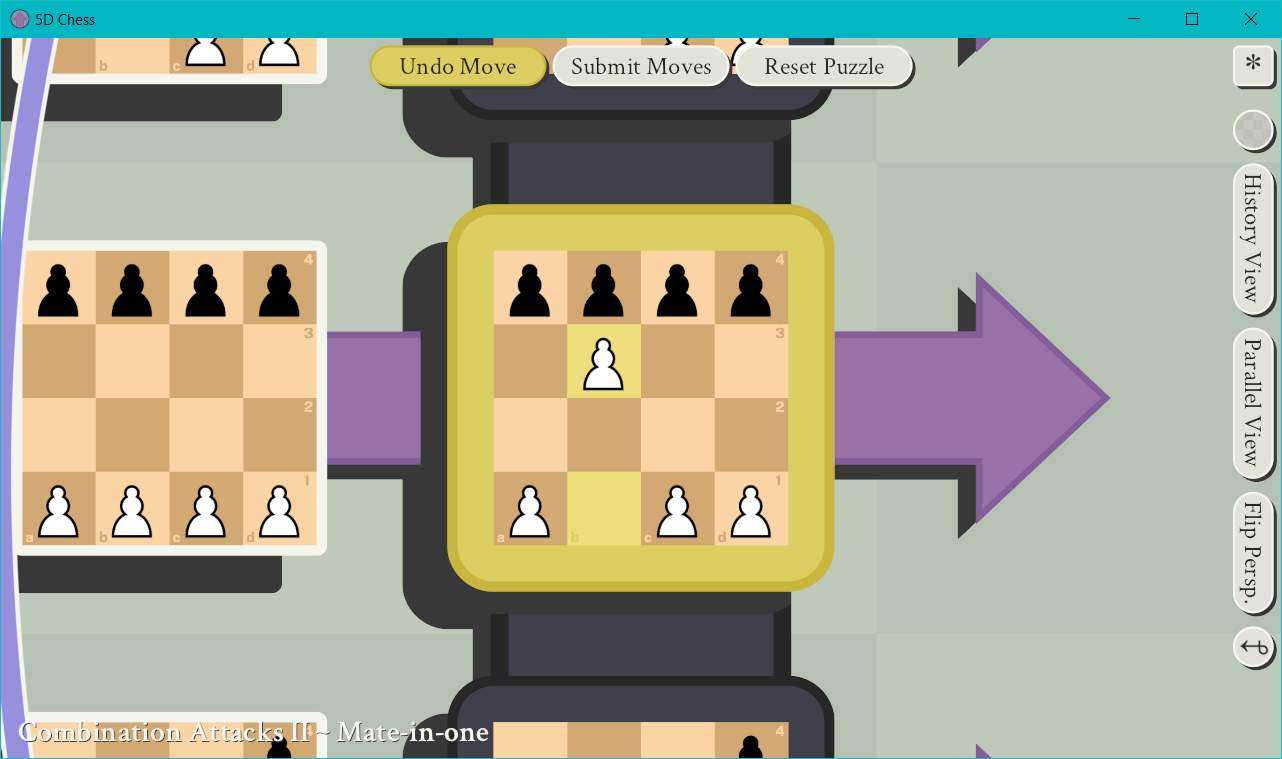
This will be what the puzzle will look like:
Step 5: Profit.
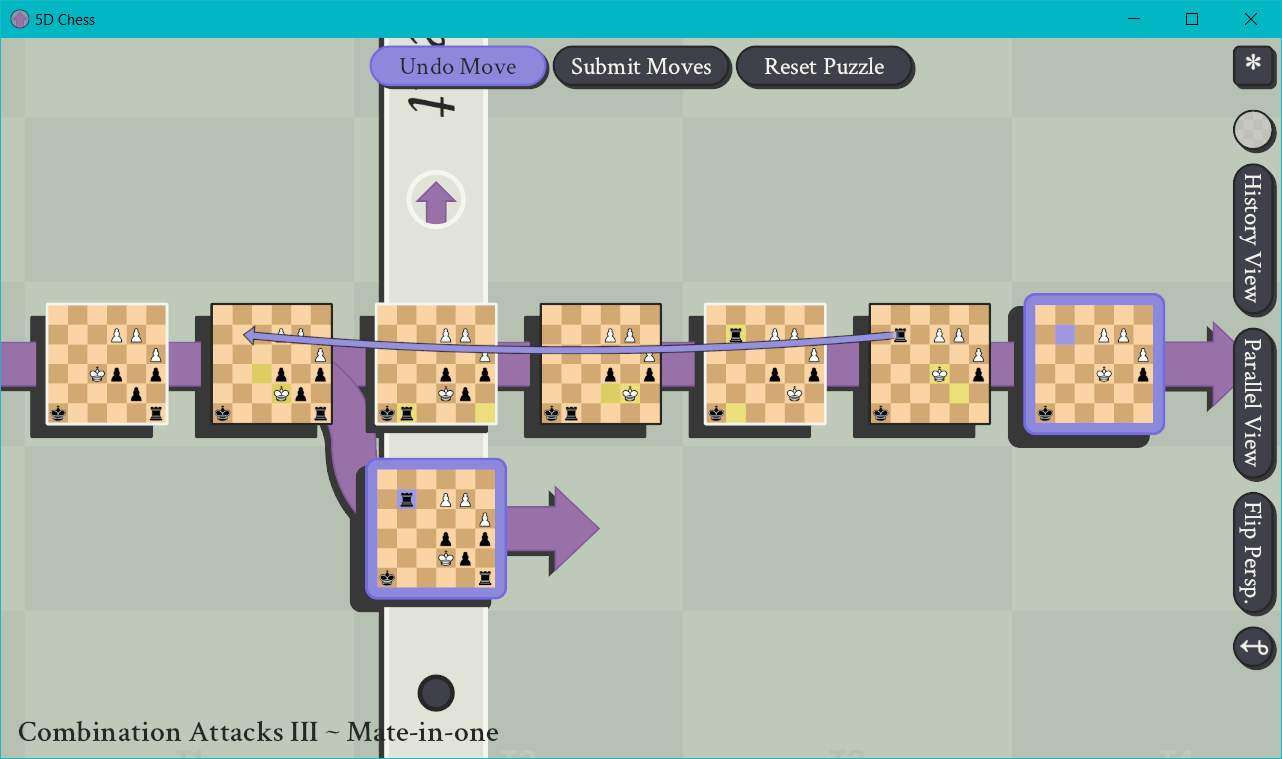
17 – Combination Attacks III – Mate-in-one
- Player Color: Black
- Opponent Color: White
So, we never got a Pawn Tactics series of puzzles, but we need to understand how Pawns work with the time/parallel world mechanics to solve this puzzle. In the present board state, Pawns can move 2 squares upward on the Y axis if they have not moved previously, and 1 square upward on the Y axis otherwise, unless there is an opposing piece 1 square upward on the Y axis and additionally 1 square away on X axis, in which case they can take the piece. However, in 5D Chess, they can also normally move upward 1 square on the parallel axis, and if there is an opposing piece 1 square upward on the parallel axis and 1 square away in either direction on the time axis, it can claim that piece. If it seems confusing, we’ll see an example of it in this puzzle.
Here’s the puzzle:
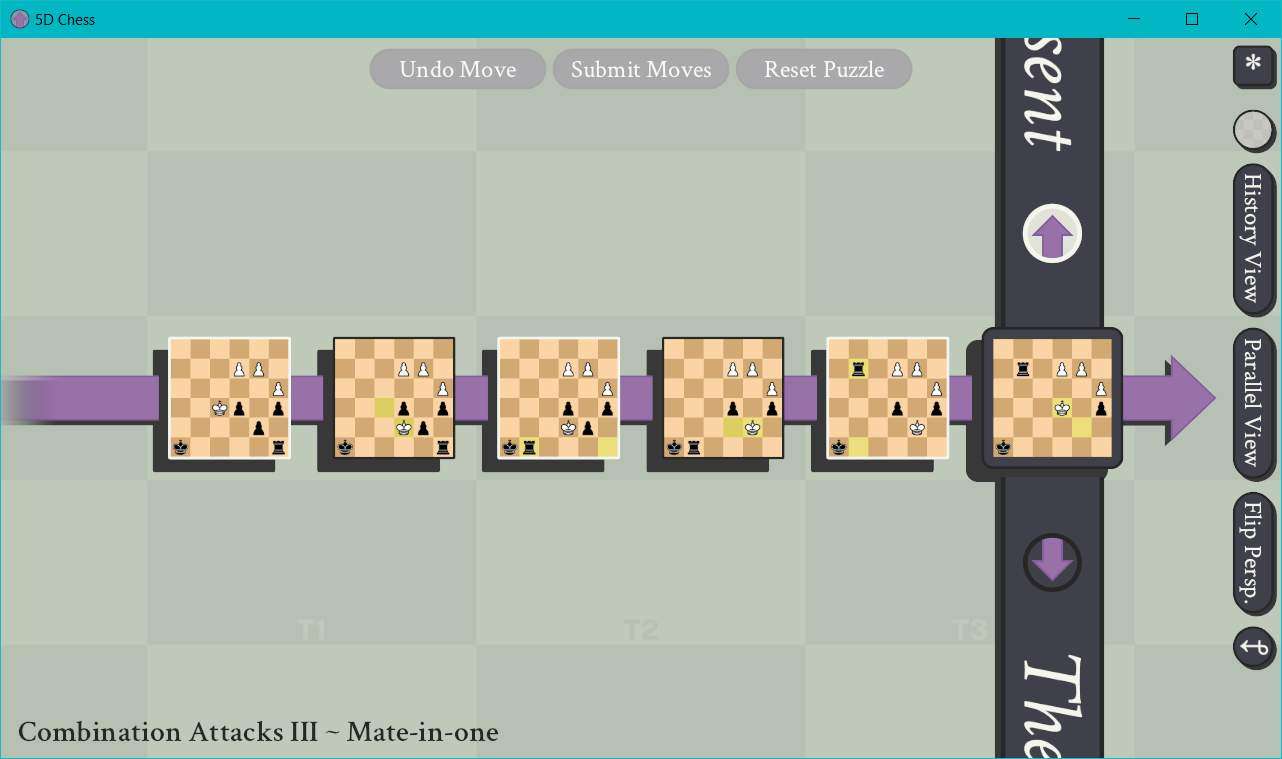
Step 1: We’re back to having no options for where to start, so we’re hitting up the only active board state.
Step 2: We’re going to send our Rook 2 squares backward in time. We honestly don’t care too much about the Rook itself. What we care about is the position in time we’re going to branch off at. We want a board state from which we can use our Pawn to capture White’s King at C4, so it needs to be one board state below on the parallel world axis and one board state away in either direction on the time axis.

Here’s what the puzzle should look like:
Step 3: Profit.
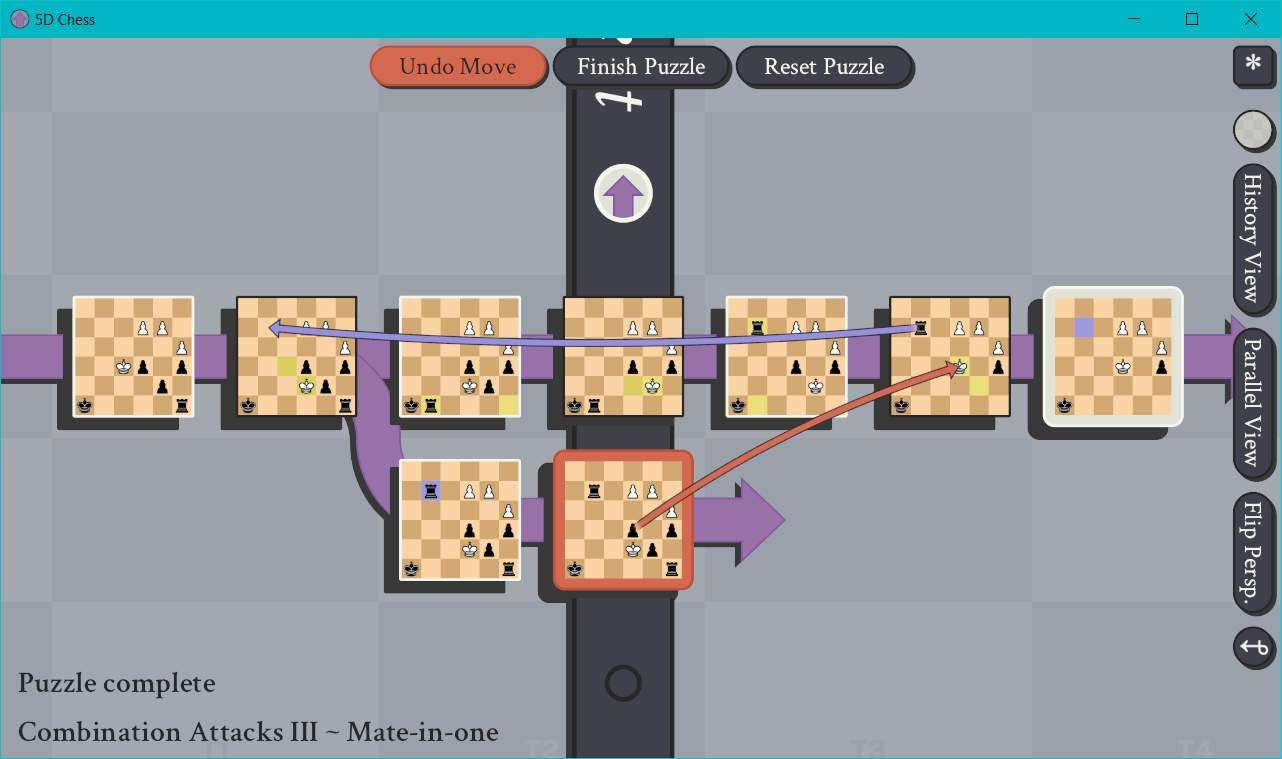
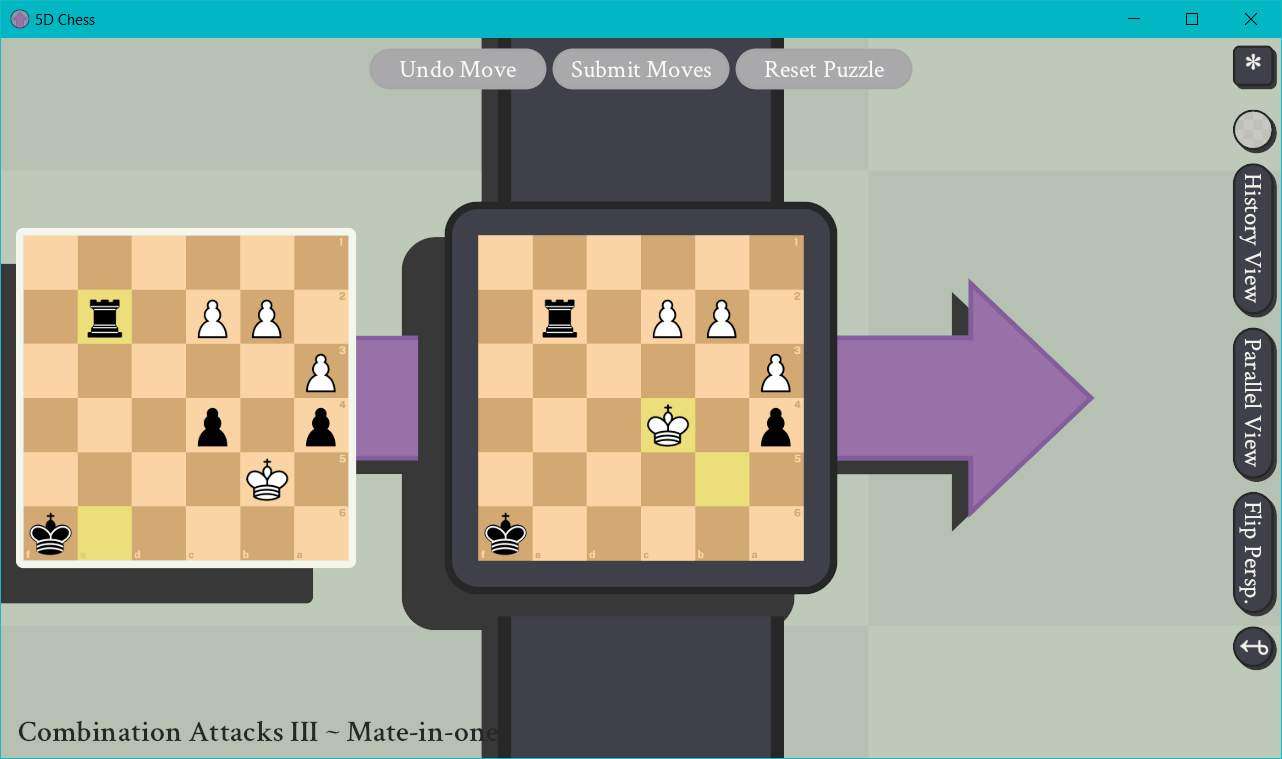
In case this Pawn movement is confusing, here’s another viewpoint:
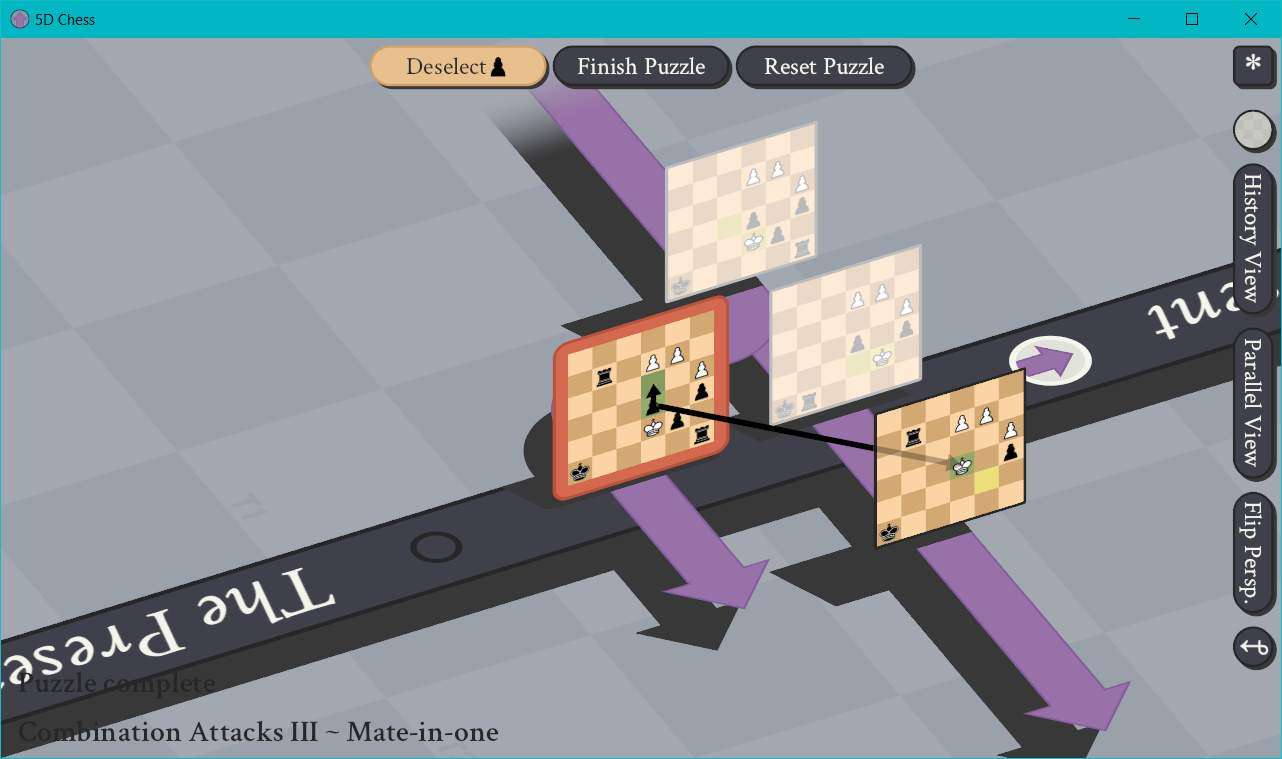
As you can see, we’re threatening to attack with our Pawn diagonally through time and parallel worlds to claim White’s King.
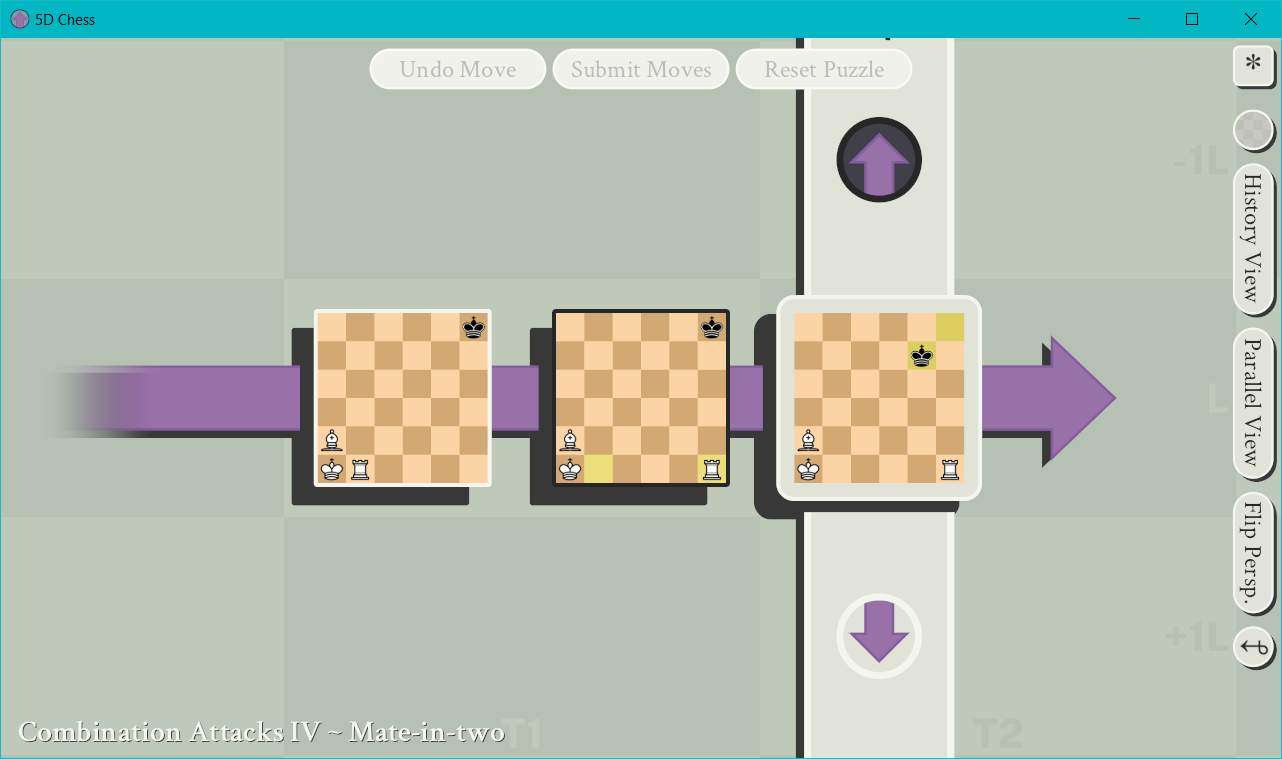
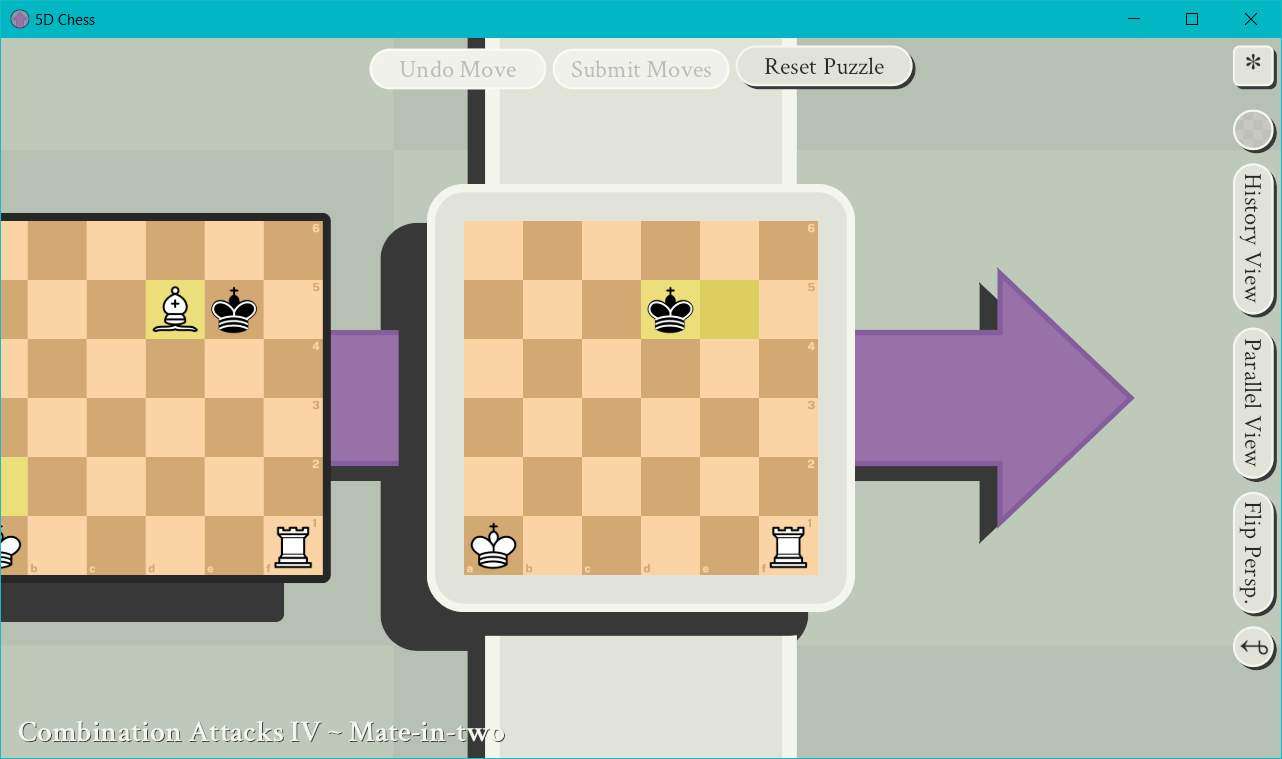
18 – Combination Attacks IV – Mate-in-two
- Player Color: White
- Opponent Color: Black
This puzzle will see us leaning back on some old classic strategies from the Rook Tactics days.
Here’s the puzzle:
Note: This puzzle got updated, and it eliminated one possible solution. If you’re interested, you can see an explanation of the changes in the Comments section. Another member of the community pointed it out to me, and this puzzle solution should now be up to date.
Note: It actually got changed back to the original version for some reason. Honestly not sure why this was, but it makes me kind of sick of looking at this puzzle, truth be told.
Step 1: Yeah, so imagine I made a hilarious joke about how we’re starting with only active board state.

Step 2: So we’re going to start by trying to bait Black’s King away from the corner. Our final winning move will involve using our Rook to threaten Black’s King in the past by taking the top-right corner, but if we move there now, their King will simply take our Rook. So we’re going to move our Bishop from A2 to D5. This puts their King in check in the past, and they have no options but to take our Bishop with their King. The Bishop is a necessary sacrifice on our end to win this.

And as you can see, Black takes the bait:
Step 3: Now we’re free to move our Rook from F1 to F6, threaten Black’s King in the past, and leave them without a counter. And this will give us the checkmate.
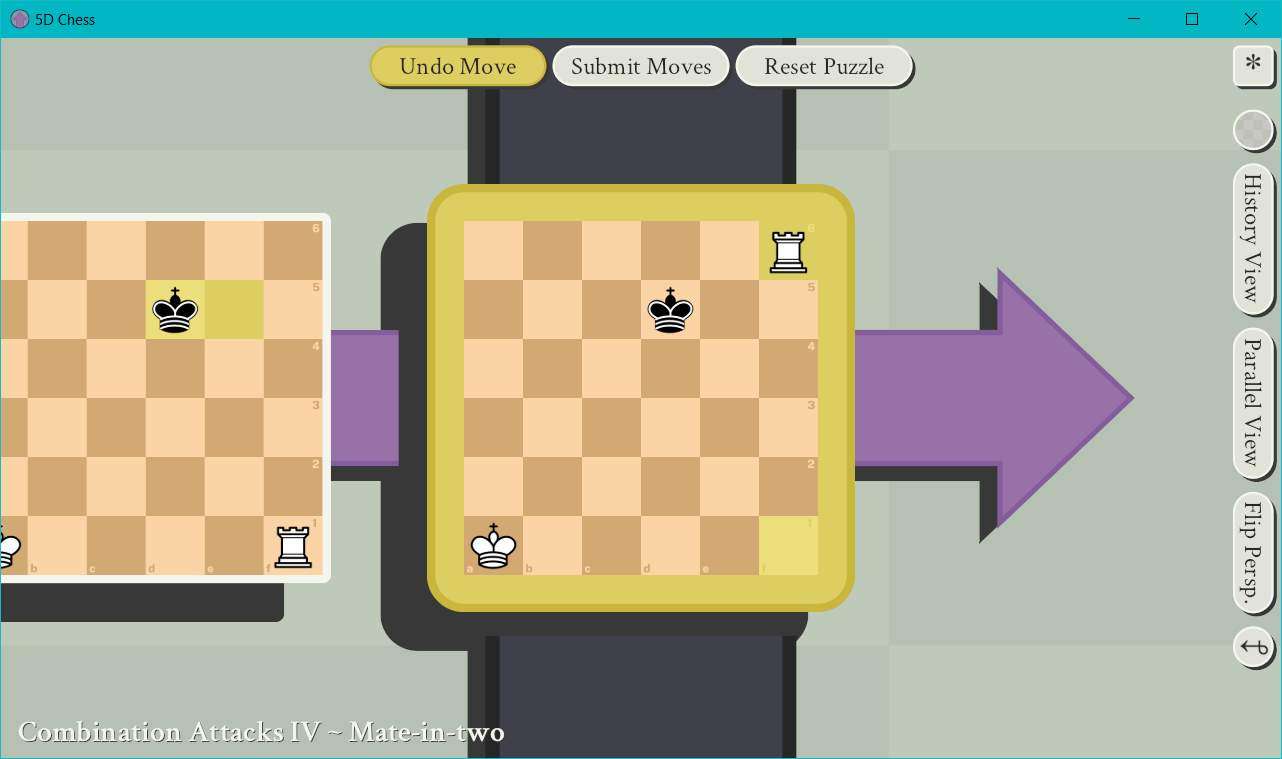
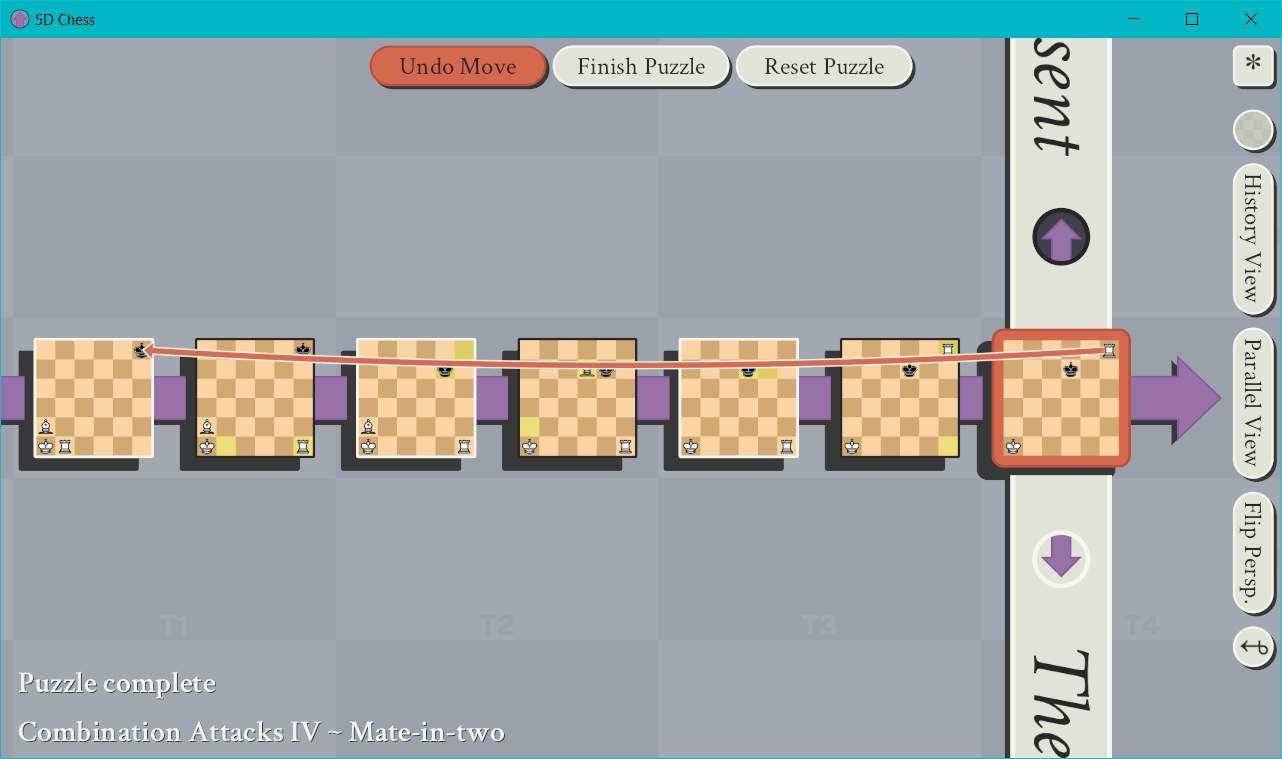
Step 4: Profit.
19 – Backrank Basics I – Mate-in-one
- Player Color: White
- Opponent Color: Black
So, I’m going to level with you here. The Backrank Basics puzzles are mostly your standard fare chess puzzles which you can solve with standard fare chess moves. Only two of them (Backrank Basics III and IV) see any use of the time axis or parallel world axis, and only one of those (Backrank Basics IV) actually requires you to make use of those mechanics to solve it. I’m adding these solutions to the guide for the sake of completion, but you should really try these on your own because there frankly isn’t much for me to teach you here.
Here’s the puzzle:
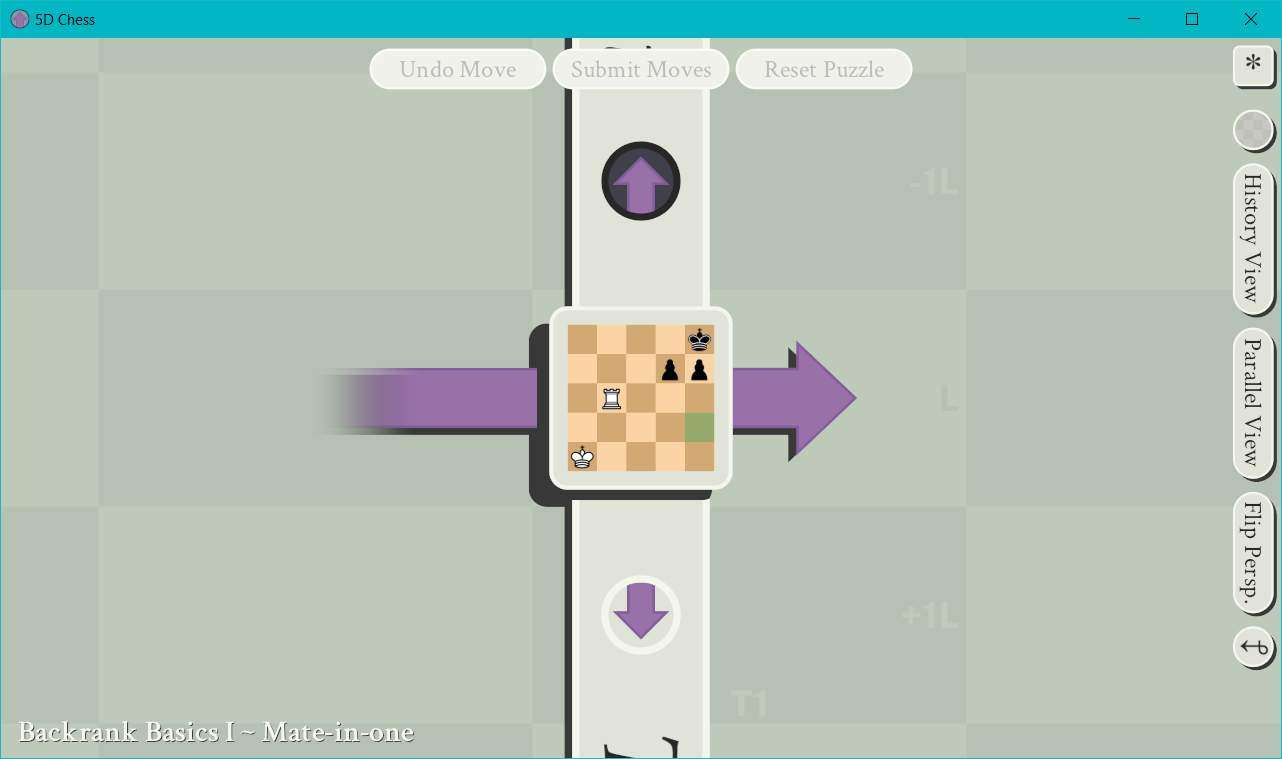
Step 1: Start on the active state.
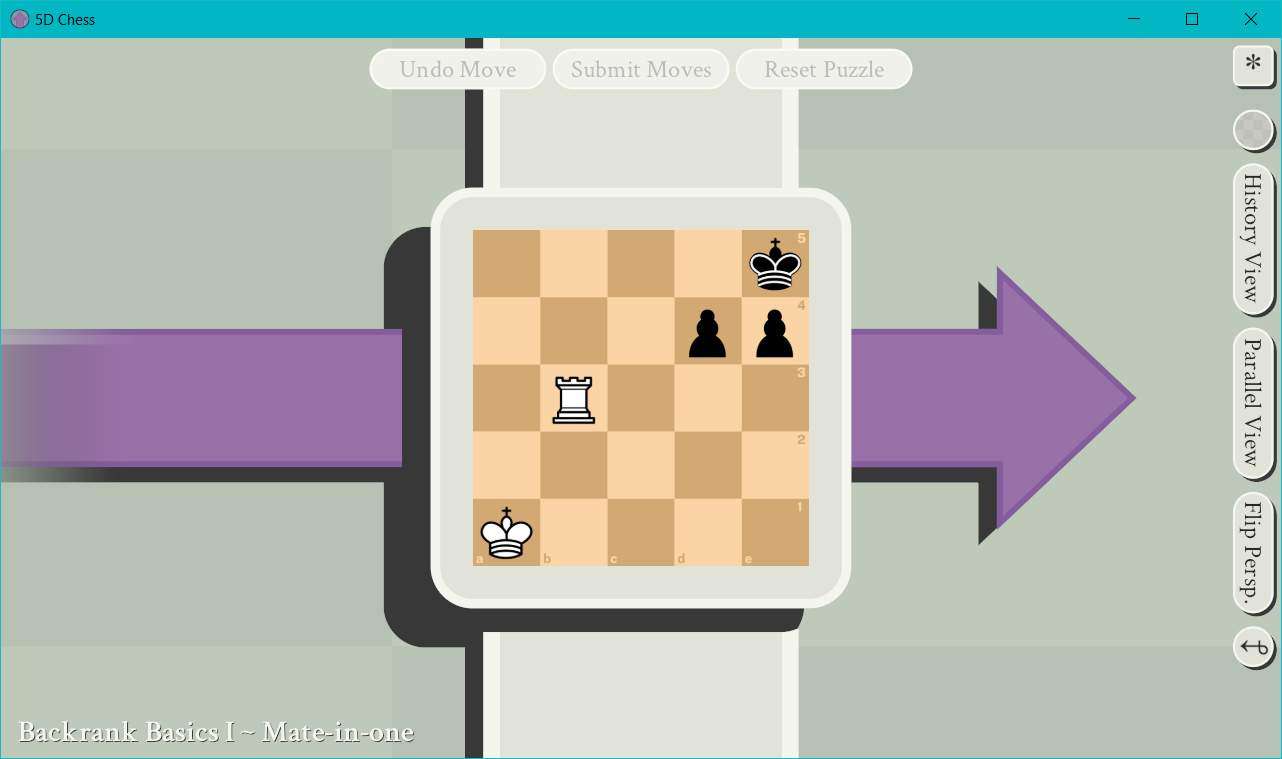
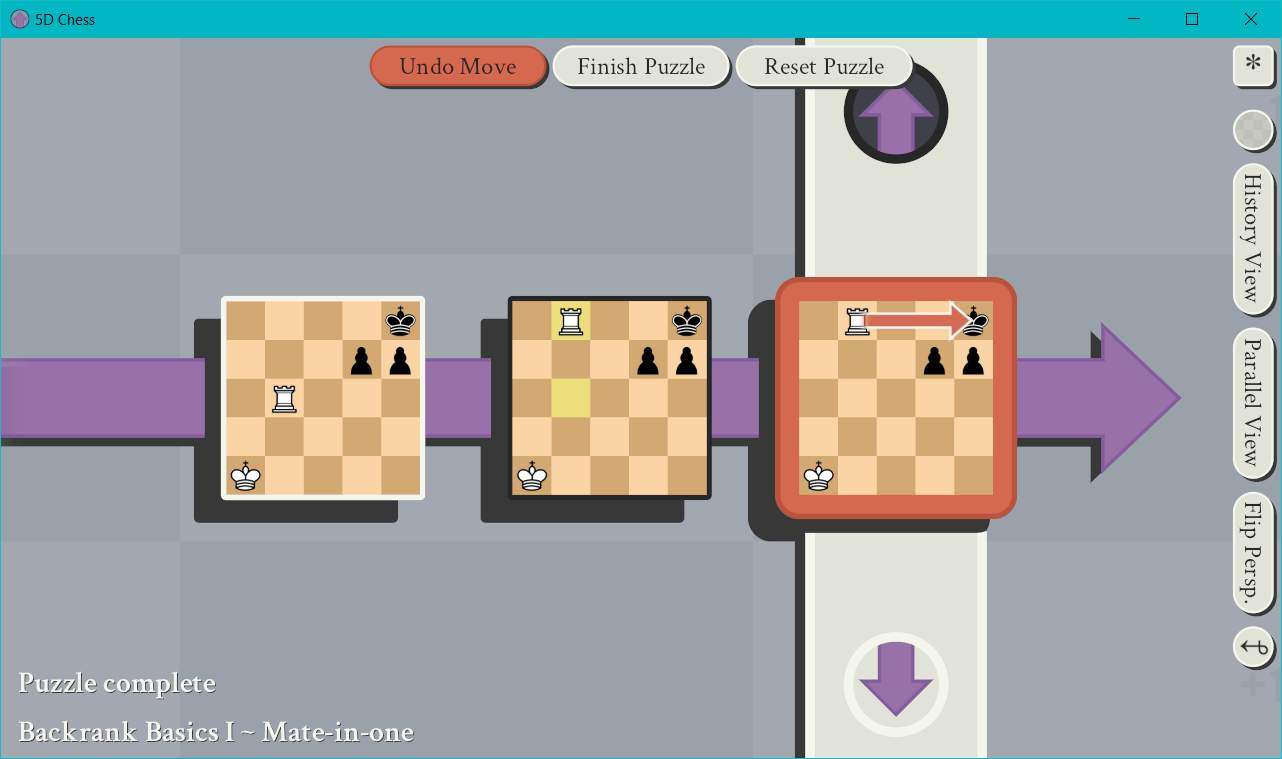
Step 2: Move your Rook from B3 to B5 to threaten Black’s King, aaaaand you’ve won. Really, that’s it. Remember, both players can only move in time or across parallel worlds to board states where it was their move to play. In other words, you can only move to boards with your own color on them.
Black hasn’t had a chance to play any other moves, so they have nowhere to retreat to. And since your Rook is cutting off all possible moves by their King in the present as well, you have checkmate.

Step 3: Profit.
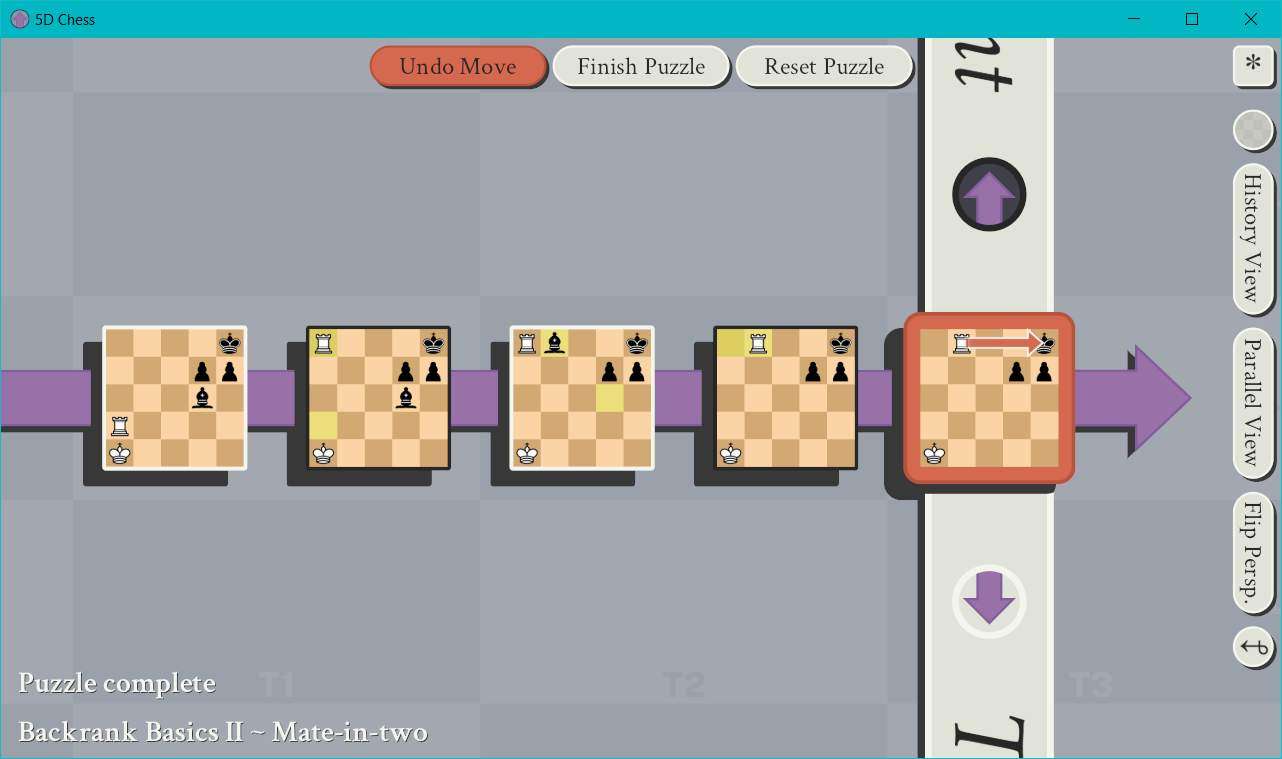
20 – Backrank Basics II – Mate-in-two
- Player Color: White
- Opponent Color: Black
Again, no 5D shenanigans to be seen here. We’re just playing regular chess.
Here’s the puzzle:

Step 1: Start at the active state.
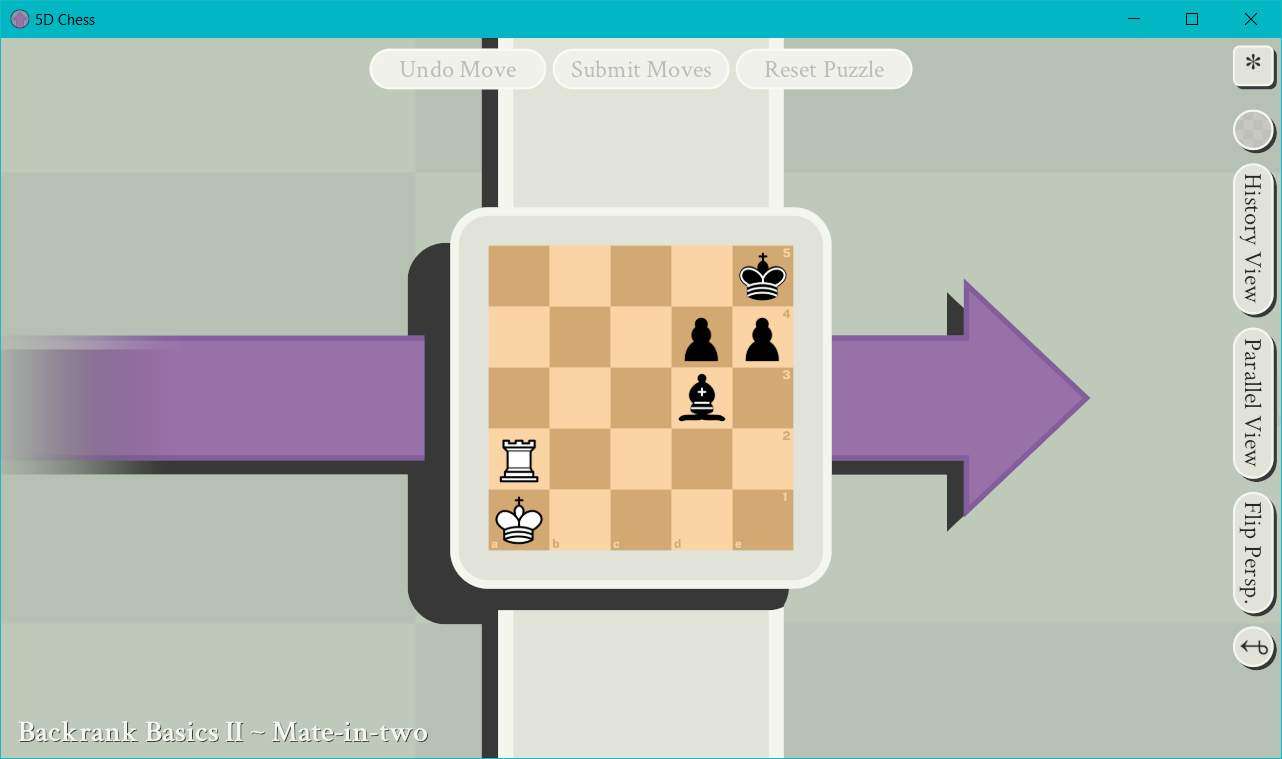
Step 2: We’ll put their King in check by moving our Rook from A2 to A5.

They need to respond, and like in Backrank Basics I, Black has no previous board states or parallel board states to escape to, so their only move is to block our Rook with their Bishop.

Step 3: Second verse, same as the first. We’re going to take their Bishop on B5 with our Rook from A5, which will put their King in check. Technically, they have a response to this by sending their King back in time to one of their previous board states, but the only position they could send it to would be D5 on the most recent Black bordered board state, which they can’t actually do because they would be moving their King into check from our Rook, which is illegal. So, they have no options, which means we win. If you’re confused about how the King moves through time since we haven’t covered that in any previous puzzle, just try not to worry about it for now. We’ll cover that in King Tactics puzzles.
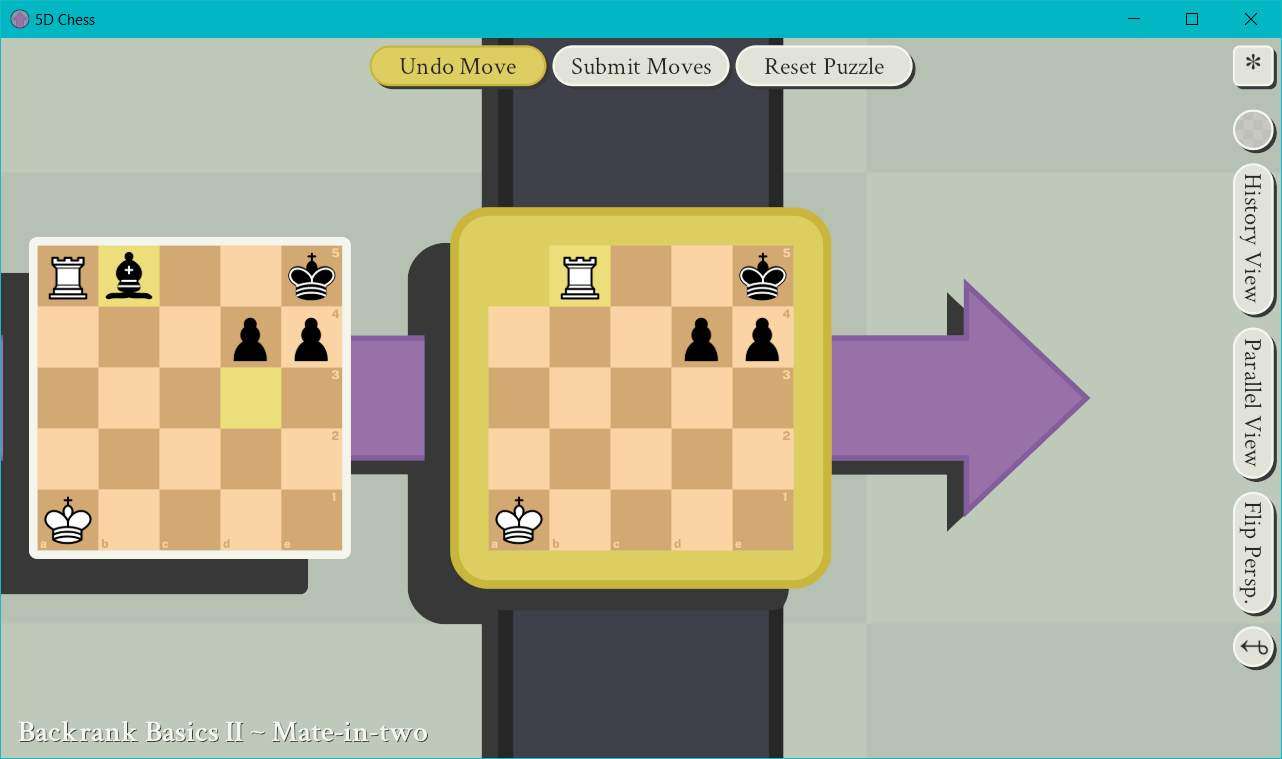
Step 4: Profit.
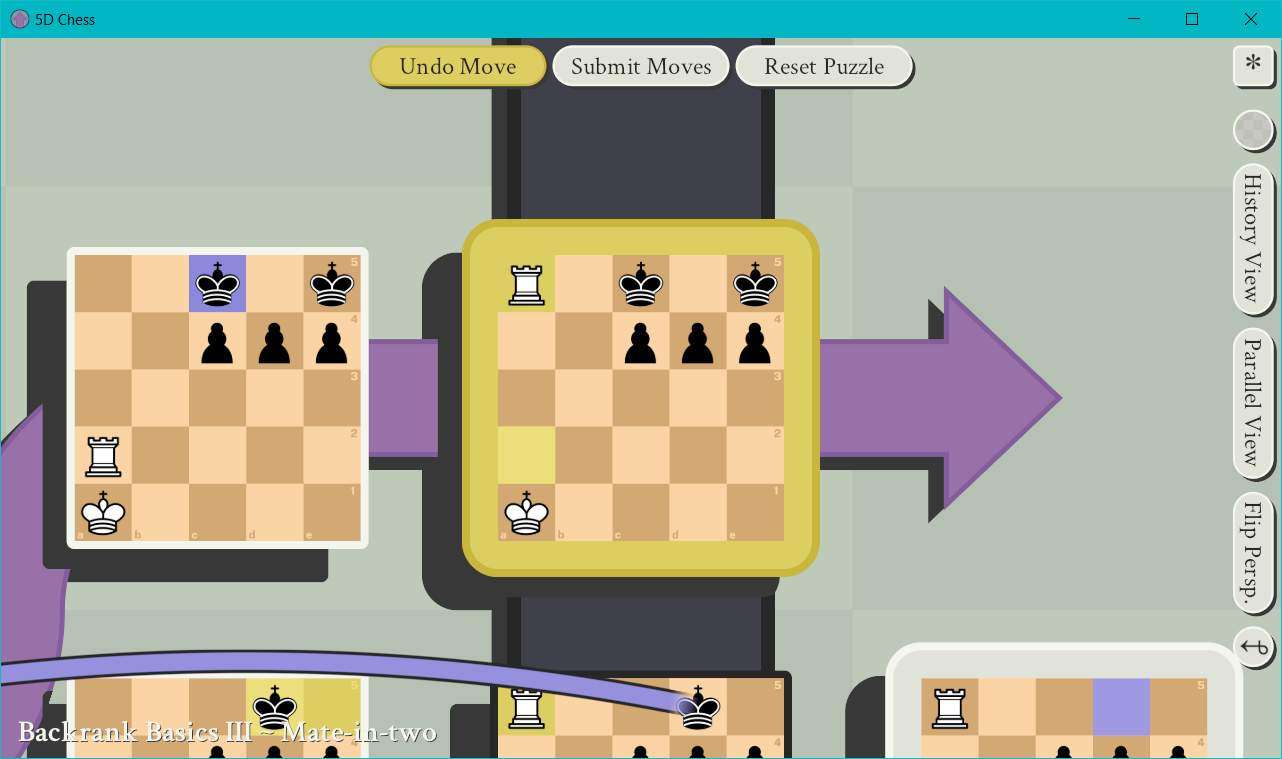
21 – Backrank Basics III – Mate-in-two
- Player Color: White
- Opponent Color: Black
This is the first Backrank Basics puzzle which will see either player move outside the 2D bounds of regular chess. However, it will only be our opponent doing so, unfortunately.
Here’s the puzzle:

Step 1: No options here, start with the active state.
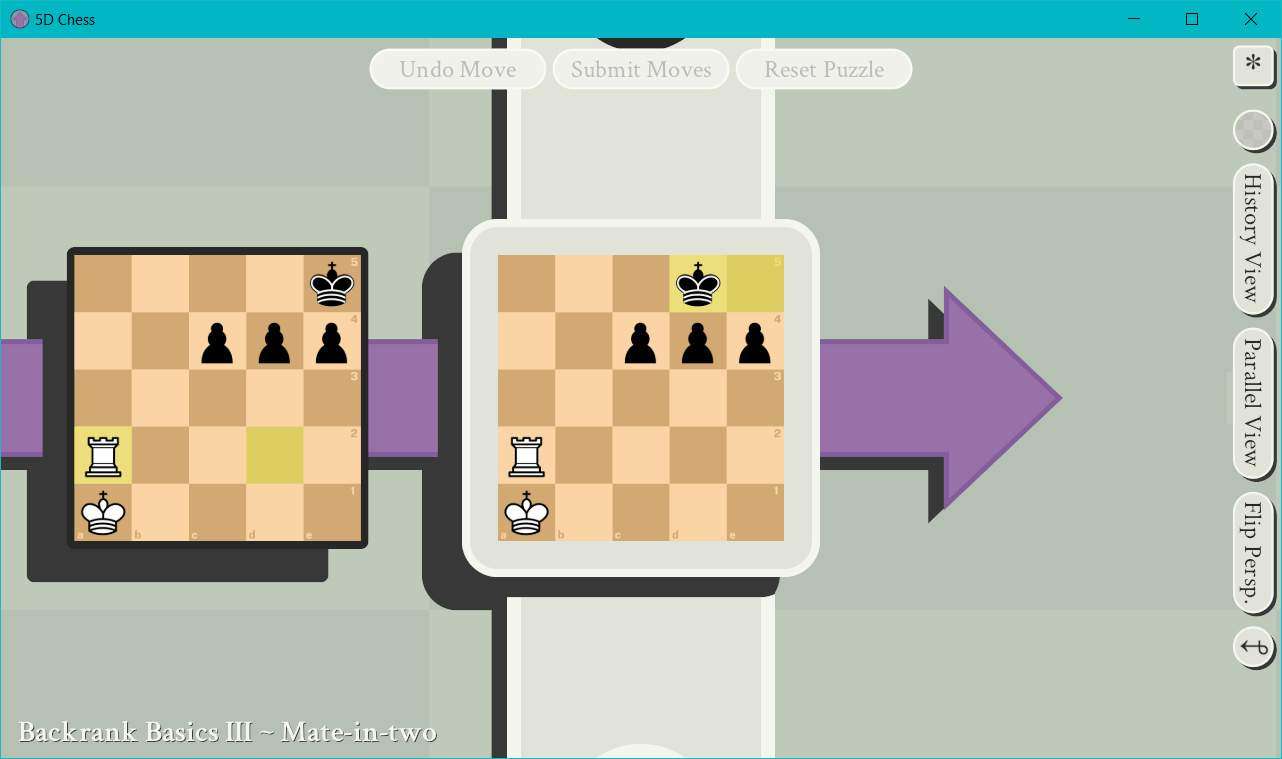
Step 2: We’re going to move our Rook from A2 to A5 and put Black’s King in check.
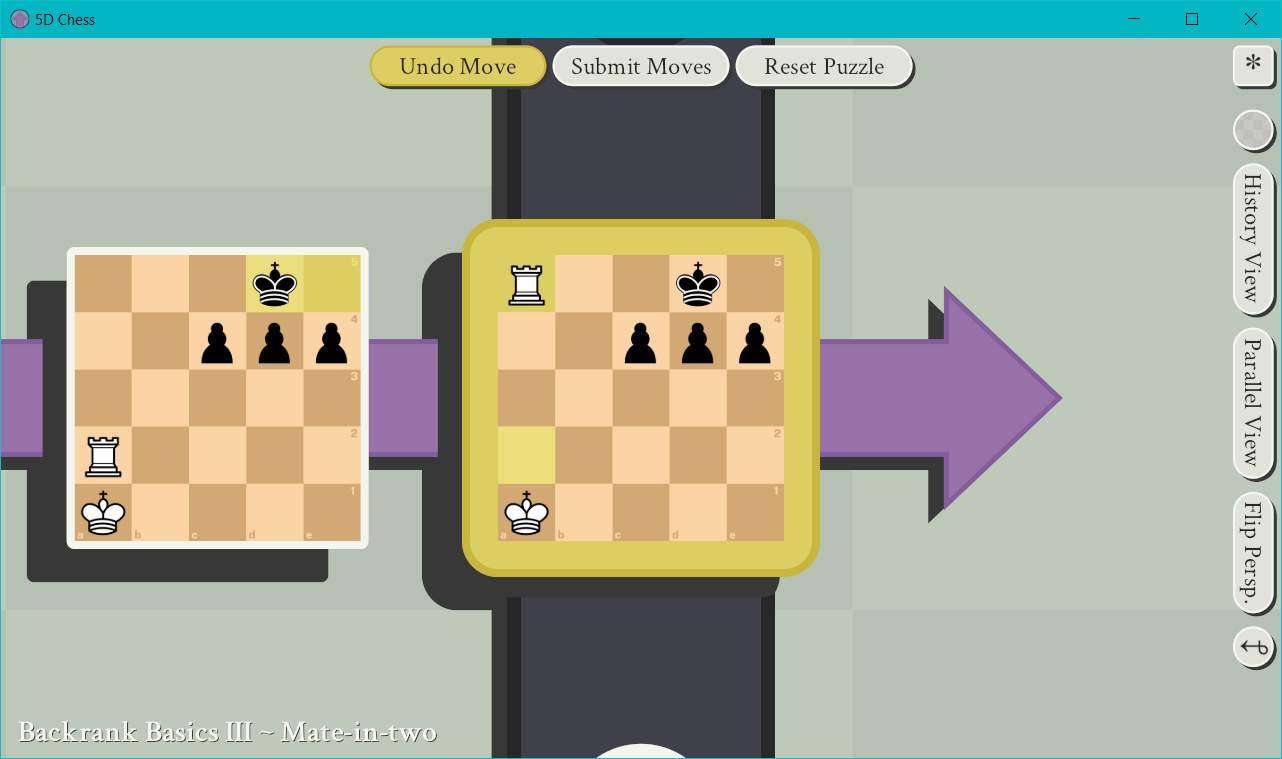
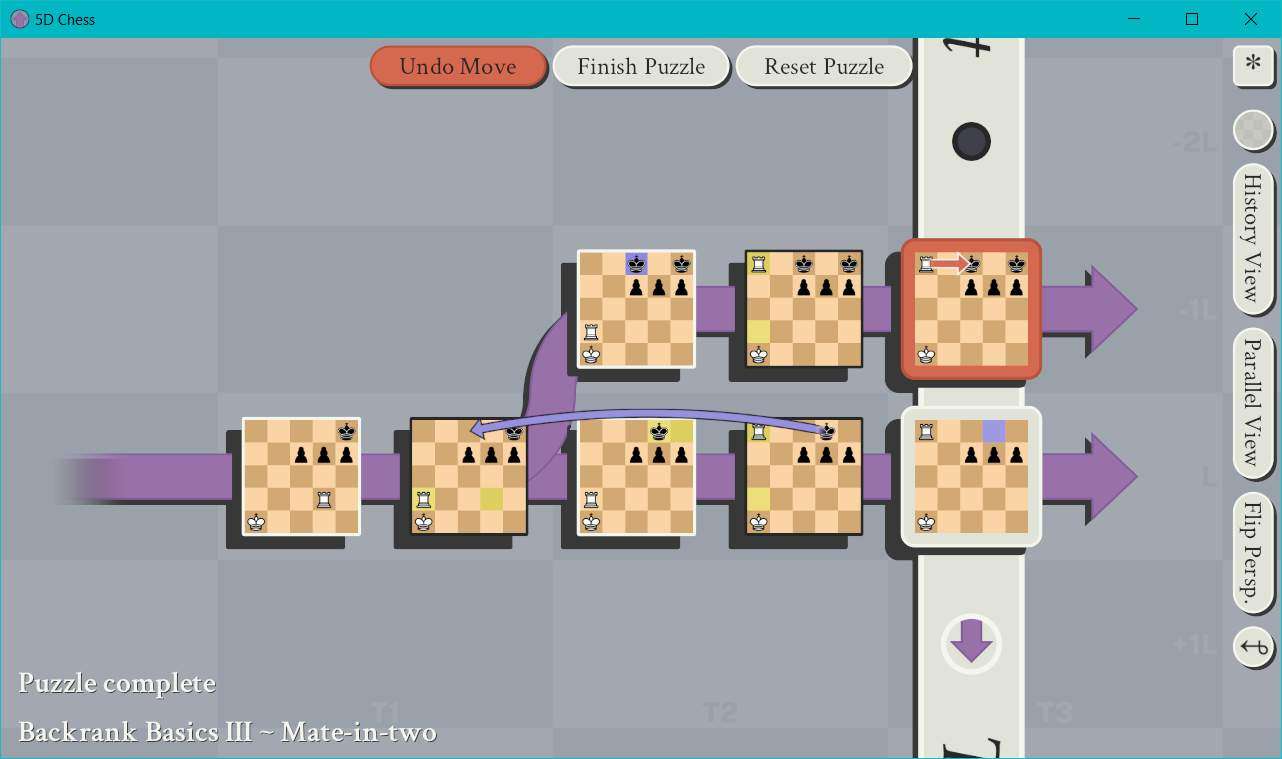
They have no way to escape, block, or counter this threat in the present, so they’re going to make a new present where they seem to be safe by sending their King back in time to their previous board state which will result in the puzzle looking like this:
Step 3: We have to play on the upper timeline Black just created. We could additionally make a move on the lower timeline, but we don’t need to here. This timeline is actually pretty cozy for us, and I already promised we would do no 5D shenanigans here. Why would we, after all? What game do you think we’re playing?

Step 4: We’re honestly just going to do what we did before, but this time it wins. We’re going to move our Rook from A2 to A5, which will put their King in check. They have no options here because even if they move their new King from C5, they would be simultaneously putting their other King in check from our Rook, which is illegal. They have no plays, so we win.
Step 5: Profit.
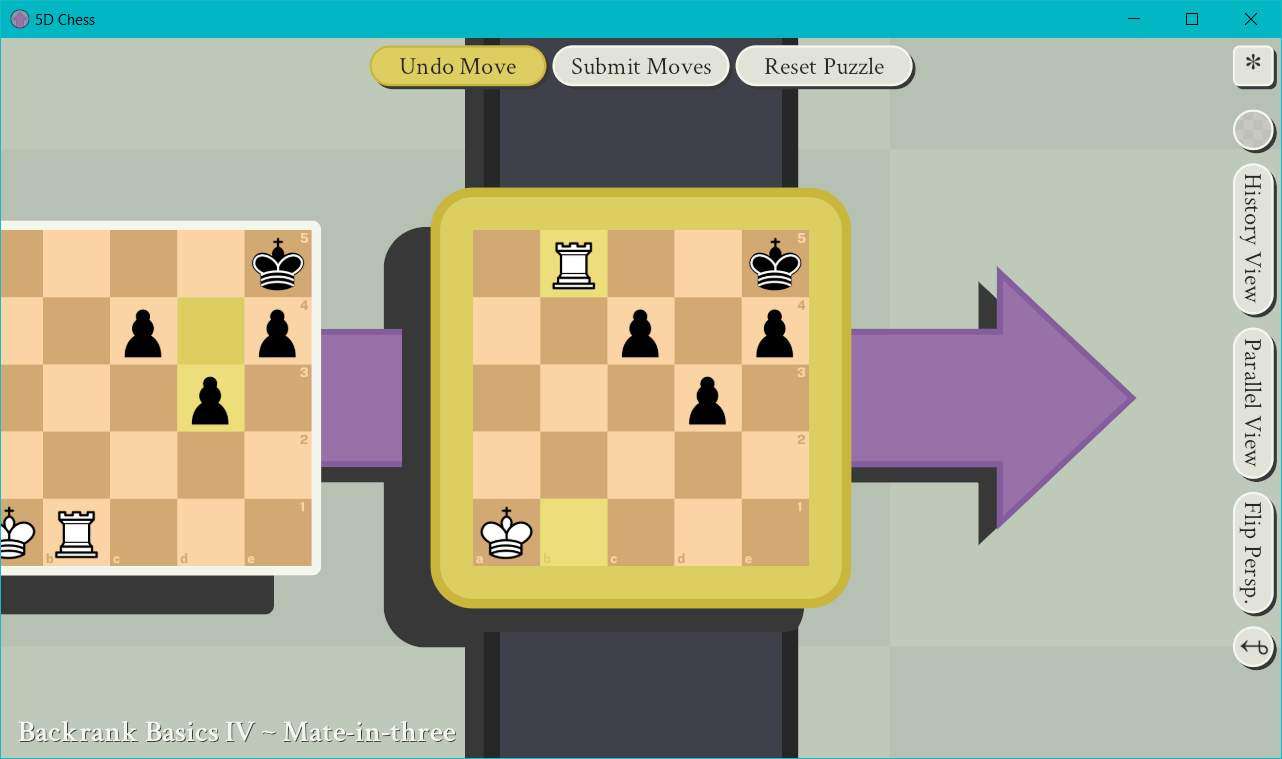
22 – Backrank Basics IV – Mate-in-three
- Player Color: White
- Opponent Color: Black
So 5D Chess tried slimming down, cutting back on a few of the extra Ds, and slipping into something a little more comfortable and 2D chess-like, but we’re finally back to messing with all of the fun stuff.
Here’s the puzzle:
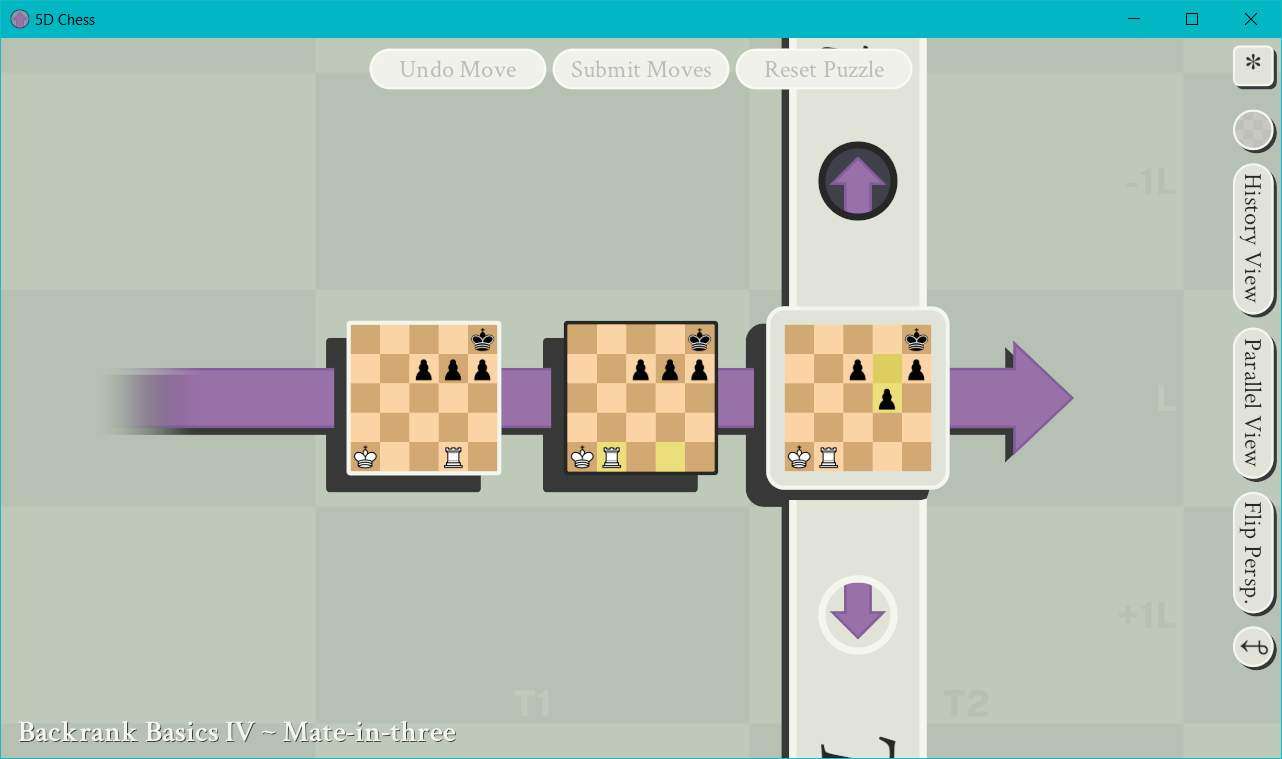
Step 1: Still only one active state to play on, though.
Step 2: We’re going to threaten Black’s King by moving our Rook from B1 to B5.
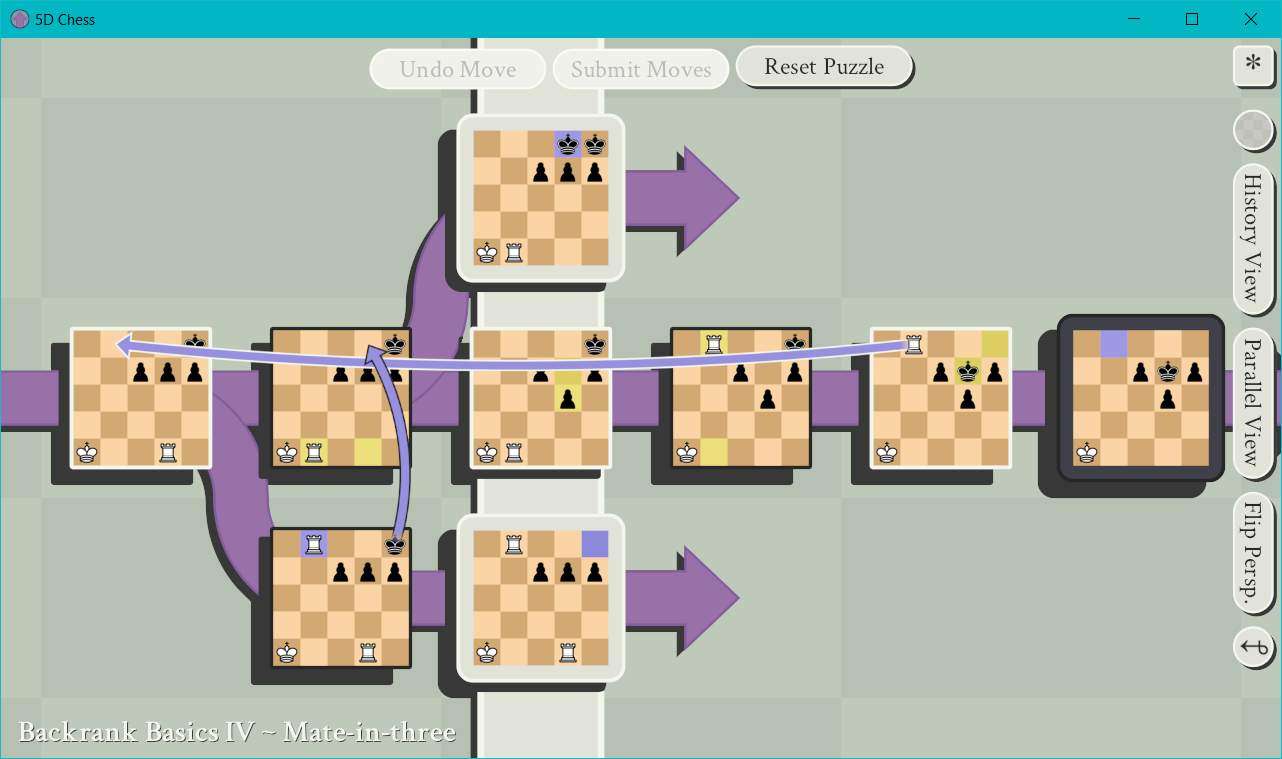
And they’ll respond the only way they can: by running and hiding. Black moves their King from E5 to D4.

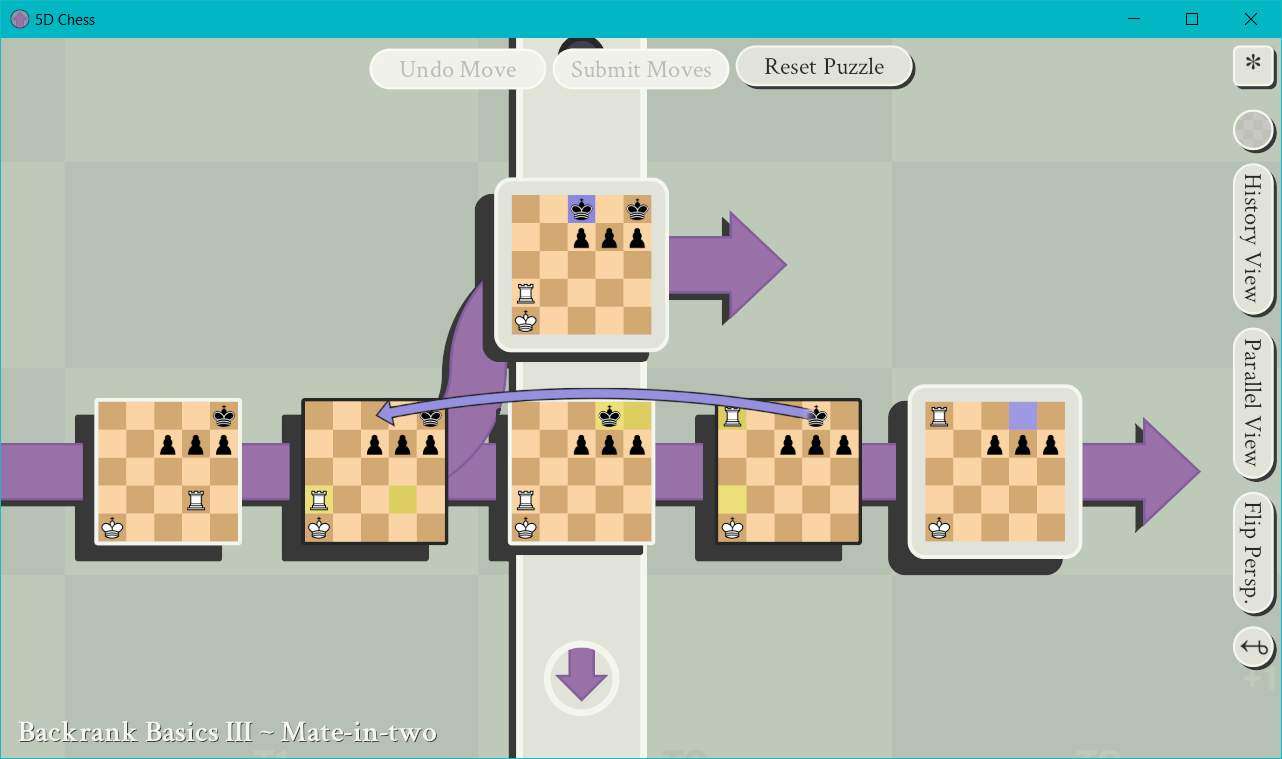
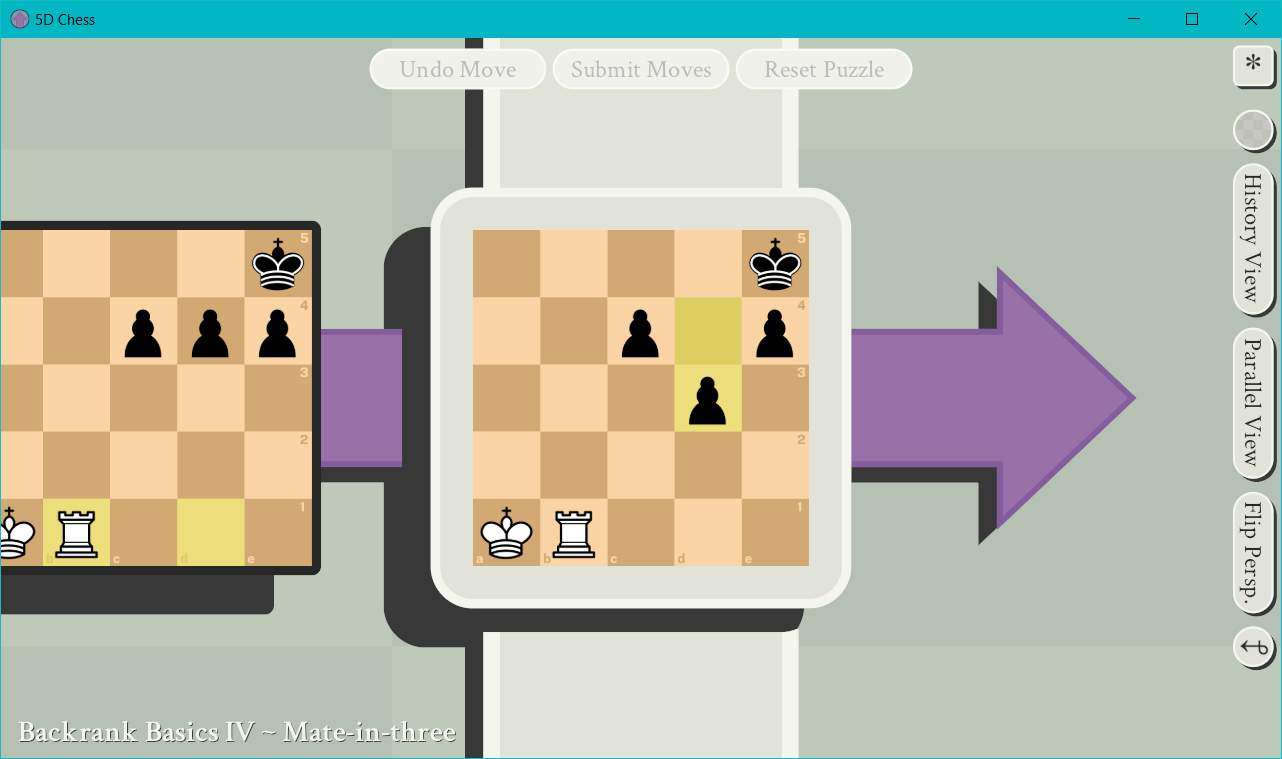
Step 3: I’ve been itching to screw around with the space-time continuum for a few puzzles now, so let’s use this chance to send our Rook back in time by two squares on the time axis.

This should result in the puzzle looking like this:

Now Black’s King is being threatened again in the lower timeline, so they’re going to try to run away from their problems like I’ve done most of my life, and move 2 squares upward on the parallel world axis, which should make the puzzle look like this:
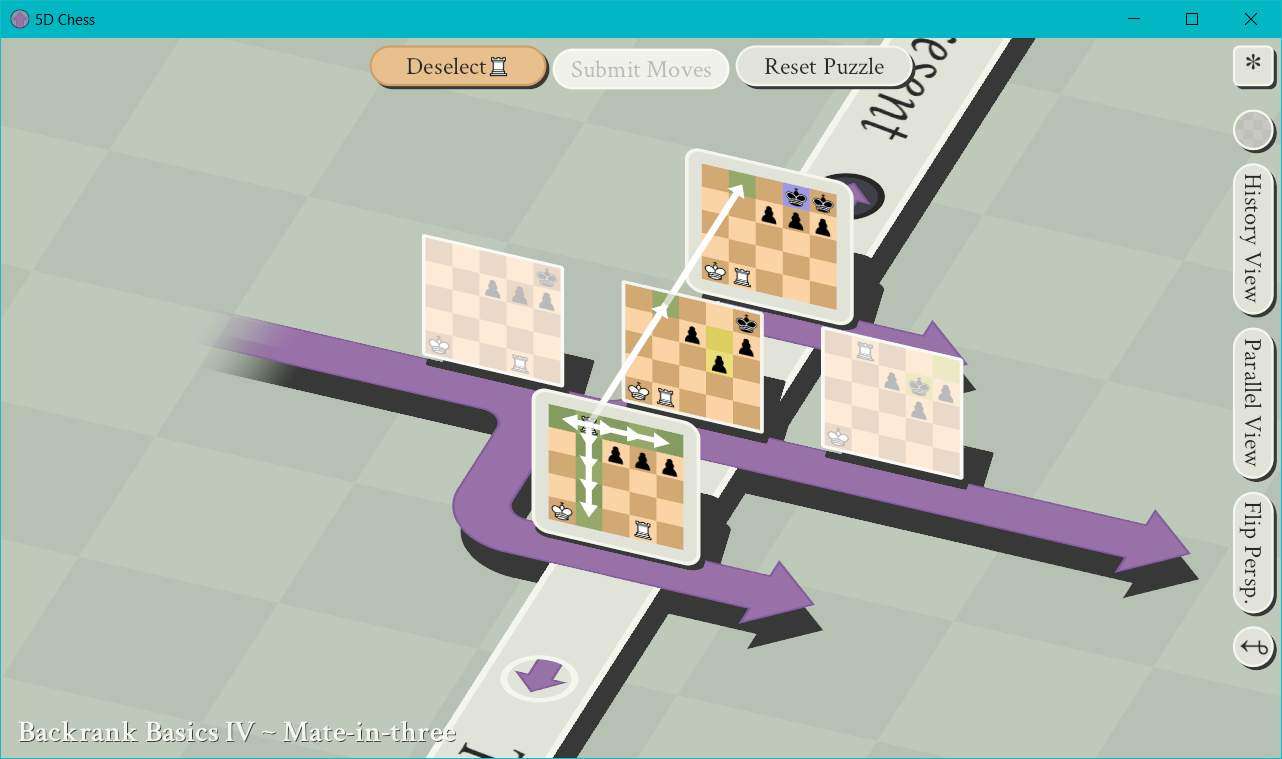
Step 4: We have 2 options for where to play first, but we ultimately need to play on both timelines before we can end our turn. I’m feeling a tad lazy, so let’s win this with one move that uses both board states at once. We’re going to start from the lower board.
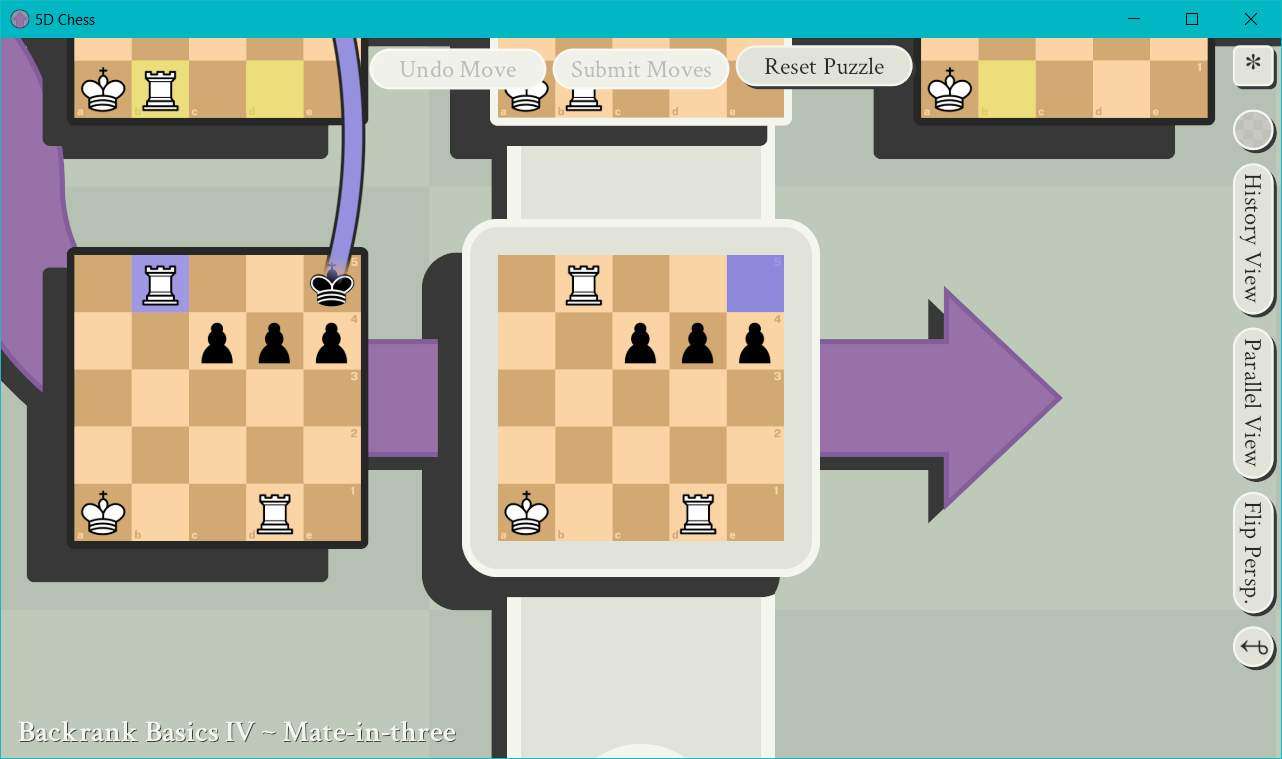
Step 5: We’re going move our Rook 2 squares upward on the parallel world axis to chase Black’s King.
The puzzle should now look like this:

And at this point we’ve won because, once again, we’ve put Black in a situation where they can’t block or counter our Rook, but even if they try to escape with one King, their other King will be put in check, which is illegal. Therefore, we win.
Step 6: Profit.

23 – Queen Tactics I – Mate-in-one
- Player Color: White
- Opponent Color: Black
Alright, it’s been a while, but it’s finally time to introduce another of the game’s pieces: the Queen. I’m going to level with you here, the Queen is kinda unfair in my opinion. Up until now, we’ve always operated on the understanding that there are 4 axes of positioning (X and Y, which are used in standard chess, and time and parallel world, which are new to 5D Chess) and we’ve also always operated on the assumption that pieces are not able to change their position on more than 2 axes at a time. If a piece changed its position in time AND parallel worlds, then it retained its position on the X and Y axes, just now on a new board. The Queen, however, does not care about this. It still has some restrictions to conform to, but it can potentially change positions on 1, 2, 3, or even all 4 axes at once. This means that however threatening the Queen already was in regular chess, it has become even more terrifyingly lethal in 5D Chess.
The way the Queen works is as follows: it can move as many squares along as many axes as possible, as long as (1) it is not blocked by another piece along its path of movement and (2) it travels an equal number squares along all of the axes it chooses to move on. If this sounds confusing, that’s because…well it kind of is.
Another way of thinking about it is that if the Queen moves 1 square in time and/or across parallel worlds, then it can (1) retain its X and Y positions, (2) move 1 square orthogonally along either the X or Y axis, or (3) move 1 square diagonally along both the X and Y axes. If it moves 2 squares in time and/or across parallel worlds, then it can retain its position, or move 2 squares orthogonally, or move 2 squares diagonally. And so on for 3 or more squares in time and/or parallel worlds.
Here’s the puzzle:
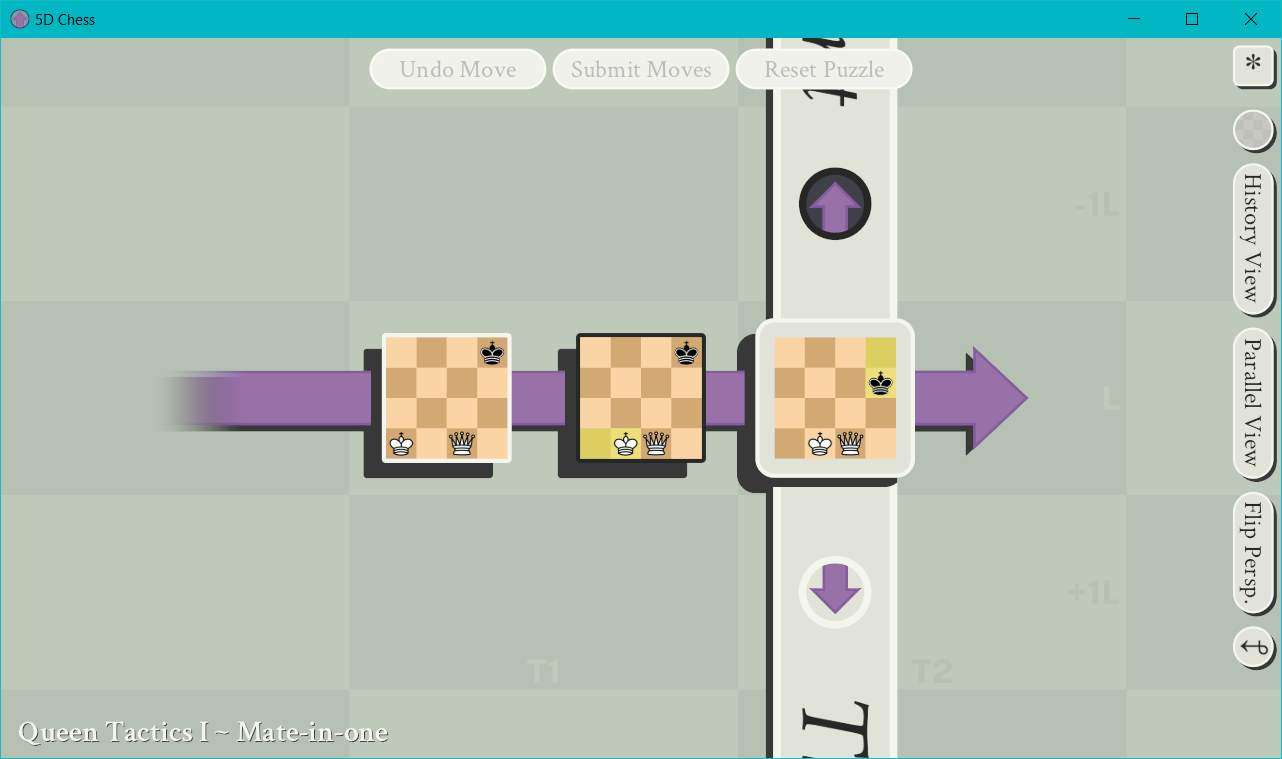
Step 1: Start with the active state.
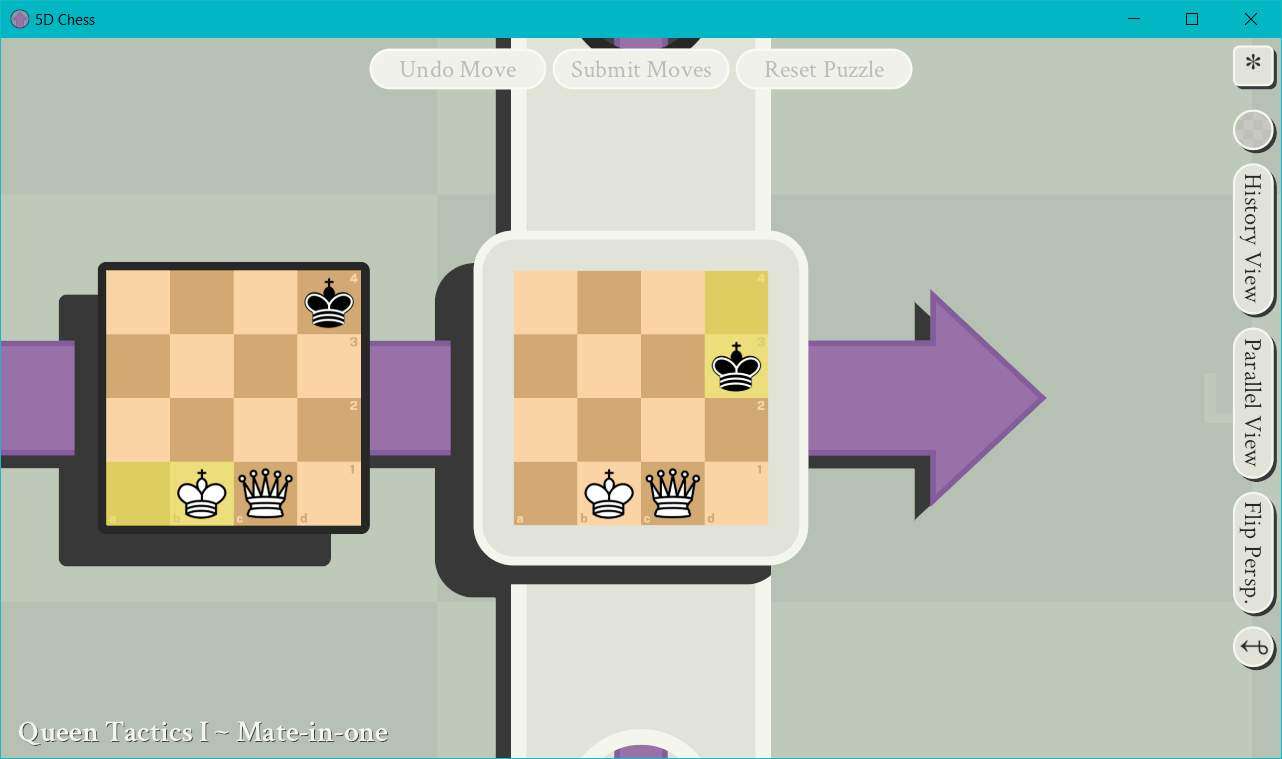
Step 2: We’re going to move our Queen from C1 to C2.
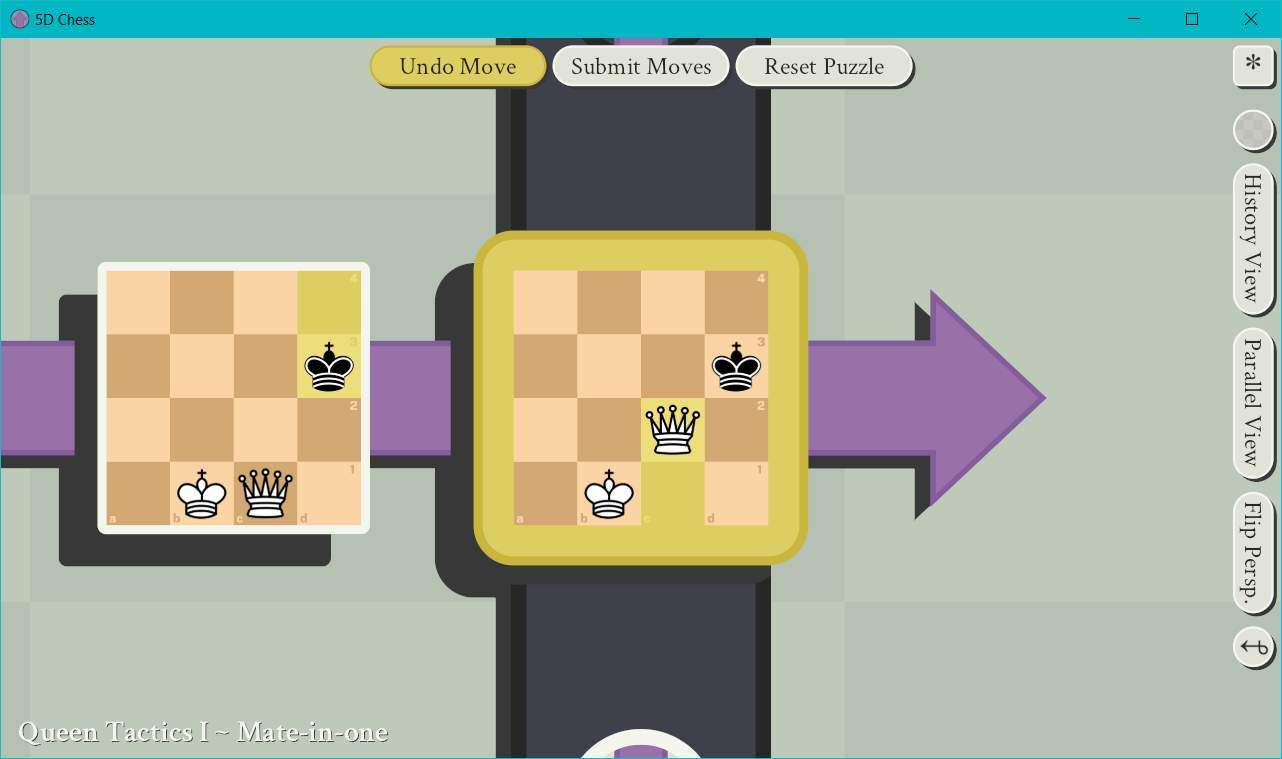
This will threaten Black’s King in the present, but they are unable to take our Queen because doing so would put their King in check to our King, which is illegal. They could move their King away from our Queen, but that would not address the fact that our Queen is actually threatening their King in the past. Oh, yes, our Queen is actually threatening their King in the past. And Black has no response. Checkmate.
Step 3: Profit.

If you’re confused about how the Queen is making this threat, here’s another perspective:
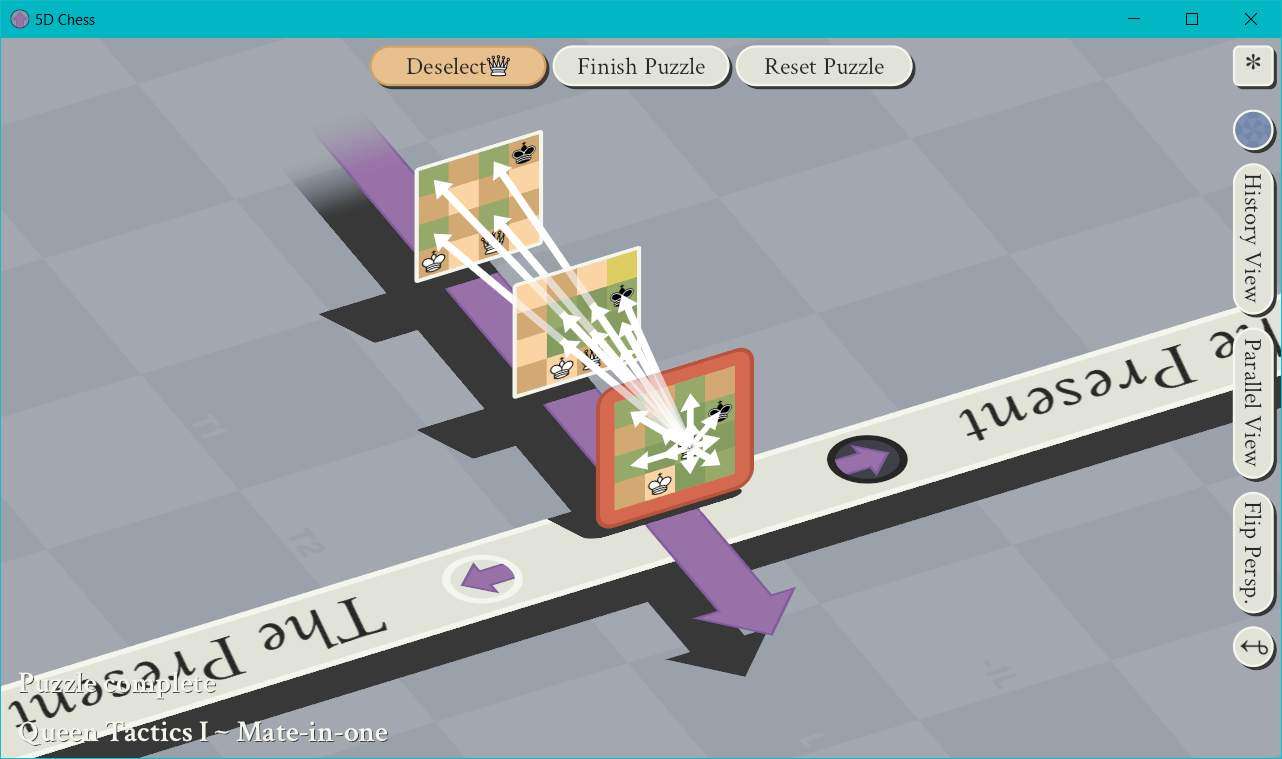
As you can see, if our Queen goes back in time by 1 square, it can retain its C2 position, or move 1 square away orthogonally or diagonally. And one of those options includes D3, where Black’s King is positioned. This is how we achieved our checkmate.
24 – Queen Tactics II – Mate-in-two
- Player Color: White
- Opponent Color: Black
If you had any confusion about how Queens operate in 5D Chess after the previous puzzle, this one should hopefully help to dispel those concerns. We’ll not only have an example of a Queen going backward in time, but also posing threats across both the time axis AND the parallel world axis. Fun stuff.
Here’s the puzzle:
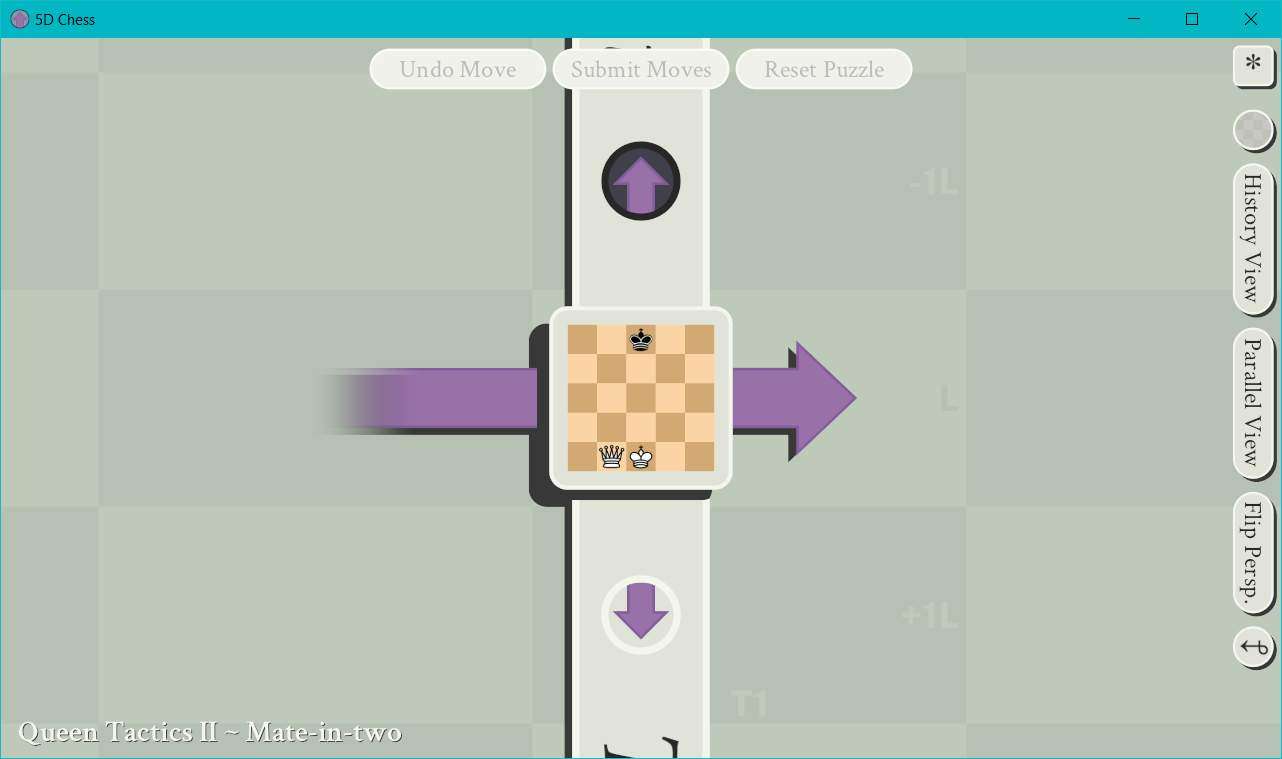
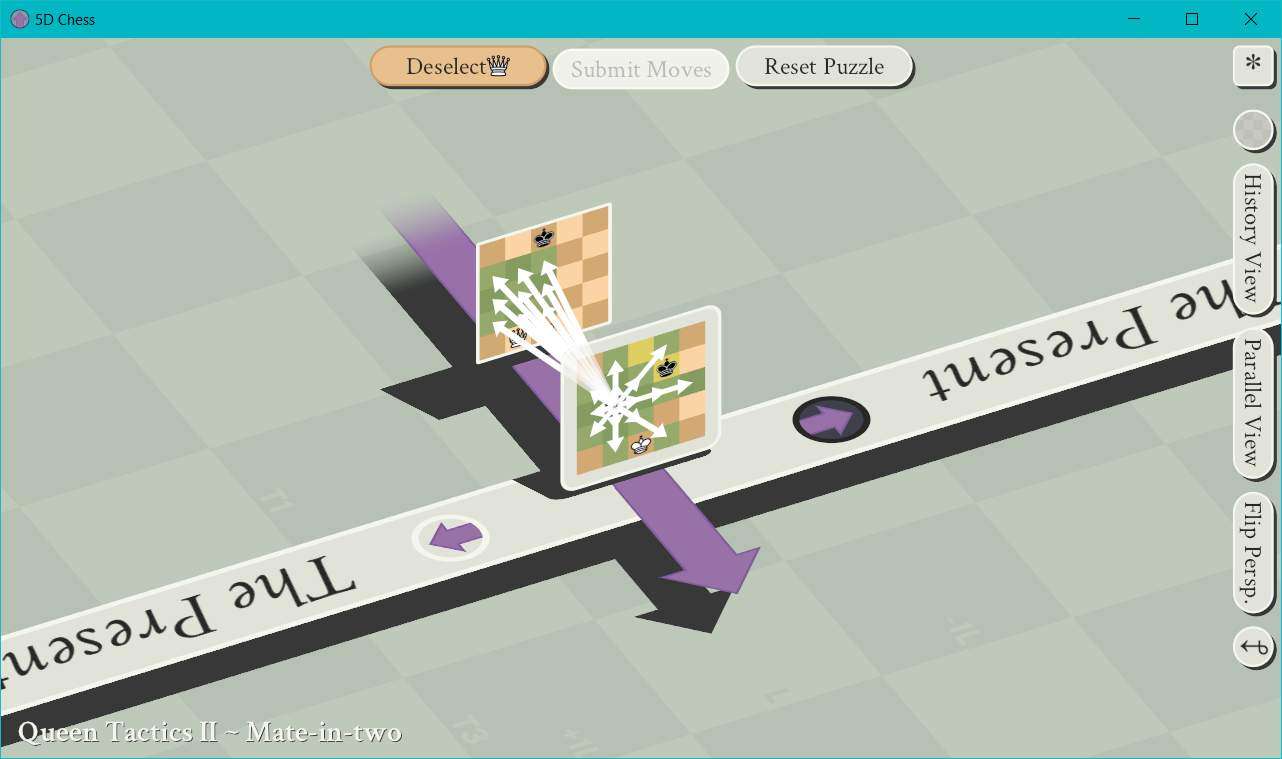
Step 1: Start from the only active state.

Step 2: We’re going to move our Queen from B1 to B3. The point here isn’t to threaten Black, it’s to safely get into a position from which we move to the past and end up in a threatening position.

Black responds by moving their King from C5 to D4. Because they are required to move if able, and our Queen is blocking all other squares their King can move to, this is their only play. Honestly speaking, we don’t care. We’re ditching this reality for a better one.

Step 3: Time to hippity hop out of here. We’re going to move our Queen 1 square back in time, and 1 square up on the Y axis. This should move us from B3 in the present to B4 in the past.
This is how the puzzle should look now:
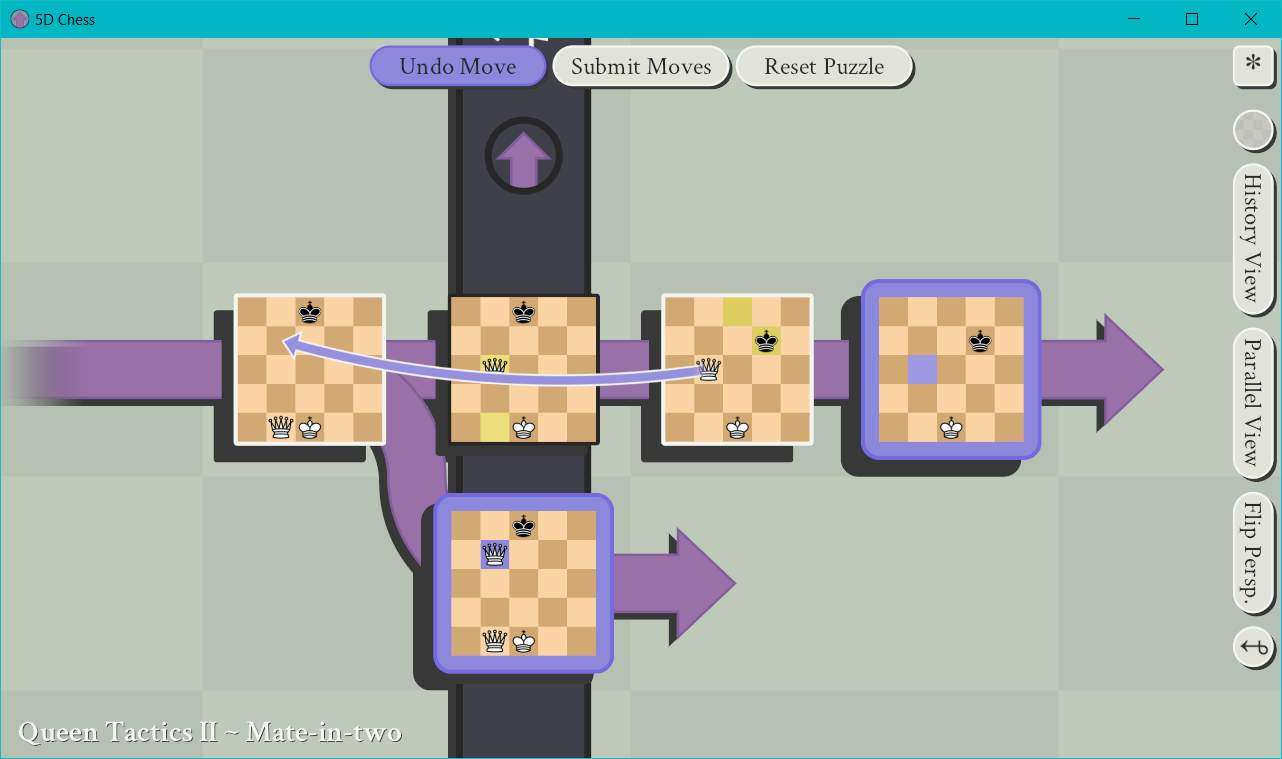
And that’s it. We’ve won. Our second Queen is threatening Black’s King in the present, but more importantly, we’re threatening Black’s King in the past in the timeline next door as well. And Black has no counter because even if they were to try to take our second Queen with their King in the present, they would be moving into check from our other Queen. Hence, we have checkmate.
Step 4: Profit.
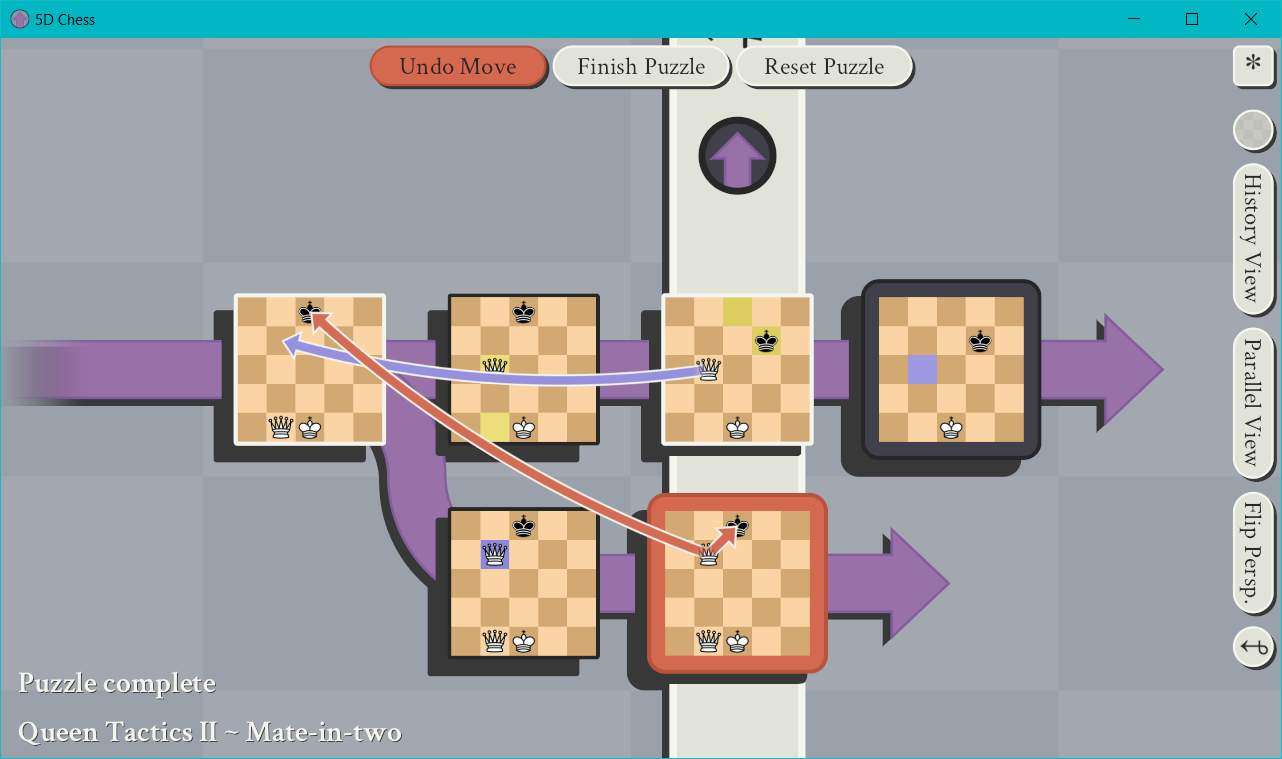
And, if you’re confused about how this maneuver checkmates their King in the past in the parallel world line, here’s another perspective on the situation:

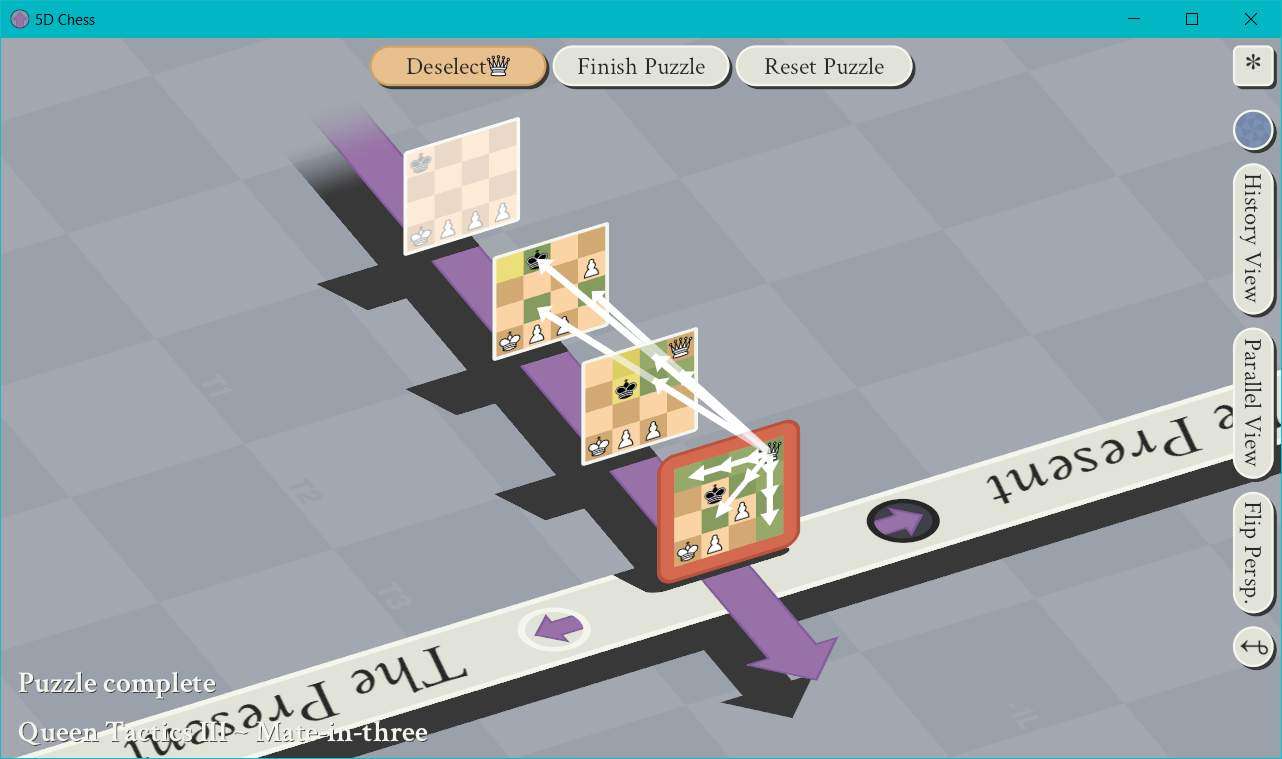
25 – Queen Tactics III – Mate-in-three
- Player Color: White
- Opponent Color: Black
Here’s the puzzle:

Step 1: Only choice, nuthin’ we could do, gotta start with the active state.
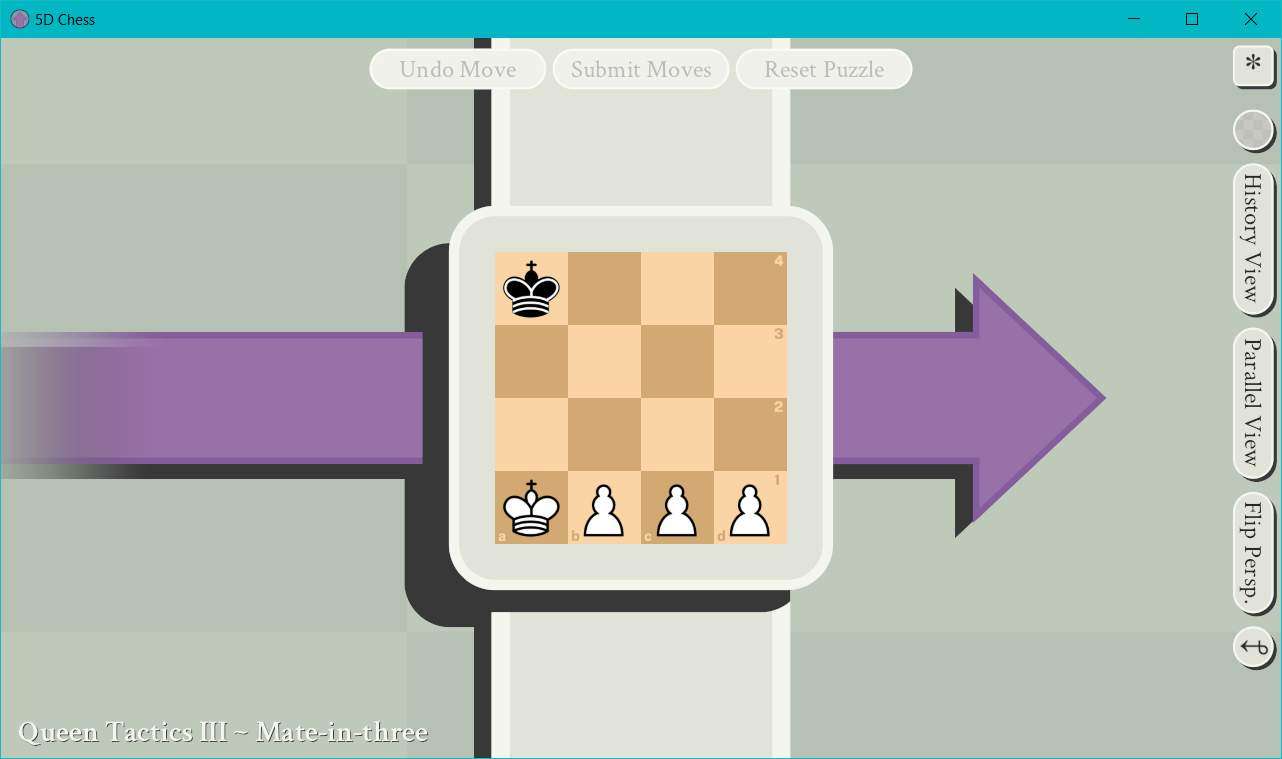
Step 2: We’re going to move our Pawn from D1 to D3 to threaten promoting our Pawn to a Queen.
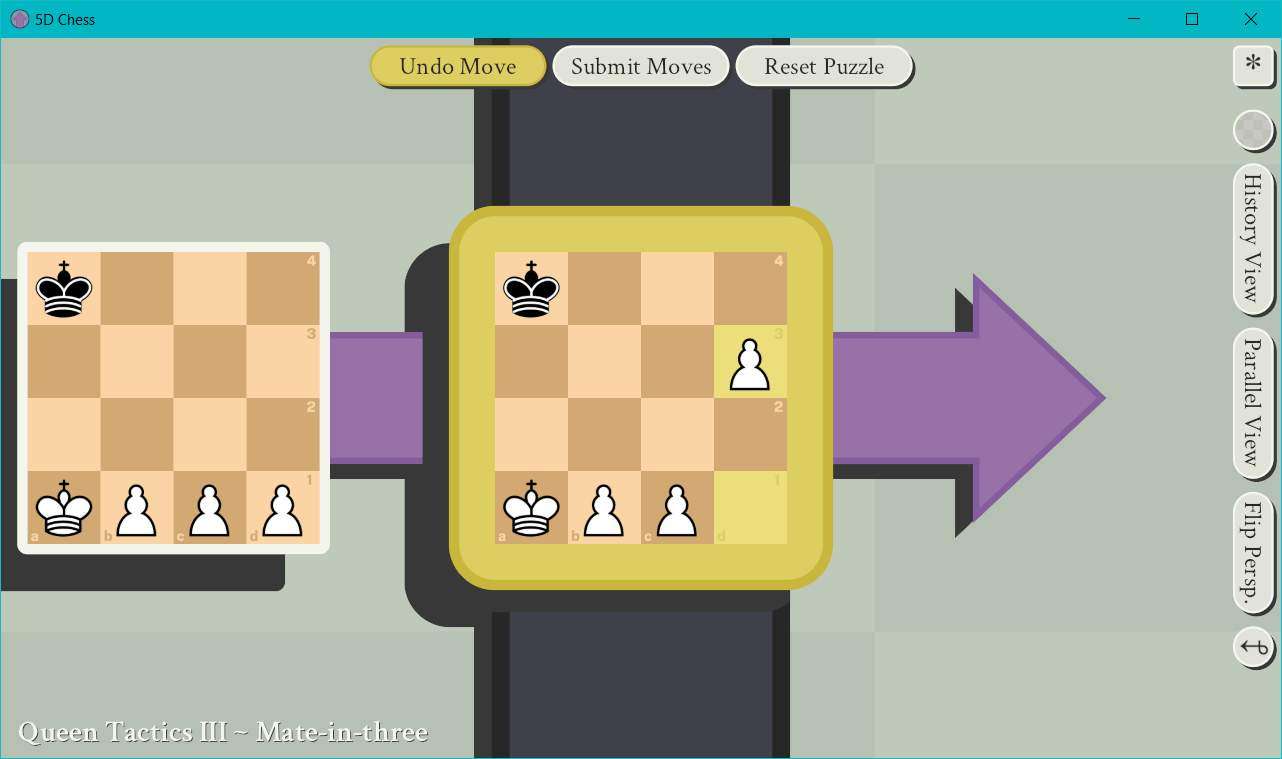
Black actually has 3 options here. They could move their King from A4 to A3, B3, or B4. I’m going to show the solution in the case that they select B4, but the solution is largely the same in each case.
Black will futilely move their King from A4 to B4.

Step 3: We’re going to advance our Pawn from D3 to D4 which will then immediately replace it with a Queen at D4.
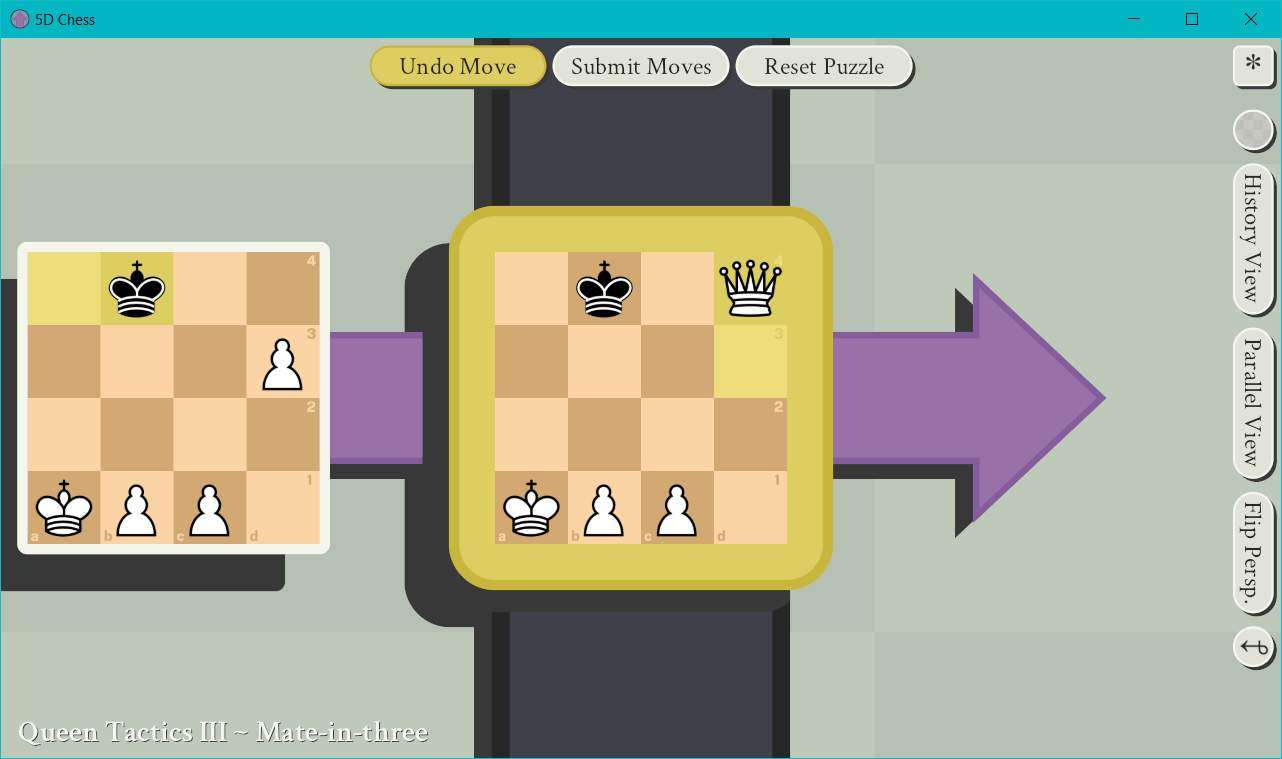
And now Black is in check. Once again, ,they actually have 2 options here. They could move their King from B4 to A3 or B3. All other options have been cut off by our Queen. I’m going to continue with an example wherein they opt for the B3 move. But as stated previously, the solution will be pretty similar if they go for A3.
They’re going to attempt to escape by moving their King down 1 square from B4 to B3.
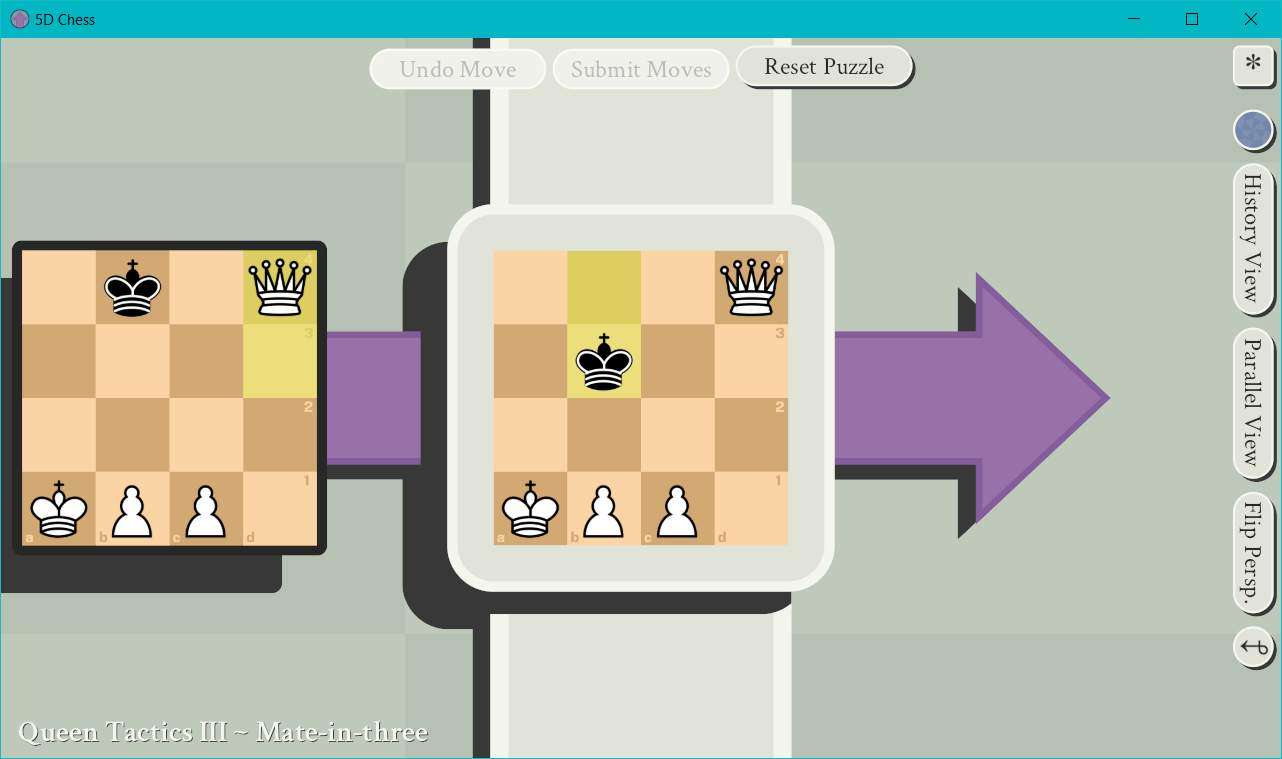
Step 4: We’re going to issue another threat by moving one of our Pawns from C1 to C2. This will put Black’s King in check once again, but more importantly, while Black’s King has options to escape for another turn of safety in the present, our Queen is now threatening their King 2 squares in the past and 2 squares to the left. So from D4 in the present to B4 2 board states prior. Black has no counter, so we win.

Note that in all solutions we would have moved our Pawn from D1 to D3, then ignored their King’s movement and promoted our Pawn to a Queen at D4. Regardless of which move their King made, we would follow up by threatening with one of our remaining Pawns, using our King and our last Pawn to protect it and make it a checkmate. If you see one of those other variations, just stick to the principles here, and you should win.
Step 5: Profit.

If you’re confused about the checkmate by our Queen at the end, here’s another perspective:
26 – Queen Tactics IV – Mate-in-two
- Player Color: Black
- Opponent Color: White
Here’s the puzzle:
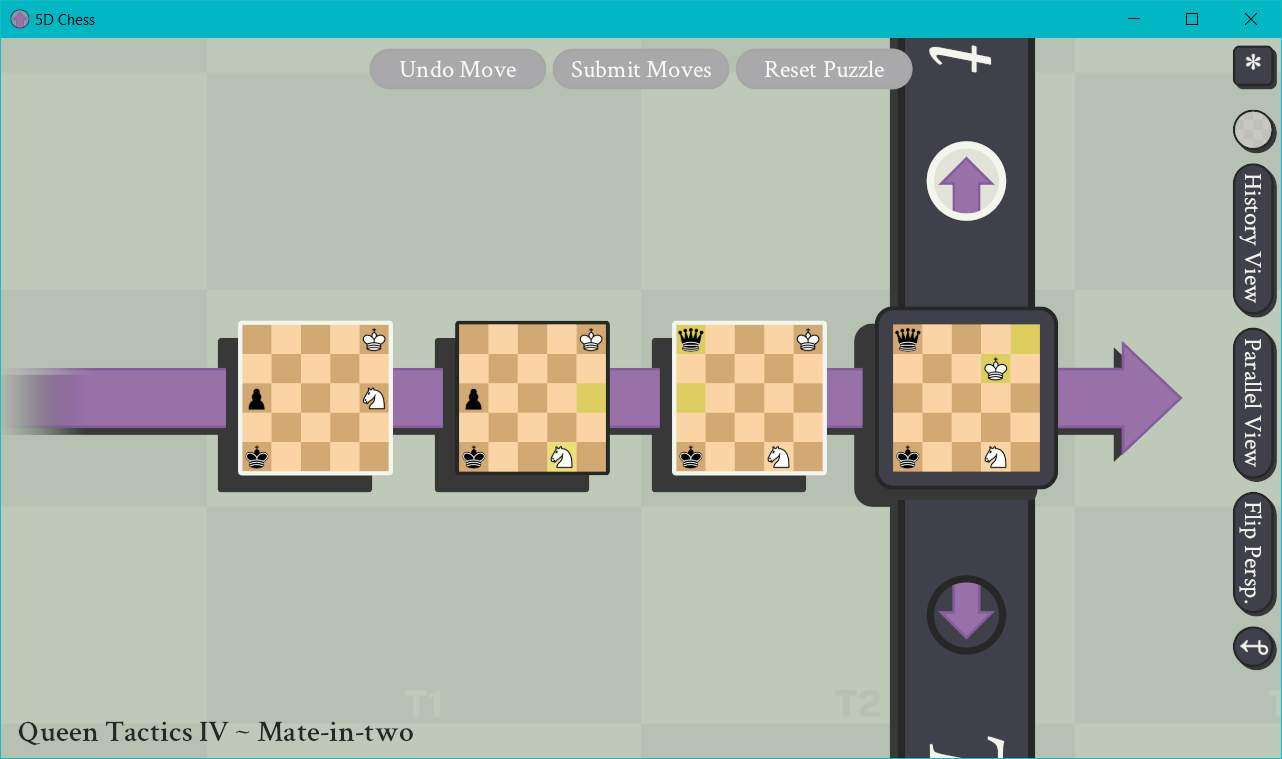
Step 1: Start with the active state.

Step 2: We’re going to move our Queen from E1 to D2. We’ve inadvertently threatened White’s King, but that’s not really what we’re after here. Or at least, not in the present. We’re setting up our position to attack their King in what will soon be the past.

White is going to move their King out of check, and we frankly don’t care.

Step 3: Our Queen is right where we want her to make our move, so we’re going to move our King up 1 square instead, so from E5 to E4. When we submit this move, we’ll have put White’s King in check 2 squares in the past and 2 squares to the right of our Queen. White has no response, so we have checkmate.
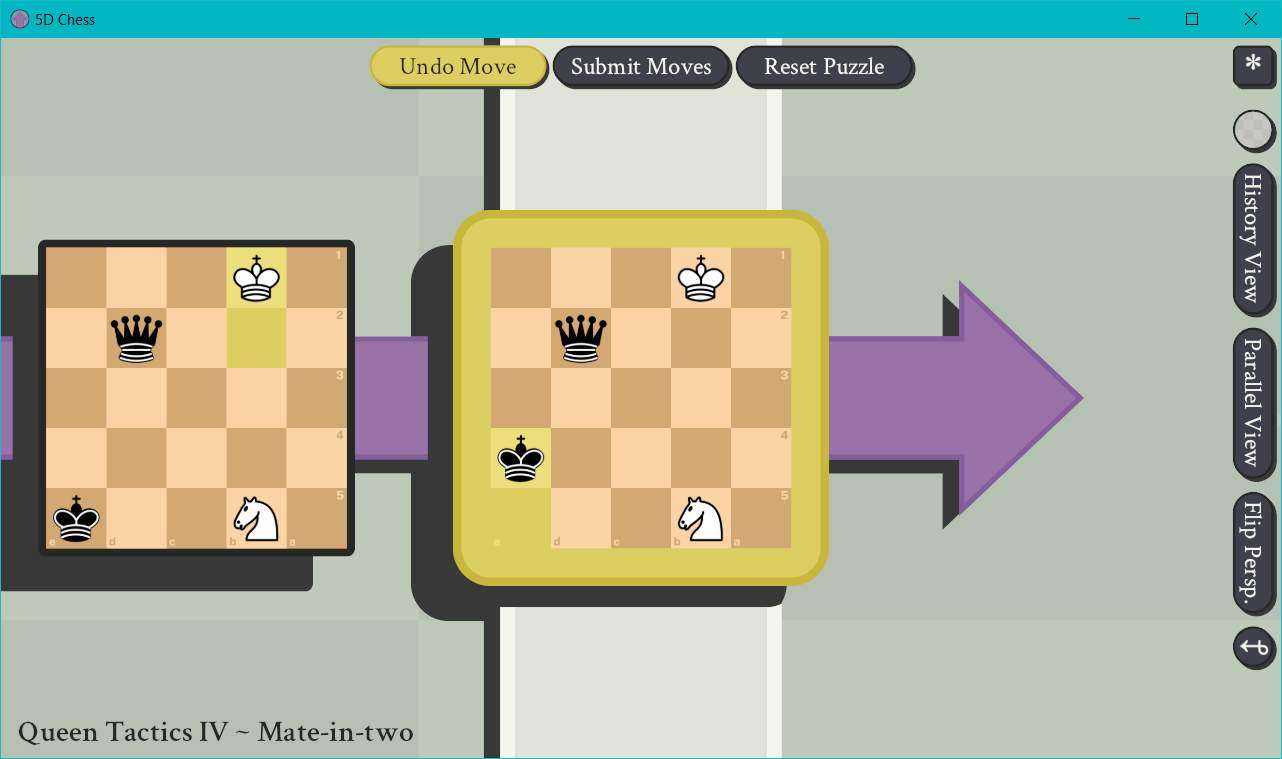
Step 4: Profit.

27 – King Tactics I – Mate-in-one
- Player Color: Black
- Opponent Color: White
Okay, time to introduce the final piece we’ll be using in these puzzles: the King. Like the Queen, it doesn’t play by our established rules which the Rook, Bishop, and Pawn faithfully adhered to. It, however, has a much simpler movement pattern than the Queen.
Put simply: the King can move 1 square along any combination of axes. This effectively means that any square it can ordinarily move to in the X and/or Y axes (as well as the square it already occupies), it can also now reach in any board state 1 square away across time and parallel world lines.
Here’s the puzzle:
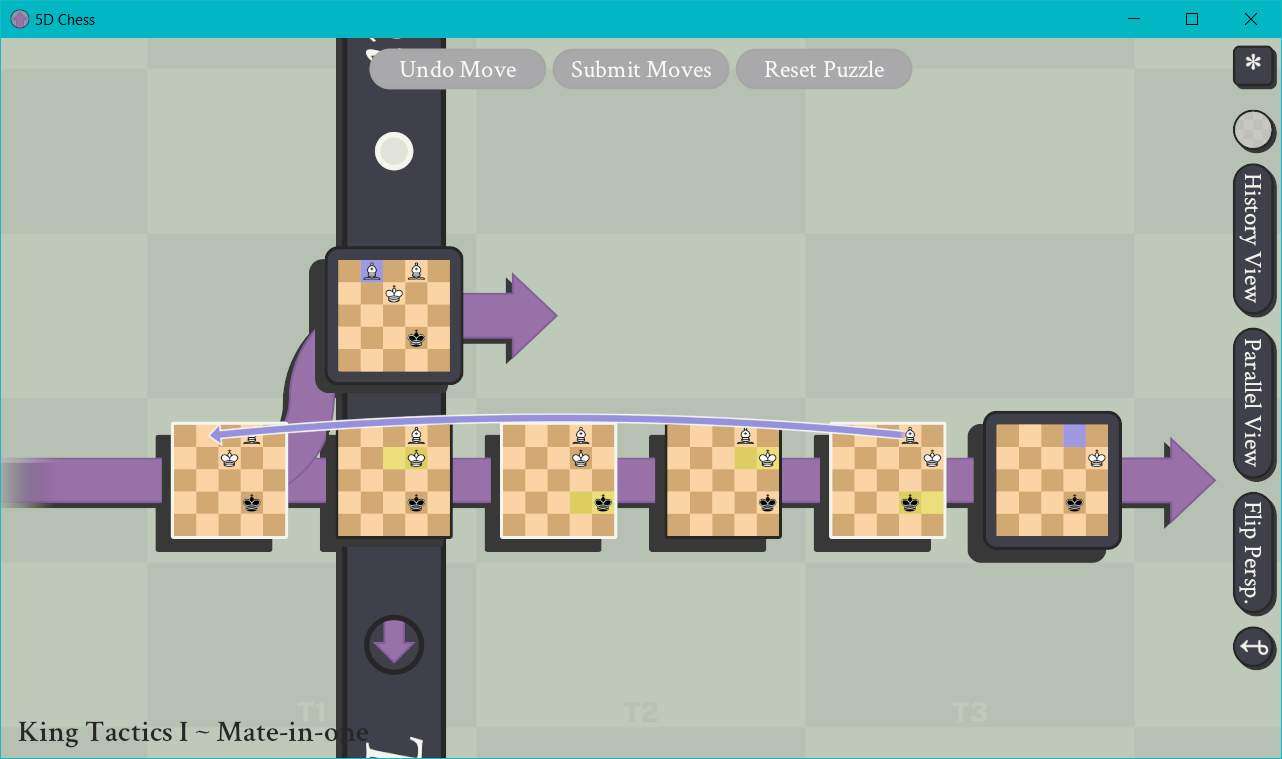
Step 1: We actually have an optional board state to mess with here, but we don’t need to, so let’s just start with the present state.
Step 2: With one move, we’re going to put White’s King in check. At THREE different points in time. We’re going to move our King from B4 to A3. And now our King can threaten the White’s King in all three of our board states in the parallel world line. Furthermore, White has no counter, so we have the checkmate.
Step 3: Profit.
If this checkmate seems confusing, here’s another perspective:
28 – King Tactics II – Mate-in-one
- Player Color: White
- Opponent Color: Black
Here’s the puzzle:
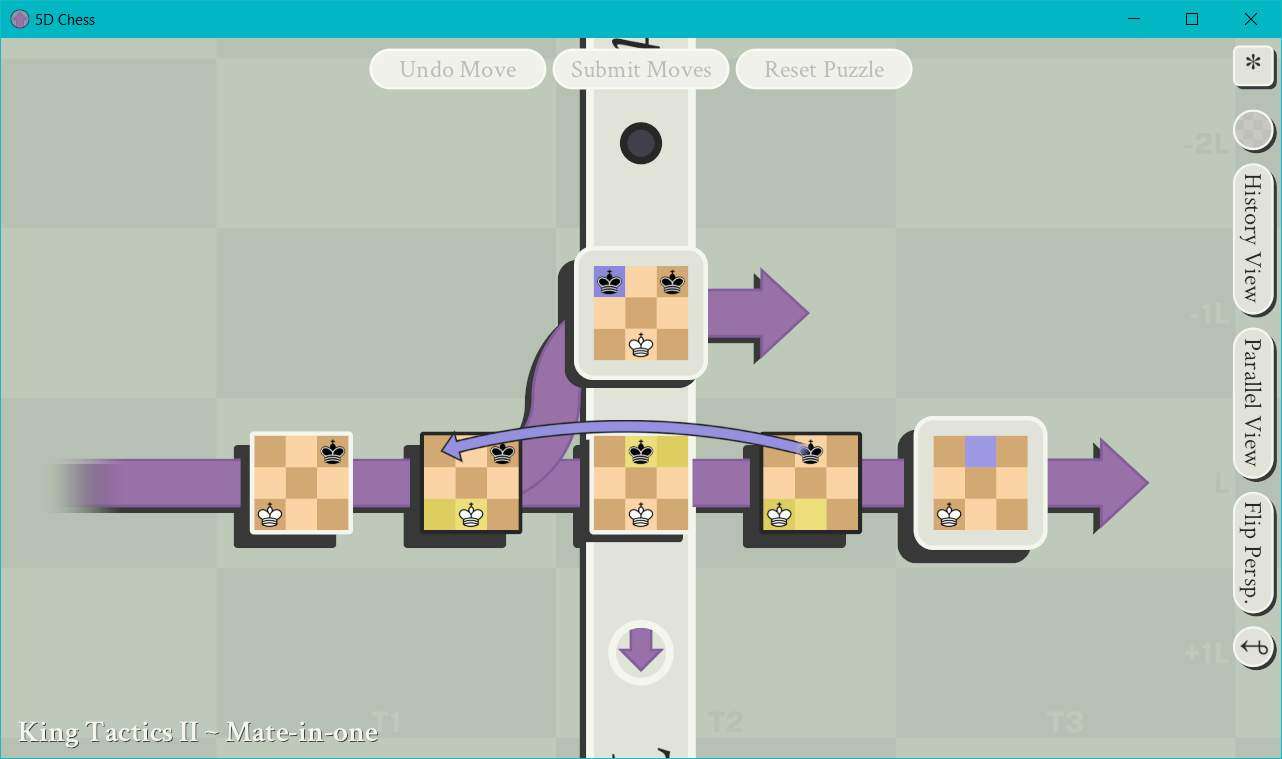
Step 1: We have an optional timeline to play in, but we’re going to ignore it and play in the present one.
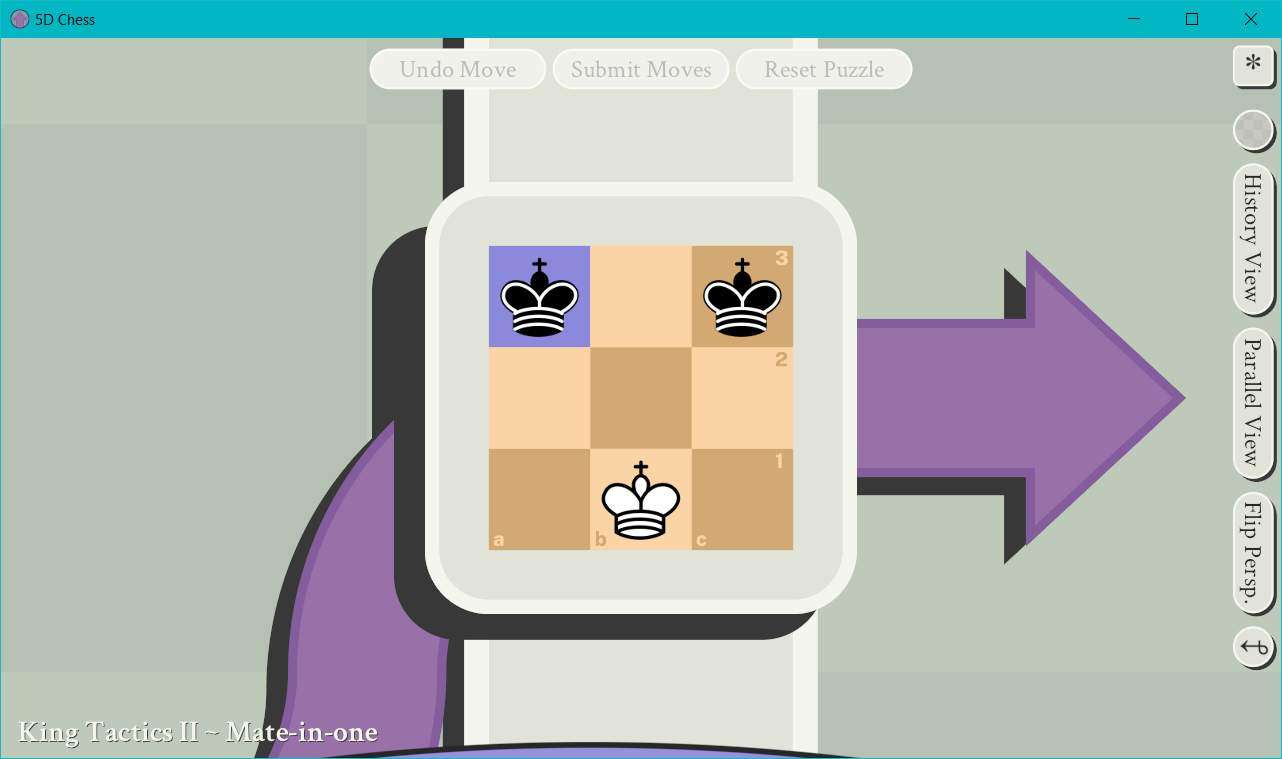
Step 2: Black has us in a 2v1 here, and that’s…not particularly ideal. But we can cheat harder. We’re going to send our King 1 square back in time, 1 square down across parallel world lines, 1 square left on the X axis, and 1 square up on the Y axis. So from B1 in the present to A2 in the very first board state.
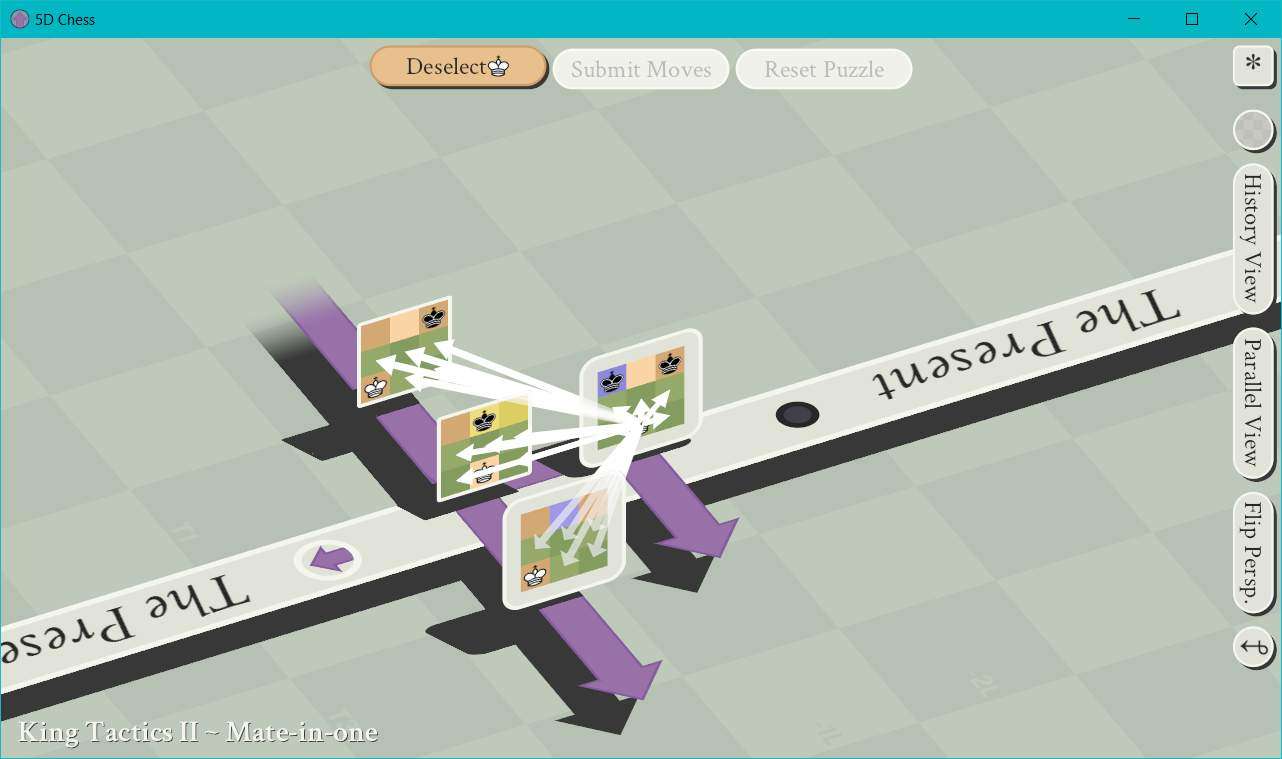
This will result in the puzzle looking like this:
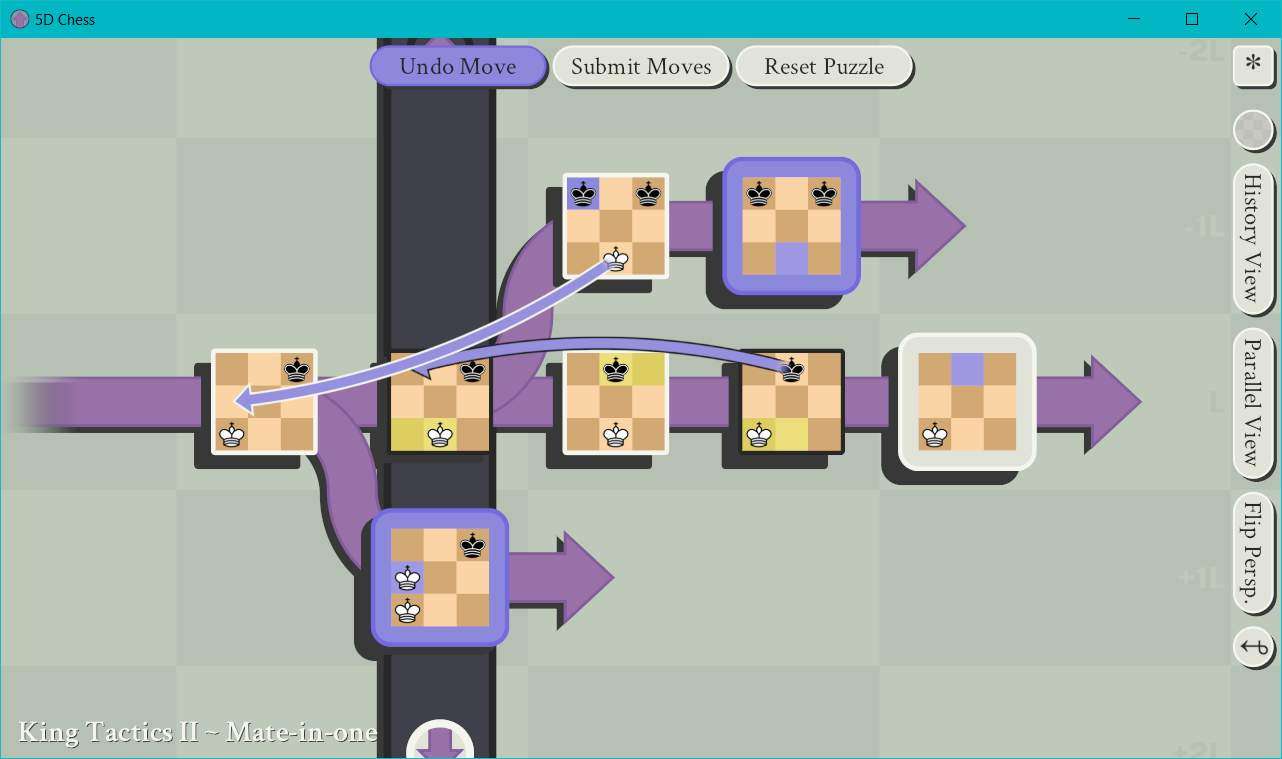
And in doing so, we’ve threatened White’s King one board state up across the parallel world axis.
Step 3: Profit.

29 – Opening Traps I – Mate-in-one
- Player Color: White
- Opponent Color: Black
I think this is the first time we’ve seen something like this: a proper, standard-sized chess board. Both players even have all of the standard starting pieces AND they all started in their correct positions. Wild stuff.
Here’s the puzzle:
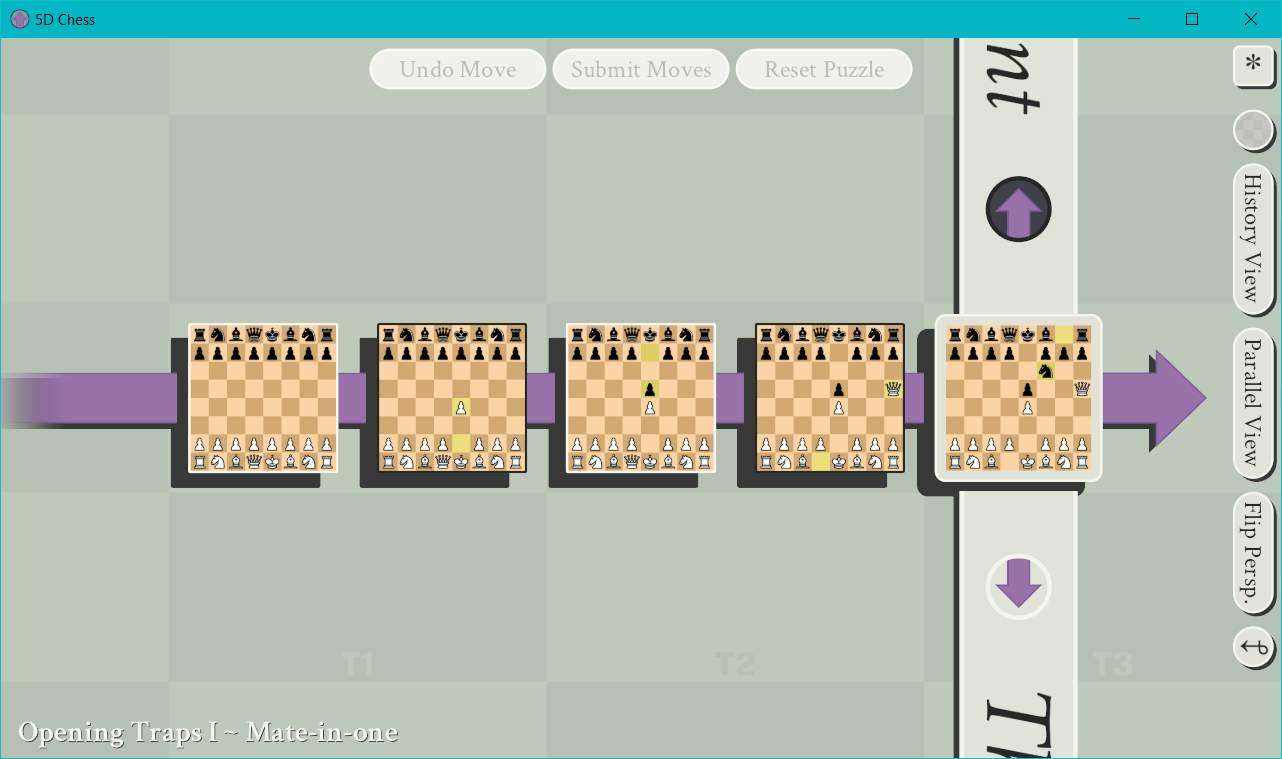
Step 1: Only one option, start at the active state.
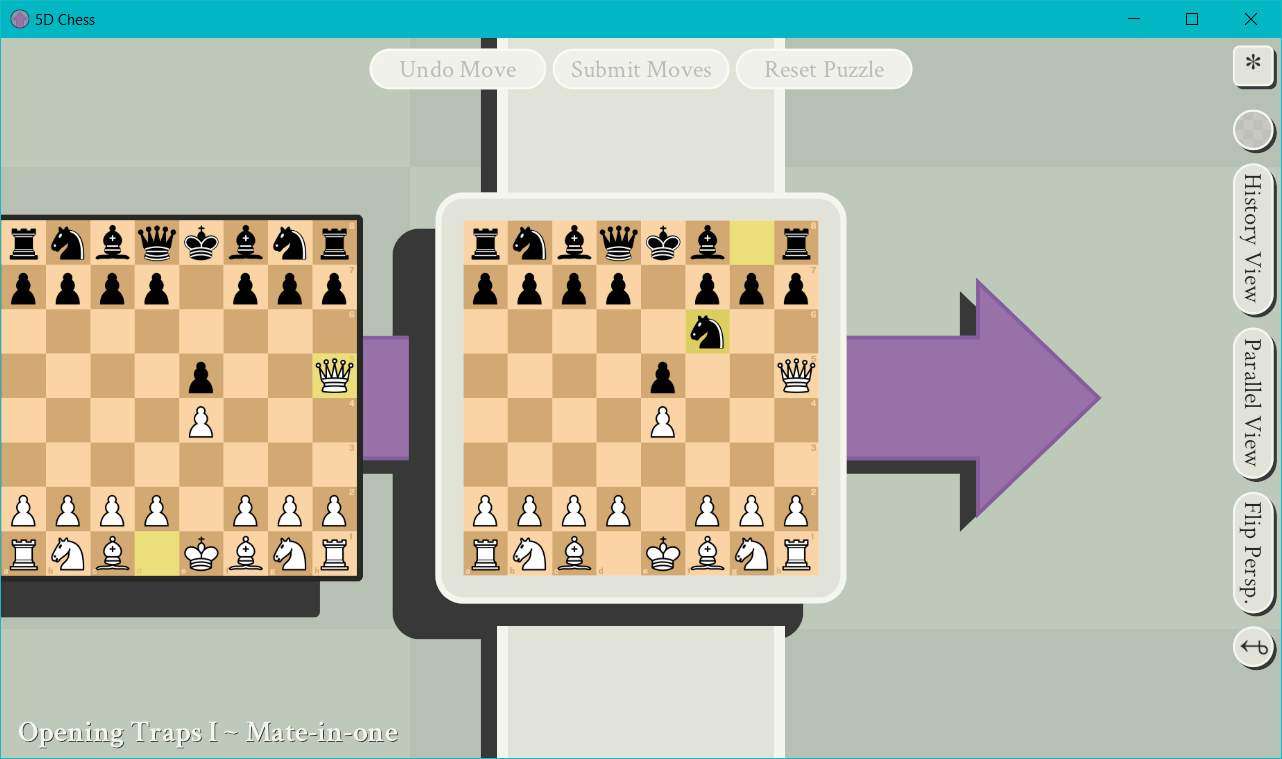
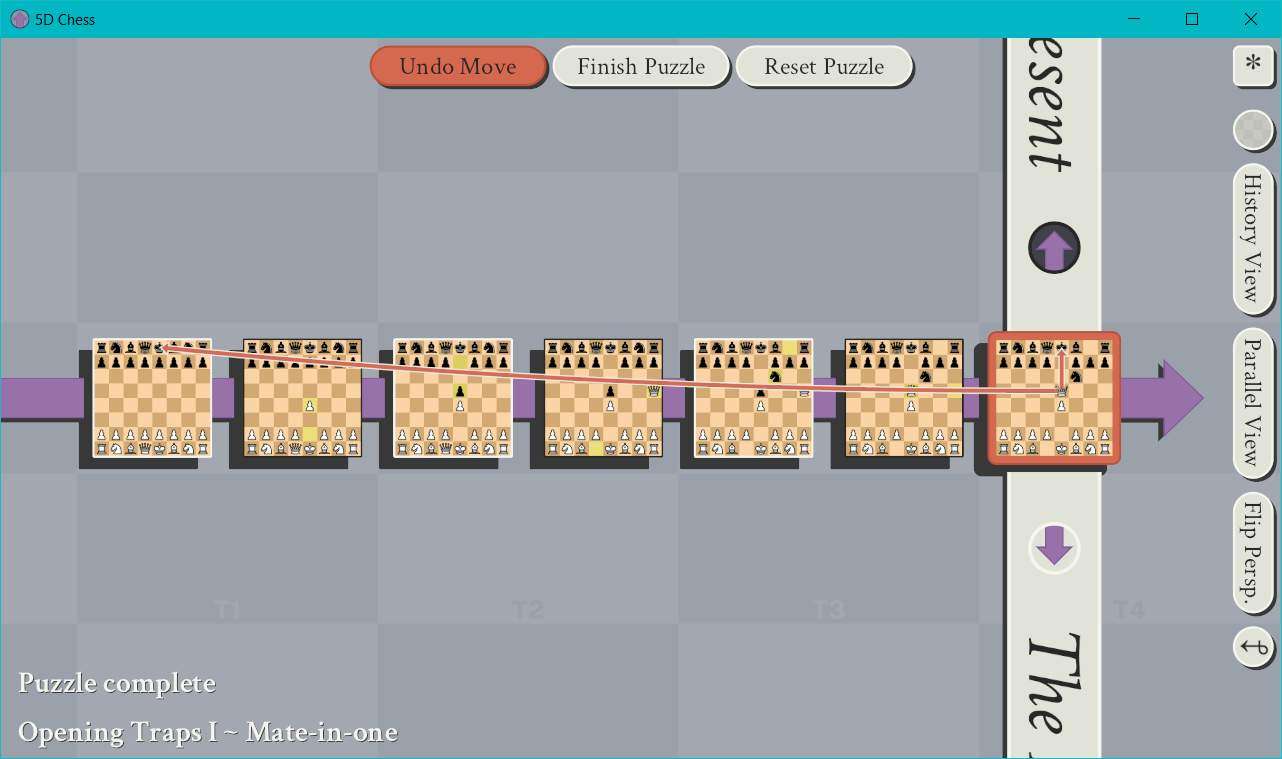
Step 2: We’re going to do something which probably looks monumentally preposterous to an experienced chess player, but bear with me, it’s 2020 and this is how we win in 5D Chess. We’re going to move our Queen from H5 to E5. In standard chess, this would put Black’s King in check, and they would have no recourse but to block with either their Bishop or their Queen, and then we would have to decide if we want to trade our Queen for whichever piece they moved up. But in 5D Chess, this just wins. Our Queen isn’t only threatening Black’s King in the present, but also 3 squares into the past and 3 squares upward on the Y axis. And while Black can still block us in the present through either of the means which I’ve described, it would not address the check we’ve put on their King in the past, and that gives us the win.

Step 3: Profit.
30 – Opening Traps II – Mate-in-one
- Player Color: Black
- Opponent Color: White
So, the solution to this puzzle is very similar to the solution to Opening Traps I. The difference here lies in that (1) we’re not positioned to attempt the solution to the previous puzzle without wasting an extra turn, and (2) if we even had a way to get our Queen to the winning position from Opening Traps I, it would be moving into a position threatened by White’s Knight.
Here’s the puzzle:
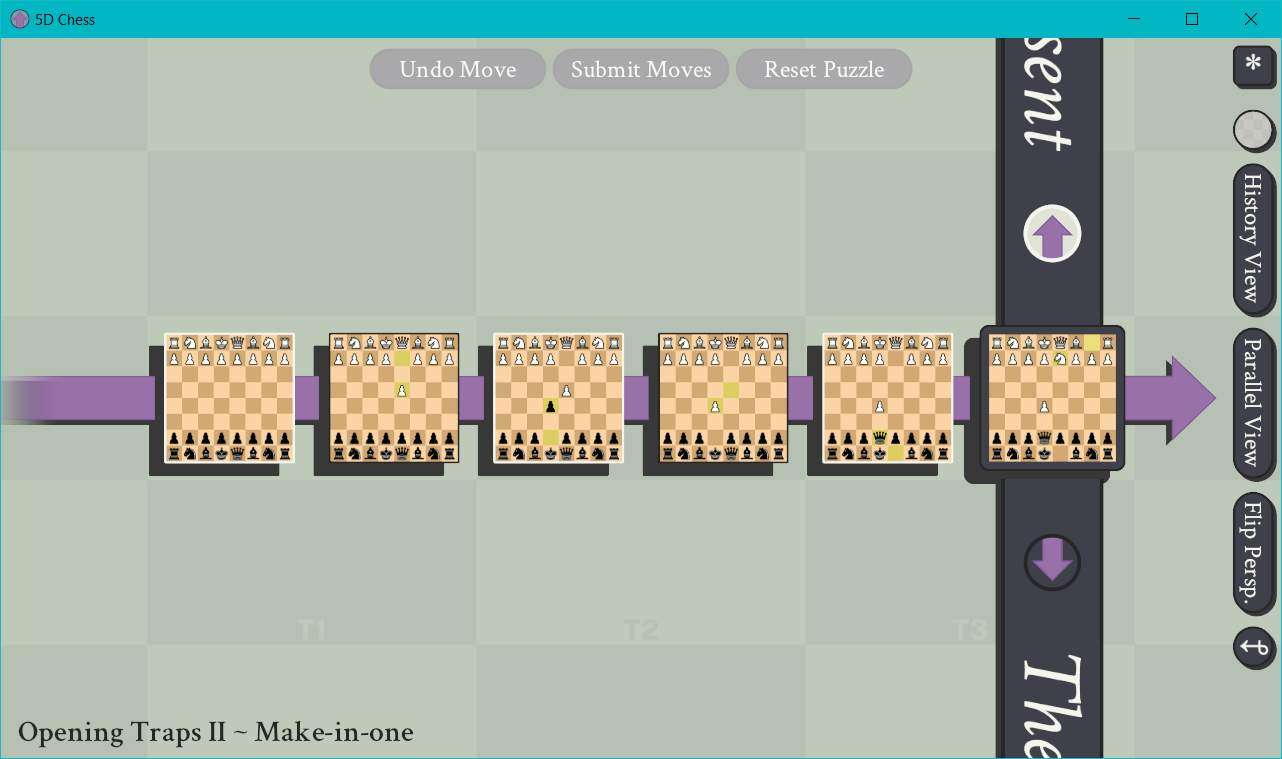
Step 1: Start with the active board state.
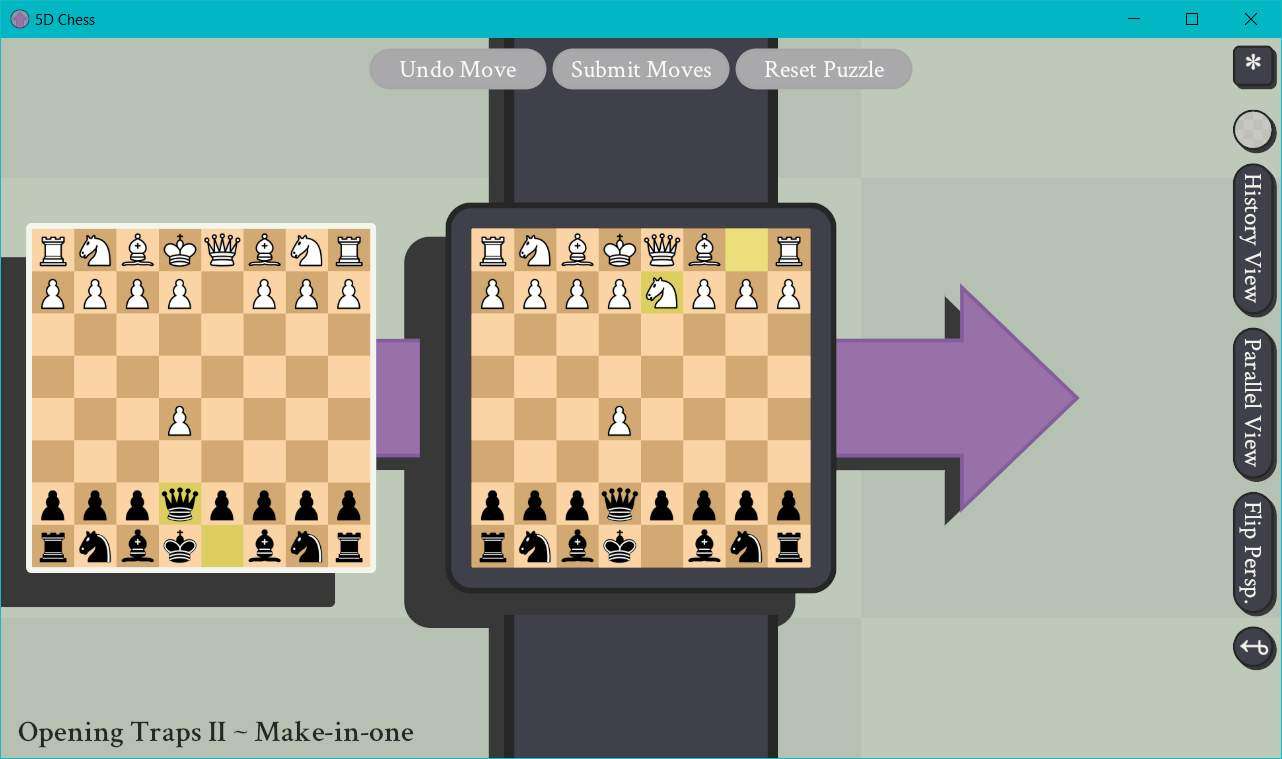
Step 2: We’re going to move our Queen from E7 to B4. This may look pointless in the present, but we’ve actually threatened White’s King 3 board states in the past and 3 tiles diagonally upward and leftward.
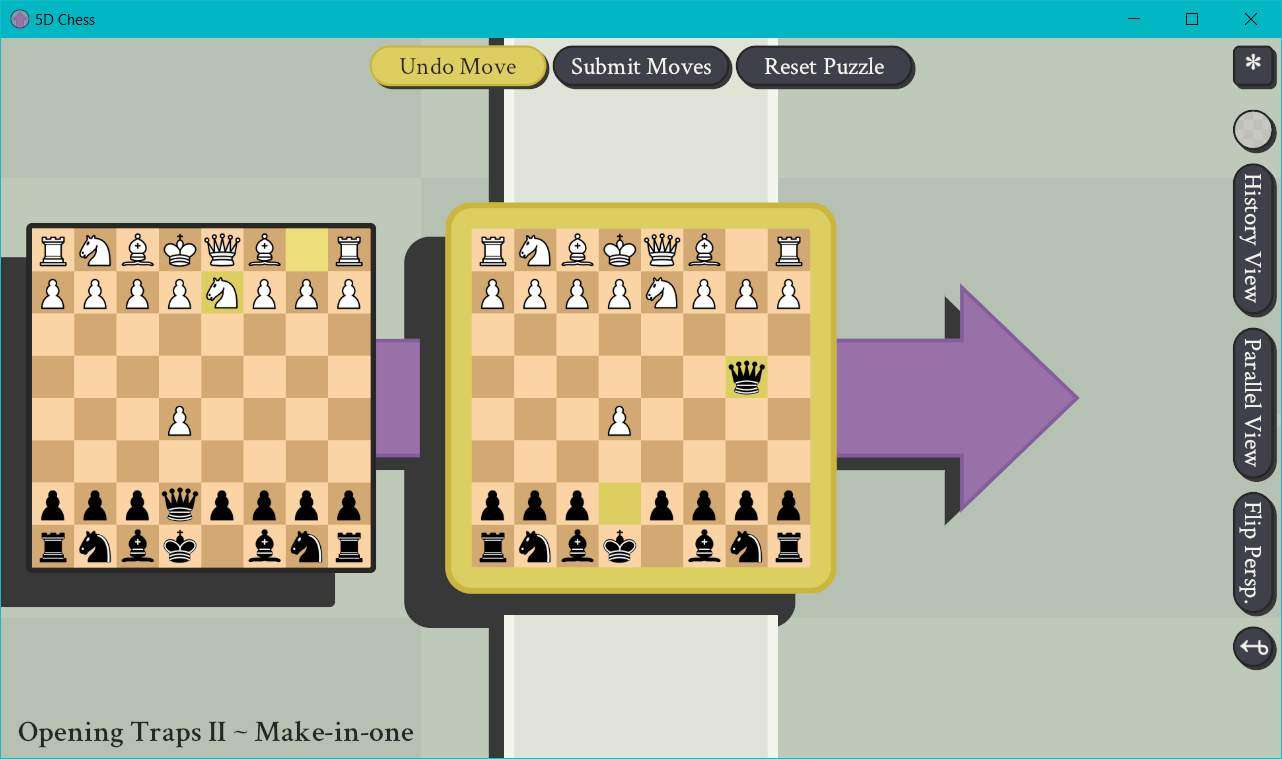
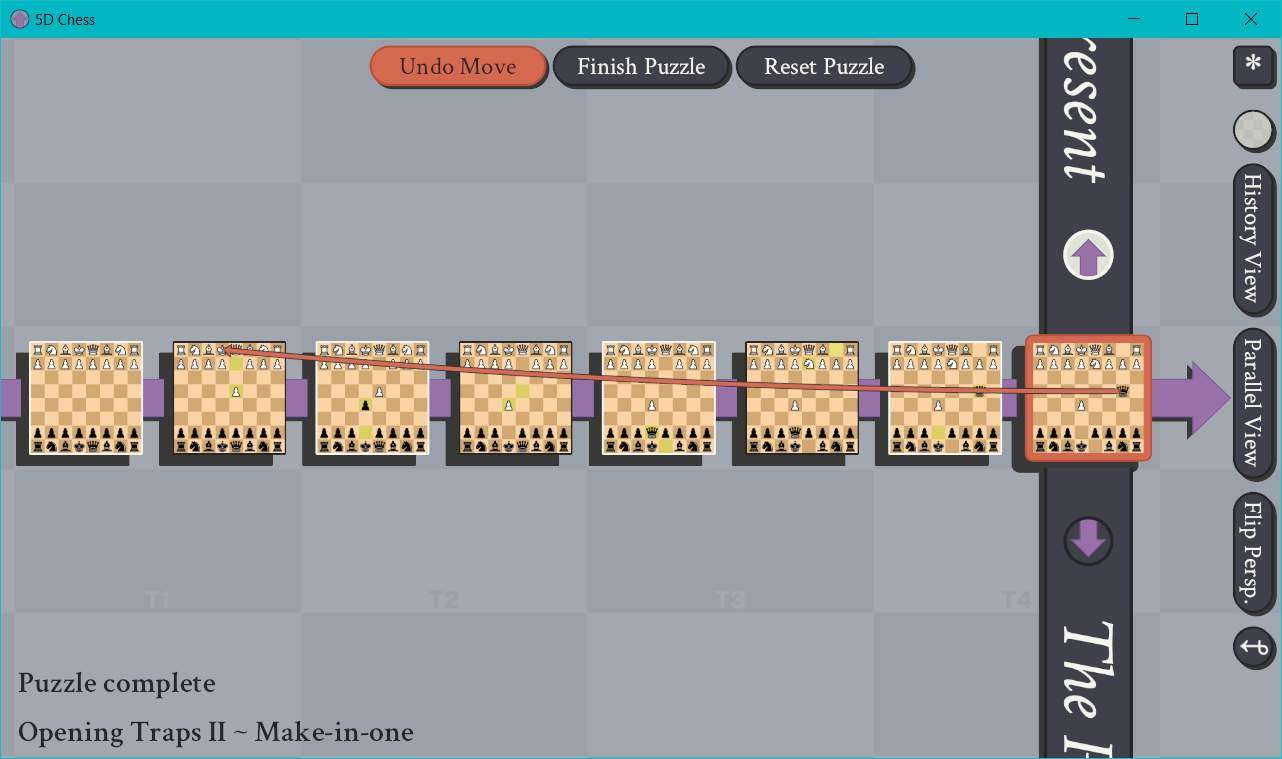
Step 3: Profit.
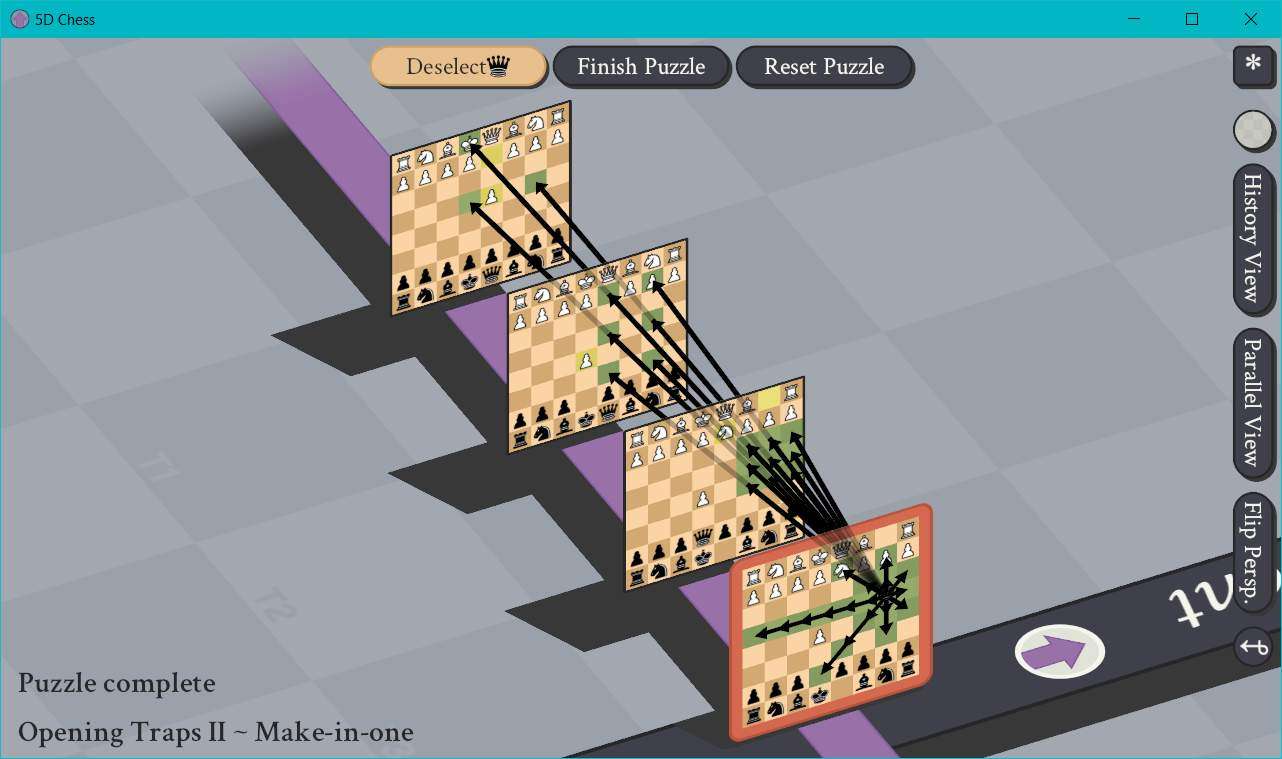
If you’re confused about this maneuver, here’s another perspective:
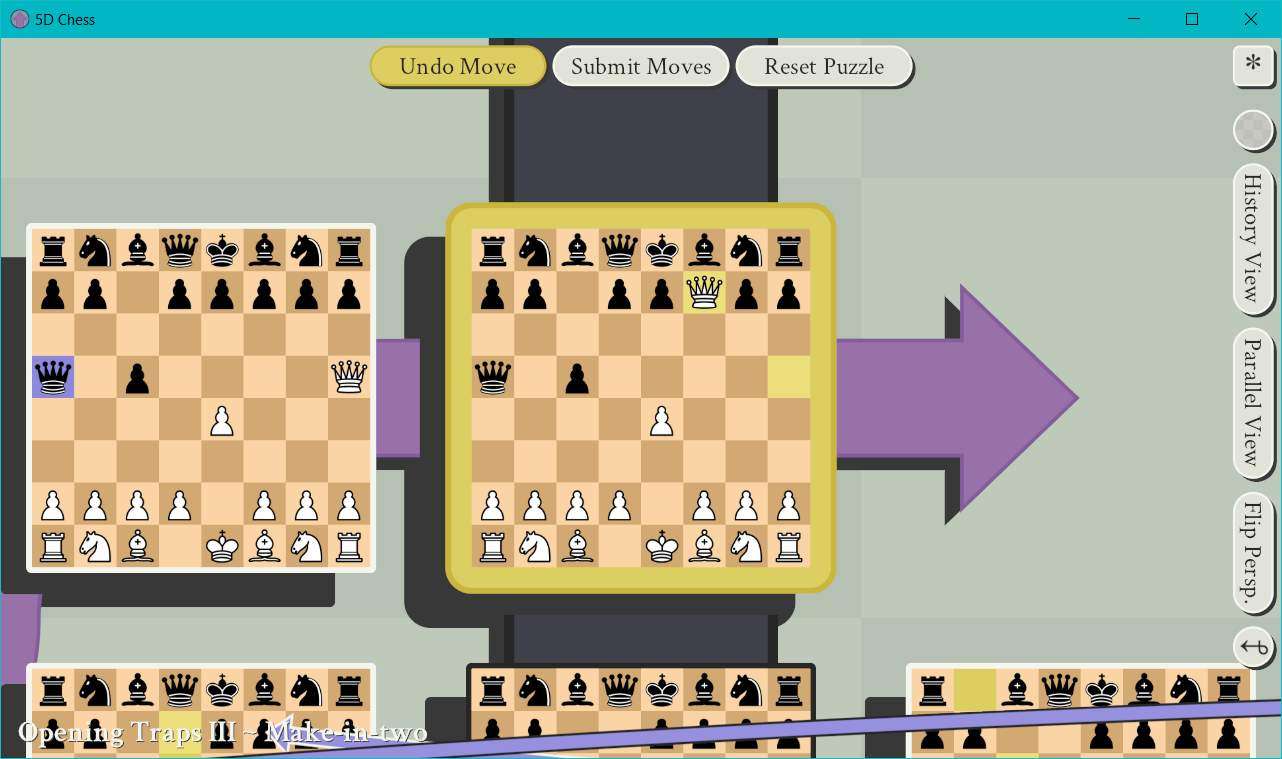
31 – Opening Traps III – Mate-in-two
Earlier in this guide, I mentioned how there were a few puzzles which felt disproportionately difficult, and this was one of the puzzles I was referring to. A lot of people were struggling with this puzzle when the game was first released. It’s one of the few puzzles which has us dipping our toes into how the present shifts. Recall that each player is only required to make moves in the present, and we can choose to ignore board states which are not in the present. This is important to solving this puzzle.
Here’s the puzzle:
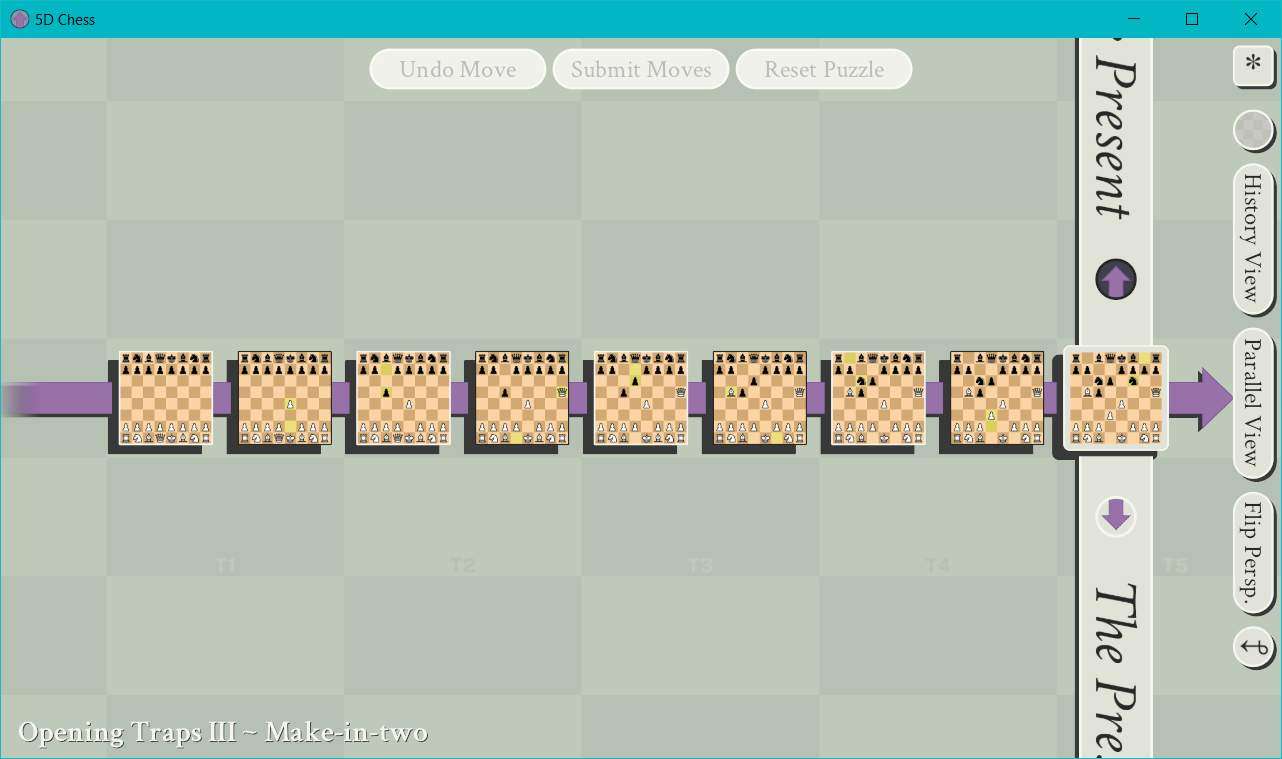
Step 1: One active state, so we play there.

Step 2: We’re immediately dipping from this timeline and making a better one. One with 2 Queens and an easy checkmate. We’re going to move our Queen 2 squares into the past, and 2 squares diagonally upward and leftward. So from H5 in the present to F7 2 board states in the past. I’ve highlighted our destination board state to better clarify where we’re moving.
This is how the puzzle should now look:
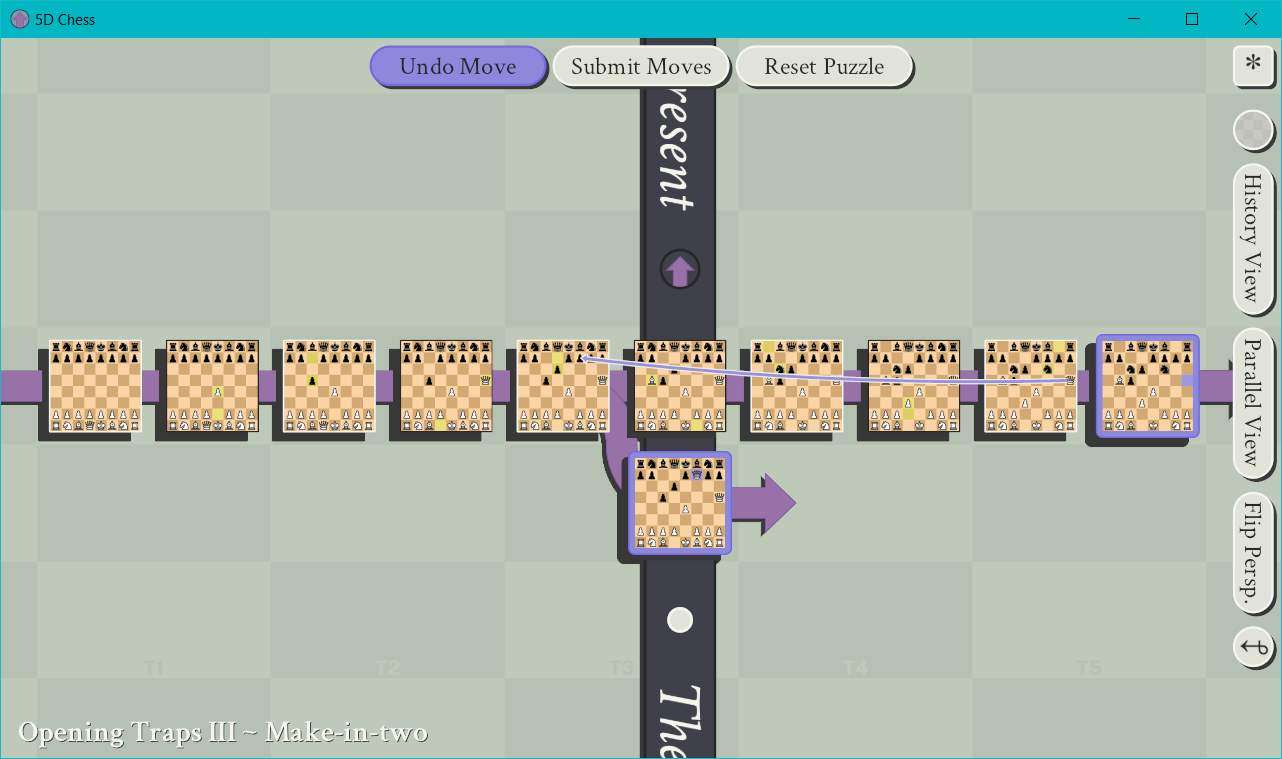
The present will now have shifted to match our new timeline, and you might be inclined to think that we have the Black King in checkmate. Black’s King is threatened by our new Queen, it has no other timelines to escape toward, and Black’s only answer to our new Queen is to take it with their King, which would put it in check to our other Queen, which is illegal. Black does, however, have a move here. Well, not actually “here” as in “in this timeline”. No, Black is going to shift the present further back to avoid needing to address this timeline. They’re going to move their Queen from D8 in the upper future timeline to A5 three squares backward in time.
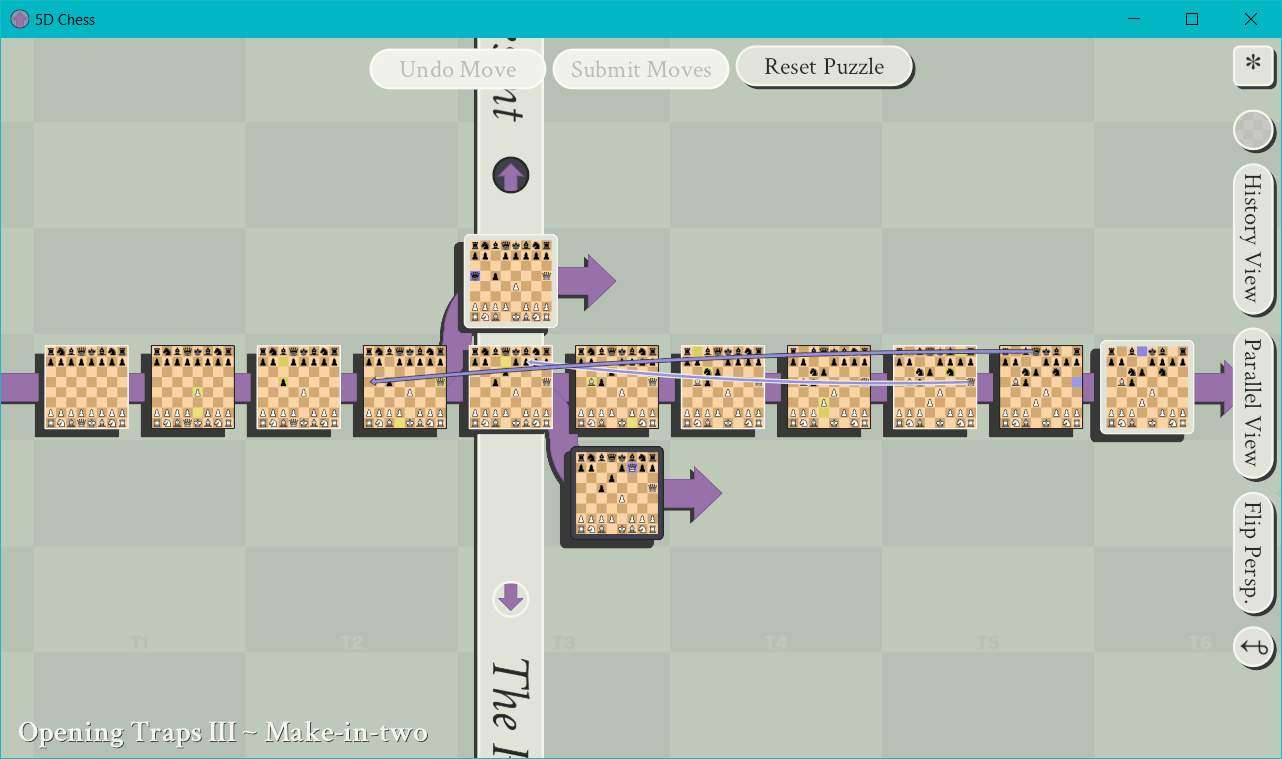
Step 3: We have an optional board state to play on, but we’re just going to ignore it and make use of the new present timeline up top.

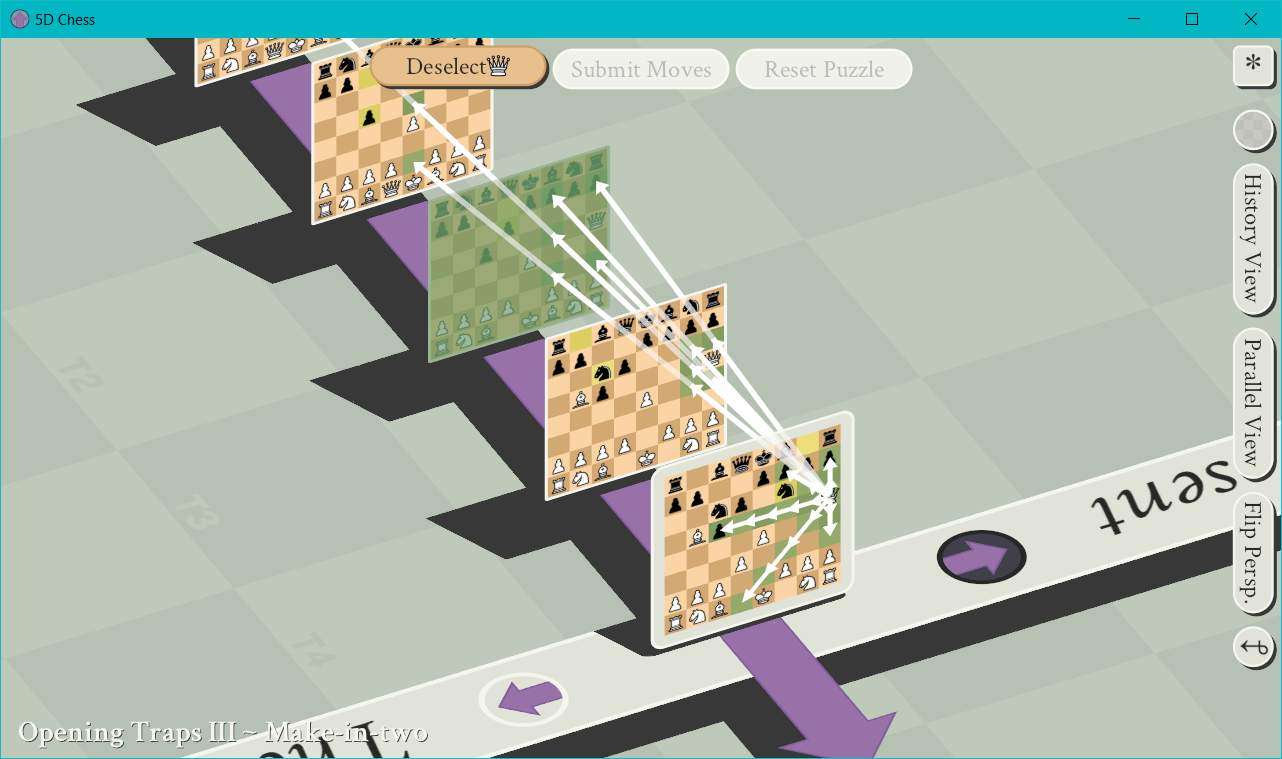
Step 4: We’re going to move our Queen from H5 to F7. Now that this timeline has matched up with the bottom one, and now that the middle timeline has a white border which locks Black out from playing on it, Black is forced to address our threats on the top and bottom. As already explained, the bottom timeline is a complete checkmate. This timeline is ALSO a complete checkmate because even if Black tries to take our Queen with their King and remove its threat, it would be moving into a square which our Queen on the bottom timeline can move to, which would mean Black would be moving into check, which is illegal. Additionally, our Queens on both the top and bottom timelines could claim Black’s King at several other board states if they’re not addressed. And since they can’t be addressed, we actually have checkmate in like half a dozen different ways.
Step 5: Profit.
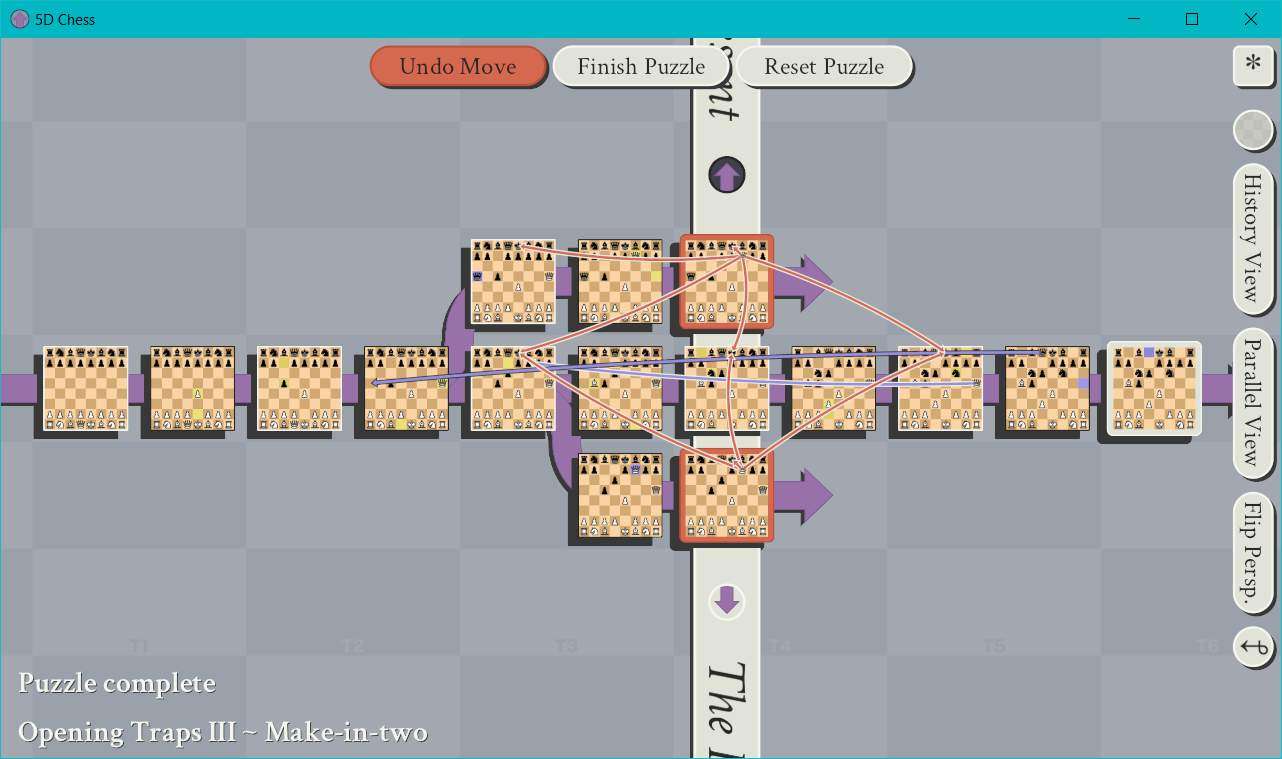
That’s a lot of arrows.
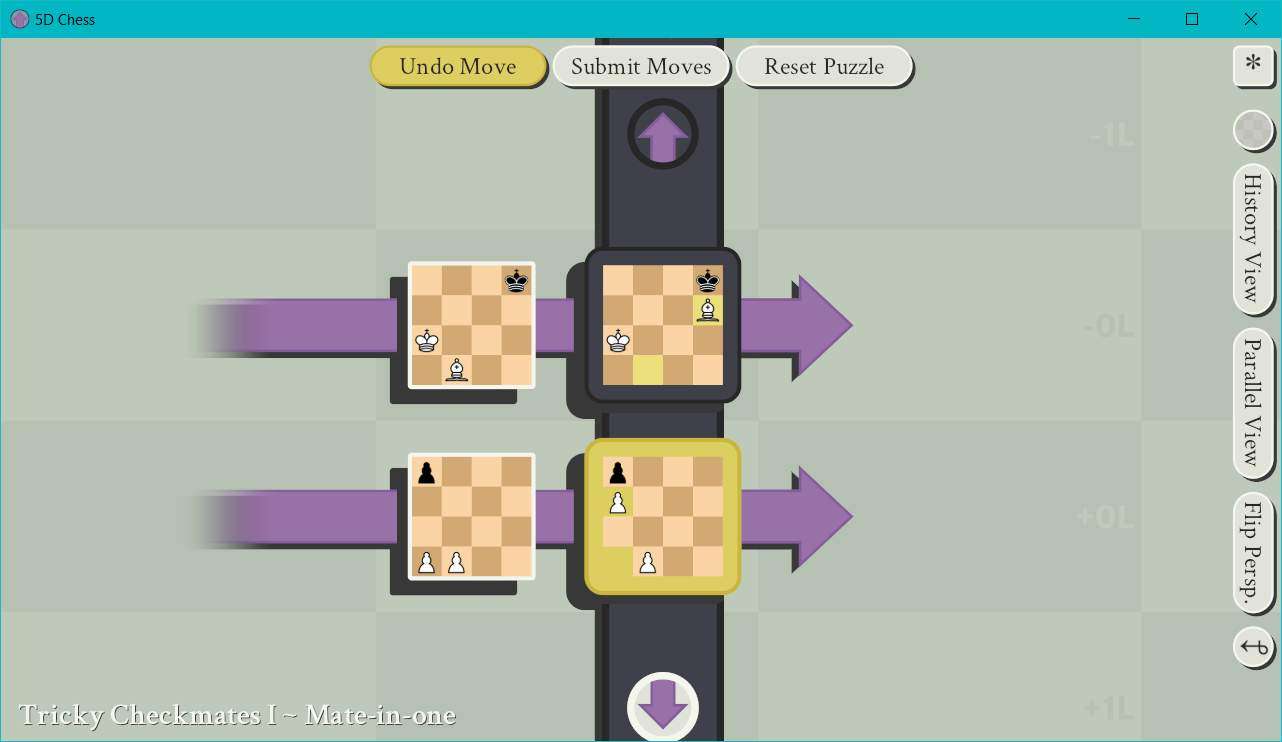
32 – Tricky Checkmates I – Mate-in-one
- Player Color: White
- Opponent Color: Black
So, the title “Tricky Checkmates” is apt. This puzzle will see us making use of a gimmick which I don’t believe we’ve encountered up to this point. As I’ve explained before, players need to address all board states which are considered part of the present. What I had not yet explained in any of the puzzles (or at least, what I THINK I haven’t explained yet) is that: if you ever are rendered incapable of moving, but are not in check, then in regular chess this would lead to a stalemate which is scored as a draw. BUT, in 5D Chess, if you are ever rendered incapable of moving on one present board state, but are in check on another present board state, then it counts as a checkmate. This is because you are not able to end your turn until you address all present board states, and as such in this case you would then be incapable of moving out of check, which causes it to become a checkmate rather than a stalemate. If this is confusing, then hopefully going through this puzzle will help clarify what I’m trying to explain here.
Note that this puzzle was also changed slightly after the game’s initial release. Specifically, there used to be Pawn on the lower board state on C1, which was later removed in the same update which changed Combination Attacks IV. It didn’t actually affect the solution in any way, but I think by removing that Pawn, they hoped to make the intended solution clearer to newer players. Anyway, the pictures have been updated to reflect this change.
Here’s the puzzle:

Step 1: We have options here. We have two board states which we need to address, but the solution to this puzzle is flexible with regard to which board state we address first. Let’s start up top.
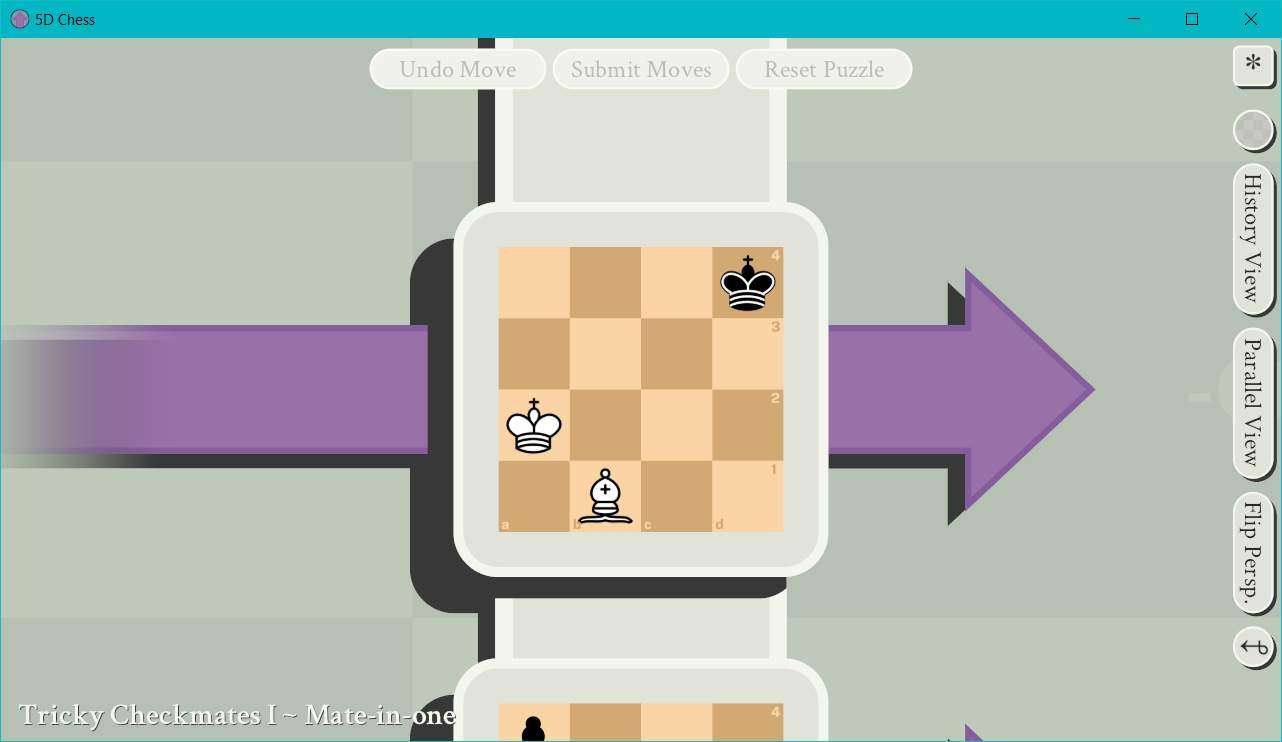
Step 2: We’re planning to go for check up top, and then block the bottom board in such a way that our opponent has no valid moves. Our check move will be to move our Bishop from B1 to B3. We haven’t used Bishops in a hot minute, so to refresh your memory in case you’ve forgotten, our Bishop can move 1 square orthogonally if it moves 1 square into the past. This position will threaten Black’s King in the past. Sure, Black’s King could take our Bishop in the present to remove the threat…if we weren’t going to also completely lock them out of being able to move in the following steps.

Step 3: We’re going to switch our focus back over to the bottom timeline.
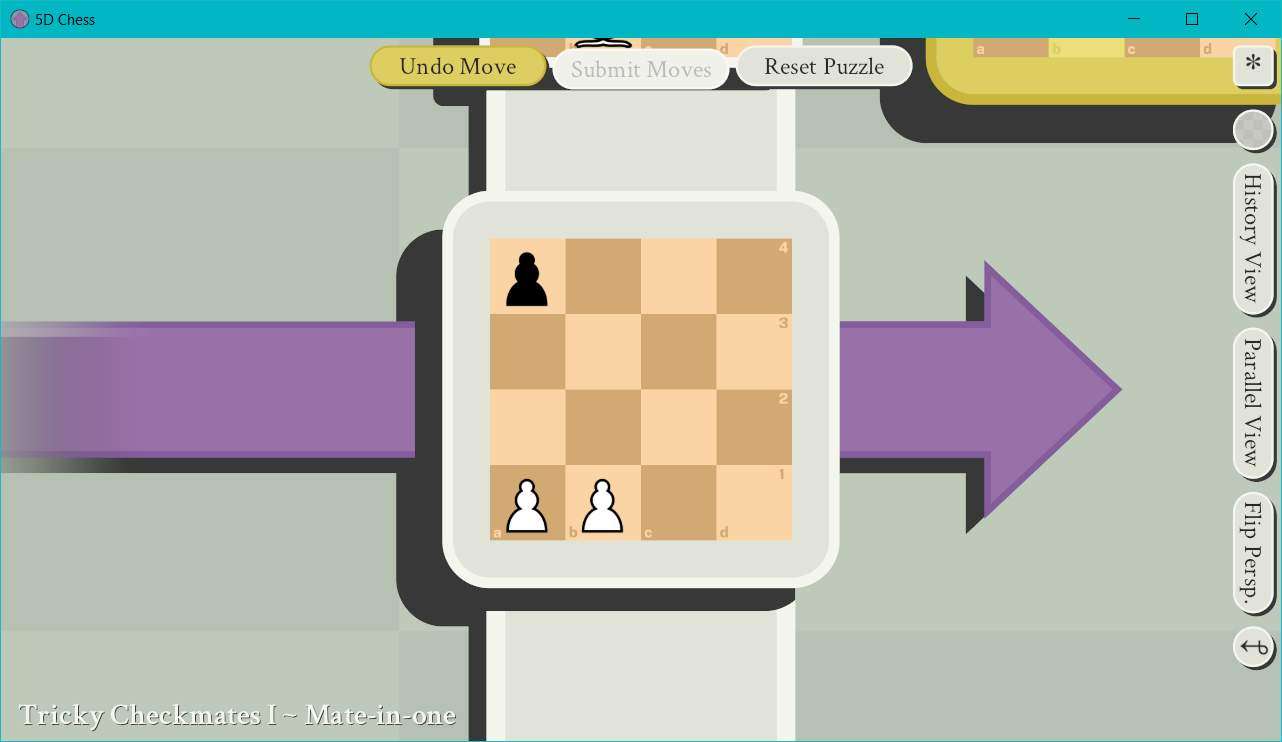
Step 4: Their only piece is a Pawn, which unlike the Knight, cannot move over pieces within its path. So, we’re going to move one of our Pawns from A1 to A3. Suddenly, Black is not only in check up top, but completely blocked from moving on that board because they can’t address our bottom board. This gives us checkmate.

This is how the puzzle should look now:
Step 5: Profit.

As you can see in this picture, the bottom board has no possible future, and thus Black cannot make their move, which means our check is indeed a checkmate.
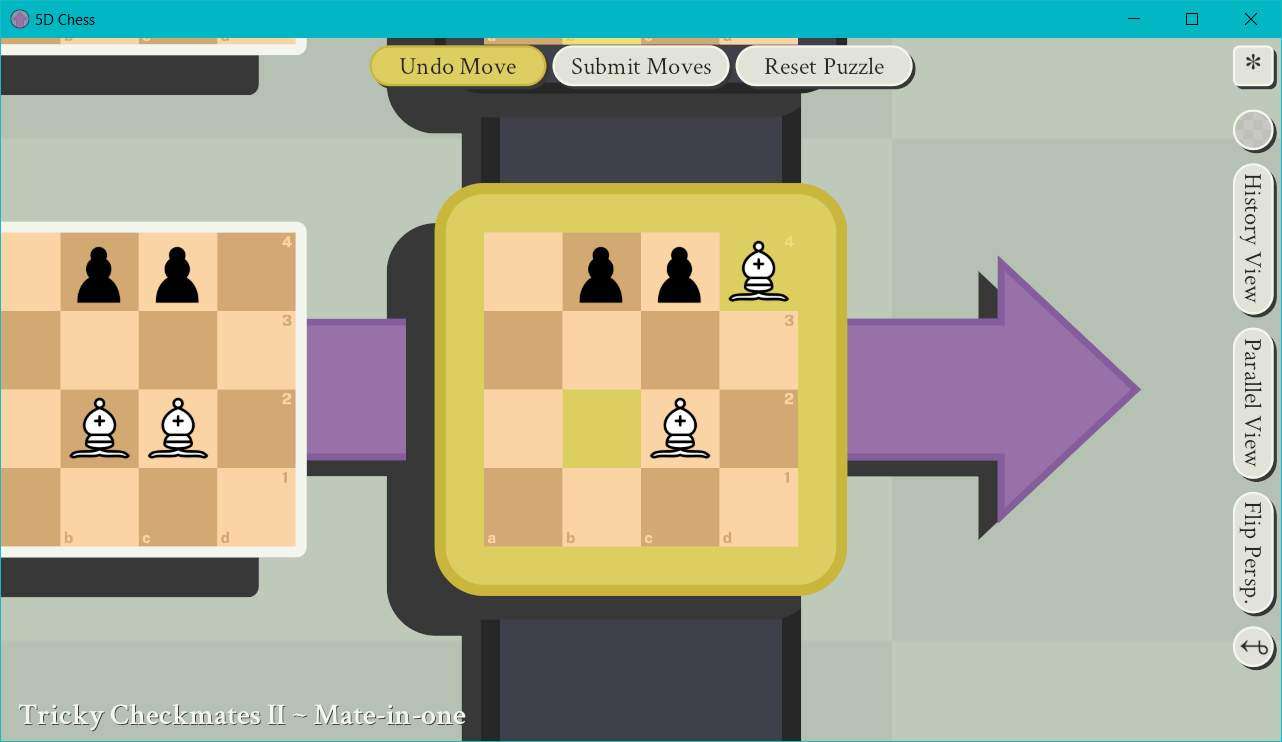
33 – Tricky Checkmates II – Mate-in-one
- Player Color: White
- Opponent Color: Black
Here’s the puzzle:
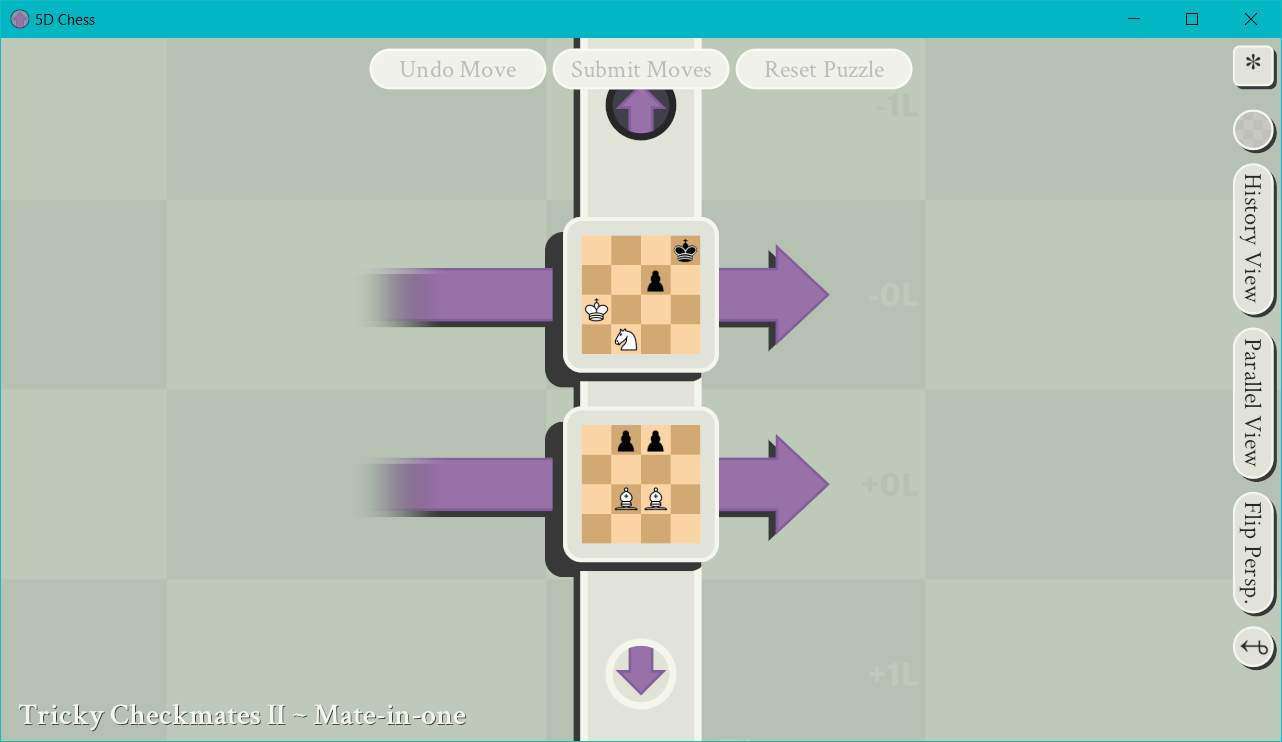
Note that this puzzle was also changed after the game’s initial release, and the nature of the solution is completely different now. In the old version, it required making use of the same sort of mechanics as Tricky Checkmates I, but using a different array of pieces. Now it’s become a more standard, but also more difficult puzzle, I feel. For those curious, the old version did not include the Pawn on B4 on the bottom timeline, which allowed us to block their other Pawn on C4 from moving by sending our Bishop from B2 to C3. This would block them taking being able to take any actions on the lower board state, just as we did in Tricky Checkmates I. I’ve updated the solution to reflect the update.
Step 1: Just as in the previous puzzle, we have 2 options for where to start, but we ultimately need to play on both to be able to end our turn. Let’s just start on the top as we did last time.
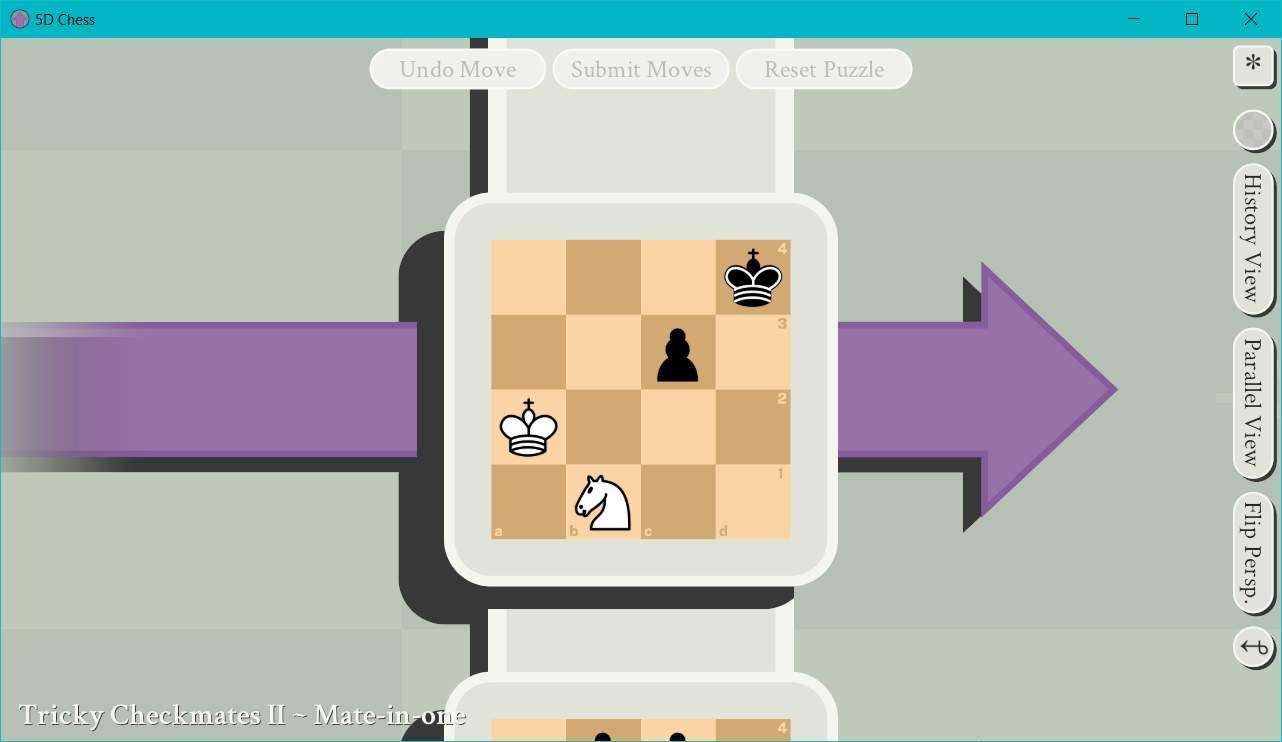
Step 2: Up top, we’re going to use one of our old favorite tricks: we’re going to attempt to threaten Black’s King 1 square back in the past and 2 squares up on the Y axis using our Knight. This means moving it from B1 to D2. Of course, it’s within attack range of Black’s Pawn, but we’re not going to let Black make use of it.
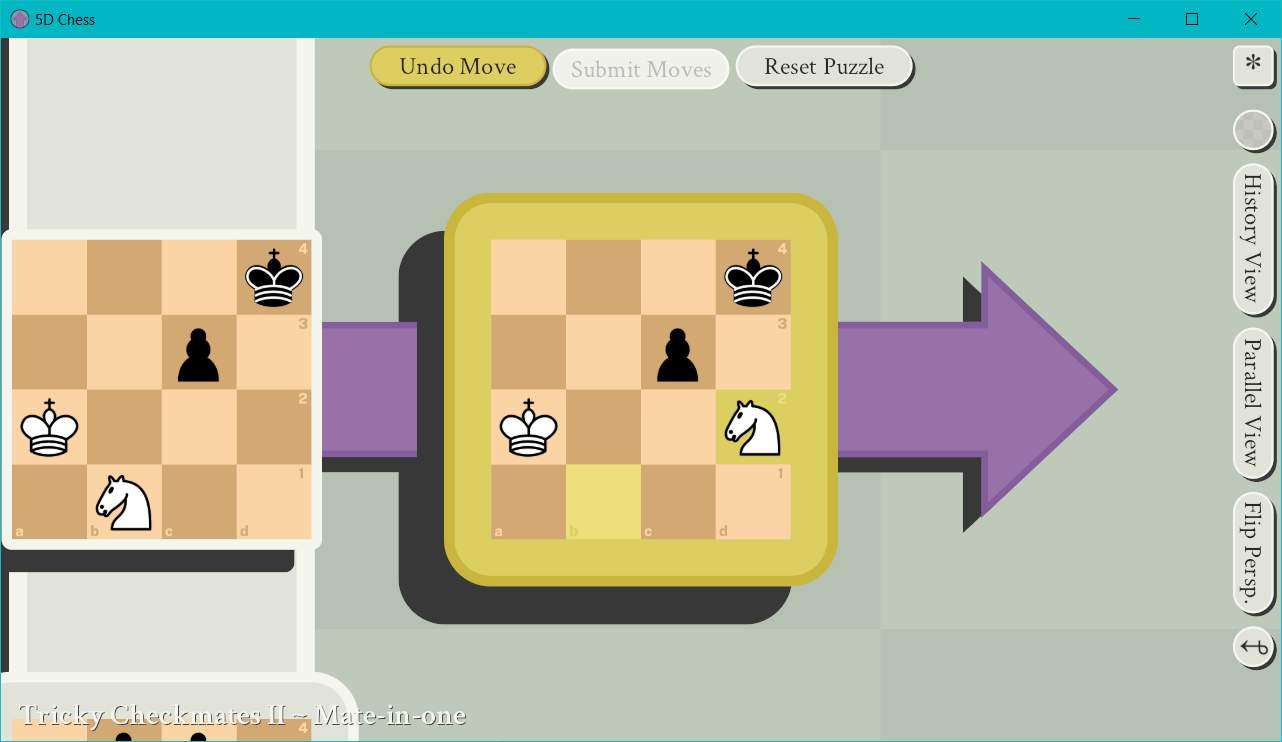
Step 3: Now we’re going change gears and drop down to the bottom timeline.

Step 4: Down below, we’re going to issue a threat which cannot be countered: we’re going to move one of our Bishops from B2 to D4. This will threaten Black’s King 1 square into the past and 1 square across parallel world lines. So, from D4 on the bottom timeline one turn from now, to D4 on the top timeline on the very first board state.
This cannot be blocked, escaped, or countered. Should Black attempt to take our Knight with their Pawn up top, then their King in the past will be left in check to our Bishop, which they cannot allow. At the same time, should Black instead move their King 1 square down on the parallel world axis from D4 up top to D4 down below to take our Bishop, then they cannot move their Pawn to take our Knight up top, which would also leave them in check. Therefore we’ve produced a result wherein Black has the means to counter all of our threats, but cannot make all of the moves in the same turn which would be necessary to perform those counter plays. Thus, we have checkmate.
The puzzle should now look like this:

Step 5: Profit.
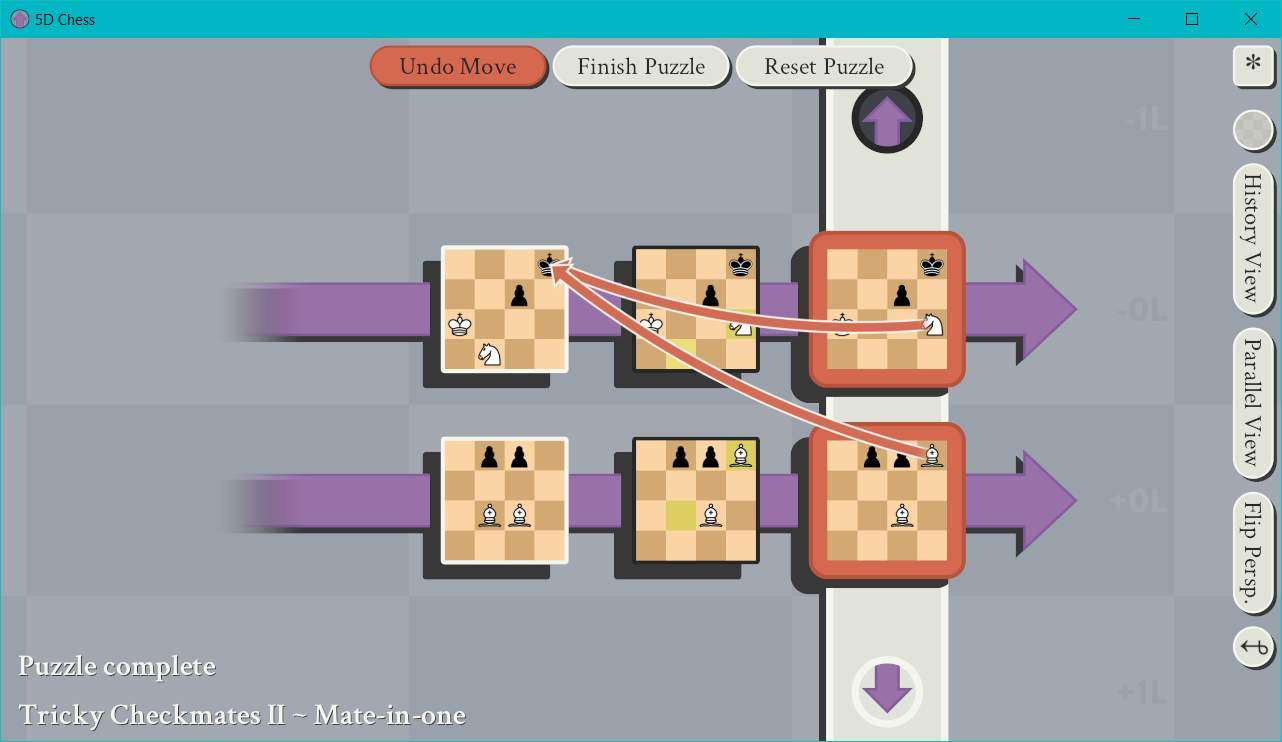
And here you can see our threats which help to cover one another’s weaknesses.
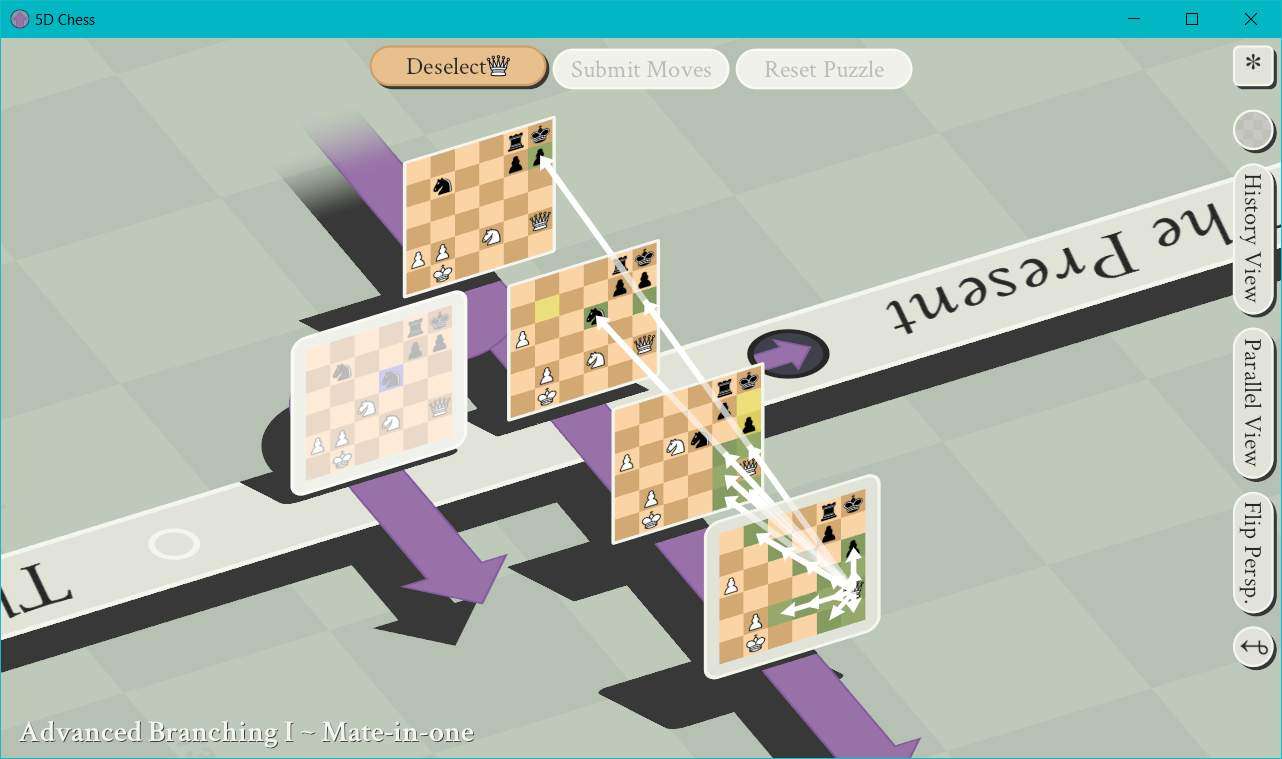
34 – Advanced Branching I – Mate-in-one
- Player Color: White
- Opponent Color: Black
This is it. At the time of the original writing of this guide, this is the final puzzle in the game. This is also probably the hardest puzzle in the game up to this point, and the puzzle which I’ve seen the largest number of players struggle with. However, if you’ve been reading along through the other 33 puzzles, the barrier to entry for this puzzle will hopefully be lowered a bit. Or maybe nothing I’ve written was any help. Who knows. But here we are.
This puzzle also has one of the messiest sequences of previous board states prior to where it lets us start, but I hope at this point you can more or less read the progression and understand what transpired and where we’re at here.
There is one last thing I need to teach you here: the present doesn’t always move when you create a new timeline. I teased at this all the way back in Rook Tactics II, and it’s finally time to own up and explain it. You see, there can be “inactive” timelines which may be played on or ignored, and which exist before the “present”. The condition for this is simple: if you branch off two or more timelines before your opponent branches off one, then only the first branch you created will be considered “active”, and the “present” will not shift to any of your other timelines (even if they are to the left of the present) until your opponent creates a new branch. The caveat to this is that in such a case, the present will immediately shift once your opponent does make a branch. And this is how we’re going to solve this puzzle.
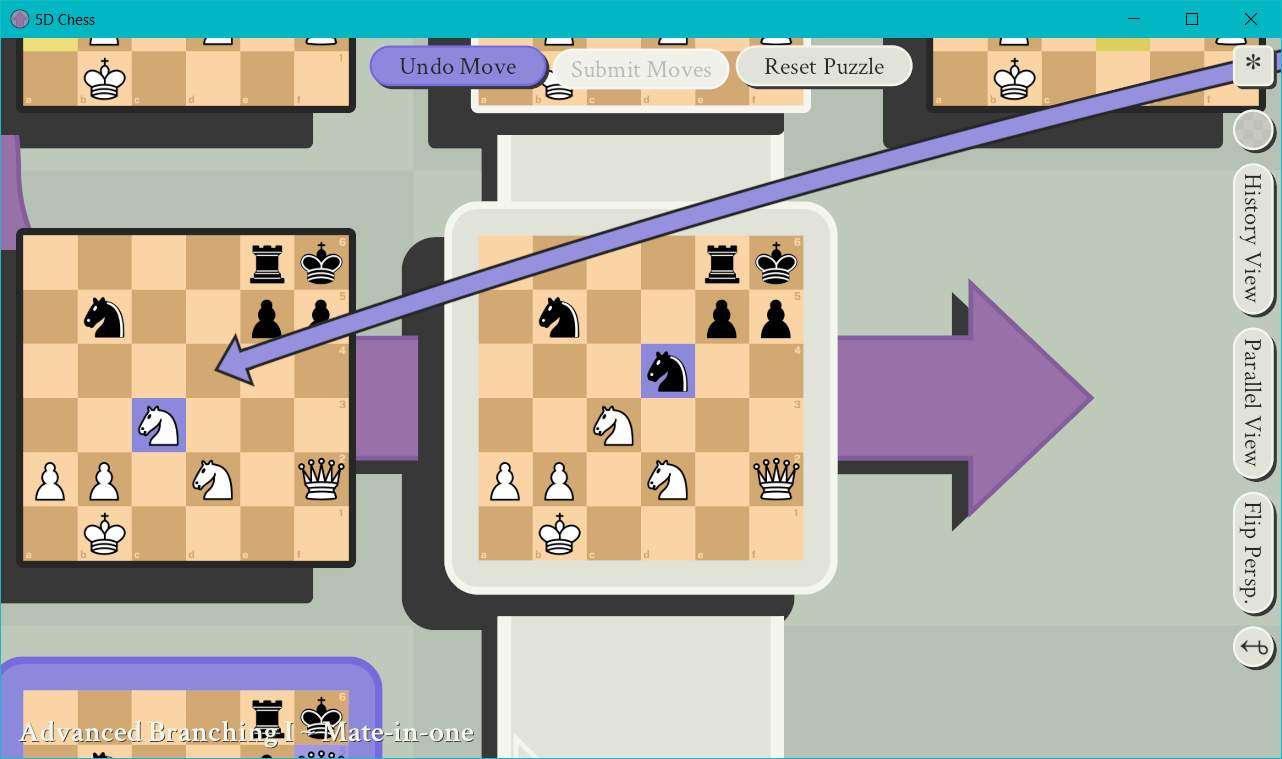
Here’s the puzzle:

Step 1: We have two board states we can play on, but only the lower one is in the present. However, we absolutely need to act on the top branch to win this puzzle. We’re aiming to create a new inactive timeline prior to the present wherein our opponent would be checkmated if they were forced to play there. Then we’re going to threaten Black’s King in the present and put them in a situation where their only way out would be to move their King to another timeline, which would then make our other timeline become active, and would shift the present to that position. This means that their only way out of check in the present would shift the present to a timeline where they’re already checkmated. And since they have no other options, this should give us the win. If it’s confusing, then just follow along, and hopefully all will be made clear, and I can be freed of the curse of writing any more for this guide.
Anyway, let’s start up top.

Step 2: We’re going to lay our trap from here by moving our Queen backward in time by 3 squares and upward on the Y axis by 3 squares as well. So, from F2 in the future to F5 in the first board state. This will create our new inactive timeline wherein Black is checkmated because even if they use their King to take our new Queen, our old Queen will have them in check.
Now the puzzle should look like this:
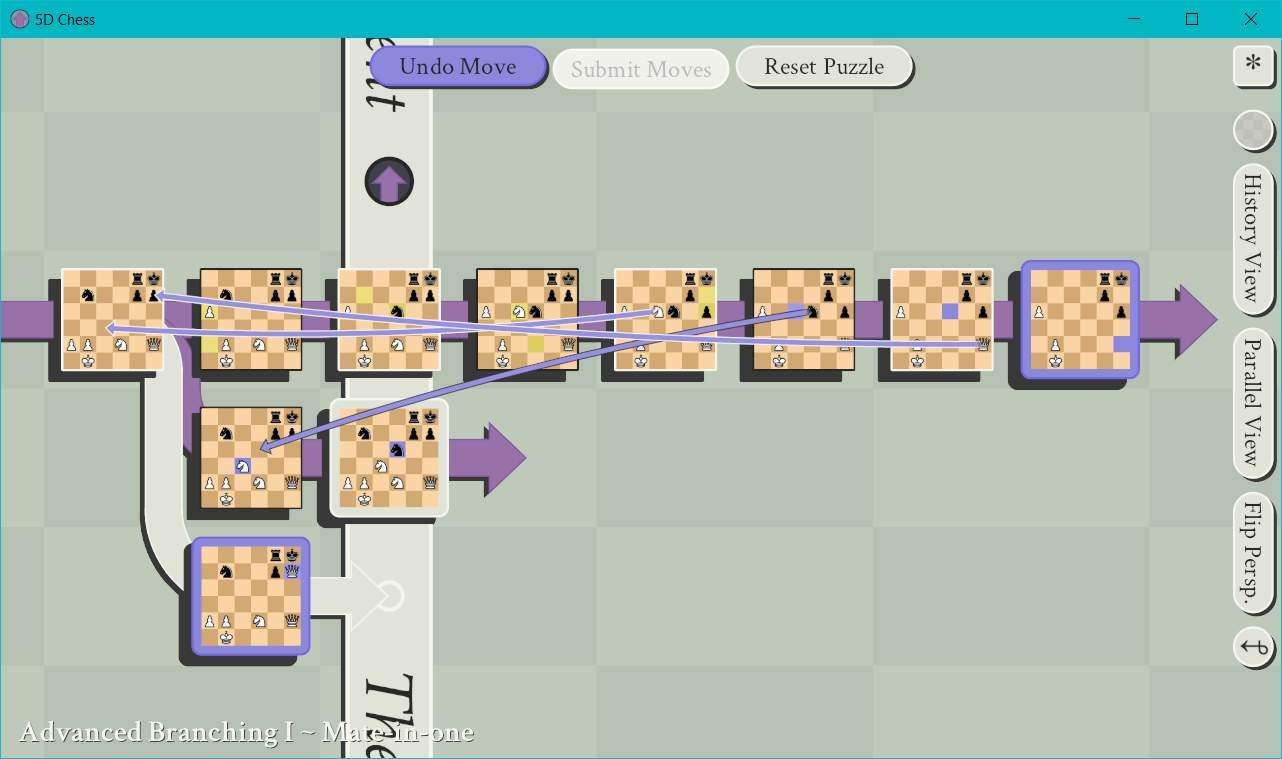
Step 3: With our trap laid, we need only to force Black into it. Let’s hippity hop back down to the present timeline and do just that.
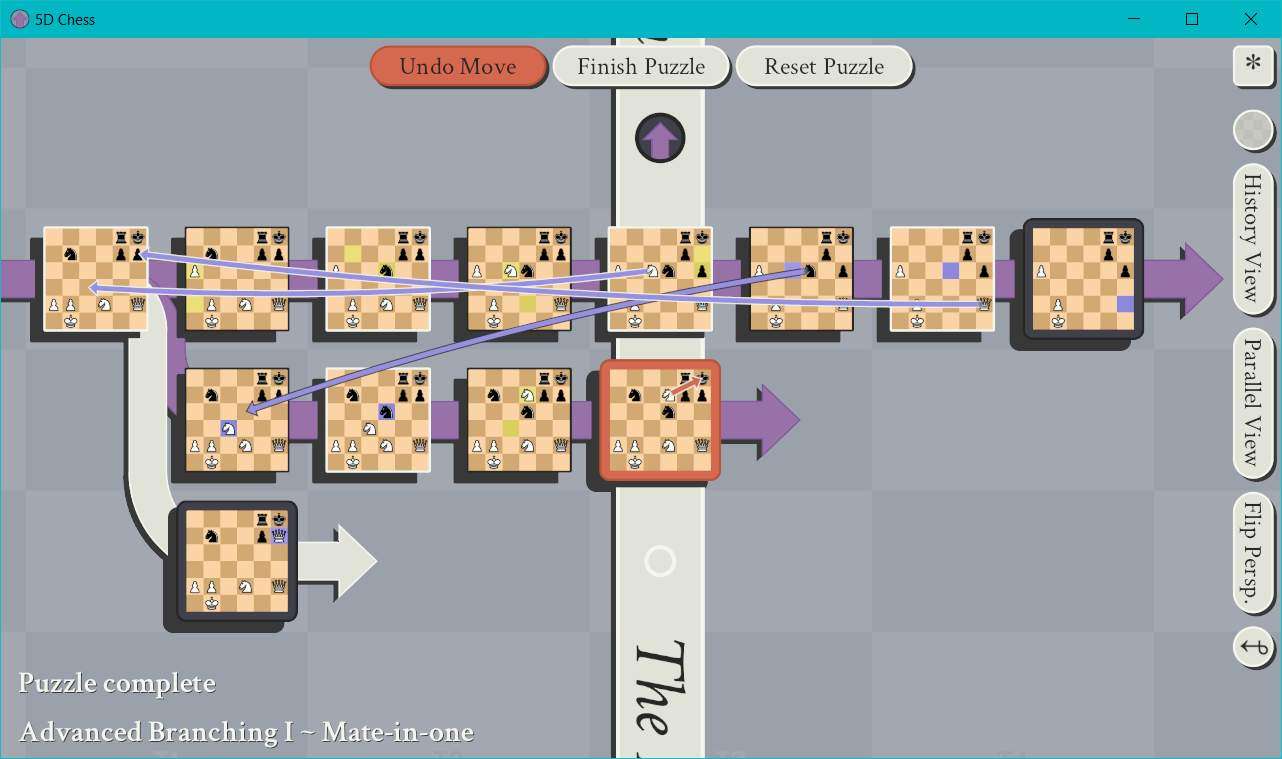
Step 4: We’re going to move one of our Knights from C3 to D5. This will threaten Black’s King in this timeline. If we had not created our other timeline, Black would now be able to move their King across the time axis and parallel world axis to escape this threat, and we would have failed to get the mate in one. However, if Black would actually attempt to do this, it would branch off a new timeline, and this would then make our other timeline (which is further left) active and move the present over to it. This would mean that by escaping their threat in one timeline, they would cause themselves to be in checkmate in another timeline. Therefore, they have no moves to get out of check, and we win.

Step 5: Profit.

Did the developer change the puzzles? My first puzzle only contains 1 white rook, not two. It seems impossible to solve in one move also.
There were new puzzles added. The solution is relatively simple. Move the rook to e5 (the top right corner of the board). This creates a checkmate on the first board.